


 0
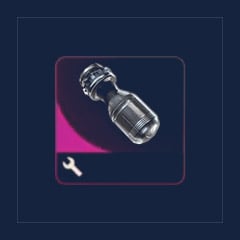
Bully Fragmenter
Buy ARC Raiders Material Bully Fragmenters: Farming and Stash Guide
XBOX/PS/PC
Em estoque
1
- 1
- 2
- 3
- 4
- 5
- 6
$1.17
You May Also Be Interested In:
Em estoque
Chave do hospital da cidade enterrada / Key
Em estoque


[BP] Vulcano / BluePrint

XBOX/PS/PC
Em estoque
1
For Bully Fragmenters in ARC Raiders, prioritize a confirmed loot source and a safe extraction—not an unsupported best drop rate route. Check your current quest and upgrade requirements before selling, recycling, or using any Fragmenter you bring home.
A route is useless if its loot claims are wrong. The draft's 11.82% Pendola Pass drop rate, night-only advantage, and guaranteed boss drop lack sufficient evidence to treat them as established mechanics.
We recommend separating source confirmation from route optimization. First establish where the item drops in your current build; then improve how quickly you reach and leave that source.
If you are testing ARC Couriers, record every container searched—not just the successful ones. Keep daytime and nighttime results separate, and note whether the container was already looted.
One lucky run proves availability, not superiority.
Once you confirm a source, plan a short circuit with cover and an extraction option. Skip a breach if another player controls the approach; opening a container does not compensate for losing its contents.
Use these decisions instead of an unsupported map ranking.
| Situation | Action | Reason |
|---|---|---|
| Confirmed container source, quiet approach | Search it and move toward extraction | Avoids an unnecessary extended fight |
| Container approach exposed or contested | Skip it or change approach | A loot opportunity is not worth a predictable ambush |
| Bully nearby, adequate supplies and retreat cover | Consider fighting | Removes travel time, but adds combat risk |
| Required Fragmenter already secured | Extract | Another stop puts completed progress back at risk |
Choose successful extractions over impressive loot screenshots.
For route comparisons, track Fragmenters brought home per minute, not merely items found. A crowded route with more drops can still deliver less usable progress.
A nearby Bully is not automatically a good farming opportunity. The fight also costs ammunition, healing, time, and whatever you risk carrying into it.
We would make the decision before firing: identify hard cover, a retreat path, and enough supplies to survive after the kill. If those are missing, leave the encounter alone.
Do not treat the draft's yellow-joint stagger claim or explosive recommendation as verified instructions. If your shots produce little effective damage, reposition or disengage rather than emptying your ammunition into an unproductive angle.
Against an enemy using explosives, thin obstacles are poor substitutes for solid cover. Avoid crowding teammates into the same escape route.
Save resources for the exit.
After a kill, check the surroundings before searching the wreck. If players arrive, surviving with your existing inventory is better than dying over an assumed guaranteed drop.
The expensive mistake is disposing of an item you still need. The draft's seven-item requirement and fixed economy figures are not sufficiently verified, so use your current game interface rather than those numbers.
Open your active quests and upgrade screens. Reserve the quantity they explicitly request, and check newly available requirements before disposing of surplus.
We use this order to prevent irreversible stash mistakes.
| Item Status | Decision | Practical Rule |
|---|---|---|
| Required by an active quest or upgrade | Keep | Reserve the displayed quantity |
| Future requirement uncertain | Hold temporarily | Check available progression screens first |
| Confirmed surplus | Compare sale and recycling | Use current values and material needs |
| Intended for combat use | Verify item behavior first | Do not spend reserved progression stock |
Sell confirmed surplus—not the stock that finishes your next upgrade.
Recycling is not automatically wrong. If its materials solve an immediate crafting bottleneck, their usefulness may exceed their vendor value; compare that benefit with the Fragmenter's current sale price.
If the current item description confirms throwable use, keep progression stock separate from your combat allocation. The draft's eight-projectile damage calculation should not be treated as guaranteed damage against one target.
The best method is a confirmed source you can repeatedly loot and extract from with low losses. Compare successful carry-outs and raid time before committing to a Courier route or repeated Bully fights.
A better nighttime drop rate is not established by the evidence available for this guide. Track matched container searches under each condition instead of treating a few empty daytime runs as proof.
Keep the quantity shown by your current quests and upgrade requirements. The draft's fixed seven-item total is unverified, so check your progression screens before selling surplus.
Sell or recycle only after reserving everything required for progression. Compare the current sale price with the recycling outputs and your immediate crafting needs; neither option is universally best.
Extract if the Fragmenter completes your current requirement and the fight adds unnecessary risk. Consider another encounter only when your ammunition, healing, cover, and escape route support it.

Usamos cookies para garantir a funcionalidade do site e melhorar sua experiência. Clique em "Aceitar tudo" para consentir, ou em "Personalizar" para gerenciar suas preferências. Veja nossa Política de Privacidade.