



 0
0GGWTB Editorial Team - Vncntly
Created: Aug 9,2026 | Anime Expeditions

GGWTB Editorial Team - Vncntly
Hydra debuffed. Storm debuffed. Boss Waves. Short Range. Tradeless. This rotation kills your comfort picks — Dark Mage and Furin are both dead weight here.
But 178M+ is still very doable. The whole run comes down to one loop: stack enemies, slow them, stagger them, and let your AoE units eat the pile.

Here's the exact setup that gets you there.
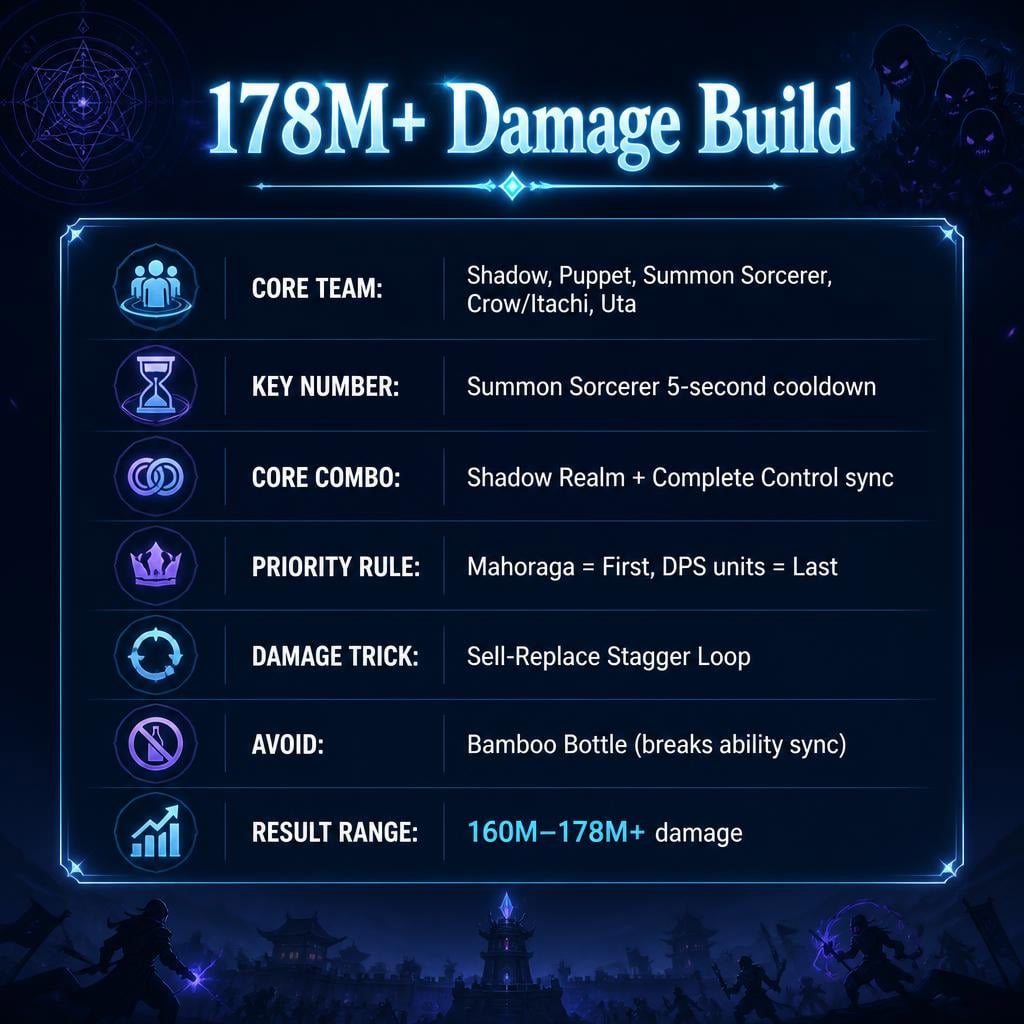
No filler picks. Every slot has a job.
| Unit | Role | Swappable? |
|---|---|---|
| Shadow / Megumi | Control + damage buff window | No |
| Puppet | Control + boss damage | No |
| Summon Sorcerer | Slow + stagger engine | No |
| Crow / Itachi | Main AoE carry | No |
| Uta | Secondary DPS | Yes (but don't) |
| Farm Unit | Economy | No |
Uta > Kenpachi in this meta. Once enemies clump up late-game, Uta's DPS profile just fits the wave pattern better. Kenpachi works if his gear is significantly ahead — otherwise don't bother.
Skip Dark Mage. Hydra debuff guts him. Skip Furin too — yes, you can sell-reset her for extra procs, but Storm debuff makes the effort not worth your attention span.
| Unit | Gear | Why |
|---|---|---|
| Shadow / Megumi | Best Magic Book + Shinigami Sword | Ability value + damage |
| Crow / Itachi | Best Magic Book | Raw DPS scaling |
| Puppet | Shinigami Sword + Three Swords from Hell | Damage without breaking timing |
| Uta | Shinigami Sword + Katana | Physical scaling |
| Summon Sorcerer | Raid Cape + Magical Item + Technique Amplifier | Range + cooldown |
Don't use Bamboo Bottle on Puppet. If Puppet's ability timing shifts but Megumi's doesn't, your Shadow Realm cycle desyncs and starts eating itself. Looks good on paper, wrecks you in practice.
This is the number that makes or breaks the run:
$$5\text{ seconds}$$
His slow lasts 5 seconds, and the internal cooldown is 5 seconds. If his attack speed lines up with that window, he reapplies slow with zero gaps. Miss that timing and enemies slip through mid-cycle.
You need Crumble Away Inverse. High-roll SS hits 5-sec timing by the second upgrade. Low-roll SS still gets there, just slower. No Inverse at all? You're throwing extra cash at a problem Inverse solves for free.
1. Farms first — you need cash for late-game repositioning and stagger spam, not just upgrades.
2. Early slow unit on Last priority — stops the opening wave from snowballing.
3. Puppet down early — control + damage from turn one.
4. Summon Sorcerers at choke points — early job is just stabilizing, not perfecting.
| Unit | Placement | Priority |
|---|---|---|
| Shadow / Megumi | Corner/central control zone | Last |
| Crow / Itachi | Where grouped enemies funnel through | Last |
| Uta | Behind Crow/Itachi's coverage | Last |
| Summon Sorcerer | Choke/stagger zones | Last |
Last priority means your units hit the deep pile, not the front leaks. That's the whole point.
Set Mahoraga to First, always. If Megumi's on Last and Mahoraga inherits that same targeting, he ignores leaks and hits the boss pile instead — and small enemies slip straight past your defense. First priority = leak insurance.
Fire Complete Control when Shadow Realm has about:
$$45\text{ seconds}$$
left on its cycle. That keeps both abilities looping cleanly — enemies get pulled back, slowed, and hammered in the same spot on repeat. That pile is your entire 178M engine.
If you're stuck at 140M–150M, this is almost always the missing piece.
1. Sell a Summon Sorcerer from a low-value spot.
2. Replace him right next to the enemy pile.
3. Let enemies walk into his purple range — triggers stagger.
4. Sell again. Replace again. Repeat.
Every stagger compresses the enemy group tighter. Tighter group = more targets per Crow/Itachi swing = damage snowballs hard.
| Action | Result |
|---|---|
| Place near pile | Triggers stagger |
| Sell + replace | Retriggers stagger |
| Repeat on bosses | Compresses the pile |
| DPS hits stack | Damage spikes |
Stop trying to hold the line forever. Start maximizing damage on the biggest cluster on screen.
Reposition priority:
1. Crow / Itachi
2. Uta
3. Backup Shadow / Megumi
4. Extra Summon Sorcerer
If the pile shifts, your DPS shifts with it. Set Crow/Itachi and Uta to Last whenever the pack sits deep in their range.
Got extra cash? Run the same sell-replace trick on Itachi/Crow directly — place, let him hit, sell, replace, repeat. Bind Toggle Auto Upgrade Placed Units to something fast (E works fine) so you're not fumbling menus mid-fight.
Boss Waves + heavy effects = input delay = missed timings.
A clean 165M run beats a laggy 178M attempt that falls apart at minute three.
| Phase | Action |
|---|---|
| Start | Farm up, early slow on Last |
| Early waves | Puppet + Summon Sorcerers down |
| Post-farm | Core DPS placed (Shadow, Itachi, Uta) |
| Mid game | Unlock Shadow Realm, Mahoraga, Puppet ability |
| First heavy leaks | Sync Shadow Realm + Complete Control |
| ~8 min left | Reposition Itachi/Crow + Megumi toward main pile |
| Late game | Stagger-spam Summon Sorcerer |
| Final minutes | Reposition DPS, place-sell if cash allows |
| Mistake | Fix |
|---|---|
| Bamboo Bottle on Puppet | Use damage gear instead |
| SS not hitting 5-sec timing | Get Inverse, fix gear |
| DPS never repositioned | Move them to the pile late-game |
| Ignoring lag settings | Turn off effects/indicators |
| Shadow Realm fired randomly | Sync with Complete Control (45s rule) |
| Mahoraga on Last | Switch to First, always |
| Skipping the stagger trick | This is your biggest missing DPS source |
| Execution | Damage |
|---|---|
| Basic clear | 100M–130M |
| Solid run | 140M–160M |
| Strong run | 160M–178M |
| High-end run | 178M+ |
RNG on Crow/Itachi passives adds swing at the top end — but only once your setup is already correct.
Shadow/Megumi, Puppet, Summon Sorcerer, Crow/Itachi, Uta, plus farms. Uta's the only flexible slot — everything else is locked.
5 seconds. Matches his slow duration and cooldown cycle exactly.
Last priority means he chases the boss pile and ignores leaks. First priority = he cleans up frontline threats while your other units farm the pile.
It desyncs Puppet's ability timing from Megumi's, which breaks your Shadow Realm cycle mid-fight.
Three usual suspects: SS cooldown isn't optimized, you're skipping the stagger trick, or your DPS isn't repositioned to the biggest pile late-game. Fix those three first.
This isn't a brute-force DPS check — it's a control loop. Lock in Shadow/Megumi, Puppet, Summon Sorcerer, Crow/Itachi, Uta. Get SS to 5-second timing with Inverse. Sync Shadow Realm + Complete Control on the 45-second window. Run the sell-replace stagger trick relentlessly. Reposition your DPS in the final minutes. Kill the lag.
Nail all of that and 178M+ isn't a ceiling — it's a starting point.


Master Anime Expeditions Update 2.5 with our raid route. Unlock Guts, evolve Silver Falcon, optimize Skull Knight synergies, and farm Totems efficiently with this in-depth progression build guide.

Learn how to unlock Griffith in Anime Expeditions, farm Eclipse Souls efficiently, and choose between Silver Falcon (Light) and Fifth Godhand (Dark) for your team.

Farm 300 free rerolls overnight in Anime Expeditions with a lean Tower auto-farm team. Real setup, real auto-upgrade rules, zero fluff.

Fast-track guide to the Anime Expeditions Dragon Ball event. Collect all 7 Wish Orbs, clear 7 event days, and lock in a free 0.1% Unbound trait — orb locations, team picks, and skip-the-fluff strategy included.

Get all 7 Wish Orbs fast in Anime Expeditions. Exact East Town orb locations, Dragon's Wish quest steps, and unlock timing — no wasted runs.

Farm Gems fast in Anime Expeditions. Unbound Frieren Ink Stomp hits 4,000 Gems/hour. No Frieren? Use the Infinite Mode restart method instead. Full gear, team, and macro setup inside.

We use cookies to ensure website functionality and enhance your experience. Click "Accept All" to consent, or "Customize" to manage your preferences. See our Privacy Policy.