0
0 Created: Sep 16,2026 | Forza Horizon 6
Forza Horizon 6 Best Drift Attack Cars and Builds for Every Class

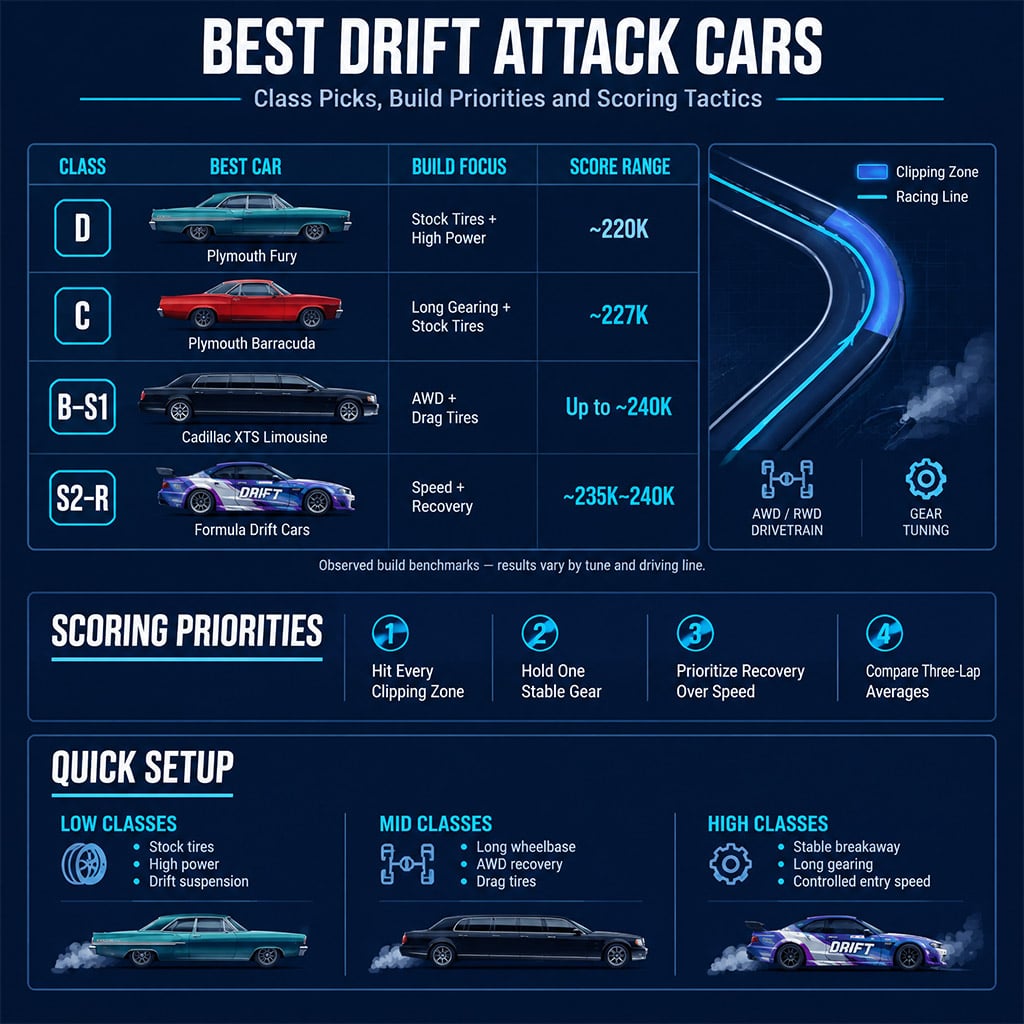
Use the Plymouth Fury in D, a Dodge Charger or Plymouth Barracuda in C, the Cadillac XTS Limousine from B through S1, and Formula Drift cars in S2 or R. These choices work because Drift Attack rewards Clipping Zone placement and recoverable angle—not realistic drift parts or maximum grip.

Drift Attack becomes available after earning the Yellow Wristband and runs at Shimanoyama Circuit. It is a permanent Shared World activity with unlimited attempts, class-based leaderboards, drift scoring, and bonus Clipping Zones.
- Best Drift Attack Cars by Class
- D and C Class: Preserve Weak Tires
- D Class: Plymouth Fury
- C Class: Charger or Barracuda
- B, A, and S1: Cadillac XTS Limousine
- Recommended Cadillac Build
- How to Drive the Limousine
- When Not to Use the Cadillac
- S2 and R: Use Formula Drift Cars
- Build for the Next Corner
- AWD vs. RWD
- Tires, Weather, and Assists
- Fix a Low Drift Attack Score
- The car straightens before the zone
- The engine hits the limiter mid-corner
- The car spins at zone exit
- The drift looks good but scores poorly
- The tune produces one strong run and several failures
- FAQ (Frequently Asked Questions)
- What is the best overall FH6 Drift Attack car?
- What is the best D-class Drift Attack car?
- Are drag tires better than drift tires?
- Is AWD better than RWD for Drift Attack?
- How do you access Drift Attack in Forza Horizon 6?
Best Drift Attack Cars by Class
A car can hold a spectacular slide and still score poorly if its body clears the Clipping Zone too quickly. Choose by zone coverage, angle stability, recovery, and Performance Index efficiency.
| Class | Recommended Car | Build Direction | Observed Test Score |
|---|---|---|---|
| D | Plymouth Fury | Stock tires, high-power swap, drift suspension | About 220,000 |
| C | Dodge Charger | Stock-tire power build | 220,000+ |
| C | Plymouth Barracuda | High power, long gearing, stock tires | About 227,000 |
| B | Cadillac XTS Limousine | AWD, drag tires, long-wheelbase placement | Nearly 240,000 |
| A | Cadillac XTS Limousine | AWD recovery with class-capped upgrades | Nearly 240,000 |
| S1 | Cadillac XTS Limousine | High power, drag tires, controlled body roll | Nearly 240,000 |
| S2 | Formula Drift Dodge Viper | High-speed angle and AWD recovery | About 235,000–240,000 |
| S2/R | Formula Drift Supra or Silvia | More accessible high-class alternatives | About 235,000–240,000 |
The score figures are results from the documented test sessions supplied for this guide, not official targets. Use them to compare builds under similar conditions, not as guaranteed totals.
D and C Class: Preserve Weak Tires
The usual failure is spending scarce PI on grip. Better tires help in normal racing but may prevent a low-class car from sustaining wheelspin.
Keep the factory tires and spend PI on power, steering angle, gearing, and braking.
D Class: Plymouth Fury
The Plymouth Fury combines a long wheelbase with low factory grip. Its slow rotation gives you time to correct the car before a wide line becomes a spin.
The documented D-class build used:
- The strongest compatible engine swap, reported at roughly 1,750 hp
- Stock tires
- Drift suspension
- A final rating at the D-class ceiling
If the Fury straightens before the next zone, shorten the active gear slightly. If it bounces against the limiter mid-drift, lengthen that gear before adding more power.
The test run reached roughly 220,000 points without a perfect lap. That consistency matters more than a setup that produces one exceptional score but fails most attempts.
Do not use this build for conventional racing. Its traction deficit is the feature that makes it effective in Drift Attack.
C Class: Charger or Barracuda
Use the Dodge Charger when it is already in your garage. Choose the Plymouth Barracuda when you need a readily available alternative with similar classic-muscle behavior.
Build either car in this order:
1. Retain the standard tires.
2. Install the strongest class-legal engine swap.
3. Add drift suspension.
4. Install an adjustable transmission.
5. Set third or fourth gear to cover most scoring corners.
6. Spend remaining PI on braking and chassis control.
7. Stop at the C-class limit.
Why does this matter? A mid-drift shift changes wheel speed and can break a stable slide inside the highest-value part of the corner.
The supplied Barracuda session produced approximately 227,000 points while holding one gear through most of the circuit. Pick the Barracuda for access; use the Charger only when ownership is no longer a barrier.
B, A, and S1: Cadillac XTS Limousine
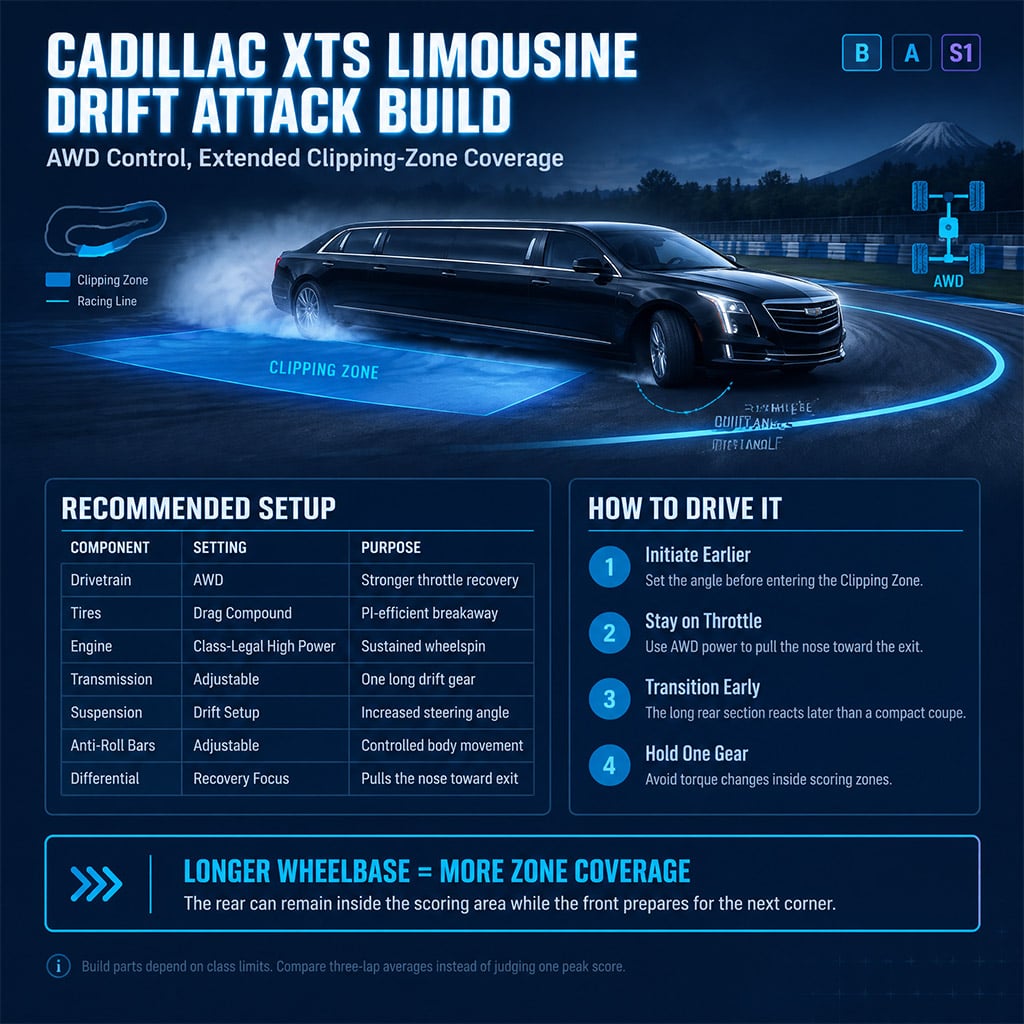
Short cars demand precise placement because their entire footprint can leave a Clipping Zone at once. The Cadillac XTS Limousine creates a larger margin: one end can remain in the zone while the other prepares for the exit.
Length scores.
The official description confirms that Clipping Zones award additional points, but it does not publish a fixed multiplier or a two-wheel activation threshold. Treat those commonly reported details as observable behavior that may change, not permanent rules.
Recommended Cadillac Build
Use a separate class-capped tune for B, A, and S1 rather than forcing one configuration across all three categories.
| Component | Starting Choice | Reason |
|---|---|---|
| Drivetrain | AWD | Pulls the nose toward the exit under throttle |
| Tires | Drag compound | Saves PI while retaining progressive breakaway |
| Engine | Highest practical class-legal output | Overcomes mass and sustains wheelspin |
| Transmission | Adjustable drift or race gearbox | Creates one long active gear |
| Suspension | Drift-oriented | Increases usable steering angle |
| Anti-roll bars | Adjustable | Controls delayed body movement |
| Differential | Tuned for throttle recovery | Helps catch excessive angle |
The test configuration used an AWD conversion, drag tires, adjustable chassis parts, and a reported 1,750-hp swap where the class cap permitted it. Do not chase that output when it forces you to remove steering-angle or recovery upgrades.
How to Drive the Limousine
The Cadillac fails when you treat it like a short coupe. Its rear continues moving after the nose changes direction, so late corrections rarely work.
Use this sequence:
1. Initiate earlier than normal.
2. Settle the angle before entering the zone.
3. Apply firm throttle to let AWD pull the nose toward the exit.
4. Lift briefly if rotation increases too quickly.
5. Return to power before the car regains full grip.
6. Begin the next transition before the rear finishes the current one.
If you coast while sliding wide, inertia keeps carrying the car toward the outside barrier. Use throttle as a recovery input, not just an accelerator.
The documented Cadillac run approached 240,000 points. Its advantage appeared at corner exit, where the trailing half remained near the scoring area after a compact car would have cleared it.
When Not to Use the Cadillac
Avoid it when you prefer rapid transitions, rely heavily on chase-camera feedback, or struggle to anticipate delayed rear movement. A conventional drift coupe feels faster and cleaner, even when the limousine holds the scoring advantage.
Cockpit view can make the Cadillac easier to place because it shifts your attention from the distant rear bumper to the next zone. Test both cameras over three runs and compare average scores.
S2 and R: Use Formula Drift Cars
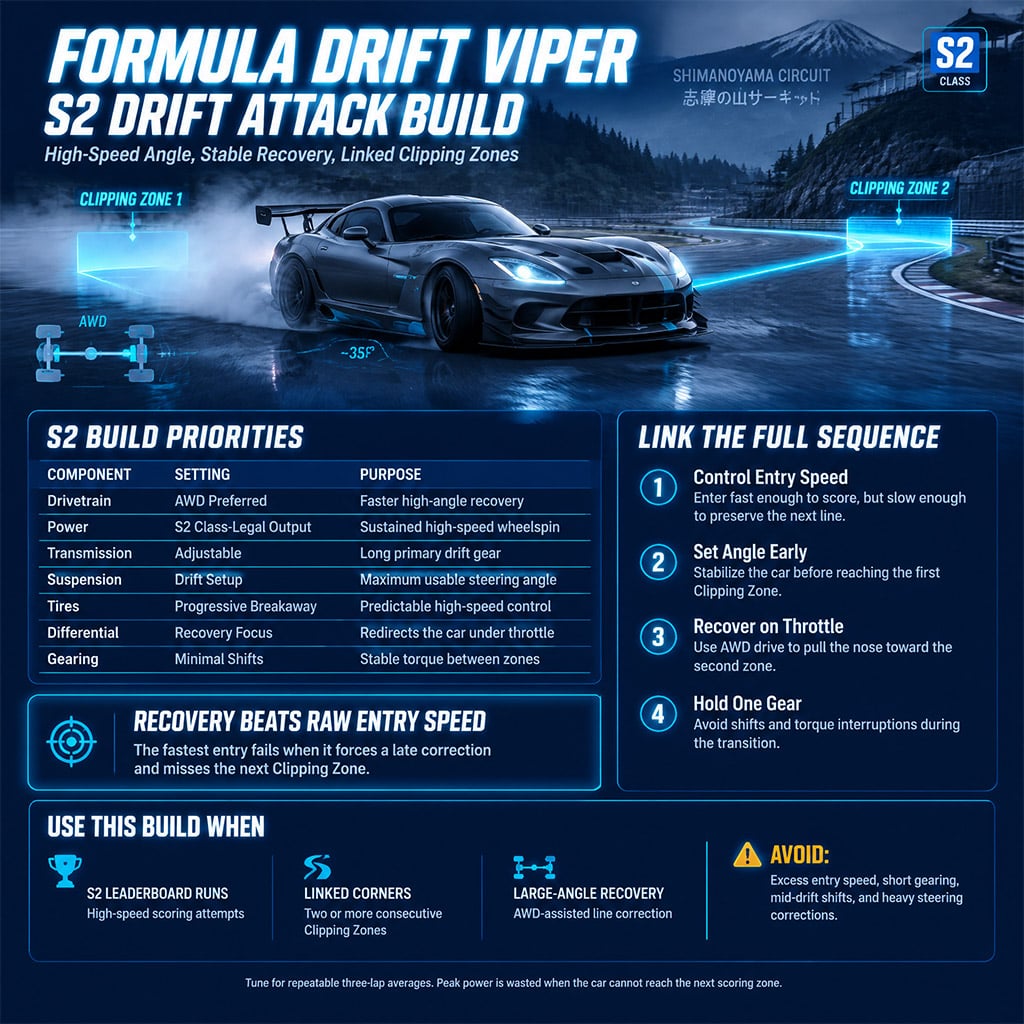
At high PI, insufficient power stops being the problem. Excess speed and poor recovery destroy more runs than weak acceleration.
The strongest documented choices are:
| Car | Best Trait | Trade-Off |
|---|---|---|
| Formula Drift Dodge Viper | Highest observed scoring ceiling | Demands controlled high-speed entries |
| Formula Drift Toyota Supra | Predictable and easier to approach | May sacrifice some peak potential |
| Formula Drift Nissan Silvia | Responsive, compact chassis | Less placement tolerance than a long car |
Use the Viper for peak attempts; start with the Supra when predictable control matters more than theoretical ceiling.
Build for the Next Corner
A fast entry is useless when it leaves the car facing the wrong direction for the next zone. Tune high-class builds in this order:
1. Secure enough power for uninterrupted wheelspin.
2. Lengthen the primary drift gear.
3. Maximize usable steering angle.
4. Tune for progressive breakaway.
5. Add AWD when score takes priority over RWD behavior.
6. Adjust the differential for recovery under throttle.
7. Remove avoidable shifts from the scoring sequence.
The documented Formula Drift sessions reached roughly 235,000–240,000 points. Failed runs shared one pattern: excess entry speed forced a late correction and compromised the following zone.
The fastest line is the one that preserves the sequence.
AWD vs. RWD
RWD remains competitive at lower speeds because you have more time to catch excessive rotation. From S1 upward, AWD usually offers the easier scoring route by pulling the front end back toward the intended line.
| Class Range | Best Starting Point | Switch When |
|---|---|---|
| D–C | RWD or the car's natural layout | The car cannot recover from moderate angle |
| B–A | Test both | AWD conversion consumes too much PI |
| S1 | AWD | RWD repeatedly loses the next zone |
| S2–R | AWD for leaderboard attempts | You specifically prefer RWD technique |
The comparison dimension most players miss is PI cost. An AWD conversion may improve recovery but weaken the complete build if it forces you to sacrifice power, steering angle, or transmission control.
Use drivetrain leaderboard filters to compare similar builds. The filters help analysis, but they do not make a weak configuration competitive by themselves.
Tires, Weather, and Assists
Part names are poor tuning instructions. Drag tires can outperform drift tires when their lower PI cost leaves room for power and chassis control.
Apply this starting rule:
- D–C: Test stock tires first.
- B–S1: Compare drag tires against drift tires over three runs.
- S2–R: Prioritize predictable high-speed breakaway.
- Wet surface: Reduce entry speed and steering input.
Rain helps low-powered cars maintain slides, but it also increases braking distance and makes precise placement harder. Use wet conditions when dry grip breaks your drift chain; avoid them when you already overshoot zones.
Start with traction control off, stability control off, and manual transmission. Keep ABS according to preference.
Automatic shifting can change torque while the car is inside a Clipping Zone. If one manual gear covers the section, hold it.
Fix a Low Drift Attack Score
Do not replace the car until you identify where the points disappear.
The car straightens before the zone
Shorten the active gear or initiate later with more wheel speed. Do not add power until gearing fails to solve the problem.
The engine hits the limiter mid-corner
Lengthen the active gear. Limiter contact interrupts stable torque delivery and may force an unwanted shift.
The car spins at zone exit
Reduce entry angle and return to throttle earlier with AWD. With RWD, countersteer sooner and use a smaller throttle increase.
The drift looks good but scores poorly
Move the line into the Clipping Zone. Angle outside the bonus area cannot compensate for weak placement.
The tune produces one strong run and several failures
Compare three-lap averages, not personal-best scores. A slightly slower setup with repeatable zone coverage is the better leaderboard tool.
FAQ (Frequently Asked Questions)
What is the best overall FH6 Drift Attack car?
The Cadillac XTS Limousine is the strongest documented all-around choice for B, A, and S1. Its long wheelbase extends Clipping Zone coverage, while AWD improves recovery under throttle.
What is the best D-class Drift Attack car?
The Plymouth Fury is the preferred D-class option. Keep its factory tires, add a class-legal high-power swap and drift suspension, then tune one gear to cover most scoring corners.
Are drag tires better than drift tires?
Drag tires are better when they save enough PI to fund power, AWD, or steering-angle upgrades without making breakaway unpredictable. They are a poor choice when the car becomes difficult to initiate or cannot hold a precise line.
Is AWD better than RWD for Drift Attack?
AWD is usually easier from S1 upward because it recovers large angles more effectively. RWD remains competitive in lower classes where slower speeds give you more time to correct rotation.
How do you access Drift Attack in Forza Horizon 6?
Earn the Yellow Wristband, then enter the event at Shimanoyama Circuit. Use the unlimited attempts to map each Clipping Zone and establish a stable three-lap average before changing the tune.

I’m Amara Okafor, a Nigerian Contributing Writer at GGWTB covering sports, racing, and driving games, alongside casual mobile titles. My guides focus on timing a pass, finding a braking point, and choosing upgrades that suit your playstyle. For shorter sessions, I keep the priorities clear: less menu-hopping, more time playing.

Most Popular Posts
- Forza Horizon 6 Credits and Wheelspins Farm: Fastest Post-Update Methods
- Forza Horizon 6 Series 3 Best Cars, Events, Italian Exotics Rewards & S2 Meta Tunes
- Forza Horizon 6 A-Class Meta: 5 Best Cars + Tune Codes New Patch
- Forza Horizon 6 Gamescom 2026 Update, Season Roadmap, PS5 Release, and Best Prep Builds
- Forza Horizon 6 Top Rarest Cars: Best Collector Targets Ranked
- Forza Horizon 6 Series 3: Italian Exotics Cars, Aftermarket Takeover & Economy Fixes Explained
Popular Category Lists
- ARC Raiders / (341)
- Grow a Garden / (292)
- CoD: Black Ops 7 / (167)
- Star Citizen / (160)
- MLB 26 / (159)
- Monopoly Go / (152)
- ARK Survival Ascended / (125)
- Steal a Brainrot / (98)
- Blox Fruits / (74)
- Adopt Me / (73)
- Forza Horizon 6 / (72)
- Sailor Piece / (68)
- Grow a Garden 2 / (68)
- Diablo IV / (62)
- CoD: BLACK OPS 6 / (55)
- Path of Exile 2 / (48)
- Monster Hunter Wilds / (46)
- Aion 2 / (45)
- Windrose / (44)
- Donut SMP / (41)