0
0 Created: Nov 25,2025 | Grow a Garden
Grow A Garden Chimera Best Combos with Giant Peacock & Trade Values

If you've been grinding endlessly for a top-tier Giant Peacock, you might want to hit pause. The Chimera has arrived, and trust me, its power level is already shaking up the meta. As the second fusion GaG pet in the game (following the Lich), it's not just a collector's item—it is arguably the most overpowered (OP) asset you can own right now. Today, I'm breaking down exactly how to get it, why the specific weight thresholds matter, and how to trade for it without getting ripped off.
- Chimera Pet Unlock Quest — Cost & Materials
- Obtaining the Chimera: Craft or Trade?
- Chimera Pet Passive Ability — Quick Data Overview
- The Skill Caps: Breaking the Cooldown Barrier
- Best Combos: The Peacock Experience for Everyone
- Trade Value Guide: What is it Worth?
- Frequently Asked Questions (FAQ)
- The Bottom Line

Chimera Pet Unlock Quest — Cost & Materials
Below is a compact table summarizing the materials and costs to craft the Chimera Stone, the first step to unlock the Chimera Pet.
| Item | Quantity | Source | Cost (Sheckles) | Notes |
|---|---|---|---|---|
| Mythical Egg | x1 | Pet Egg Shop | 8,000,000 | Base-tier mythical; required for Chimera Stone. |
| Bug Egg | x1 | Pet Egg Shop | 50,000,000 | Mid-cost component. |
| Jungle Egg | x1 | Pet Egg Shop | 60,000,000 | Commonly used for advanced crafts. |
| Gem Egg | x1 | Pet Egg Shop | 250,000,000 | Highest-cost egg in this recipe. |
| Crafting Fee | — | Crafting Table | 500,000,000 | Paid at the moment of crafting the Chimera Stone. |
| Total Cost | — | — | 868,000,000 (materials) + 500,000,000 (fee) = 1,368,000,000 | Ensure funds and inventory space before crafting. |
Obtaining the Chimera: Craft or Trade?
First things first: how do you actually get your hands on one? The recipe requires fusing an Emerald Snake, a Lion, and a Goat.
However, before you rush to gather materials, let's look at the cost.
Why You Should Probably Avoid Crafting
To fuse these pets, you need to craft a Chimera Stone. This requires four different types of eggs and a staggering 500 Million Sheckles. That is not exactly beginner-friendly. On top of that, the ritual is complicated: you need to place four glowing cosmetics and a table in your garden just to activate the stone.
My advice?
Unless you enjoy burning in-game currency, just trade for it.
The fusion process is complex enough that many players skipped it, making the pet rare but the base version is still affordable. Currently, a base Chimera trades for roughly the same value as a Disco Bee. Save your Sheckles for upgrades instead.
Chimera Pet Passive Ability — Quick Data Overview
Here's a concise breakdown of Chimera's passive effects. Since Chimera merges three pets, you gain all three passives at once.
| Passive | Trigger/Frequency | Effect | Key Numbers | Notes |
|---|---|---|---|---|
| Cooldown Advancement (Roar) | Every 15 minutes | Shares total cooldown advancement across each pet | 807.68s total; ≤ 80.77s per pet | Distribute important cooldowns across pets to avoid per-pet cap waste. |
| Ram + Common Egg | Every 8.37 minutes | Rams a random player, knocks them away, grants a Common Egg | ~8.37m interval | Be mindful of knockback during precise tasks; good for steady low-tier egg income. |
| Shop Duplication | On purchase (seed/gear shop) | Chance to duplicate the purchased item | 2.43% probability | Best value on bulk/high-cost items; long-run expected discount ~2.43%. |
The Skill Caps: Breaking the Cooldown Barrier
The Chimera features three skills, but the real reason we are here is Skill 1: Global Cooldown Reduction.
At a base level, it triggers every 13 minutes, reducing all other pet cooldowns by 80 seconds. That's decent, but the magic happens when you start increasing its weight.
Here are the critical thresholds you need to aim for:
The 38kg Milestone:
With Elephant boosts and the Nightmare Mutant status, the Chimera triggers every 7 minutes and reduces cooldowns by 128 seconds.
What does this mean? At this weight, it officially matches the efficiency of the Giant Peacock.
The 61kg Power Spike:
This is where it takes the lead. It triggers every 5 minutes, shaving off 146 seconds. It has now surpassed the Giant Peacock.
The Max Cap (With Medium Toy):
If you equip a Medium Toy, you reach the absolute limit: triggering every 3 minutes with a massive 160-second reduction. This is extremely powerful.
Note on other skills:
Skill 2 (Random Bump): It gives a common egg to a random player. You can safely ignore this.
Skill 3 (Item Duplication): An 8% chance to duplicate shop items (Sand Snake ability). It's a nice bonus, but not the main selling point.
Best Combos: The Peacock Experience for Everyone
The Chimera is a team player. Since it reduces cooldowns for all pets directly, you don't need to waste slots on items like the Pancake Stack.
The Ultimate Synergy:
The best pairing is, ironically, the Giant Peacock.
Since Giant Peacocks under 60kg have dropped significantly in value (you can often snag one for a Kitsune or Raccoon), you can pair a cheap Peacock with your Chimera. They reduce each other's cooldowns, creating a rapid-fire loop.
Recommended Loadout:
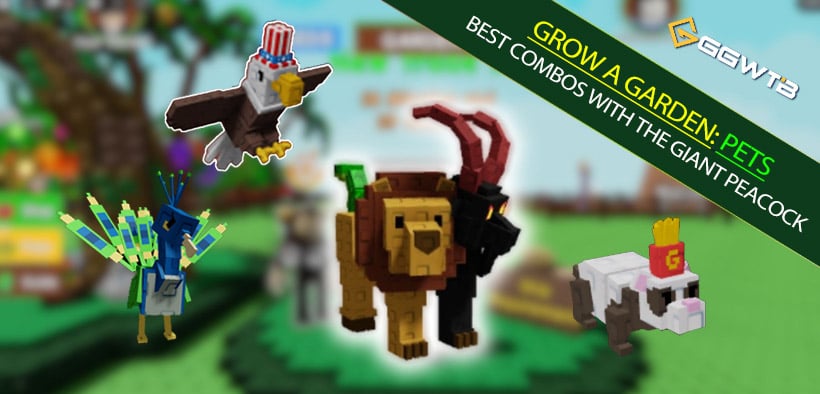
Here is a breakdown of the optimal Speed Run loadout for Grow A Garden. This combination maximizes cooldown reduction while ensuring your pets level up and hatch eggs as fast as possible.
| Pet Name | Strategic Role |
| Chimera | The Engine: Provides global cooldown reduction for the whole team. |
| Giant Peacock | The Partner: Synergizes with Chimera to create a rapid cooldown loop. |
| French Fry Ferret | Utility: drastically increases experience gain for fast leveling. |
| Bald Eagle | Utility: Speed up the egg hatching process. |
This setup essentially gives regular players access to the high-speed gameplay that used to be exclusive to top-tier whales.
Trade Value Guide: What is it Worth?
Because the fusion event was complicated, the Chimera is relatively rare. However, the market is still settling.
Here is a breakdown of what you should expect to pay or receive based on the current economy:
| Chimera Status | Estimated Trade Value | Strategy Note |
|---|---|---|
| Base / Normal Weight | 1 Butterfly | While 2 Chimeras technically equal 1 Butterfly, a 1:1 trade is the fastest way to secure a deal. |
| 38kg (Mid-Tier) | 1 Raccoon | Value jumps dramatically here. You might also trade for a Giant Peacock or Mimic Octopus of the same weight. |
| 50kg+ (High-Tier) | 1 Kitsune | At this weight, it is an elite asset. Expect to trade only for other high-weight Peacocks or Mimic Octopuses. |
Pro Tip:
If you aren't in a rush, trade for a normal weight Chimera (using a Butterfly) and slowly upgrade it yourself using an Elephant. This is much cheaper than trying to buy a 50kg+ version outright.
Frequently Asked Questions (FAQ)
Q: My Giant Peacock is only 15 seconds cooldown, should I keep it?
A: Yes! Even a low-weight Giant Peacock is extremely valuable. Trade carefully. If you have one, keep it and pair it with the Chimera for maximum effect.
Q: What toy should I use on the Chimera?
A: To hit that 3-minute trigger cap mentioned earlier, you need a Medium Toy. Without it, you won't reach the maximum cooldown reduction potential.
Q: Is the item duplication skill useful for making money?
A: It's hit or miss. An 8% chance is too low to rely on for income. Treat it as a passive bonus rather than a farming strategy.
The Bottom Line
The Chimera isn't just another pet; it's a shortcut to the endgame. By understanding the weight thresholds—specifically 38kg and 61kg—you can turn a standard fusion pet into a cooldown-shredding machine.
Your action plan:
1. Don't craft it; trade a Butterfly for a base version.
2. Equip a Medium Toy.
3. Feed it until it hits 61kg.
Most Popular Posts
- Grow a Garden Clam Event Guide: Tide Tokens, Coastal Eggs & Best Summer Update 2 Strategy
- Grow a Garden Planting Trick Guide: Best Tomato Method, High Tide Radar Leak, Rewards
- Grow a Garden Secret Badge Walkthrough: Carrot Weight & Puzzle Guide
- Grow a Garden Get Secret Seeds & Rare Pets Guides: DLC Codes + Trading Guide
- Grow a Garden Moon Harvest Part 4 Guide: Gear Odds, Reset Rewards, Cornling Strategy, New Seeds
- Grow a Garden Enfield Guide: Everfallen Roll Rules & Level Loss
Popular Category Lists
- ARC Raiders / (339)
- Grow a Garden / (292)
- CoD: Black Ops 7 / (167)
- Star Citizen / (160)
- MLB 26 / (159)
- Monopoly Go / (152)
- ARK Survival Ascended / (125)
- Steal a Brainrot / (98)
- Blox Fruits / (74)
- Adopt Me / (73)
- Forza Horizon 6 / (72)
- Sailor Piece / (68)
- Grow a Garden 2 / (68)
- Diablo IV / (62)
- CoD: BLACK OPS 6 / (55)
- Path of Exile 2 / (48)
- Monster Hunter Wilds / (46)
- Windrose / (44)
- Aion 2 / (43)
- Donut SMP / (40)