0
0 Created: Sep 23,2026 | Storage Hunters: Open World
Storage Hunter Open World Building Guide: Cliffs, Roofs & Hidden Lights

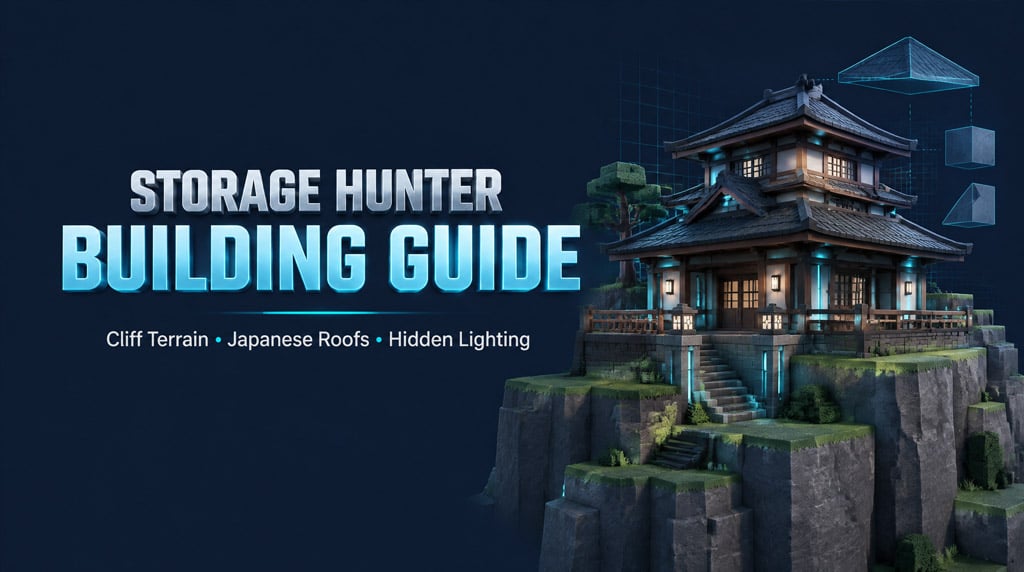
Default block snapping makes structures look like flat, artificial boxes. You can turn rigid geometric parts into natural rock faces, traditional layered eaves, and clean concealed lighting with three build-mode adjustments.
- 1. Build Natural Basalt Cliff Faces
- Part Setup & Material Matrix
- Assembly Sequence
- Anti-Repetition Rules
- 2. Build Layered Japanese Eaves
- Roof Technique Comparison
- Assembly Sequence
- Pitch Adjustment Rules
- 3. Conceal Architectural Light Sources
- Concealment Locations & Trade-Offs
- Assembly Sequence
- Failure Diagnostics
- Troubleshooting Reference
- FAQ (Frequently Asked Questions)
- How do you create realistic cliffs in Storage Hunter Open World?
- How do you prevent Japanese roof corners from clipping?
- Which lamp works best for concealed lighting?
- Why does my concealed lamp clip through the exterior wall?
- What is the recommended build order to prevent visual bugs?
1. Build Natural Basalt Cliff Faces
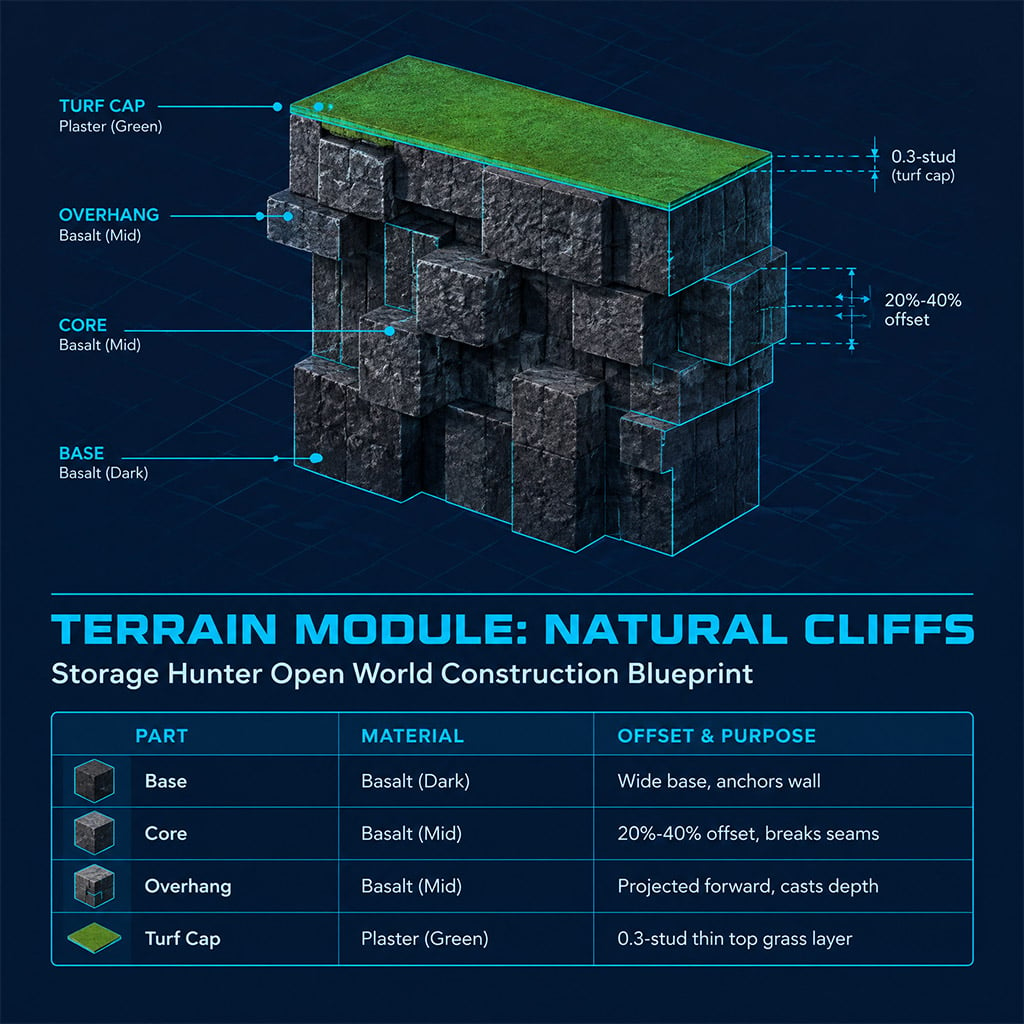
Stacking identical cubes vertically produces an artificial staircase. To build a believable rock face, break the silhouette by alternating horizontal depth, varied heights, and edge filler wedges.
Part Setup & Material Matrix
| Component | Part Type | Material | Relative Scale | Function |
|---|---|---|---|---|
| Foundation | Basic Cube | Basalt (Dark Gray) | Wide, full depth | Base structural footprint |
| Core Break | Basic Cube | Basalt (Mid Gray) | Variable width, deep | Displaces vertical seams |
| Overhang | Basic Cube | Basalt (Mid Gray) | Low height, projected | Casts ambient shadows |
| Transition | Basic Triangle | Basalt (Mid Gray) | Sized to gap | Eliminates 90° corner seams |
| Turf Cap | Basic Cube | Plaster (Forest Green) | Ultra-thin (0.2–0.5 studs) | Simulates soil/grass layer |
Assembly Sequence
1. Drop a Basic Cube to define the base of the rock wall. Scale it wide to anchor the footprint.
2. Stack a secondary cube on top. Offset it horizontally by 20% to 40% of its total depth.
3. Place a third, reduced-height cube forward past the front plane to establish a natural overhang.
4. Fill visible 90-degree internal seam corners using a rotated Basic Triangle matched to the same scale.
5. Cap the upper surface with an ultra-thin Plaster cube painted dark green to act as the top turf layer.
6. Select all components and Group them into a single terrain module.
Anti-Repetition Rules
- Vary Layer Projections: Never align the forward faces of more than two vertically adjacent blocks.
- Break Module Repetition: When cloning the finished module across a boundary, scale one axis by at least 15% or invert its horizontal rotation 180
- Control Edge Seams: Insert Basalt triangles only at visible transitions. Over-smoothing produces rounded slopes instead of fractured rock.
2. Build Layered Japanese Eaves
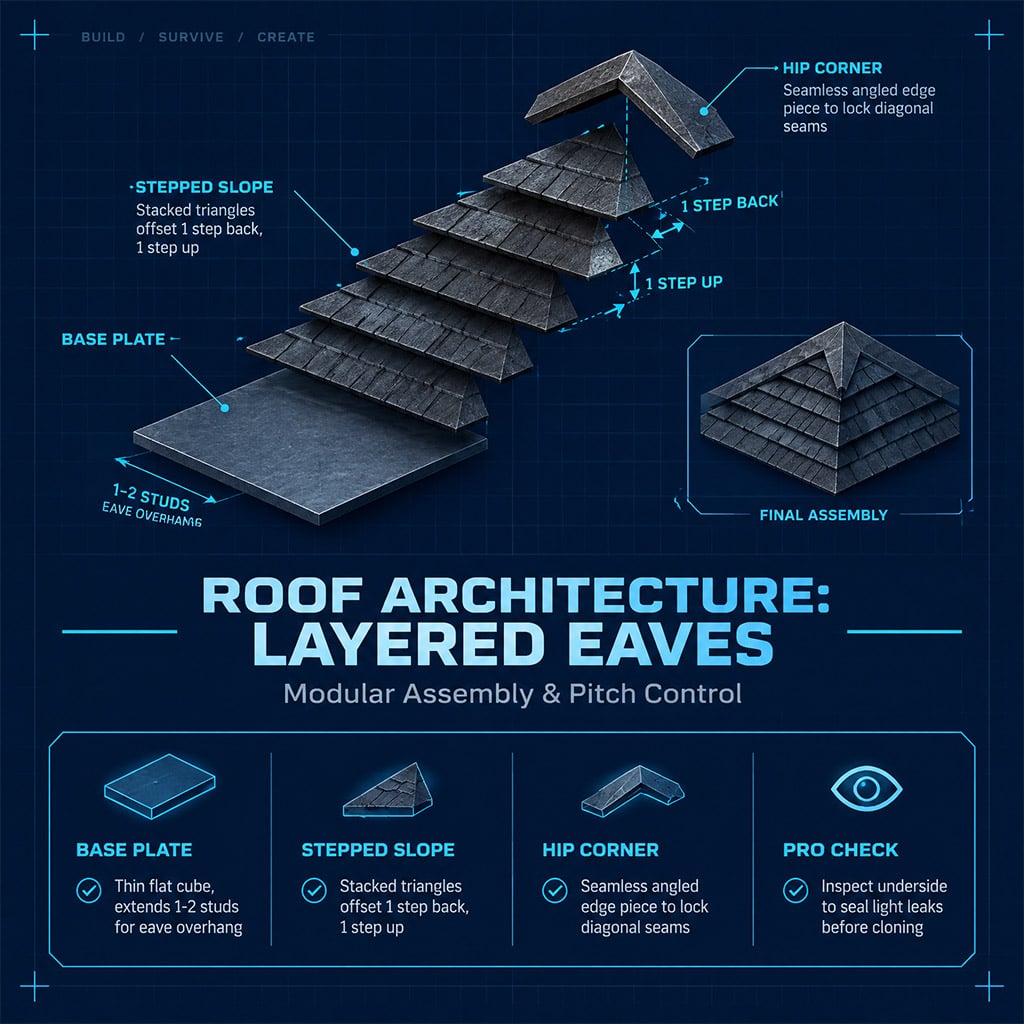
Single-triangle roofs produce razor-thin edges with no shadow definition. Layered offsets let you control roof pitch, underside depth, and realistic eave overhangs.
Roof Technique Comparison
| Method | Part Count | Camera Profile | Primary Failure Point |
|---|---|---|---|
| Single Triangle Primitive | Low (1 Part) | Flat, paper-thin edge | No underside depth; weak silhouette |
| Stepped Triangle Stacking | Moderate (3–6 Parts) | Pronounced eaves, deep cast shadow | Seam tear if grid snap varies |
| Framed Eave Assembly | High (8+ Parts) | Complete bracket system | Heavy part count impact on frame rate |
Assembly Sequence
1. Lay an ultra-thin Basic Cube flat along the top of your wall, extending outward by 1 to 2 studs to define the lower eave lip.
2. Place a Basic Triangle flush on top of the eave plate, aligning the front vertical edge.
3. Duplicate the triangle, elevate it by one vertical grid increment, and push it backward by one horizontal grid increment.
4. Repeat this stepped pattern upward until reaching the central ridge beam.
5. Place a Basic Edge or inverted corner piece at the hip junctions where two roof faces meet.
6. Group the completed roof face and apply the Shingles texture with low-reflectance, high-contrast dark coloring.
Pitch Adjustment Rules
- Steep Ridge (Temple Style): Maintain a 1:2 ratio (move 1 step back for every 2 steps up).
- Curved Flare (Gothic/Asian Flare): Decrease the step interval as you reach the eave, pushing the lowest two triangles out at double the horizontal distance.
- Gutter Occlusion: Orbit the camera directly underneath the lower eave. If skybox light cuts through, scale the eave base plate back to enclose the seam.
3. Conceal Architectural Light Sources
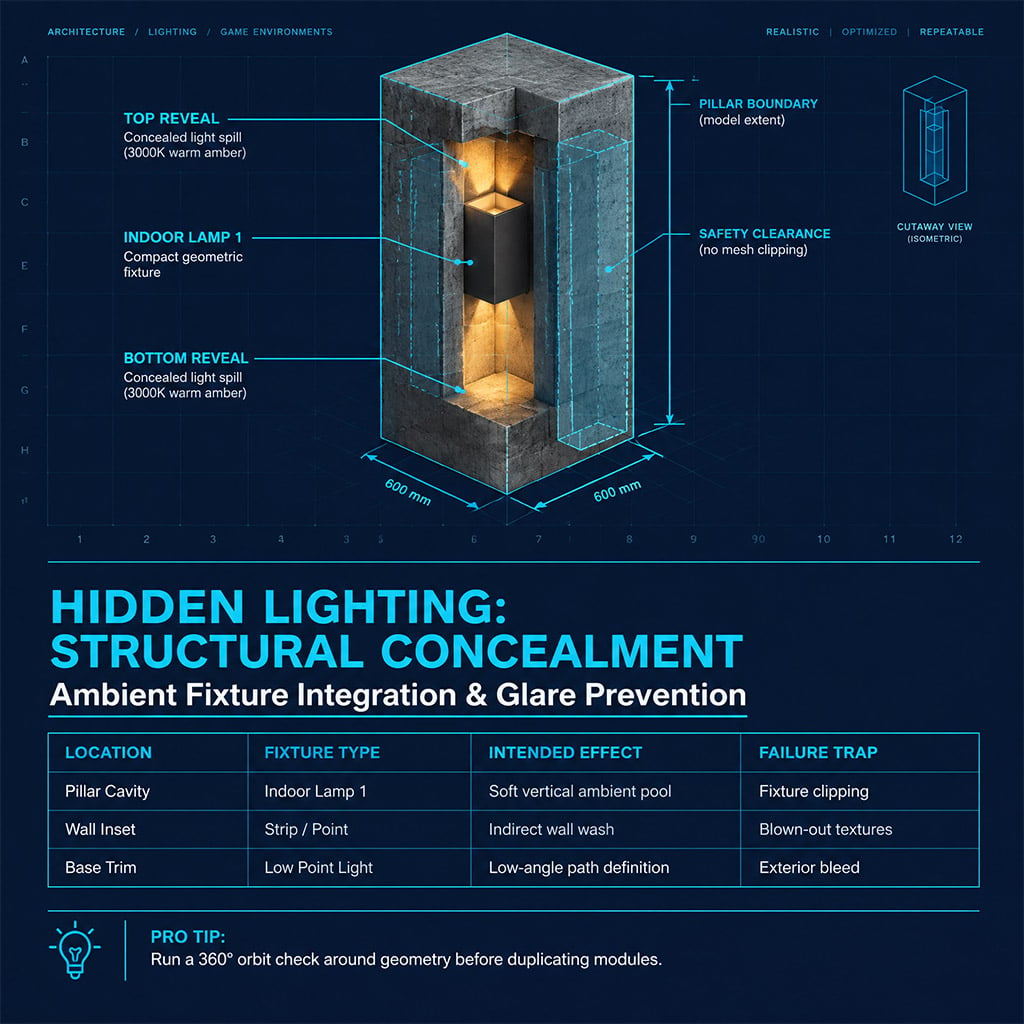
Raw light fixtures often break immersion on clean builds. Embedding lights inside architectural geometry hides the source model while casting clean ambient light over walls and floors.
Concealment Locations & Trade-Offs
| Concealment Point | Recommended Light Type | Visual Result | Failure Point to Avoid |
|---|---|---|---|
| Pillar Interior | Street Lamp / Point Source | Soft ground-to-ceiling wash | Fixture model clipping through narrow corners |
| Ceiling Soffit | Indoor Lamp 1 / Surface Strip | Indirect ambient perimeter glow | Overbright bloom blowing out wall textures |
| Floor Border Trim | Low-Intensity Point Light | Low-angle path definition | Light spill leaking through exterior foundation |
Assembly Sequence
1. Build a hollow structural element—such as a hollow pillar, double-stud wall, or drop-down ceiling beam.
2. Place your fixture (Indoor Lamp 1 or equivalent) within the center of the structural cavity.
3. Orbit the camera 360 around the structure to verify that no part of the physical fixture model clips through exterior faces.
4. Step back to view adjacent geometry. Ensure the light passes through the boundary material smoothly without showing hard internal shadow bounds.
5. Duplicate the assembly only after confirming that light spreads without washing out surface textures.
Failure Diagnostics
- Wall Bleed: If light spills onto an unwanted exterior wall, shift the light fixture 1 stud inward or increase the exterior wall thickness.
- Surface Burn: If the wall glows solid white, increase the distance between the concealed lamp and the inner surface.
- Geometry Leaks: Do not scale walls after inserting lights; scaling can alter collision and reveal hidden meshes.
Troubleshooting Reference
| Symptom | Root Cause | Immediate Action |
|---|---|---|
| Cliff resembles a uniform staircase | Horizontal and vertical offsets are identical | Alter at least two axes per layer; insert an offset Basalt triangle. |
| Seams appear along roof hips | Triangle pieces differ in thickness or snap step | Match scaling values across all components before copying. |
| Visible fixture clipping | Wall or column is too thin for the lamp mesh | Widen the hollow pillar footprint by at least 0.5 studs. |
| Flat, washed-out lighting | Multiple light radiuses overlap at peak intensity | Delete every second fixture to reintroduce ambient shadows. |
FAQ (Frequently Asked Questions)
How do you create realistic cliffs in Storage Hunter Open World?
Stack Basic Cubes with varied depths, apply the Basalt material, and place a thin green Plaster cube on top as turf. Smooth awkward 90-degree internal seams by placing rotated Basalt triangles along joints.
How do you prevent Japanese roof corners from clipping?
Assemble the base eave plate and first triangle correctly before duplicating. Use dedicated Basic Edge or corner slope parts at junctions instead of overlapping rectangular primitives.
Which lamp works best for concealed lighting?
Indoor Lamp 1 and compact point fixtures work best because their smaller boundary boxes fit easily into standard 1-to-2 stud wall cavities without protruding.
Why does my concealed lamp clip through the exterior wall?
The housing geometry is too narrow for the fixture's base dimensions. Either widen the pillar mesh or rotate the lamp 90 to align its narrowest axis with your wall.
What is the recommended build order to prevent visual bugs?
Build terrain modules first, establish structural walls and rooflines second, and place concealed lighting last. Placing lights before structural walls are finalized often reveals hidden fixtures when walls are resized.

I’m Lucas Moreau, a French Features Editor at GGWTB covering urban open-world games, life simulations, and role-playing experiences. My features explore city activities, everyday routines, and the freedom to take a different path. I look at what a new job, home, or neighborhood lets you do—not just what it costs to unlock.

Most Popular Posts
- Storage Hunters Open World Prehistoric Car Full Grind Guides
- Storage Hunters Open World: Every Exclusive Item Location (Rain, Moonlight, Back Alley)
- Storage Hunters Alien Update: Fast Alien Coin Farming, UFO Vehicles & Index Guide
- Storage Hunters Fastest Way to Get the Prehistoric Car
- Storage Hunters: Open World Gem Farming Guide: Fastest Ways to Farm Diamonds
- Storage Hunters Vehicle Guide: Free Truck, Best Parts, and Upgrade Priority
Popular Category Lists
- ARC Raiders / (348)
- Grow a Garden / (293)
- CoD: Black Ops 7 / (167)
- Star Citizen / (161)
- MLB 26 / (159)
- Monopoly Go / (152)
- ARK Survival Ascended / (127)
- Steal a Brainrot / (99)
- Blox Fruits / (74)
- Adopt Me / (73)
- Forza Horizon 6 / (72)
- Sailor Piece / (68)
- Grow a Garden 2 / (68)
- Diablo IV / (62)
- CoD: BLACK OPS 6 / (55)
- Path of Exile 2 / (48)
- Aion 2 / (47)
- Monster Hunter Wilds / (46)
- Windrose / (44)
- Donut SMP / (41)