0
0 Created: Sep 23,2026 | Maplestory Classic
MapleStory Classic World Leveling Guide: Beat Map & Loot Target


Grinding efficiently in MapleStory Classic World is an exercise in math: if a mob takes more than three hits to kill, you are bleeding meso on potions and tanking your hourly EXP. Use this battle-tested Victorian route to maintain 100% platform uptime, exploit map verticality, and avoid the trap of migration before your damage threshold is ready.
- Level Victoria Island Progression Matrix
- Levels 1–15: Maple Island Exit and First Job Transition
- Levels 8–15 Grinding Formations
- Levels 15–30: Platform Coverage and Lane Discipline
- Pig Beach (Levels 15–22)
- Caution Falling Down (Levels 15–25)
- Subway Line 1, Area 1 & Damp Forest (Levels 18–28)
- Ant Tunnel I & IV (Levels 22–35)
- Levels 25–45: The Second-Job Power Spike
- Burnt Land II (Levels 30–40)
- Subway Line 2, Area 1 (Levels 30–42)
- Levels 45–60: Hitbox Sizing and Potion Economy
- Entrance to Golem's Temple (Levels 48–60)
- Kerning Subway Wraiths (Levels 43–55)
- Levels 60–70: EXP Rate vs. Loot Gambling
- The 15-Minute EXP Audit Rule
- Dangerous Valley II vs. Golem's Temple
- Class Architecture & Map Compatibility Matrix
- FAQ (Frequently Asked Questions)
- What is the fastest level 1–70 route in MapleStory Classic World?
- When should I move from Ant Tunnel to Wild Boars or Fire Boars?
- Is the Kerning Party Quest (KPQ) better than map grinding?
- How do I combat high potion costs as a Warrior or Bandit?
- Can I grind level 60 to 70 solo without losing money?
Level Victoria Island Progression Matrix
Use the primary map when solo or running optimal party counts; drop to the secondary alternative when the main map exceeds player capacity or when your attacks fail the 3-hit threshold.
| Level Range | Primary Map | Secondary Alternative | Ideal Party Size | Key Requisite / Loot Target |
|---|---|---|---|---|
| 1–10 | Maple Island Quests | Snails / Blue Snails | Solo | Clear only overlapping quest lines |
| 8–15 | Southern Forest I (Slimes) | Henesys Hunting Ground I | 1–3 | Weapon DEF gear; Slime Bubbles |
| 15–22 | Pig Beach | Caution Falling Down | 3–6 | Leather, Pig's Heads (quest demand) |
| 18–28 | Subway Line 1, Area 1 | Damp Forest | Solo or 3–4 | ACC check for Jr. Necki; fast clears |
| 22–35 | Ant Tunnel I | Ant Tunnel IV | 4–6 | Pure density; low potion overhead |
| 25–35 | Land of Wild Boar | Ant Tunnel | 3–5 | Dark Axe Stump drops; Wooden Tops |
| 30–40 | Burnt Land II (Fire Boars) | Subway Line 2, Area 1 | 2–3 | 2-hit threshold required; Throwing Stars |
| 33–43 | Cave of Evil Eye | Dangerous Valley I | 2–4 | Melee AoE pull map; Ice-weak |
| 38–48 | Valley of Death | Drake Hunting Ground | 3–4 | Cleric/Poison split farming; Scrolls |
| 43–55 | Kerning Subway (Wraiths) | Drake Hunting Ground | Solo or 2 | Holy weakness; Red Whip target |
| 48–60 | Entrance to Golem's Temple | End of Fleeting Light | 2–4 | Large vertical hitboxes; Tobi drops |
| 52–62 | Another Sanctuary | Golem's Temple III | 4–6 | Coordinated lane holds; Holy-weak |
| 60–70 | Golem's Temple / Sanctuary | Dangerous Valley II | Solo or Duo | Steely drops; test net EXP vs. potion burn |
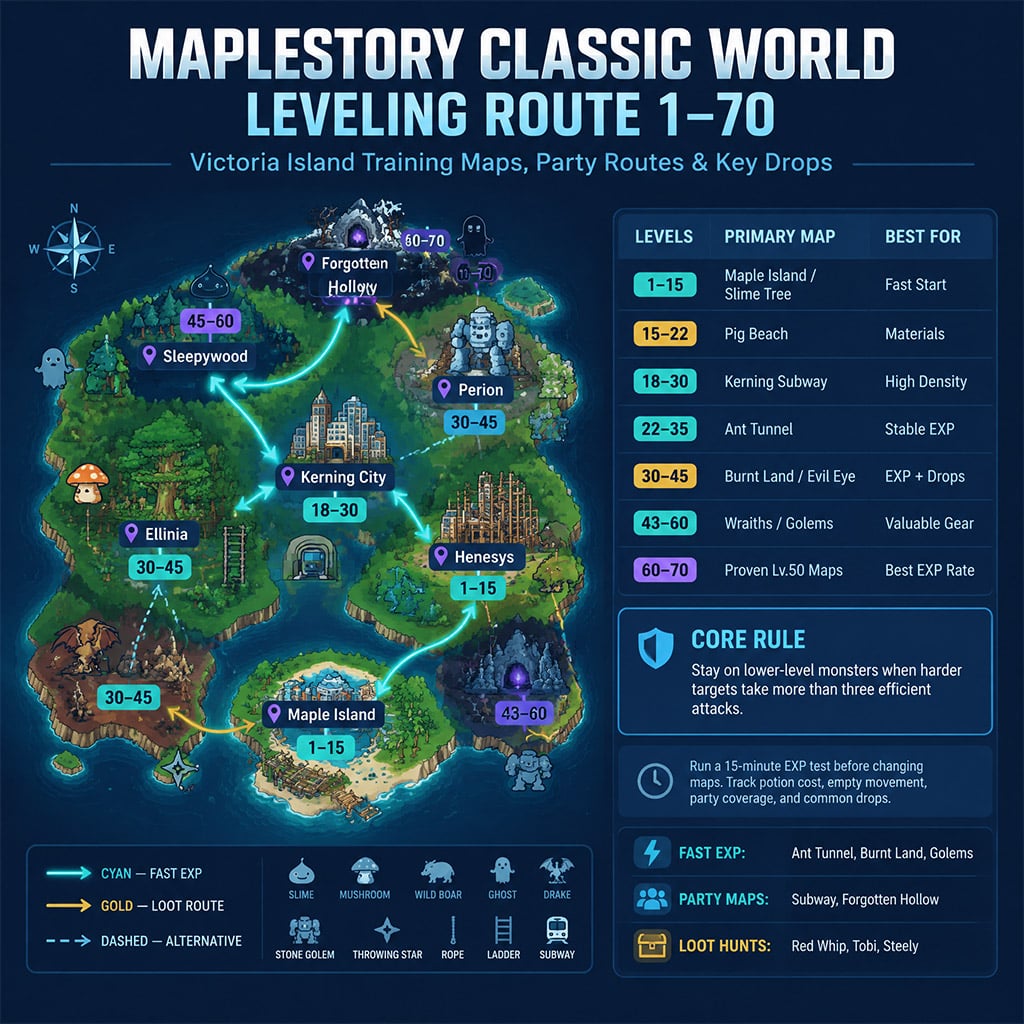
Levels 1–15: Maple Island Exit and First Job Transition
Skip non-essential Maple Island side quests. Complete only the introductory chain that rewards basic consumable supplies and pathing toward Southperry. Board the ship to Victoria Island immediately at level 8 for Magicians or level 10 for physical classes.
Levels 8–15 Grinding Formations
- Southern Forest I (Tree Dungeons): The definitive solo bracket map. Slimes funnel naturally down the tree nodes, eliminating vertical climbing overhead. Pick up all level 10 basic gear to cover early potion costs.
- Henesys Hunting Ground I (HHG1): Viable only with explicit lane ownership. Run the top platforms if playing an Archer or Thief; leave the floor to Warriors. If more than three players crowd your floor, channel-hop immediately.
- Kerning Construction Site: Solid secondary option for Thieves and Warriors already bound for Kerning City. Avoid the bottom-left pit where Octopuses bottleneck behind low clearance obstacles.
Golden Rule: Stay at Slime Tree until level 15 unless you have a guaranteed high-clear partner at HHG1.
Levels 15–30: Platform Coverage and Lane Discipline
Vertical transit destroys grinding rates. In multi-tiered maps, monsters only respawn once an existing platform is cleared. Never circle a map; hold your assigned platform.
Pig Beach (Levels 15–22)
- Lane Assignments: Ranged attackers anchor the flat left clearing; melee jobs take the right rock platforms; your highest-mobility member patrols the top.
- Common Failure Point: Players clustering near the safe bottom-right ladder. This throttles Ribbon Pig respawns across the upper tiers and wastes clear speed.
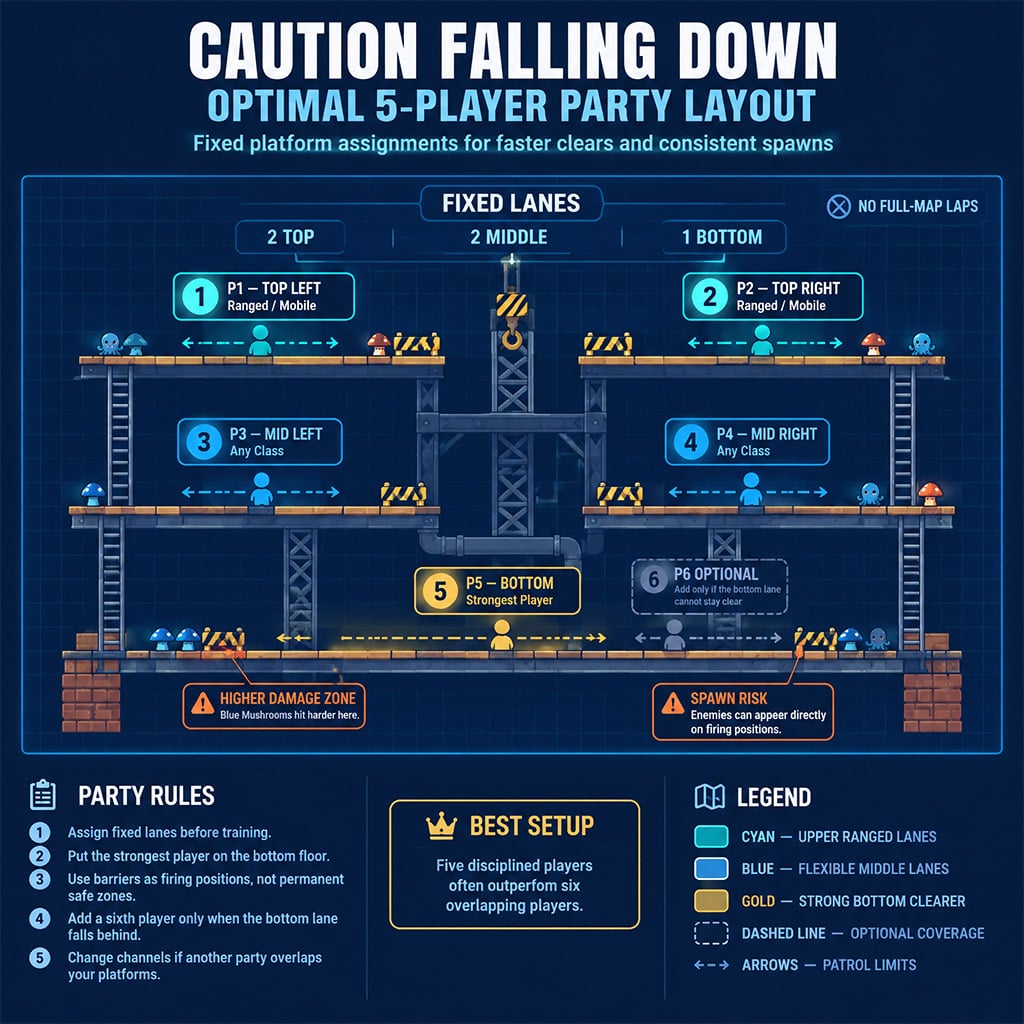
Caution Falling Down (Levels 15–25)
- Optimal Setup: 2 players top, 2 middle, 1–2 bottom. Place your highest-DPS character on the bottom floor to handle Blue Mushrooms without dying.
- The 5-vs-6 Player Rule: Running 5 coordinated players often yields higher EXP than 6. A surplus sixth player often steals active targets rather than locking down unworked spawns.
Subway Line 1, Area 1 & Damp Forest (Levels 18–28)
- Subway Line 1: Assassins and Bowmen can hit higher platforms using jump-shots without mounting ladders. Stake out two adjacent Bubbling platforms and sweep horizontally.
- Damp Forest: Station one player on the isolated top platform and two below. Caution: Jr. Necki has an extremely high Avoidability stat. Skip this map entirely if your physical Accuracy stat causes you to miss more than 15% of your attacks.
Ant Tunnel I & IV (Levels 22–35)
The absolute standard for group leveling. Horny and Zombie Mushrooms provide steady, non-threatening EXP with zero downtime. Form 4-to-6-player parties with dedicated platform sweeps. Move deeper to Ant Tunnel IV if the primary tunnel experiences heavy channel competition.
Levels 25–45: The Second-Job Power Spike
Advancing to your second job at level 30 does not mean you should immediately jump to high-level mobs. Stay on level 20–30 mobs until your main attack skill hits its primary damage consistency thresholds.
| Grinding Map | Optimal Class / Build | Minimum Clear Benchmark | Drop Targets |
|---|---|---|---|
| Land of Wild Boar | Warriors / Brawlers | 2-hit kill on Wild Boar | Dark Axe Stump drops, Wooden Tops |
| Burnt Land II | Assassins / Crossbowmen | 2-hit kill on Fire Boar | Throwing Stars, Diamond Ore |
| Subway Line 2, Area 1 | Clerics / F/P Wizards | 2-cast clear on Jr. Wraiths | Pure EXP, Scroll drops |
| Cave of Evil Eye | I/L Wizards / Page | AoE stun or elemental freeze | Evil Eye Tails, Equipment drops |
| Dangerous Valley I | Ice/Lightning Wizards | 2-hit Cold Beam on Drakes | Drake Blood, Fire Boar drops |
Burnt Land II (Levels 30–40)
- Lock down two players on the bottom double-tier and one player running the top rock line.
- If Fire Boars take 4 or more hits, return to Ant Tunnel. The high knockback damage and potion burn will wipe out any slight EXP advantage.
Subway Line 2, Area 1 (Levels 30–42)
Ideal fallback when Perion maps are packed. Narrow, tight corridors favor linear piercing attacks (Iron Arrow, Piercing Arrows) and single-target spell rotations.
Levels 45–60: Hitbox Sizing and Potion Economy
Monster HP scales dramatically after level 45. Pure mob count matters less than hitbox size and mob collision behavior.
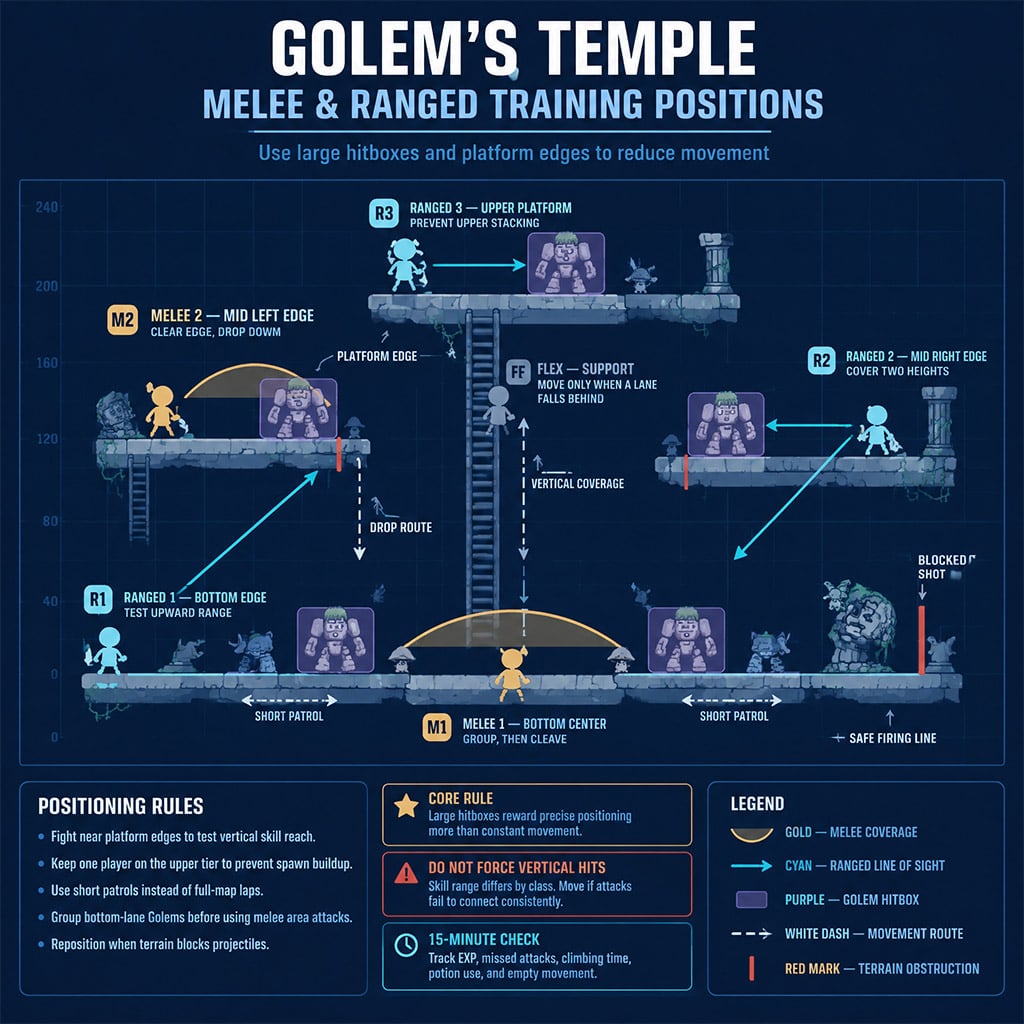
Entrance to Golem's Temple (Levels 48–60)
Stone Golems and Dark Stone Golems feature massive vertical hitboxes. Melee characters can hit them from lower steps without taking touch damage, and ranged classes can cleanly fire over terrain lips.
- Spawn Mechanics: Maps like Golem's Temple I feature tight mob spawn groupings. Clear the edges first to prevent golems from clustering in the center pit.
- High-Value Drop: Tobi Throwing Stars. However, if your kill rate drops below 12 golems per minute, you are burning meso without leveling advantage.
Kerning Subway Wraiths (Levels 43–55)
The holy grail for Clerics. Group up Wraiths along the flat railway platforms.
- Red Whip Farming: Wraiths drop the coveted Red Whip (+15 Movement Speed).
- Efficiency Test: If you lack Heal mastery or are not playing a Cleric, test your net potion cost before committing. Magic damage from Wraiths quickly drains white potion reserves.
Levels 60–70: EXP Rate vs. Loot Gambling
Victoria Island's highest-tier mobs (Tauromacis, Taurospear, Cold Drakes) hit hard and boast deep HP pools. Grinding these mobs without optimized 3rd-job tools often yields worse EXP per hour than holding down Golem's Temple or Another Sanctuary.
The 15-Minute EXP Audit Rule
Before committing your play session to a high-level map, run a strict 15-minute diagnostic:
1. Clear inventory of misc drops; record starting EXP and exact potion counts.
2. Grind non-stop for 15 minutes using your planned skill rotation.
3. The Rule: If the new map increases your potion burn by >50% but delivers <15% additional EXP per hour, drop back down to your previous map.
Dangerous Valley II vs. Golem's Temple
- Dangerous Valley II: High risk, high reward. Home to Steely Throwing Stars. Only grind here if your class possesses sufficient Avoidability or ranged stun to minimize direct contact damage from Drakes.
- Another Sanctuary (Levels 52–62): Superior consistency. Ideal for 4-player organized groups with dedicated Cleric support to negate potion drainage.
Class Architecture & Map Compatibility Matrix
| Class Archetype | Optimal Map Geometry | Primary Maps | Invalidation Triggers |
|---|---|---|---|
| Warriors (Fighter/Page/Spearman) | Flat, long ground lanes with slow mobs | Pig Beach, Wild Boar, Drakes | Multi-tier ladder climbing |
| Thieves (Assassin) | Tiered steps within minimum-throwing range | Subway Line 1, Burnt Land II | Cramped pits forcing close melee |
| Thieves (Bandit) | Dense, flat mob packs for Savage Blow | Ant Tunnel, Evil Eyes | Sparse platforms requiring ranged pulls |
| Archers (Hunter/Crossbowman) | Wide open horizontal lines of sight | Construction Site, Golems | Narrow ledges with steep vertical drops |
| Wizards (Fire/Poison) | Linear lanes with fire-weak/poisonable targets | Jr. Wraiths, Valley of Death | High Magic DEF or mixed-element maps |
| Wizards (Ice/Lightning) | High-density mob groups susceptible to Freeze | Evil Eyes, Dangerous Valley I | Fast mobile mobs resistant to Ice |
| Clerics | Pure Undead maps with flat grouping | Ant Tunnel, Wraiths, Sanctuary | Non-undead high-damage maps |
FAQ (Frequently Asked Questions)
What is the fastest level 1–70 route in MapleStory Classic World?
The absolute fastest path is Southern Forest I (8–15), Pig Beach (15–22), Ant Tunnel I (22–35), Burnt Land II (30–40), Subway Wraiths or Golem's Temple (40–55), and Another Sanctuary (55–70). Always verify that each monster dies within 2 to 3 hits to keep speed optimal.
When should I move from Ant Tunnel to Wild Boars or Fire Boars?
Move only when your primary attacking skill reliably 2-shots Wild Boars (around level 28–30 for high-STR/DEX builds). If you take 4 hits per boar, Ant Tunnel's density yields significantly higher EXP per minute at near-zero potion cost.
Is the Kerning Party Quest (KPQ) better than map grinding?
KPQ is worth running from levels 21 to 30 for the reward scrolls (such as 10% and 60% Overall DEF/DEX scrolls) and Squishy Shoes, but Ant Tunnel I consistently wins on raw, uninterrupted EXP per hour. Run KPQ for early wealth, then grind Ant Tunnel for pure leveling speed.
How do I combat high potion costs as a Warrior or Bandit?
Train on monsters 2 to 5 levels below you to minimize contact damage and eliminate accuracy-penalty misses. Anchor maps with high-value secondary drops (such as Dark Axe Stumps for Wooden Tops or Evil Eyes for equipment) to subsidize your White and Blue Potion consumption.
Can I grind level 60 to 70 solo without losing money?
Yes, by remaining at Entrance to Golem's Temple or Subway Wraiths rather than pushing into Dangerous Valley II or Deep Sleepywood. Golems and Wraiths drop high-demand equipment, scrolls, and throwing stars while dealing manageable damage that won't liquidate your meso reserves.

I’m Emily Zhang, an American Research Writer at GGWTB covering Korean MMORPGs and games based on classic franchises. My guides focus on class choices, leveling routes, and long-term character progression. I look at what a class needs beyond its starter skills—and which upgrades are worth your materials before the next gear tier arrives.

Most Popular Posts
- MapleStory Classic World CBT2: The No-BS Guide to 3rd Job, Orbis, and Class Reworks
- MapleStory Classic World Early Best Maps, PQ, and Party Spot): The No-BS 1-30 Leveling Guide
- Maplestory Classic Closed Beta #2: 3rd Job Skills, Class Reworks & What to Test First
- MapleStory Classic Early Leveling Guide: Best Maps, Fastest Route, Real Player Tips
- MapleStory Classic World Release Date Guide: Launch Date, Founder Access
- MapleStory Classic World Priest Guide: Skills, Nerfs and Holy Arrow build
Popular Category Lists
- ARC Raiders / (348)
- Grow a Garden / (293)
- CoD: Black Ops 7 / (167)
- Star Citizen / (161)
- MLB 26 / (159)
- Monopoly Go / (152)
- ARK Survival Ascended / (127)
- Steal a Brainrot / (99)
- Blox Fruits / (74)
- Adopt Me / (73)
- Forza Horizon 6 / (72)
- Sailor Piece / (68)
- Grow a Garden 2 / (68)
- Diablo IV / (62)
- CoD: BLACK OPS 6 / (55)
- Path of Exile 2 / (48)
- Aion 2 / (47)
- Monster Hunter Wilds / (46)
- Windrose / (44)
- Donut SMP / (41)