



 0
0GGWTB Editorial Team - Tischler
Created: Aug 22,2026 | ARK Survival Ascended

GGWTB Editorial Team - Tischler
Genesis punishes lazy base placement. Mission zones block enemy foundations. Volcanoes erupt on anyone standing outside. A huge cave with a wide-open entrance is worthless — a cramped hole that requires a puzzle to enter can hold for weeks.
Here are the 10 spots that actually work, plus which ones will get your base wiped by admins instead of enemies.
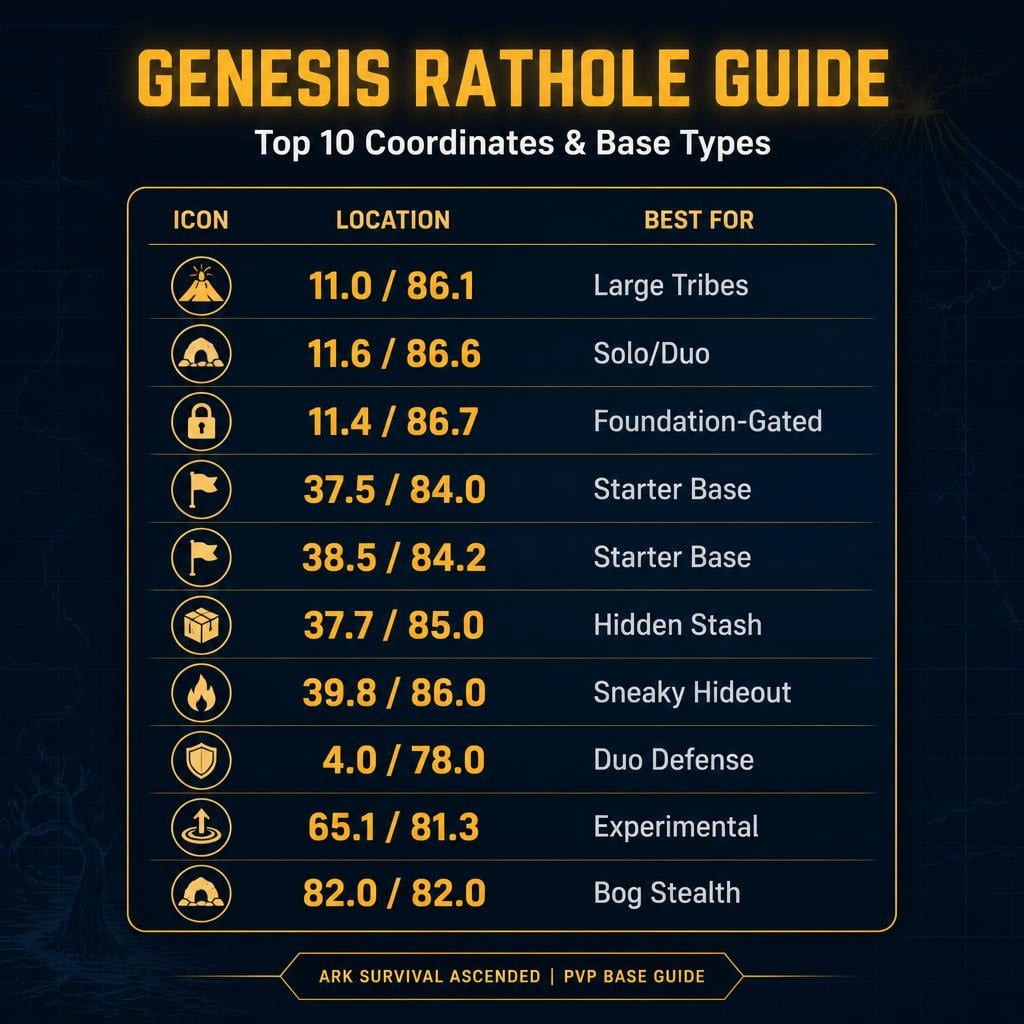
| # | Coords | Area | Best For | Risk |
|---|---|---|---|---|
| 1 | 11.0 / 86.1 | Volcano ceiling | Large tribes | Likely bannable |
| 2 | 11.6 / 86.6 | Inside volcano | Solo/duo | Eruption damage |
| 3 | 11.4 / 86.7 | Inside volcano | Solo/duo | Tight space |
| 4 | 37.5 / 84.0 | Starter volcano | New wipes | Big entrance |
| 5 | 38.5 / 84.2 | Opposite starter | New wipes | Weak long-term |
| 6 | 37.7 / 85.0 | Volcano niche | Loot stash | Almost no room |
| 7 | 39.8 / 86.0 | Fake lava | Sneaky solo | Blows if scouted |
| 8 | 4.0 / 78.0 | Small niche | Duo | Cramped |
| 9 | 65.1 / 81.3 | Border bog | Meme base | Almost certainly bannable |
| 10 | 82.0 / 82.0 | Bog ceiling | Stealth solo | Limited expansion |
Rule of thumb: on Genesis, an awkward entrance beats a big one. If enemies can't foundation-spam your doorway, you've already won half the fight.
The strongest rathole on the map. Mission zone coverage stops attackers from placing foundations near the entrance, so they can't build an FOB right on top of you.
Space: big enough for storage, crafting, turrets, maybe breeding.
Catch: many servers flag mission-zone bases as exploits. Ask admins before you move loot in.
| Category | Score |
|---|---|
| Space | 9/10 |
| Defense | 9/10 |
| Legality | 3/10 |
| Tribe use | 9/10 |
If your server bans mesh/mission-zone builds, skip this one entirely.
Compact hidden chamber. Floor below sits in the mission zone, so attackers struggle to support foundations underneath you.
Good for: smithy, fabricator, storage, backup base.
Bad for: breeding. Eruptions kill anything caught outside — even a safe interior won't save exposed tames.
Keep it vertical. Every foundation counts here.
Entry only works if you place a foundation in the exact right spot. No foundation, no way in — for attackers too.
This is access control through building mechanics, not turrets. Raiders who don't know the trick burn hours figuring it out while your turrets chew through them.
Before committing your loot: test whether enemies can also place that foundation on your server settings. If they can, the spot loses its edge.
Day-one base, not a fortress. Multi-level foundation space, decent for early metal runs and first turrets.
Weakness: entrance is wide enough for players and Bloodstalkers to push through easily.
Use it, farm it, then leave before it becomes common knowledge.
Same deal as Spot 4, mirrored location. Pick whichever one is free — or whichever is less scouted on your server.
Not a long-term hold. Move once you've got turrets and metal gear.
Tiny wall pocket. Not a base — a stash. Fits a smithy, mortar and pestle, a bed, some boxes.
Strategy: stay invisible, not strong. A stash nobody finds beats a base everyone raids.
Move immediately if you spot foot traffic nearby.
Lava visuals, no actual damage in this pocket. Most players won't check behind deadly lava — that's the whole defense.
Small interior. Essentials and storage only.
Don't leave dropped bags, tames, or visible structures outside. The second someone notices activity, the illusion is gone.
Cramped but defensible — a handful of turrets covers the whole approach.
Good for solo/duo. Once crafting stations start spilling outside the walls, you've outgrown the spot. Move on.
Foundation + teleporter, accessed only via another teleporter. Clever, and almost guaranteed to be classified as exploitative on active-admin servers.
Fun factor: high. Loot-safety factor: low.
Test on unofficial/private servers only. Don't store anything you'd cry over losing to a rule enforcement wipe.
Multiple small ceiling holes instead of one perfect spot — if one's taken, grab another nearby.
Bog terrain is cluttered and annoying to scout, so players rush through instead of checking every gap overhead.
Build priority: concealment first, defense second. No exposed lights, no exposed cables.
| Player Type | Recommended Spots |
|---|---|
| Solo | 2, 3, 6, 7, 8, 10 |
| Duo | 2, 3, 8, 10 |
| Small tribe | 1, 4, 5, 10 |
| Early wipe | 4, 5, 6, 7 |
| Unofficial servers | 1, 3, 9 |
| Rule-safe play | 4, 5, 6, 8, 10 |
Test these before moving your main loot in:
Skip this and you'll find out the hard way — usually after your loot's already trapped or your base is reported.
Keep the footprint tight. Pipes, cables, turrets, or tames sticking outside turn a hidden rathole into a giant raid me sign.
Layer your storage. Spread loot across multiple boxes instead of one vault. Tribes that survive raids fastest are the ones with backup stashes already in place.
Don't breed in tight ratholes. Most of these spots aren't built for it — you'll get clutter, blocked movement, and dead babies from eruption damage.
11.0 / 86.1 — biggest space, best mission-zone protection. Confirm your server allows it before moving in.
37.5 / 84.0 or 38.5 / 84.2. Not fortress-tier, but reliable for early farming and crafting.
11.4 / 86.7 — foundation-gated entry keeps casual raiders out, if your server permits it.
No. Tight space plus eruption damage makes breeding a bad bet. Stick to crafting and storage.
Only on lenient private/unofficial servers. On anything with active admins, it's a liability, not a base.
Genesis rewards awkward over big. Mission zones block FOBs, volcanoes punish exposed raiders, and a gated entrance beats a wide cave every time.
Start small in a starter rathole (37–39 / 84–86). Move up to a volcano rathole (11 / 86) once you've got turrets. Go stealth in the bog ceilings (82 / 82) if hiding beats fighting.
Test legality first. Keep your footprint invisible. The base that survives isn't the biggest one — it's the one nobody can find, enter, or build against.

Prepare for the ARK Survival Ascended Enigmasaur launch on November 6, 2026. Master the form-matching taming loop, ability retention rules, and cryo-prep strategy.
Learn the reported Magmasaur cryopod breeding trick, fix common failures, and check compatibility before moving breeders. Start with one eligible pair.
Compare Therizino and Mantis farming setups, avoid misleading yield claims, and measure Element per minute before spending resources on a replacement.
Follow Gargantar's taming cycle, prepare exact feeding sources, and troubleshoot swallowing, gear demands, and keratin rounds before risking valuable equipment.
Separate verified ARK patch mechanics from speculative leaks. Real data on the Therizinosaurus jump, Giga TLC status, and breeding baseline survival prep.
Check which DLC unlocks Cerberax and Gargantar, then follow the taming sequence for each. Includes prep checklists, failure points and a quick-reference table.

We use cookies to ensure website functionality and enhance your experience. Click "Accept All" to consent, or "Customize" to manage your preferences. See our Privacy Policy.