0
0 Created: Jul 28,2026 | COD: Black Ops 2
Black Ops 2 Zombies Easter Egg Guide: Beat Every BO2 Quest in One Brutal Sitting

Two-hit downs. No perks after power-off. Four-player requirements that fall apart when one guy dies out. BO2 doesn't make Easter Eggs hard — it makes them fragile.
This is the route we actually use to clear all five quests in one sitting, based on runs where we've eaten every possible bug: bad EMP timing on TranZit, elevator deaths on Die Rise, sharpshooter chaos on Buried, solo robot RNG on Origins. No fluff. Just what works.
- Best Order to Run All 5 BO2 Easter Eggs
- Before You Start
- TranZit Maxis Easter Egg
- Die Rise Maxis Easter Egg
- Buried Maxis Easter Egg
- Mob of the Dead Easter Egg
- Origins Easter Egg
- Marathon Time Expectations
- Common Mistakes & Fixes
- Practical Tips for a Clean One-Sitting Run
- FAQ
- How many players do I need for all BO2 Easter Eggs?
- Which maps make up the BO2 Super Easter Egg?
- Why does the TranZit Avogadro step keep failing?
- What's the hardest step in the whole marathon?
- How long does the full marathon take?
- Summary
Best Order to Run All 5 BO2 Easter Eggs
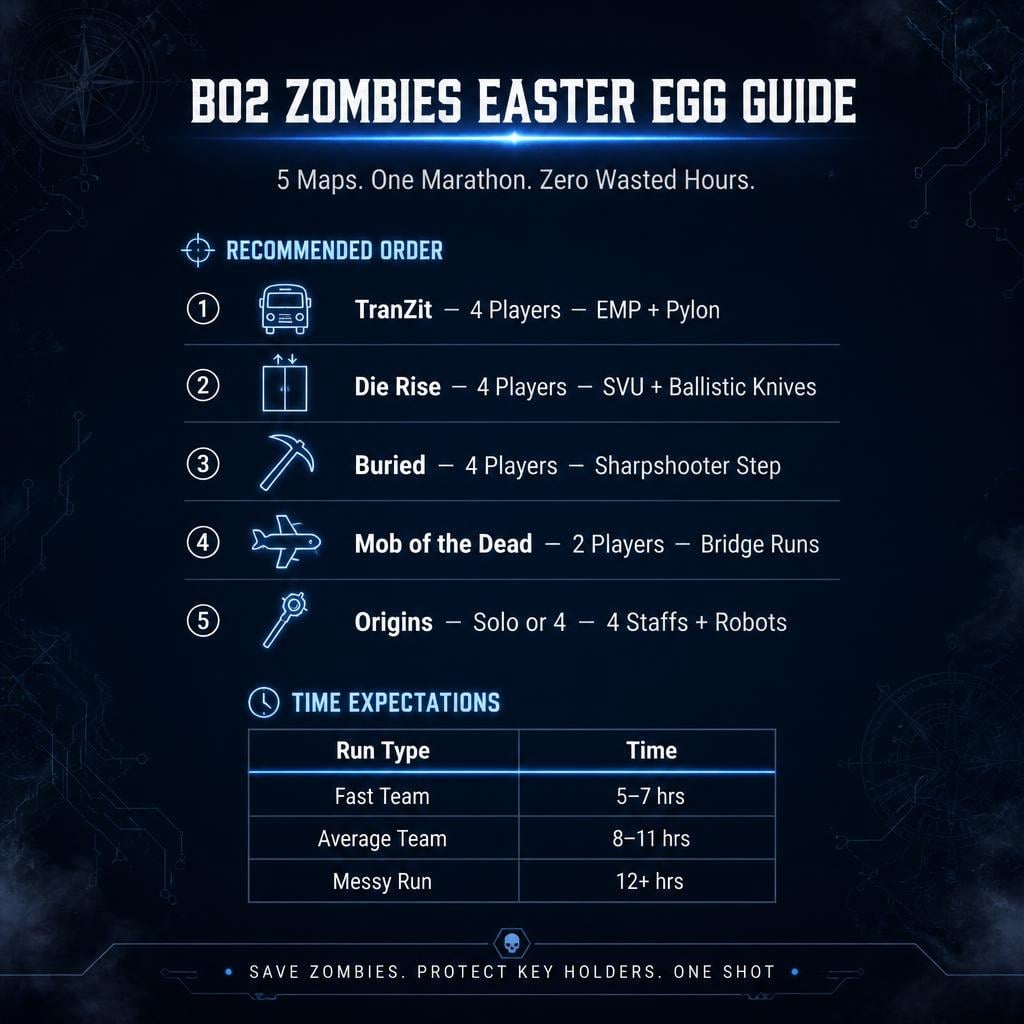
Route matters. Some maps need 4 players locked in, some tolerate solo. Don't save the hard ones for when your squad is fried.
| Order | Map | Min Players | Why Here |
|---|---|---|---|
| 1 | TranZit | 4 | Needs coordination + EMPs — do it fresh |
| 2 | Die Rise | 4 | Short, but bugs kill momentum |
| 3 | Buried | 4 | Final Super EE map, sharpshooter needs focus |
| 4 | Mob of the Dead | 2 | Only needs 2, but 4 speeds it up |
| 5 | Origins | 1–4 | Longest, most demanding — solo possible but exhausting |
TranZit, Die Rise, and Buried are the Super Easter Egg path. Complete all three on the same side — Maxis or Richtofen. Mixing sides kills the Super EE payoff. This guide runs Maxis throughout.
Before You Start
- 4 committed players for TranZit/Die Rise/Buried — don't start short-handed.
- Voice comms mandatory. Multiple steps need simultaneous action.
- Expect 8–12 hours. Plan around it.
- Save zombies during setup steps. Ending rounds accidentally makes the map harder while your progress stays flat.
- Most failed runs aren't combat deaths. They're bad coordination and box RNG.
TranZit Maxis Easter Egg
The map is the real boss — fog, lava, Denizens, zero perks once power's off.
Steps:
1. Turn power on, then off after Maxis speaks.
2. Get EMP grenades from the box (get 2 if possible).
3. Lure the Avogadro directly under the pylon — not near it.
4. EMP him only when he's fully under the tower.
5. Place 2 turbines under active streetlights.
The #1 failure point: throwing the EMP too early. If the Avogadro is close enough, it's not close enough. Wait.
| Situation | Action |
|---|---|
| Avogadro approaching pylon | Wait |
| Beside the tower | Wait |
| Directly underneath | Throw |
| Anyone unsure | Don't throw |
Protect your EMP holder like they're carrying the run — because they are. Lose both EMP holders and you're back at the box.
Die Rise Maxis Easter Egg
Faster than TranZit, but elevators and vertical confusion cause dumb deaths.
Steps:
1. Hit elevator symbols in sequence (4 players, call locations clearly — AK74u symbol, not mine).
2. Buy the SVU-AS, shoot the dragon balls.
3. Get + Pack-a-Punch Ballistic Knives, complete the Buddha Room kill.
4. Place Trample Steams to launch the balls.
5. Solve the Mahjong tile step.
Critical bug: if the Ballistic Knife step won't trigger, check whether that player fully died out earlier. This single check saves 20–30 minutes of confused restarts.
For the Mahjong step: assign one reader, everyone else stays quiet. Chaos here is 100% avoidable.
Buried Maxis Easter Egg
The Super EE finale, and the most coordination-heavy of the three.
Steps:
1. Build the Gallows (Maxis, not Guillotine).
2. Get Paralyzer + Time Bomb.
3. Build the Navcard Table.
4. Grenade the lantern, then charge it.
5. Complete the orb escort — train big zombie groups, don't force a weak orb forward.
6. Solve the bell step (one caller, everyone else responds only when called).
7. Complete the sharpshooter step — all 4 players hit targets in a time limit.
8. Hit the final button.
Sharpshooter step is where runs die. Assign zones beforehand. Use accurate, fast-firing weapons — skip slow reloads. If someone keeps missing, reassign their zone before you blame their aim. A different angle usually fixes it instantly.
| Problem | Fix |
|---|---|
| Orb fizzles out | Train bigger hordes first |
| Bell step messy | One caller, no guessing |
| Sharpshooter fails | Reassign zones, don't rage |
Mob of the Dead Easter Egg
Only needs 2 players. Doesn't tie into the Victis Super EE, but it's iconic.
Flow:
1. Build the plane, fly to the Golden Gate Bridge (repeat trips).
2. Feed the 3 hellhounds, get the Hell's Retriever.
3. Poster + spoon sequence, use Afterlife.
4. Enter codes in the Citadel Tunnels.
5. All players enter Afterlife, board plane, final Weasel fight.
Not hard — just repetitive. Bored players get careless during bridge trips. Keep one zombie alive, stop flipping rounds for no reason.
Origins Easter Egg
The longest, most demanding BO2 quest. Solo is possible but brutal.
Core tasks:
- Build + upgrade all 4 staffs (Fire, Ice, Wind, Lightning).
- Place staffs in the correct robots.
- Hit the red button + G-Strike throw on the seal.
- Survive the Panzer horde.
- Shoot down the plane, use Zombie Blood for the invisible zombie.
- Complete the melee step.
- Place staffs in the Crazy Place, get the kill requirement, release Samantha.
Benchmark to hit: first staff built by round 8, before the first Panzer. Fall behind this and Panzers get dangerous fast.
Staff placement:
| Staff | Robot |
|---|---|
| Wind | Middle |
| Lightning | Thor |
| Ice | Freya |
| Fire | Excavation Site pedestal |
G-Strike step is the hardest solo moment. Timing is tight, robot spawns feel random. Practice your throw angle before pressing the button — rush the movement, not the aim.
Marathon Time Expectations
| Map | Fast | Average | Messy |
|---|---|---|---|
| TranZit | 25–40 min | 45–75 min | 2+ hrs |
| Die Rise | 35–60 min | 60–90 min | 2+ hrs |
| Buried | 60–90 min | 90–150 min | 3+ hrs |
| Mob of the Dead | 45–75 min | 75–120 min | 2+ hrs |
| Origins | 90–150 min | 2.5–4 hrs | 5+ hrs |
| Full Marathon | 5–7 hrs | 8–11 hrs | 12+ hrs |
The biggest time-killer isn't skill. It's reset prevention.
Common Mistakes & Fixes
| Mistake | Map | Fix |
|---|---|---|
| EMP thrown too early | TranZit | Wait for full pylon coverage |
| EMP holder dies | TranZit | Protect them at all costs |
| Elevator death | Die Rise | Avoid risky timing |
| Wrong Ballistic Knife holder | Die Rise | Use a player who hasn't died out |
| Orb loses charge | Buried | Train bigger hordes |
| Bad sharpshooter zones | Buried | Assign before starting |
| Rushed plane trips | Mob | Keep one zombie, move together |
| No staff by round 8 | Origins | Prioritize staff parts early |
| Missed G-Strike | Origins | Practice angle first |
| Flipping rounds constantly | All | Save a zombie during setup |
Practical Tips for a Clean One-Sitting Run
- One shot caller per map. Controls pacing so nobody talks over each other during timed steps.
- Save zombies aggressively. Biggest time-saver in the whole guide.
- Protect key holders: EMP (TranZit), Ballistic Knife (Die Rise), Time Bomb/Paralyzer (Buried), code-enterer (Mob), staff/G-Strike player (Origins). If they go down, revive them first.
- 5-minute breaks between maps. Check next steps, reset focus, refill water.
- This is a marathon, not a speedrun. Take the safe route. Use the strong weapon. Don't get cute.
FAQ
How many players do I need for all BO2 Easter Eggs?
4 players for TranZit, Die Rise, and Buried. 2 players minimum for Mob of the Dead. Origins can be solo.
Which maps make up the BO2 Super Easter Egg?
TranZit, Die Rise, and Buried — completed on the same side (Maxis or Richtofen) consistently.
Why does the TranZit Avogadro step keep failing?
The Avogadro wasn't directly under the pylon when you threw the EMP. Beside the tower doesn't count.
What's the hardest step in the whole marathon?
Buried's sharpshooter step. All 4 players must hit targets in a tight time window — bad zone assignments cause most failures.
How long does the full marathon take?
5–7 hours for a rehearsed team, 8–11 hours average, 12+ hours if things go messy.
Summary
Clearing every BO2 Zombies Easter Egg in one sitting comes down to discipline, not aim. Run TranZit → Die Rise → Buried first for the Super EE, then Mob of the Dead, then close with Origins.
Save zombies. Protect your key item holders. One shot caller per map. Never trust TranZit to behave. That map has hands.

Most Popular Posts
- Black Ops 2 Zombies Easter Egg Guide: Beat Every BO2 Quest in One Brutal Sitting
- Black Ops 2 Zombies Perma Perks: Unlocking and Keeping Every Persistent Upgrade
- Black Ops 2 Best PS5 Controller Settings: Low Input Delay, Better Aim, Smoother Gameplay
- Black Ops 2 Diamond Snipers Guide: Fast Camo Grind, Best Classes, Perks, Maps, and FFA Tips
- Black Ops 2 Leveling Fast Guides: Best Modes, Weapons, Scorestreaks, and Hidden XP Sources
- Black Ops 2 AN-94 Class Setup: Best Attachments, Perks, and Hardpoint Strategy
Popular Category Lists
- ARC Raiders / (351)
- Grow a Garden / (294)
- CoD: Black Ops 7 / (167)
- Star Citizen / (162)
- MLB 26 / (159)
- Monopoly Go / (152)
- ARK Survival Ascended / (128)
- Steal a Brainrot / (99)
- Blox Fruits / (74)
- Adopt Me / (74)
- Forza Horizon 6 / (72)
- Sailor Piece / (68)
- Grow a Garden 2 / (68)
- Diablo IV / (62)
- CoD: BLACK OPS 6 / (55)
- Aion 2 / (50)
- Path of Exile 2 / (48)
- Monster Hunter Wilds / (46)
- Windrose / (44)
- Donut SMP / (41)