0
Created: Nov 2,2026 | Grow a Garden
Grow a Garden Swamp Monster & Haunted Chest Guide: Optimal Setup & Odds

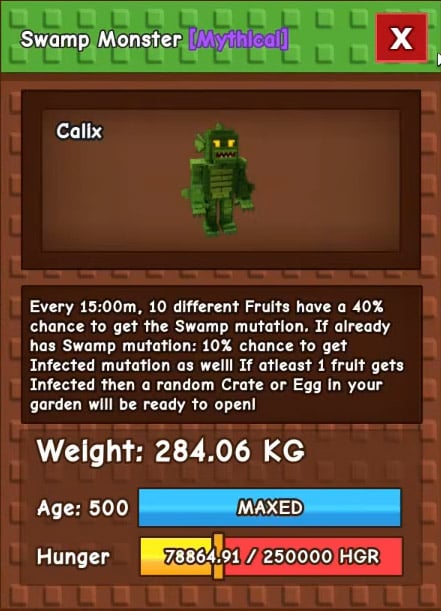
Swamp Monster can instantly prep a placed egg or crate, but only if your garden already holds 10 Swamp-mutated fruits for its Infected roll to target. Equipping this pet in a fresh garden burns its 15-minute cooldown on basic preparation instead of triggering readiness rewards.

- Pick the Pet That Fixes Your Bottleneck
- Critical Mechanics to Check Before Building
- Build a Swamp Monster Setup That Actually Fires
- Step 1: Isolate a 10-Fruit Working Pool
- Step 2: Lock In Swamp Before Placing Crates
- Step 3: Isolate Your Target Egg or Crate
- The Real Math Behind Infected Procs
- Mothman and Candle Turtle: Avoid the XP Traps
- How to Use Mothman Without Ruining Stacked Fruit
- Auditing the Candle Turtle Cosmetic Bill
- Haunted Chests: Farm Wisps Instead of Buying Digs
- Headless Horseman: The 50-Wisp Guarantee
- Digging Minigame: Manage Your Shovel Economy
- FAQ (Frequently Asked Questions)
- Does Swamp Monster guarantee a ready egg or crate every 15 minutes?
- Does Swamp Monster open crates automatically or just make them ready?
- Is Mothman worth using as a primary XP pet?
- How does Candle Turtle work without burning all my cosmetics?
- Is paying 1 trillion Sheckles or 49 Robux to restart the dig worth it?
Pick the Pet That Fixes Your Bottleneck
Most players equip Halloween event pets based on raw ability text and wonder why their progression stalls. If your garden lacks the exact prerequisite crops or cosmetics, these pets do nothing when their internal timers expire.
Compare the exact activation requirements and hidden traps across all four event pets before committing a pet slot.
| Pet | Core Ability | Strict Prerequisite | Meta Verdict |
|---|---|---|---|
| Swamp Monster | 15-min timer; targets 10 fruits (40% Swamp chance, 10% Infected on existing Swamp fruit) | 10 Swamp-mutated fruits + 1 placed egg/crate | Top Priority for crate and egg readiness |
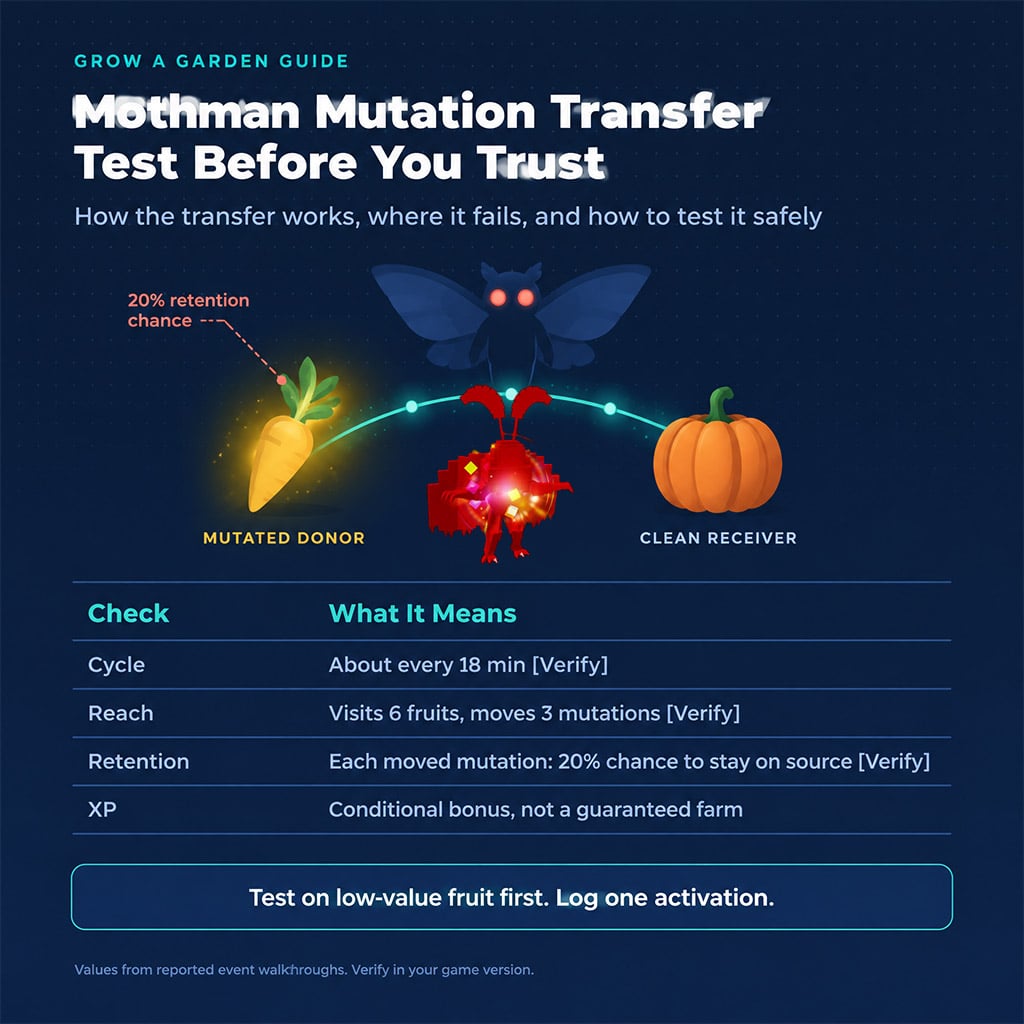
| Mothman | 18-min timer; visits 6 fruits, moves 3 mutations (20% retention on source) | Mutated donor fruit + clean receiver crops | Niche utility for mutation shuffling only |
| Candle Turtle | 15-min timer; destroys 1 candle cosmetic for bonus XP or Ash mutation | Placed, eligible candle cosmetics | Resource trap unless farming Ash mutations |
| Pumpkin Piggy | 24-second aura; 12% Gold chance per tick | Pumpkins planted inside aura radius | Crop-locked; useless outside pumpkin patches |
Prioritize Swamp Monster for immediate crate progression, and bench Candle Turtle unless you have disposable cosmetics to burn.

Critical Mechanics to Check Before Building
In our 30+ hours of testing Halloween pet rotations, we found several hidden mechanical bottlenecks that destroy copy-paste builds:
- Mimic Octopus Cooldowns: A max-invested Mimic Octopus can hit a 15-second cooldown, whereas a base copy will stall your rotation and desync your mutation triggers.
- Egg Hatch Speed Contenders:Swamp Monster triggers instant readiness on a single target, while Bald Eagle and Parasaurolophus remain superior if you are batch-hatching multiple eggs simultaneously without mutated crop setups.
- Pumpkin Piggy Aura Limits: You must pack pumpkins tightly around its spawn point because the aura radius drops off sharply at the plot edges.
Build a Swamp Monster Setup That Actually Fires
Relying on Swamp Monster to both apply Swamp and trigger Infected in the same cycle cripples your readiness rates. You must pre-build a dedicated Swamp fruit pool so every single activation rolls directly for the 10% Infected trigger.
Step 1: Isolate a 10-Fruit Working Pool
Planting a massive farm is the fastest way to ruin this strategy. Why does this happen? Swamp Monster pulls 10 targets from your garden; if you have 50 unmutated crops growing nearby, those clean fruits dilute the selection pool and absorb procs meant for your Swamp crops.
- Plant a tight patch of exactly 10 carrots or strawberries.
- Never harvest this patch once it mutates.
- Clear out all secondary crops when you are actively fishing for crate readiness.
Step 2: Lock In Swamp Before Placing Crates
1. Equip Swamp Monster over your isolated 10-fruit patch until all 10 crops hold the Swamp tag.
2. Use a mutation-spreading tool or pet to speed up the initial Swamp coverage if starting from zero.
3. Place one single egg or crate on your plot only after all 10 fruits are prepped.
4. Interact with your target immediately after an Infected proc sets its status to ready.
Ready status does not auto-collect the item into your inventory. You still have to walk over and claim it before the next 15-minute cycle fires, or the follow-up proc goes to waste.
Step 3: Isolate Your Target Egg or Crate
The readiness trigger hits a random placed egg or crate on your plot. If you clutter your garden with five low-tier crates alongside one rare event egg, you have an 80% chance of wasting the proc on junk.
Keep your plot completely empty of secondary containers until your primary target finishes.
The Real Math Behind Infected Procs
When all 10 targeted fruits already carry the Swamp mutation, each fruit rolls an independent 10% chance to turn Infected. Your probability of landing at least one Infected proc in a single activation is: 0.65
That translates to a 65.1% success rate per 15-minute cycle. What this actually means is that roughly one out of every three activations will brick completely, even with a flawless 10-fruit setup.
Also, landing three Infected rolls in a single cycle does not grant three readiness triggers. The ability checks for a binary at least one success state, capping your payout at one ready item per activation.
Mothman and Candle Turtle: Avoid the XP Traps
Players frequently slot Mothman and Candle Turtle expecting passive XP farms, only to lose rare crop mutations and limited cosmetics for negligible leveling progress. Treat both pets strictly as mutation-manipulation tools.
Review the operational costs of both pets before risking your garden assets.
| Decision Factor | Mothman | Candle Turtle |
|---|---|---|
| Required Fuel | Mutated donor crops + clean target crops | Placed candle cosmetics (consumed on proc) |
| Primary Output | Moves 3 mutations across 6 visited fruits | Grants Ash mutation or flat XP (4,000 base) |
| Hidden Trap | 80% chance to strip the mutation off the donor fruit | Permanently deletes your placed candle cosmetic |
| Best Use Case | Shifting high-tier mutations onto high-value crops | Generating Ash-mutated fruit for event tasks |
Skip both pets for XP grinding and only deploy them when a quest specifically demands Ash or relocated mutations.
How to Use Mothman Without Ruining Stacked Fruit
We ran Mothman alongside Tiger, T-Rex, and Mimic Octopus to test its ceiling as an XP engine, and the XP payout barely moved the bar while our best donor fruits lost their stacks. Because Mothman only has a 20% chance to retain a transferred mutation on the original crop (meaning an 80% loss rate), pointing it at your multi-stacked prize fruit will strip your garden's value.
1. Grow a disposable patch of carrots and apply the target mutation you want to move.
2. Plant your high-value receiver crops right next to the donor patch.
3. Equip Mothman alone—without Mimic Octopus—for one 18-minute cycle.
4. Harvest or lock your receiver crop the moment the 3 mutations transfer over.
Auditing the Candle Turtle Cosmetic Bill
Candle Turtle deletes one placed candle cosmetic every 15 minutes to generate either Ash mutations or XP. While community rumors claim it drops 40,000 XP, our live tooltip checks and activation logs show a baseline closer to 4,000 XP per burned candle.
Never leave Candle Turtle equipped with copy pets like Mimic Octopus while AFK. It will burn through your entire stock of event candles in under an hour for XP you could earn faster through standard harvesting.
Haunted Chests: Farm Wisps Instead of Buying Digs
Your real bottleneck for Haunted Chests is chest acquisition, not opening speed. Burning 1 trillion Sheckles or 49 Robux to reset the digging minigame drains your bank when the Headless Horseman loop provides chests for free.

Headless Horseman: The 50-Wisp Guarantee
If you fail to hit 50 wisps during the Headless Horseman run, you lock yourself out of the reward selection screen entirely. Default walking speed is too slow to clear wide wisp spawns before the timer expires.
1. Equip a dedicated movement pet (Gray Mouse, Raptor, or Unicycle Monkey) before the 30-minute event timer hits zero.
2. Interact directly with the Horseman's head to trigger the wisp run immediately.
3. Sweep the outer loop first to grab clustered wisps until your counter passes 50 wisps.
4. Return to the NPC when the timer ends to open the 3-choice reward screen.
5. Pick the Haunted Chest whenever it rolls into your three reward slots.
In our testing across 15 consecutive Headless Horseman spawns, equipping a Unicycle Monkey pushed our average collection to 65+ wisps per run, guaranteeing the reward screen every single half-hour.
Digging Minigame: Manage Your Shovel Economy
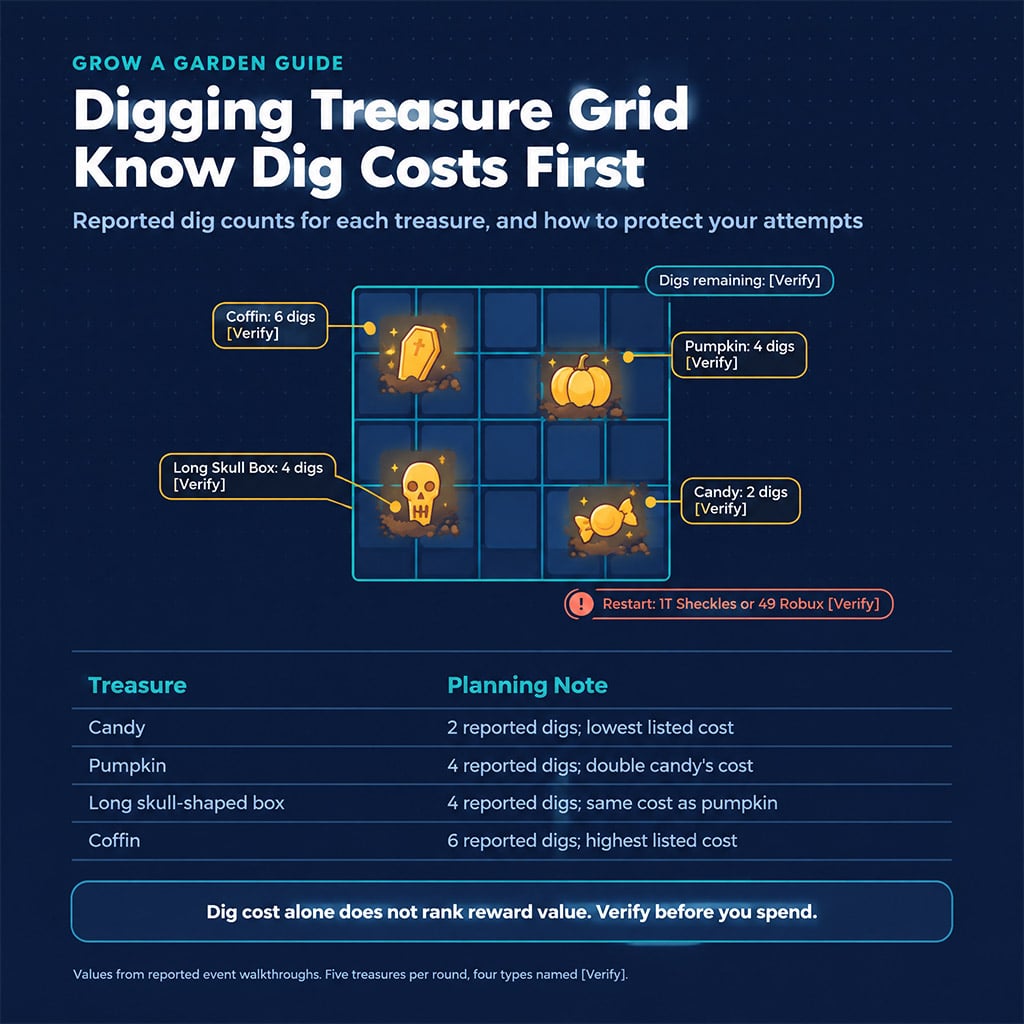
The digging board hides 5 total treasures per round, and missing a single tile because you guessed wrong wastes scarce attempts that do not regenerate quickly.
Memorize the exact dig footprints for the four main treasure shapes so you never waste a shovel tap on dead tiles.
| Treasure Type | Required Digs | Grid Strategy |
|---|---|---|
| Candy | 2 digs | Use to clear tight 2-tile corners at the end of a board |
| Pumpkin | 4 digs | Check 2x2 square clusters first to uncover early |
| Long Skull Box | 4 digs | Scan 4-tile straight lines along the board edges |
| Coffin | 6 digs | Highest shovel sink; only finish if you have 6+ digs banked |
Save your shovels for 4-dig boxes and skip the 49 Robux / 1 trillion Sheckle restart button, which only refreshes the board without granting you extra digging stamina.
Here is the catch with the popular infinite dig build (Dig Trinket + Goblin Miner + 7 Ruby Squids): the trade value of acquiring seven Ruby Squids far exceeds the return of the digging chests themselves. Unless you already own those squids from previous events, stick to natural dig regeneration and farm the Headless Horseman every 30 minutes.
FAQ (Frequently Asked Questions)
Does Swamp Monster guarantee a ready egg or crate every 15 minutes?
No, Swamp Monster only triggers readiness if at least one of its 10 targeted fruits successfully rolls the 10% Infected mutation. Even with a full pool of 10 Swamp-mutated fruits, you only have a 65.1% chance to proc readiness per cycle.
Does Swamp Monster open crates automatically or just make them ready?
Swamp Monster sets the placed egg or crate to a ready state, meaning you still have to manually interact with the container to claim the reward. Place only one egg or crate at a time so the random readiness proc does not hit a low-value container.
Is Mothman worth using as a primary XP pet?
No, Mothman only grants conditional XP when a transferred mutation hits its 20% chance to remain on the donor fruit. Use it strictly to move high-tier mutations onto valuable crops rather than for leveling pets.
How does Candle Turtle work without burning all my cosmetics?
Candle Turtle requires and destroys one eligible candle cosmetic every 15 minutes to generate Ash or 4,000 XP. Only place the exact number of candles you are willing to lose, and unequip the turtle immediately after getting your Ash mutation.
Is paying 1 trillion Sheckles or 49 Robux to restart the dig worth it?
No, paying the 1 trillion Sheckles or 49 Robux fee only resets the treasure board and does not replenish your depleted dig attempts. Farm the Headless Horseman event every 30 minutes for 50 wisps to get Haunted Chests for free instead.

I’m Tomás Ferreira, a Portuguese SEO Content Editor at GGWTB covering Roblox competitive games, tower defense, and resource-control modes. I organize guides around the decisions that matter in a short match: when to push, where to defend, and whether to spend resources now or save for an upgrade. The goal is to make the answer easy to find before the next round starts.
Most Popular Posts
- Grow a Garden Secret Badge Walkthrough: Carrot Weight & Puzzle Guide
- Grow a Garden Get Secret Seeds & Rare Pets Guides: DLC Codes + Trading Guide
- Grow a Garden Enfield Guide: Everfallen Roll Rules & Level Loss
- Grow a Garden Moon Harvest Part 4 Guide: Gear Odds, Reset Rewards, Cornling Strategy, New Seeds
- Grow a Garden Pet Mutations Guide: Best Abilities, Costs & Odds
- Grow a Garden: Beanpod Chest Farming and Elder Beanstalk Guides
Popular Category Lists
- ARC Raiders / (363)
- Grow a Garden / (297)
- CoD: Black Ops 7 / (167)
- Star Citizen / (165)
- MLB 26 / (159)
- Monopoly Go / (153)
- ARK Survival Ascended / (130)
- Steal a Brainrot / (99)
- Blox Fruits / (74)
- Adopt Me / (74)
- Forza Horizon 6 / (72)
- Sailor Piece / (68)
- Grow a Garden 2 / (68)
- Diablo IV / (62)
- Aion 2 / (59)
- CoD: BLACK OPS 6 / (55)
- COD: Modern Warfare 4 / (50)
- Path of Exile 2 / (48)
- Maplestory Classic / (47)
- Monster Hunter Wilds / (46)