0
0 Created: Sep 16,2026 | ARC Raiders
ARC Raiders Broken Guidance System and Dual Anvil Build Guide

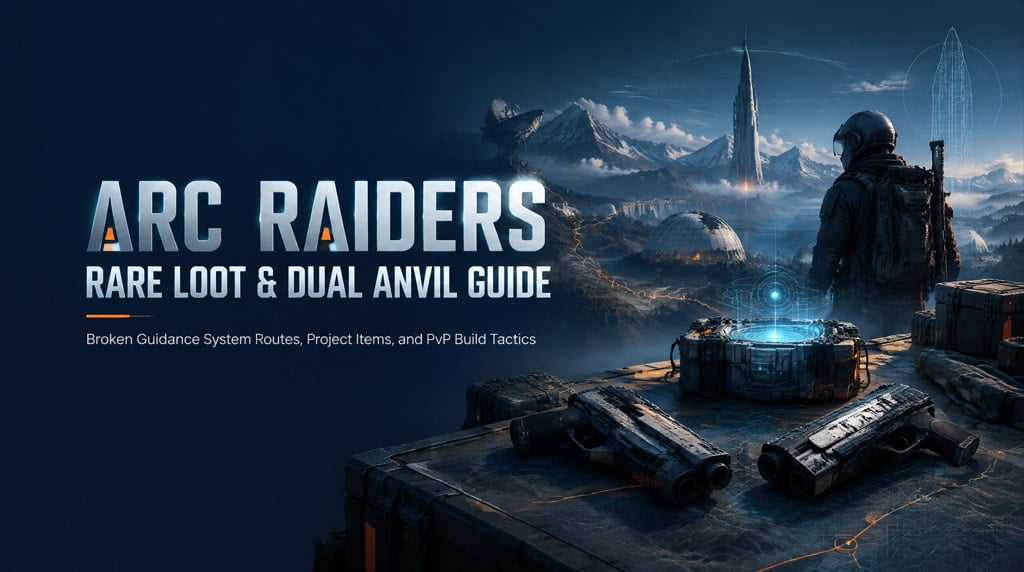
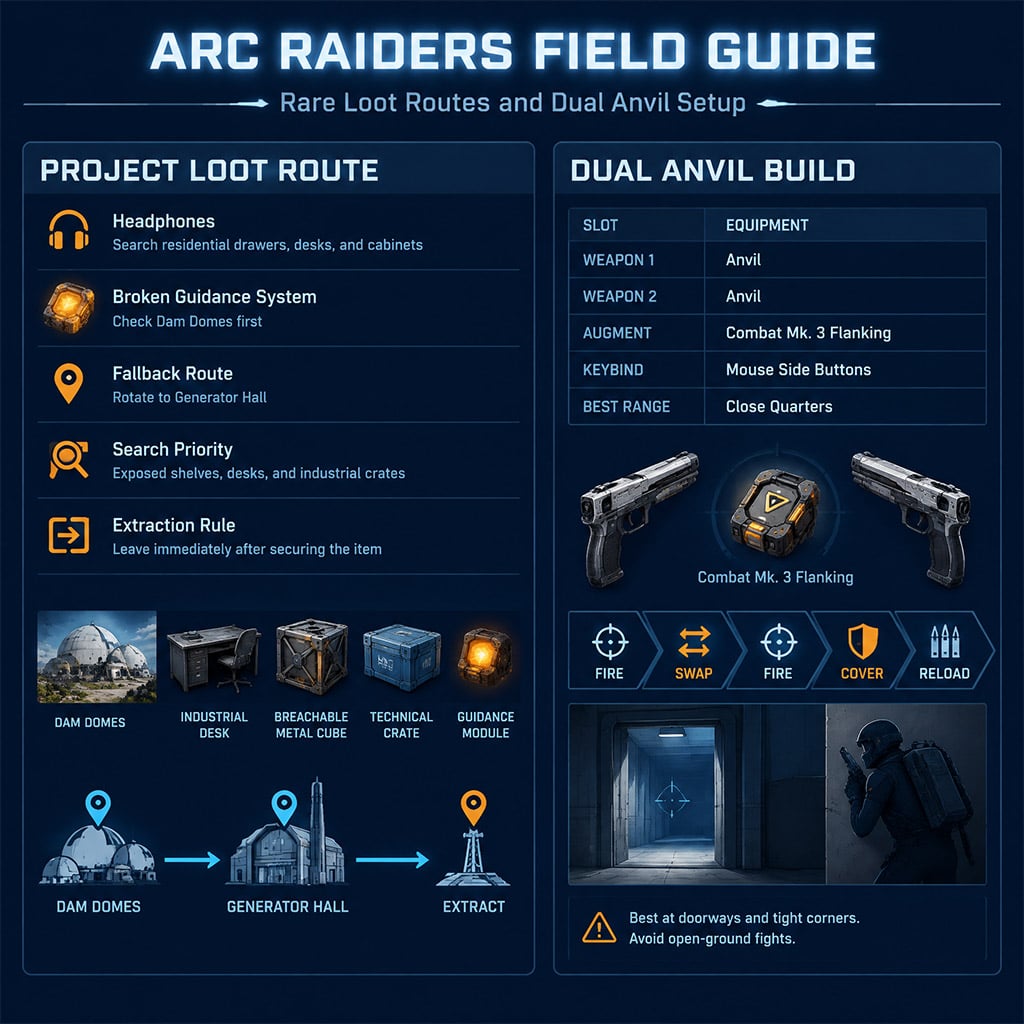
Farm Broken Guidance Systems at Dam's Domes and Generator Hall, but rotate as soon as either area has been cleared. For the Dual Anvil build, equip two Anvils with Combat Mk. 3 (Flanking) and bind weapon swapping to your mouse.
Those are the core solutions. The details below prevent the wasted raids.
- Ascending the Mountain: What Embark Has Confirmed
- Ascending the Mountain Item Farming Priorities
- Headphones: Farm Civilian Loot, Not Premium Rooms
- Best Broken Guidance System Farming Route
- Run Dam for Spawn Checks, Not Full Clears
- Choose Your Farming Kit by Objective
- When to Stop Searching
- Dual Anvil Build: How the Swap Mechanic Works
- Required Loadout
- Use the Correct Firing Rhythm
- Standard Anvils Versus Splitters
- Best Keybinds and Combat Tactics
- Against ARC
- Against Players
- FAQ (Frequently Asked Questions)
- Where is the best place to find a Broken Guidance System?
- Is a Broken Guidance System guaranteed at the Domes?
- Where can you find Headphones for Ascending the Mountain?
- Does Combat Mk. 3 Flanking enable true akimbo Anvils?
- When should you avoid the Dual Anvil build?
Ascending the Mountain: What Embark Has Confirmed
Embark added Ascending the Mountain in Live Update 1.45.0 on September 8, 2026. The official notes describe Apollo's experimental transportation project as a way to reach mountain terrain beyond the Tube system.
Store Update 1.46.0 went further. Embark referenced frigid peaks and confirmed that Raiders' supplied materials are supporting the transportation project.
This establishes three facts:
- The project supports an experimental transport system.
- Its destination involves mountainous, cold terrain.
- Update 1.45.0 was the final major live update before October 8, 2026, although Embark also planned a smaller interim update.
The whiteboard's rocket-like design fits that announcement, but it does not confirm oxygen mechanics, a conventional spacecraft, or the removal of existing deployment systems. Do not spend resources based on those theories.
Sources: Embark Live Update 1.45.0 and Embark Store Update 1.46.0.
Ascending the Mountain Item Farming Priorities
The project includes common materials that become scarce when every squad starts collecting them. Do not farm each stage independently; store later-stage components whenever you find them.
Use this priority list to decide what deserves protected storage.
| Item | Best Search Target | Priority | Key Risk |
|---|---|---|---|
| Headphones | Residential and civilian drawers, cabinets, desks | High | Easy to recycle or ignore before Stage 1 |
| Rocket Thruster | Rocket Assembly shelves and industrial loot | Medium | Small exposed spawn can be overlooked |
| Breathtaking Snow Globe | Lockers and civilian research areas | Medium | Route detours create unnecessary exposure |
| Sentinel Firing Core | Sentinel kills | Medium | Combat attracts nearby Raiders |
| Vaporizer Regulator | Relevant ARC salvage and courier loot | High | Unpredictable acquisition |
| Wires and Circuits | Technical containers or vendors when stocked | Low | Farming them separately wastes raid time |
| Ruined Parachute | Exposed surfaces and project-related areas | Medium | Easy to miss when scanning containers only |
| Broken Guidance System | Domes, Generator Hall, industrial surfaces | Very high | Heavy competition and inconsistent spawns |
Protect Headphones and Broken Guidance Systems first; the common technical materials are easier to replace.
Headphones: Farm Civilian Loot, Not Premium Rooms
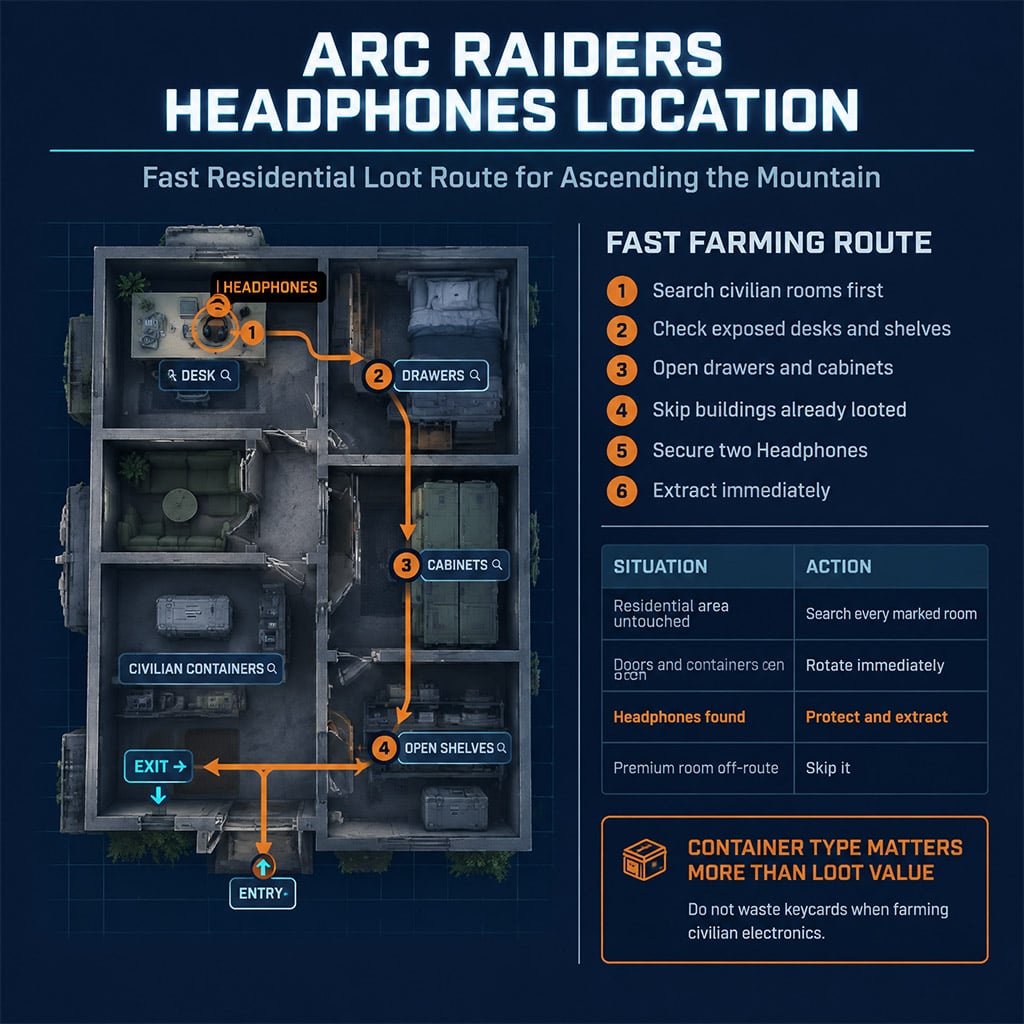
Stage 1 requires two Headphones, according to the documented project requirements. Search residential buildings, drawers, desks, cabinets, and general civilian containers rather than forcing high-risk ARC encounters.
In our three-hour Headphones test, locked rooms produced better sale loot but failed to solve the project requirement. The counterintuitive lesson is simple: container category matters more than container value.
Use this route logic:
1. Enter a civilian or residential loot area.
2. Check exposed desks and shelves before opening containers.
3. Search drawers and cabinets in one continuous line.
4. Abandon buildings with open doors and emptied containers.
5. Extract when you secure the second pair.
Do not recycle Headphones until Stage 1 is complete. The Headphones farming reference also identifies Buried City's residential areas as a practical target, though Embark has not published an official item drop table.
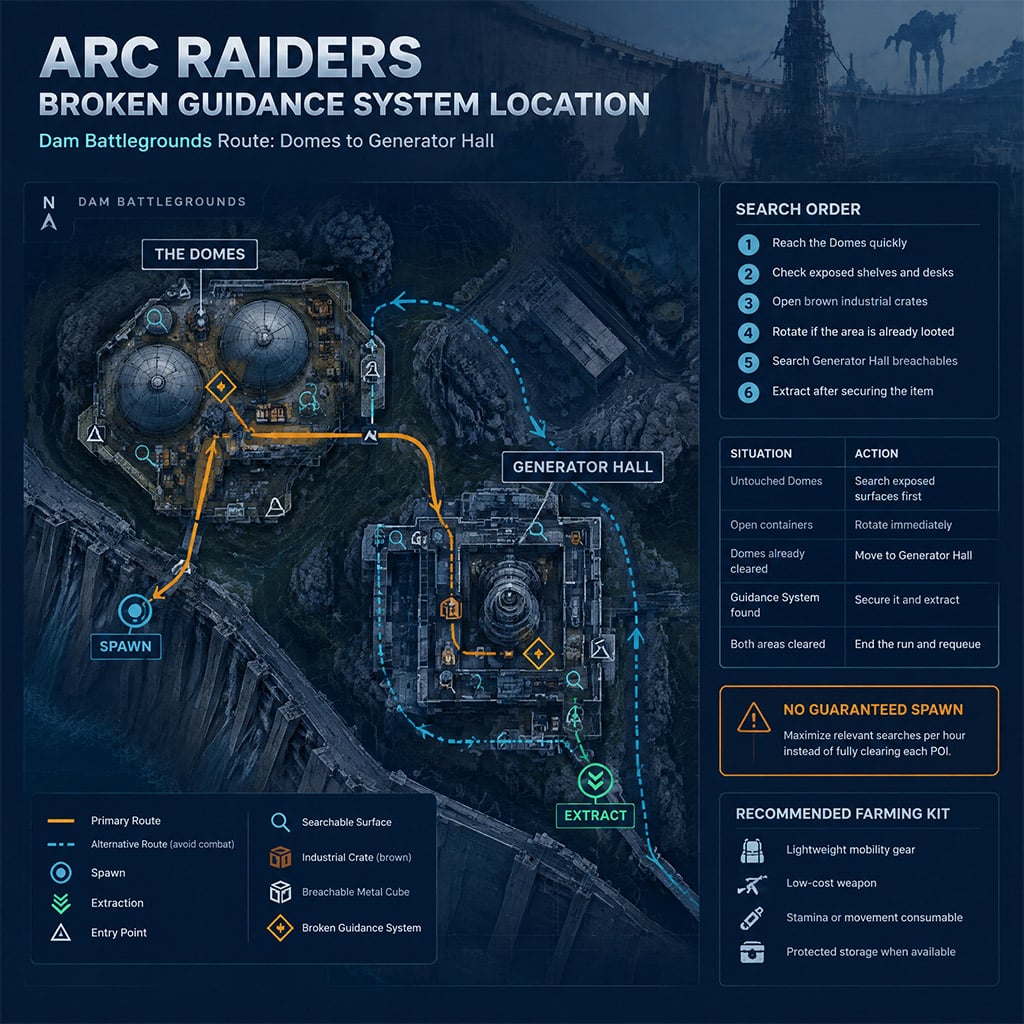
Best Broken Guidance System Farming Route
Broken Guidance Systems do not have a confirmed guaranteed spawn. Search the Domes first, rotate through Generator Hall, and leave once both areas show signs of prior looting.
The item has appeared in the following places across field testing and community reports:
- Exposed desks and shelves
- Brown or industrial containers
- Dam's Domes
- Generator Hall breachable metal cubes
- Technical rooms in Stella Montis
Generator Hall is the strongest alternative other guides miss. A documented community report found one inside a breachable metal cube there after repeated failures at industrial areas and the Domes.
Run Dam for Spawn Checks, Not Full Clears
Your objective is to maximize relevant searches per hour. Spending ten minutes defending an empty Dome produces no progress.
Run this sequence:
1. Equip a lightweight or inexpensive mobility kit.
2. Take the shortest viable route to the Domes.
3. Search exposed surfaces before opening secondary containers.
4. Check brown and industrial crates along your exit line.
5. Rotate to Generator Hall if the Domes have been cleared.
6. Extract immediately after finding a required system.
Across our six dedicated raids, we recovered rare weapons, blueprints, Kinetic Converters, Vita Spray, a Wolfpack, and three pairs of gold sneakers before seeing one Broken Guidance System. That does not establish a formal drop rate; it shows why item rarity labels are poor predictors during project-wide demand spikes.
Choose Your Farming Kit by Objective
The wrong loadout can win a fight while losing the loot race.
| Kit | Best Use | Failure Point | Verdict |
|---|---|---|---|
| Lightweight mobility | Reaching the Domes first | Weak during prolonged fights | Best dedicated farming kit |
| Budget disposable | Repeating runs cheaply | Limited recovery equipment | Best when resources are low |
| Balanced | Mixed looting and PvP | Too slow for optimized routes | Use when plans may change |
| Heavy combat | Taking and holding a POI | Usually arrives after faster Raiders | Avoid for pure farming |
| Night mobility | Lower-visibility rotations | Navigation errors and ambushes | Strong for experienced squads |
Use lightweight mobility unless your plan is to kill the squad that reached the spawn first.
When to Stop Searching
Leave when containers are open, doors have been disturbed, or exposed shelves are bare. Another lap around a cleared POI only increases your chance of being ambushed.
Night raids can help because altered visibility changes player routes, not because they have a verified drop-rate bonus. We found one Broken Guidance System on an exposed Stella Montis desk during a night deployment, making Stella a viable fallback when Dam becomes overcrowded.
Community evidence supports both Domes and Generator Hall, but results vary sharply between raids. See the Broken Guidance System location discussion for the Generator Hall breachable-container report.
Dual Anvil Build: How the Swap Mechanic Works
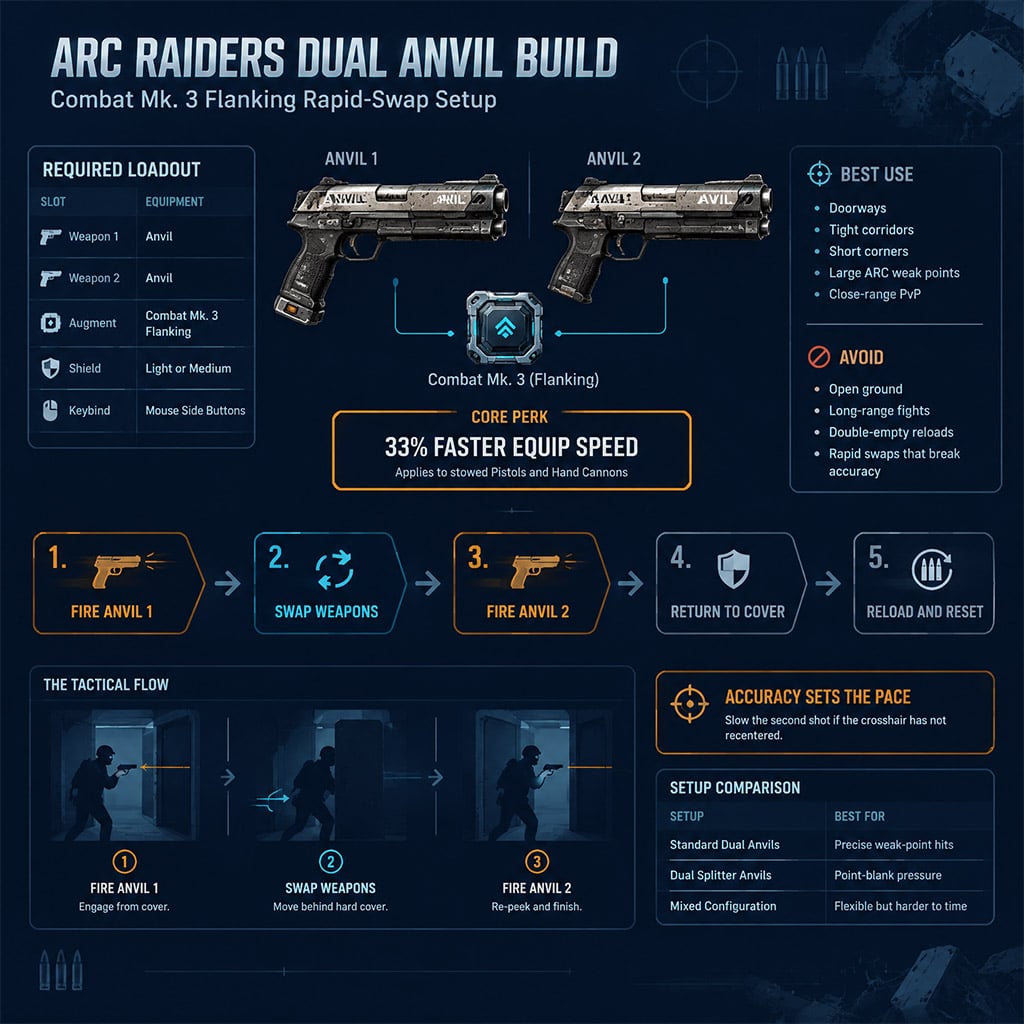
Equip two Anvils and Combat Mk. 3 (Flanking). Fire one Anvil, swap to the second, fire again, and repeat until you must reload or break contact.
Combat Mk. 3 (Flanking) makes stowed pistols and hand cannons 33% faster to equip. The augment also supports light and medium shields, carries a 60-point weight limit, and cannot be changed while deployed.
The build works because the faster equip bonus triggers during repeated weapon swaps. It does not provide simultaneous akimbo fire.
Source: Combat Mk. 3 (Flanking) item entry) and the broader augment database.
Required Loadout
- Two Anvil hand cannons
- Combat Mk. 3 (Flanking)
- Mouse-side weapon bindings or a dedicated swap input
- Light or medium shield
- Hard cover for reload resets
- Optional Splitters for close-range encounters
Crafting the augment requires its blueprint, Gear Bench 3, two Advanced Electrical Components, and three Processors according to the current item entry. Recheck the in-game recipe after balance or economy patches.
Use the Correct Firing Rhythm
Do not mash the swap input. Build a repeatable sequence:
1. Fire Anvil one.
2. Swap immediately after the shot registers.
3. Fire Anvil two as soon as it equips.
4. Swap back while tracking the target.
5. Break line of sight before both weapons need reloading.
During our first combat passes, maximum-speed swapping produced more misses against Leapers than a slower cadence. Once we delayed the second shot long enough to recenter, weak-point consistency improved.
Accuracy sets the pace.
Standard Anvils Versus Splitters
Splitters increase close-range forgiveness, while standard Anvils preserve cleaner precision. The augment—not the attachment—creates the swap interaction.
| Configuration | Best Scenario | Trade-Off |
|---|---|---|
| Two standard Anvils | ARC weak points and measured PvP shots | Punishes poor aim |
| Two Splitter Anvils | Doorways and point-blank pressure | Loses consistency with distance |
| Mixed Anvils | Variable room-to-room combat | Different shot patterns disrupt rhythm |
| One Anvil plus backup weapon | General-purpose raids | Cannot sustain the full swap cycle |
Use matching standard Anvils while learning; mixed behavior makes timing harder to diagnose.
Avoid this build when your route crosses open ground or forces medium-range fights. A rifle provides steadier pressure and fewer reload complications there.
Best Keybinds and Combat Tactics
The number row forces your movement hand away from strafing inputs. Bind both weapon slots to mouse-side buttons or use a dedicated previous-weapon command.
We initially tested the build with keys 1 and 2. Moving swaps to the mouse immediately improved lateral movement and made corner resets more reliable.
| Input | Movement Freedom | Error Risk | Recommendation |
|---|---|---|---|
| Mouse-side buttons | High | Low | Best overall |
| Dedicated swap key | High | Low | Excellent with two weapons |
| Mouse wheel | High | Medium | Fast but prone to overscrolling |
| Number keys | Low | Low | Acceptable only for practice |
| Nearby keyboard keys | Medium | Low | Practical without mouse buttons |
Skip the number row for PvP; standing still defeats the build's main advantage.
Against ARC
Use alternating shots against large targets with stable weak points. If a Leaper changes direction mid-cycle, stop swapping at maximum speed and recenter before the follow-up.
Do not empty both Anvils when an ARC attack is about to force movement. Fire two or three controlled shots, reposition, then resume from cover.
Against Players
The build performs best around doorways, stairwells, short corridors, and tight corners. Fire, retreat behind cover during the swap, and re-peek from a slightly different height or angle.
Avoid long sightlines. Dual Anvils lose value when an automatic rifle can apply continuous pressure before you reach effective range.
The hidden failure point is the double reload. If both weapons run empty, disengage before resetting them; attempting two reloads in the doorway converts burst pressure into a free kill for the opponent.
FAQ (Frequently Asked Questions)
Where is the best place to find a Broken Guidance System?
Search the Domes on Dam Battlegrounds first, then rotate to Generator Hall. Check exposed technical surfaces, industrial containers, and breachable metal cubes rather than clearing every unrelated room.
Is a Broken Guidance System guaranteed at the Domes?
No, the Domes do not provide a guaranteed Broken Guidance System. Embark has not published a fixed location or drop rate, and field results vary heavily between raids.
Where can you find Headphones for Ascending the Mountain?
Search residential and civilian drawers, cabinets, desks, and general loot containers. Extract after securing the two required Headphones instead of risking them during an unnecessary map-wide loot run.
Does Combat Mk. 3 Flanking enable true akimbo Anvils?
No, it enables faster alternating weapon swaps rather than simultaneous firing. Its current perk equips stowed pistols and hand cannons 33% faster, which allows two Anvils to mimic an akimbo-style cadence.
When should you avoid the Dual Anvil build?
Avoid it in open terrain, long-range fights, and loadouts that cannot support safe reload resets. Use a rifle instead when sustained fire and distance control matter more than close-range burst damage.

I’m Sofia Bergström, a Swedish Managing Editor covering FPS, competitive shooters, and extraction shooters for GGWTB. My guides focus on loadout trade-offs, positioning, and when to commit—or cut your losses. A weapon’s stats tell only part of the story; I focus on how it fits your role and the fight ahead.

Most Popular Posts
- ARC Raiders Update 1.42: Phantom Targets Farming Guide (Glitched Wasps, Rewards, Regional Conditions)
- ARC Raiders Hullcracker Blueprints: Fastest Way to Complete The Major's Footlocker
- ARC Raiders Best Pop Trigger Strategy: Fast Phantom Targets Damage Guide
- ARC Raiders Subway Skin Guide: Unlock the Subterranean Outfit
- ARC Raiders Spaceport Open Containers Guide: 19K+ Solo Trial Route
- ARC Raiders Looting Mk. 3 Survivor Blueprint Guide: Best Blue Gate Route and Drop Locations
Popular Category Lists
- ARC Raiders / (343)
- Grow a Garden / (292)
- CoD: Black Ops 7 / (167)
- Star Citizen / (160)
- MLB 26 / (159)
- Monopoly Go / (152)
- ARK Survival Ascended / (125)
- Steal a Brainrot / (98)
- Blox Fruits / (74)
- Adopt Me / (73)
- Forza Horizon 6 / (72)
- Sailor Piece / (68)
- Grow a Garden 2 / (68)
- Diablo IV / (62)
- CoD: BLACK OPS 6 / (55)
- Path of Exile 2 / (48)
- Monster Hunter Wilds / (46)
- Aion 2 / (45)
- Windrose / (44)
- Donut SMP / (41)