0
Created: Nov 13,2026 | ARC Raiders
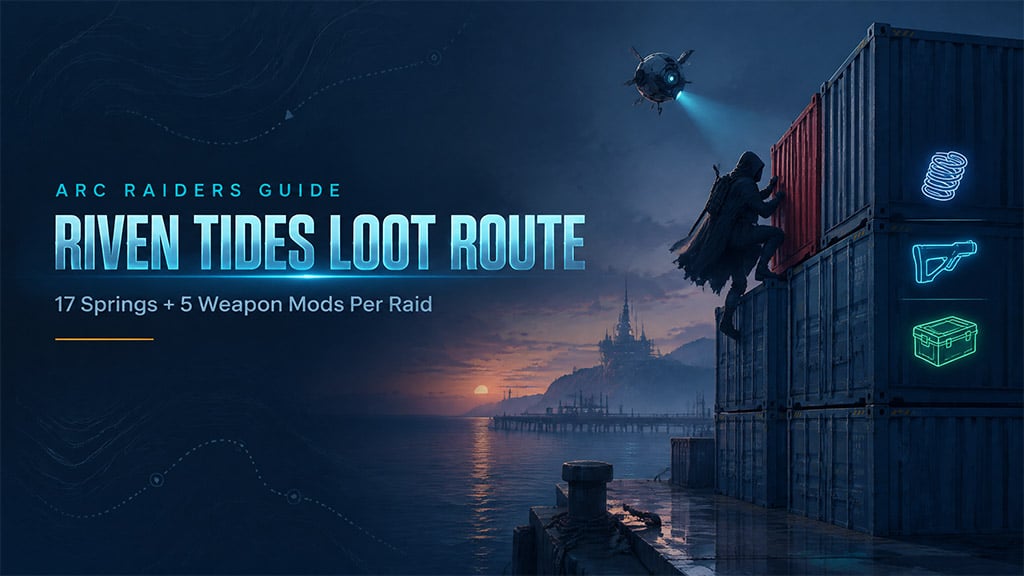
ARC Raiders Riven Tides Loot Route: Farm 17 Springs and 5 Weapon Mods Per Raid

- Quick Raid Specs
- Expected Yields and Raid Conditions
- Beachcombing vs. Day vs. Night
- When to Skip This Route
- Loadout and Salvage Rules
- Salvage Spring Items In-Raid
- Use Your Weapon as Mod Storage
- Riven Tides Docks Route
- Zone 1: Entry Car and First Cargo Stacks
- Zone 2: Weapon Crate, Grenade Tube, and Red Container Stack
- Zone 3: Dock 2 Loop and Dock 1 Return
- FAQ (Frequently Asked Questions)
- What is the best raid condition for the Riven Tides loot route?
- How many springs does the Riven Tides docks route give per raid?
- Why salvage Turbo Pumps in-raid instead of in Speranza?
- Should you fight the Firefly and Wasp on the docks?
- Do keys drop on the Riven Tides docks route?
Loot the cargo container stacks on the Riven Tides docks for ~17 Spring Parts and 4–5 Weapon Mods per raid (~15,000 coins/minute). Queue Beachcombing or Day, and salvage Turbo Pumps in-raid, because Speranza recycling returns zero springs.
Quick Raid Specs
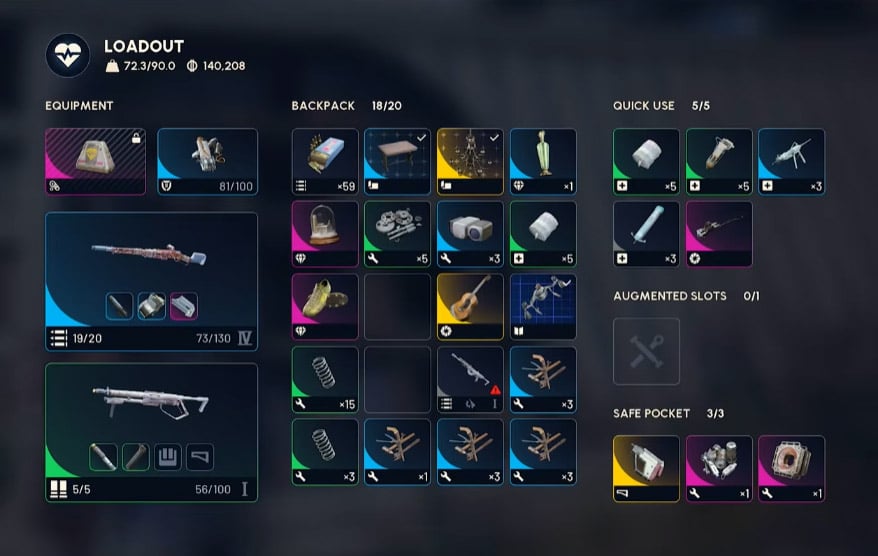
Set these four things before you queue.
| Parameter | Setup | Why |
|---|---|---|
| Raid condition | Beachcombing (172k avg) or Day (167k avg) | Highest container density with manageable ARC pressure. |
| Loadout | Stripped Renegade 4 + Photoelectric Cloak | Empty weapon slots carry mods; the Cloak breaks ARC lock-on. |
| Container cap | Max 2 green containers per shipping container | Leave the stack after the second green box. |
| In-raid action | Salvage Turbo Pumps before extracting | Speranza recycling gives no springs. |
This route pays for fast climbing and inventory discipline, so skip combat clearing.
Expected Yields and Raid Conditions
Container positions activate randomly each raid from a fixed pool of nodes. Across our 25-raid sample, the steady value came from crafting parts and attachments.
| Item | Avg per raid | Action |
|---|---|---|
| Spring Parts | ~17 (33 peak) | Keep raw Steel Springs; salvage bulky spring items mid-raid. |
| Weapon Mods | 4–5 (green to purple) | Mount on weapon slots; dismantle duplicates into Mechanical Components. |
| Herbal Bandages | ~4 | Pull from medical bags and green boxes to save stash meds. |
| Blueprints and keys | ~1 each | Move keys and unlearned blueprints to safe storage at once. |
| Stencils and Designs | ~1 Stencil (5 peak), 1–2 Designs | Keep Stencils; drop common Designs first when slots fill. |
Treat Kinetic Converters as a windfall: we pulled 2 in 25 raids.
Beachcombing vs. Day vs. Night
Coins per minute held near 15,000 in all three conditions in our testing, because higher danger forces faster exits.
| Condition | Avg loot value | Trade-off |
|---|---|---|
| Beachcombing | 172,000 coins | Most containers along the docks. |
| Day | 167,000 coins | Only 3% below Beachcombing. |
| Night | 125,000 coins (4-raid sample) | Aggressive ARC patrols cut the number of containers you loot. |
Run Beachcombing when it is active and Day otherwise; never wait on the event.
When to Skip This Route
- Kinetic Converter hunting: An 8% appearance rate makes the docks a poor converter farm.
- Late spawn: Skip the docks if you spawn across the map with under 12 minutes left, since the multi-level stacks take too long to climb.
- PvP on Dock 1: Abort vertical climbs when you hear gunfire or breaching, because climb animations lock your camera and movement.
Loadout and Salvage Rules
Slot starvation is the bottleneck. Bulky parts and unstackable attachments fill a standard backpack midway through Zone 2 unless you consolidate.
Salvage Spring Items In-Raid
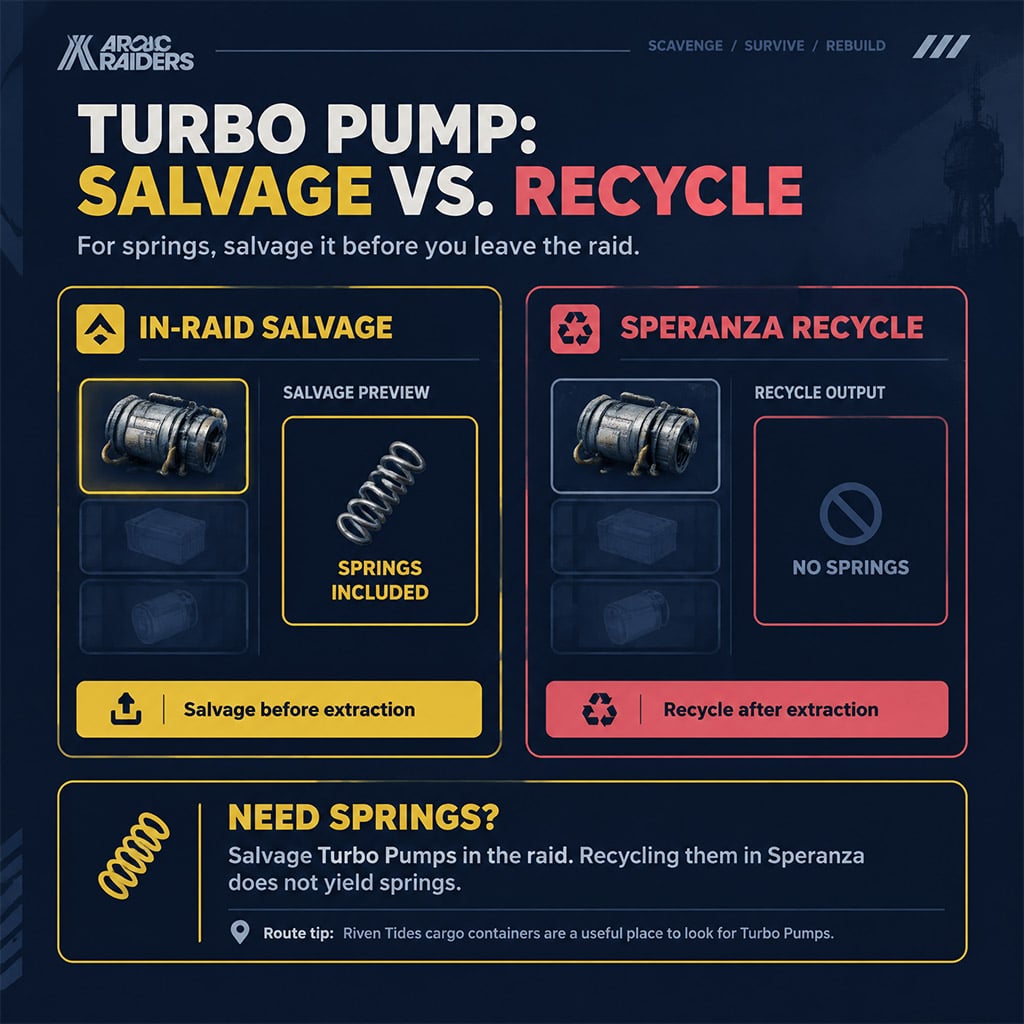
Turbo Pumps yield springs only when salvaged inside an active raid. We confirmed that a whole Turbo Pump recycled in Speranza returns non-spring components.
- Steel Springs: Keep as-is; they stack and are the direct target resource.
- Turbo Pumps: Salvage on pickup to bank the springs.
- Rusty Tools: Grab them from already-opened containers, where other raiders leave them behind.
- Cooling Coils and Spring Cushions: Check the salvage preview and consolidate before Dock 2.
Pro tip: Check every salvage preview before leaving Zone 2 so you never extract with dead-weight components.
Use Your Weapon as Mod Storage
Bring an unmodified Renegade 4 with empty muzzle, grip, magazine, and stock slots. Mounting found attachments such as Lightweight Stocks, Padded Stocks, Horizontal Grips, and Extended Barrel 3 frees 3–4 backpack slots.
- Compatibility limit: One rifle cannot hold class-locked mods like Shotgun Silencers, so loot the Zone 2 or Zone 3 Weapon Crate early for a second frame.
- Overflow: Dismantle low-tier green attachments into Mechanical Components when the backpack fills on the return loop.
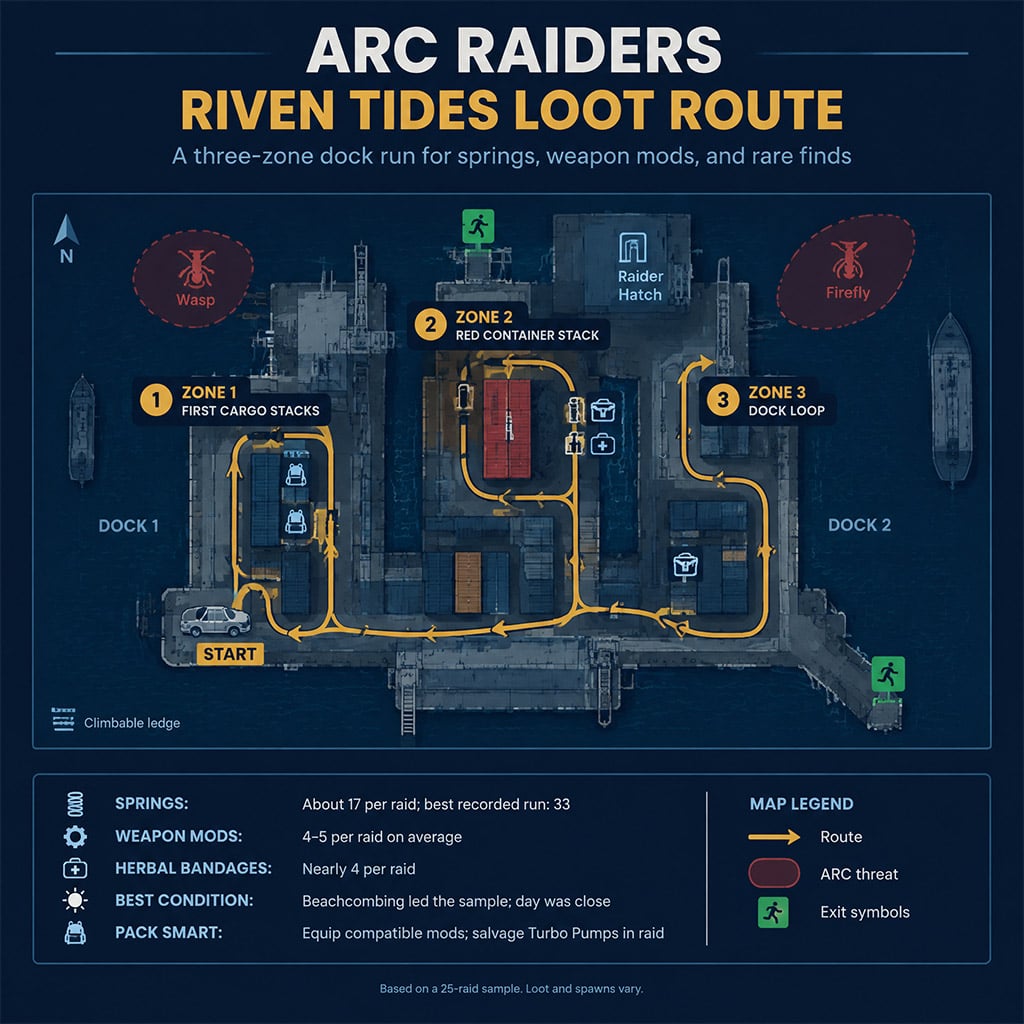
Riven Tides Docks Route
Loot sits on top of, behind, and between shipping containers, not at ground level. A single shipping container never spawns more than two green boxes, so move on after the second.
Zone 1: Entry Car and First Cargo Stacks
Approach the outer container yard with spacing from ARC patrols. Keep the Photoelectric Cloak ready to break lock-on.
1. Car and base stack: Loot the containers by the parked car, then squeeze into the gap between containers for the first backpack spawn.
2. Rear stack: Check the second stack's blind rear corners, then climb into its interior crevice for the second backpack spawn.
3. Upper ledges: Climb to the top tier and check the perimeter ledges and industrial buckets.
Pro tip: Check containers with open lids, since leftover Rusty Tools are spring value with no breach noise.
Zone 2: Weapon Crate, Grenade Tube, and Red Container Stack
Sightlines tighten here and aerial ARC units patrol the lane. Breach containers only when nearby ARC units face away, because breach audio draws aggro.
1. Wasp crevice: Slip into the container gap near the Wasp, climb the container face, and jump the gap to the Weapon Crate and Medical Bag.
2. Grenade Tube: Wait for the Firefly to drift clear, then loop back for Frag Grenades and Explosive Compound.
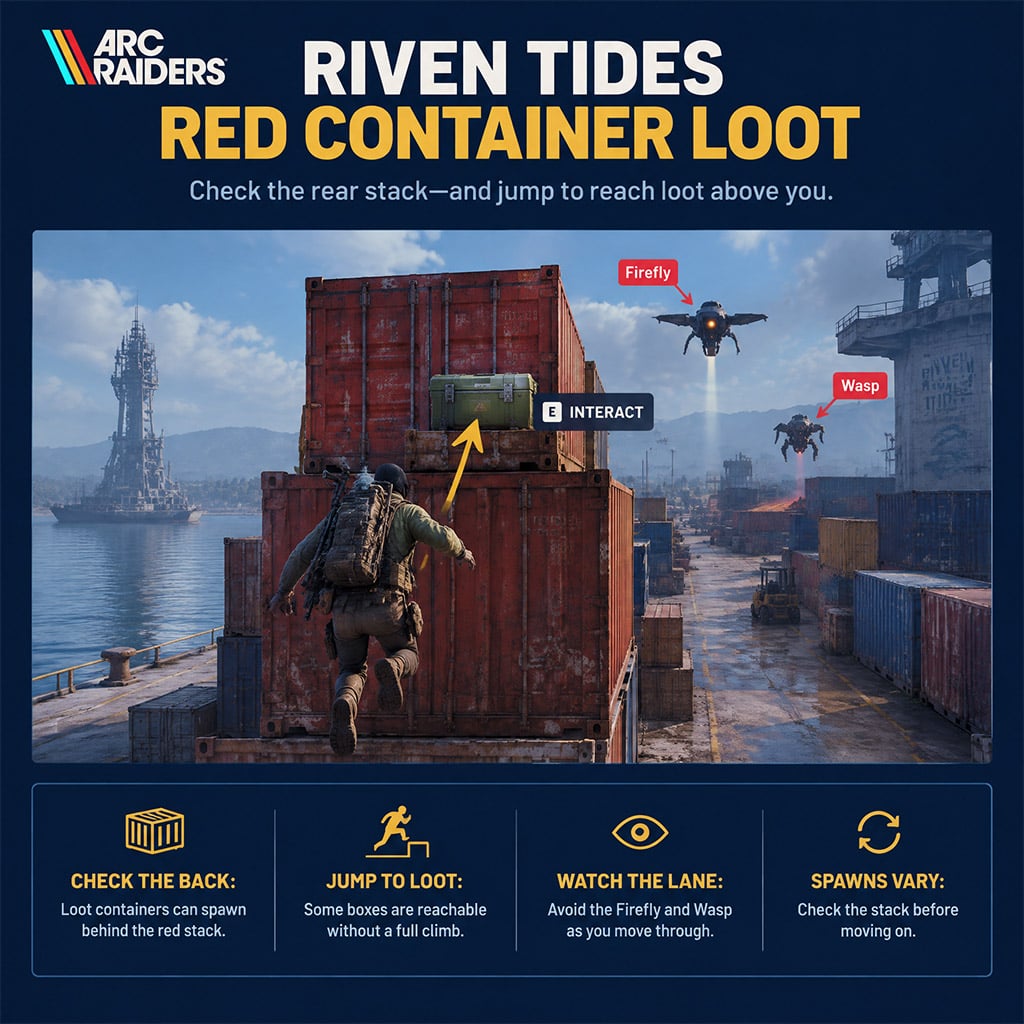
3. Red container stack: Check the rear face of the red shipping container on the central stack.
Pro tip: Jump-interact with the mid-level boxes behind the red container to loot them mid-air and skip full climb animations.
Zone 3: Dock 2 Loop and Dock 1 Return
The back half sweeps the water's edge, then crosses the Dock 1 stacks toward extraction.
1. Approach: Cross the elevated container bridge, sweep the left ledge, roof, and rear lip, then loot the second Weapon Crate at the mouth of Dock 2.
2. Dock 2 pier: Sprint the pier scanning open container faces, then loop the far tip for the Medical Bag and corner floor spawns.
3. Return leg: Cut between container walls instead of the open pier lane, climbing one tier to spot recessed green boxes.
4. Dock 1 stack: Scale the tall stack beside Dock 1 for its interior crevice and roof ledges, consolidate inventory, then extract.
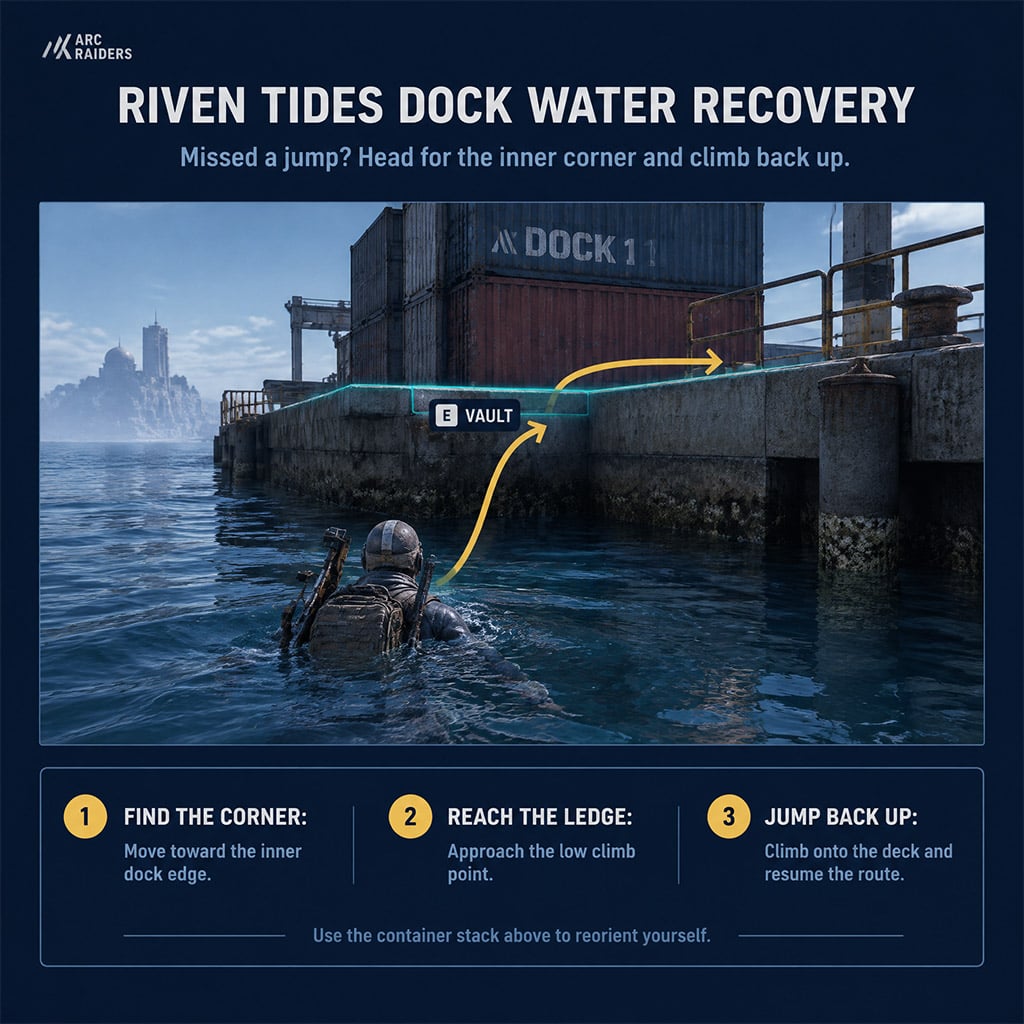
Pro tip: A missed jump into the water costs seconds, not the run: swim to the inner dock corner and vault the low ledge back onto the deck.
FAQ (Frequently Asked Questions)
What is the best raid condition for the Riven Tides loot route?
Beachcombing averages 172,000 coins per raid. Day runs 3% lower at 167,000, so queue Day whenever the event is off.
How many springs does the Riven Tides docks route give per raid?
The route averages ~17 Spring Parts per raid, with a peak of 33 in our 25-raid sample.
Why salvage Turbo Pumps in-raid instead of in Speranza?
Turbo Pumps yield springs only when salvaged inside a raid. Recycling them in Speranza returns non-spring components.
Should you fight the Firefly and Wasp on the docks?
No. Break line-of-sight with container walls and the Photoelectric Cloak, and only destroy a Firefly parked over a jump you need.
Do keys drop on the Riven Tides docks route?
Yes, in roughly half to two-thirds of runs. Keep one safe-storage slot open so an early Raider Hatch Key gives you a low-risk exit.

I’m Priya Raman, an Indian Content Strategist at GGWTB covering fantasy MMORPGs, classic online games, and guild-focused play. I plan coverage around class roles, group coordination, and long-term character growth. A strong solo build is only part of the picture—I focus on what you bring to a party and which investments stay useful as your guild takes on tougher content.
Most Popular Posts
- ARC Raiders Update 1.42: Phantom Targets Farming Guide (Glitched Wasps, Rewards, Regional Conditions)
- ARC Raiders Subway Skin Guide: Unlock the Subterranean Outfit
- ARC Raiders Frozen Trail Update Guide: Pendola Pass, Frigate & Meta Loadouts
- ARC Raiders Ascending the Mountain: Fast Loot Routes and Item Guide
- ARC Raiders Broken Guidance System and Dual Anvil Build Guide
- ARC Raiders Frozen Trail Prep Guide: Skills, Weapon Upgrades & Map Shifts
Popular Category Lists
- ARC Raiders / (372)
- Grow a Garden / (300)
- Star Citizen / (171)
- CoD: Black Ops 7 / (167)
- MLB 26 / (159)
- Monopoly Go / (153)
- ARK Survival Ascended / (132)
- Steal a Brainrot / (101)
- Adopt Me / (78)
- Blox Fruits / (74)
- Forza Horizon 6 / (72)
- Sailor Piece / (68)
- Grow a Garden 2 / (68)
- Aion 2 / (64)
- Diablo IV / (62)
- COD: Modern Warfare 4 / (57)
- CoD: BLACK OPS 6 / (55)
- Maplestory Classic / (50)
- Path of Exile 2 / (48)
- Monster Hunter Wilds / (46)