0
0 Created: Sep 24,2026 | ARC Raiders
ARC Raiders Frozen Trail Update Guide: Pendola Pass, Frigate & Meta Loadouts

Deploying into Pendola Pass without verified shelter protocols and extraction pacing guarantees lost gear before your first Weapon Amplification. Frozen Trail introduces lethal Flash Freeze cycles, a contested three-seat Ballistic Gondola, and the airborne Frigate—demanding strict resource management over uncalculated aggression.
- Frozen Trail Survival & System Priority Matrix
- Pendola Pass: Drop Plan & Flash Freeze Protocols
- Surviving the Flash Freeze
- Ballistic Gondola Extraction Dynamics
- Frigate Infiltration & Squad Archetypes
- Squad Role Allocation
- Room Clearing Protocol
- Combat Breakpoints: Bully, Skulker, and Hydra
- Weapon Amplification & Ballistics Analysis
- Stiletto vs. Bantam Comparison
- FAQ (Frequently Asked Questions)
- When does the ARC Raiders Frozen Trail update release?
- Is Pendola Pass a permanent map or a temporary mode?
- Can solo players extract through the Ballistic Gondola?
- How does Weapon Amplification branch switching work?
- How much does the Frozen Trail Premium Reward Pass cost?
Frozen Trail Survival & System Priority Matrix
Separate cosmetic features from high-risk combat mechanics before committing high-tier gear to your loadout.
| System / Zone | Core Threat & Metric | Primary Tactical Failure | Action Trigger |
|---|---|---|---|
| Pendola Pass | Extreme verticality, sightlines over 200m | Rushing the fallen Emperor early | Scout Avalanche Shelters within 45s of drop |
| Flash Freeze | Environmental damage over time | Looting through warning sirens | Break engagement immediately; sprint to secondary shelter |
| Ballistic Gondola | Exactly 3 extract seats per car | Assuming surplus seats mean a truce | Clear ridge elevation before calling; wipe third parties |
| Frigate Raid | Multi-level CQB + Hydra turrets | Running triple sniper / scout builds | Deploy 1 CQB Breacher, 1 Sustained DPS, 1 Rear Guard |
| Weapon Amplification | Irreversible modification tree | Burning mats on primary weapon first | Test branch recoil and ammo burn on sidearms |
Pendola Pass: Drop Plan & Flash Freeze Protocols
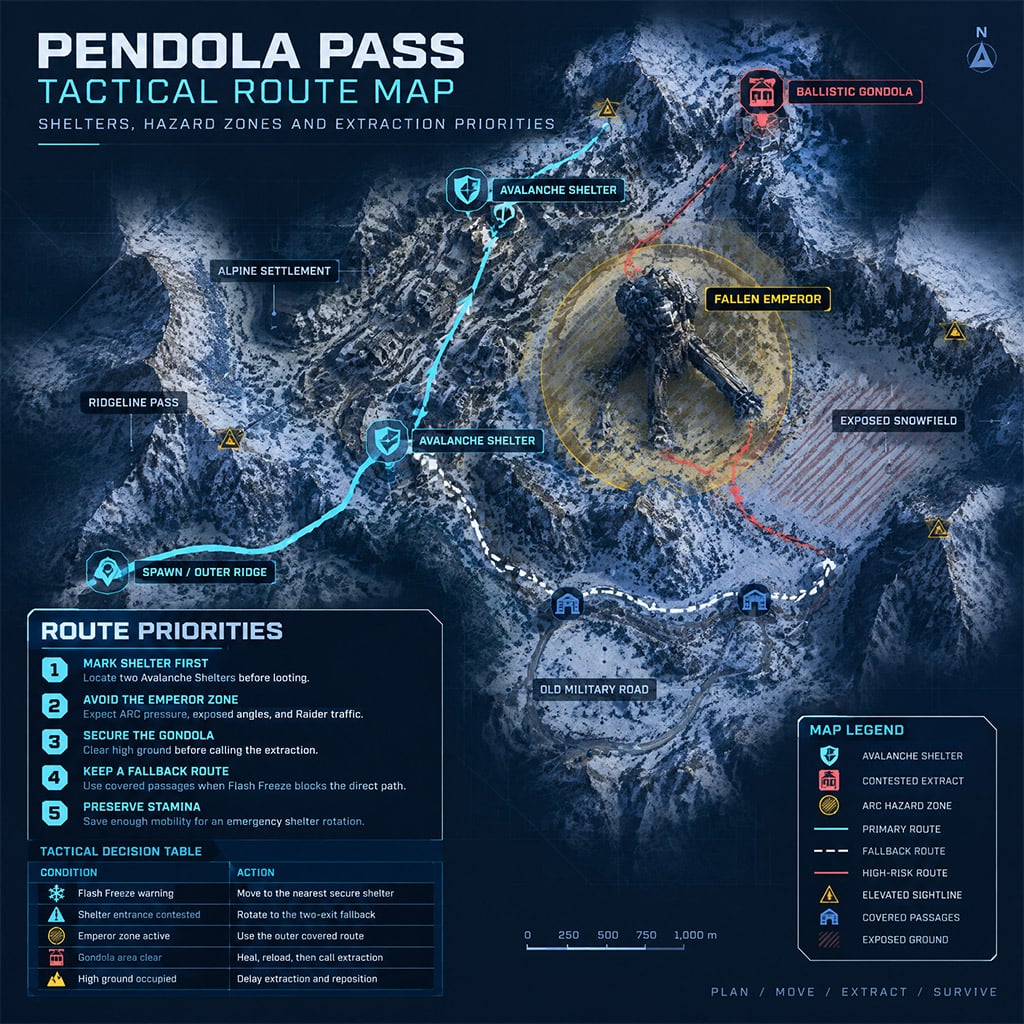
Pendola Pass punishes delayed rotations harder than any prior rust-belt map. Long exterior angles expose squads to distant fire, while tight interior compounds become instant deathtraps during storms.
Surviving the Flash Freeze
When the acoustic warning siren sounds across the pass, drop-point looting ends immediately:
- Ditch Container Interactions: Canceling an open chest animation takes valuable sprint frames; drop low-tier salvage to clear stamina weight.
- Bypass Primary Doors: Shelters marked visibly on high ground attract 2 to 3 converging squads. Target low-elevation service exits or industrial cellars.
- Establish Threshold Control: The first squad inside must not sit directly on the door threshold. Set crossfire traps 5 meters back from the frame to shred incoming panicking players.
- Two-Exit Fallback Rule: If your primary shelter shows muzzle flashes during the freeze countdown, divert instantly to a secondary two-exit structure rather than contesting a chokepoint.
Ballistic Gondola Extraction Dynamics
The Ballistic Gondola features an uncompromising restriction: exactly three Raider seats.
- Trios: Elimination is mandatory. Any un-squaded solo or duo arriving at the dock represents an immediate seat denial. Secure high-ground rocks 30 seconds prior to platform arrival.
- Duos & Solos: Never board first. Wait for the departure chime to hit its final three-second countdown before using grappling lines to hook directly into the cabin.
Frigate Infiltration & Squad Archetypes
The Frigate is an airborne ARC fortress operating under persistent interior pressure. Long-range battle rifles lose viability the moment squads clear the boarding ramp.
Squad Role Allocation
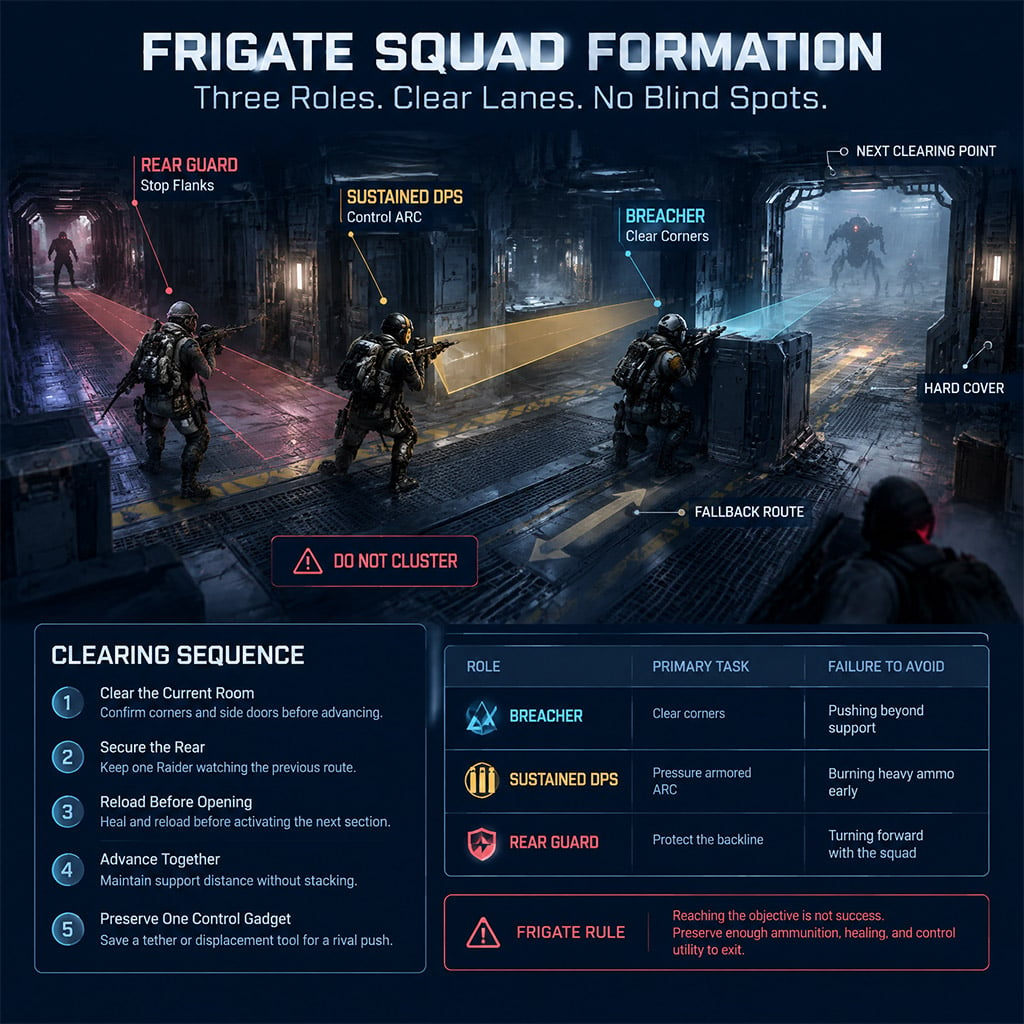
Run balanced operational roles to avoid getting pinched in corridor transit:
| Role | Recommended Arsenal | Tactical Responsibility | Critical Mistake |
|---|---|---|---|
| Point Breacher | Auto Burletta / High-DPS Shotgun + Stun Tether | Clears door traps, scouts blind turns | Overextending beyond squad trade-range |
| Heavy Suppression | 64-Round Rattler / Anti-Armor Launcher | Shreds ARC plating, focuses Bully weakpoints | Burning heavy ammunition on trash drones |
| Rear Guard | Scoped Renegade / Stiletto + Proximity Mines | Covers boarding tubes, denies trailing squads | Turning forward to help loot dead targets |
Room Clearing Protocol
1. Clear the Frame: Flash or tether the doorway before body-crossing.
2. Anchor the Rear: The Rear Guard places claymores or tethers on entry thresholds to counter third-party squads trailing your audio signature.
3. Isolate Consoles: Never allow two teammates to access an unlock terminal simultaneously. One interacts while two maintain 180-degree sector defense.
Combat Breakpoints: Bully, Skulker, and Hydra
New ARC models punish common shooter habits like open retreats and static cover holding.
| Enemy Unit | Attack Pattern | Hard Counter | Fatal Blunder |
|---|---|---|---|
| Bully | Rapid kinetic charge, line-of-sight ramming | Pivot around low, solid cover; punish turning radius | Backpedaling across flat snow |
| Skulker | Perimeter stalking, flanking wounded targets | Anchor on corners; hold crosshairs on low-angle terrain | Chasing its withdrawal away from the team |
| Hydra | Multi-target modular turret; field respawns | Stagger squad cover; burst individual modules concurrently | Stacking two players behind the same barricade |
- Bully Engagement: Break its forward charge vector using solid rock geometry. It loses tracking during tight corner maneuvers, exposing its rear heat dissipation vents.
- Hydra Engagement: The Hydra operates three distinct targeting eyes. Distribute fire across all three heads to disable weapon mounts simultaneously before completing the room objective.
Weapon Amplification & Ballistics Analysis
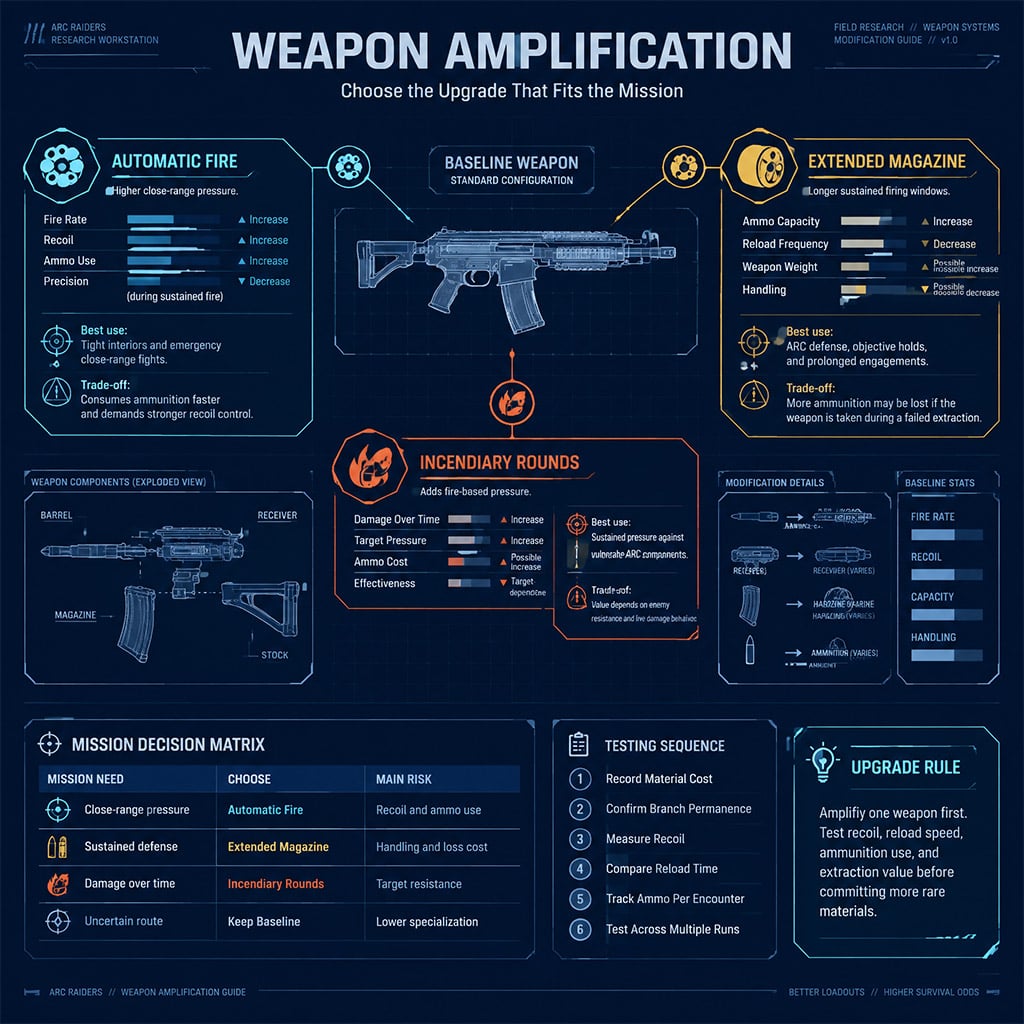
Weapon Amplification introduces a fifth quality tier and divergent specialization trees across 15 platforms. Research Workstation investment must take priority over cosmetic base expansions.
Stiletto vs. Bantam Comparison
| Weapon | Caliber Class | Engagement Sweet Spot | Primary Drawback |
|---|---|---|---|
| Stiletto | Light Ammunition | Mid-to-Long (40m–90m) | Bloom expands aggressively under rapid fire |
| Bantam | Heavy Ammunition | Close-to-Mid (5m–25m) | Depletes primary ammunition reserves |
- The Stiletto functions as an economical semi-auto scout rifle. Fire in controlled two-round bursts. Trigger mashing blooms the cone of fire beyond target silhouettes at 50 meters.
- The Bantam delivers massive burst damage from a sidearm slot, but consumes shared Heavy ammo. Do not pair the Bantam with heavy machine guns or anti-materiel rifles unless your squad runs specialized ammo supply boxes.
FAQ (Frequently Asked Questions)
When does the ARC Raiders Frozen Trail update release?
Frozen Trail goes live on October 8, 2026 as a free content update across PC, PlayStation 5, Xbox Series X|S, and GeForce NOW.
Is Pendola Pass a permanent map or a temporary mode?
Pendola Pass is a permanent map addition to the Rust Belt selection, featuring unique Flash Freeze weather cycles, the fallen Emperor landmark, and Frigate boarding triggers.
Can solo players extract through the Ballistic Gondola?
Yes, but the gondola has a hard limit of three seats total. If a three-man squad reaches the platform, they will likely eliminate any solo players to guarantee their own extractions.
How does Weapon Amplification branch switching work?
Weapon Amplification branches are locked once forged at the Research Workstation. Modifying a weapon down an alternative path requires sourcing a new weapon base and re-investing upgrade materials.
How much does the Frozen Trail Premium Reward Pass cost?
The Premium Reward Pass costs 1,150 Raider Tokens. Completing both the Free and Premium reward tracks yields up to 1,350 total Tokens, fully returning the entry investment.

I’m Sofia Bergström, a Swedish Managing Editor covering FPS, competitive shooters, and extraction shooters for GGWTB. My guides focus on loadout trade-offs, positioning, and when to commit—or cut your losses. A weapon’s stats tell only part of the story; I focus on how it fits your role and the fight ahead.

Most Popular Posts
- ARC Raiders Update 1.42: Phantom Targets Farming Guide (Glitched Wasps, Rewards, Regional Conditions)
- ARC Raiders Hullcracker Blueprints: Fastest Way to Complete The Major's Footlocker
- ARC Raiders Best Pop Trigger Strategy: Fast Phantom Targets Damage Guide
- ARC Raiders Subway Skin Guide: Unlock the Subterranean Outfit
- ARC Raiders Looting Mk. 3 Survivor Blueprint Guide: Best Blue Gate Route and Drop Locations
- ARC Raiders Medium & Heavy Gun Parts Blueprint Guide: Best Farm Route, Locations, and Refiner Crafting
Popular Category Lists
- ARC Raiders / (349)
- Grow a Garden / (293)
- CoD: Black Ops 7 / (167)
- Star Citizen / (161)
- MLB 26 / (159)
- Monopoly Go / (152)
- ARK Survival Ascended / (127)
- Steal a Brainrot / (99)
- Blox Fruits / (74)
- Adopt Me / (73)
- Forza Horizon 6 / (72)
- Sailor Piece / (68)
- Grow a Garden 2 / (68)
- Diablo IV / (62)
- CoD: BLACK OPS 6 / (55)
- Path of Exile 2 / (48)
- Aion 2 / (48)
- Monster Hunter Wilds / (46)
- Windrose / (44)
- Donut SMP / (41)