



 0
0 Created: May 18,2026 | ARC Raiders
ARC Raiders Hidden Bunker XP Farm: Best Spaceport PvE Loot Route After Wipe

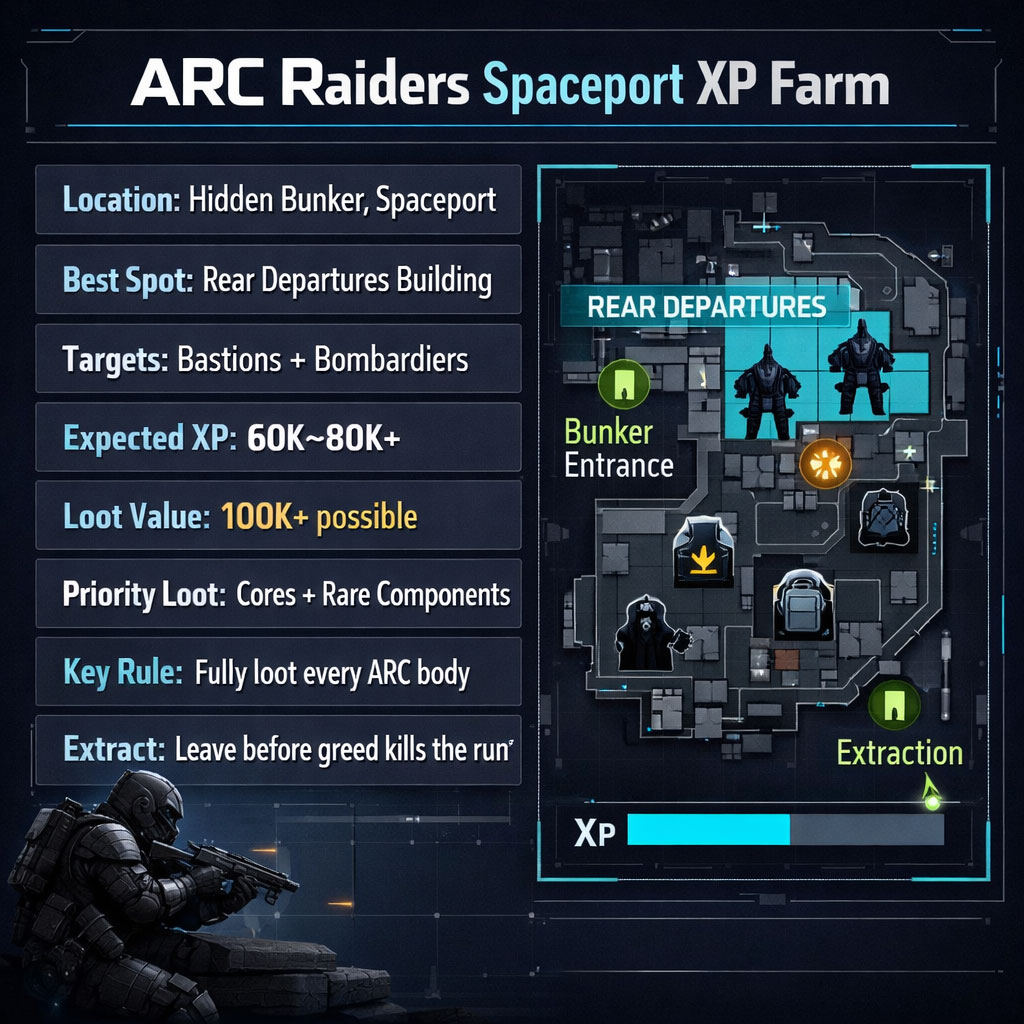
This is one of the cleanest ARC Raiders PvE XP farms after wipe because it does not rely on random container luck. We farm Bastions and Bombardiers at Spaceport's Hidden Bunker event, loot every ARC part for XP, stash heavy junk nearby, then extract before greed gets us killed.

- ARC Raiders Hidden Bunker Farm Overview
- Best Loadout for the Spaceport PvE XP Farm
- Best Location: Rear Departures Building on Spaceport
- How to Run the Hidden Bunker XP Farm
- 1. Reach Rear Departures Fast
- 2. Pull Bastions and Bombardiers Into Cover
- 3. Kill Spotters First
- 4. Fully Loot Every ARC Body
- Loot Priority and Encumbrance Management
- Expected XP, Loot, and Spawn Count
- When the Hidden Bunker Opens
- Best Time to Extract
- Common Mistakes That Ruin the Farm
- Quick Route Checklist
- FAQ
- What is the best ARC Raiders XP farm after wipe?
- Where is the best spot for the Hidden Bunker farm?
- Do I need a Hullcracker for this farm?
- How much XP can I get from this route?
- What loot should I prioritize?
- Summary
ARC Raiders Hidden Bunker Farm Overview
The farm happens on Spaceport, during the Hidden Bunker event.
Your target area is the rear side of the Departures building. This spot has reliable Bastion and Bombardier spawns, usable cover, and enough nearby space to stash loot when you get heavy.
| Farm Detail | Best Setup |
|---|---|
| Map | Spaceport |
| Event | Hidden Bunker |
| Main targets | Bastions, Bombardiers |
| Best position | Rear Departures building |
| Expected XP | 60K–80K+ XP |
| Expected profit | 100K+ loot value |
| Main risk | Players after bunker opens |
Why this works: early in the event, most players are busy with antennas. That gives us a window to kill high-value ARC units before the area gets crowded.
Best Loadout for the Spaceport PvE XP Farm
You want fast heavy-ARC damage. The less time we spend in the open, the less chance we get folded by a Bombardier or third-partied.
| Gear | Recommendation | Reason |
|---|---|---|
| Weapon | Level 4 Hullcracker | Fast Bastion/Bombardier kills |
| Attachment | Kinetic Converter | Strong upgrade, not required |
| Backpack | Best available | Prevents constant loot dumping |
| Ammo | Bring extra | Heavy ARC units eat rounds |
| Healing | Bring enough for mistakes | One bad angle can chunk you |
The Hullcracker is the cleanest option. A Kinetic Converter helps, but the farm still works without it.
If you are on a budget, bring any weapon you trust against heavy ARC units. Just expect slower kills and more exposure.
Best Location: Rear Departures Building on Spaceport
Stay near the back side of Departures. Do not roam around the map chasing random spawns.
This area is strong because:
- Bastions and Bombardiers spawn nearby
- You have cover from buildings and terrain
- You can stash loot close by
- Early player traffic is usually lower
- You can reset fights without leaving the spawn zone
If you leave too far, you risk missing the next spawn. That kills the farm's efficiency.
How to Run the Hidden Bunker XP Farm
1. Reach Rear Departures Fast
Load into Spaceport Hidden Bunker and rotate to the rear Departures area.
Check for:
- Bastions
- Bombardiers
- Spotters
- Nearby players
- Safe cover
- A stash corner
Do not start sorting loot in the open. This area can go from quiet to ugly fast.
2. Pull Bastions and Bombardiers Into Cover
Never fight heavy ARC units in wide open ground unless you have no choice.
Use:
- Building corners
- Hillside cover
- Rear structures
- Line-of-sight breaks
The goal is simple: make the ARC unit move to you, not the other way around.
If a Bastion pushes, rotate around cover.
If a Bombardier locks your area, break line of sight before looting.
3. Kill Spotters First
If Spotters are nearby, delete them first.
| Enemy | Priority | Why |
|---|---|---|
| Spotter | High | Makes Bombardier fights messy |
| Bombardier | High | Dangerous, valuable loot |
| Bastion | High | Great XP and valuable parts |
| Small ARC units | Low | Filler XP only |
Ignoring Spotters is how clean farms turn into panic reload simulators.
4. Fully Loot Every ARC Body
This is the part many players mess up.
You get XP from:
- Killing the ARC unit
- Looting its parts
So click through every lootable section on Bastions and Bombardiers, even if you do not keep every item.
| Action | Result |
|---|---|
| Kill Bastion/Bombardier | Big XP gain |
| Fully loot all parts | More XP + item value |
| Only grab one item | Leaves XP behind |
| Skip body | Wastes the farm |
If your bag is full, still interact with the loot first. Then decide what to keep.
Loot Priority and Encumbrance Management
This farm makes you heavy fast. After two big ARC kills, expect encumbrance problems unless your bag and skills are stacked.
Use a nearby building as a temporary stash. Drop lower-value bulk parts, keep the expensive pieces on you.
| Loot Type | Action |
|---|---|
| Bastion Core | Keep |
| Bombardier Core | Keep |
| Rare components | Usually keep |
| Heavy common parts | Stash |
| Low-value junk | Drop |
Do not casually drop Bastion Cores or Bombardier Cores. Those are the money pieces.
If you are overweight and another heavy ARC spawns, do not greed-loot. Stash first, then fight.
Expected XP, Loot, and Spawn Count
A strong run can hit around 60K–80K+ XP.
A clean benchmark run produced about 79K XP and over 100K profit after extracting with several Bastion and Bombardier parts.
| Run Quality | Major ARC Kills | Expected XP |
|---|---|---|
| Contested | 2–4 | 25K–45K |
| Average | 4–6 | 45K–65K |
| Strong | 6–8+ | 65K–80K+ |
| Excellent | 8+ | 80K+ possible |
You may see around 8–12 major ARC spawns across a strong event window, depending on kill speed and how the bunker objective progresses.
When the Hidden Bunker Opens
Once the bunker opens, the farm gets riskier.
Players start rotating in. Shredders can also become a problem. This is where you stop autopiloting.
| Raid Phase | Risk | Playstyle |
|---|---|---|
| Early event | Low–Medium | Farm aggressively |
| Antenna phase | Medium | Stay alert |
| Bunker opened | Medium–High | Watch for players |
| Under 15 minutes | High | Plan extraction |
| Final 5–10 minutes | Very High | Leave unless extract is close |
If you hear nearby gunfire or movement, assume someone is coming for the same loot. Finish fast or rotate.
Best Time to Extract
Leave when the run is already profitable.
Do not wait for one more spawn if you are carrying cores and sitting on 100K+ loot value.
| Situation | Best Move |
|---|---|
| 60K+ XP pace | Extract soon |
| 100K+ loot value | Extract soon |
| Players nearby | Leave |
| Under 15 minutes | Start extraction route |
| Safe fresh spawn | Kill only if extraction is still comfortable |
The biggest killer in this farm is not the Bastion. It is greed.
Common Mistakes That Ruin the Farm
- Fighting Bastions in the open
- Looting while exposed to a Bombardier
- Skipping ARC body loot and losing XP
- Dropping cores to carry junk
- Roaming too far from rear Departures
- Staying after the bunker opens with full bags
- Extracting too late while over-encumbered
Fix those, and the route becomes much more consistent.
Quick Route Checklist
| Step | Action |
|---|---|
| 1 | Queue Spaceport Hidden Bunker |
| 2 | Rotate to rear Departures |
| 3 | Pull Bastions/Bombardiers into cover |
| 4 | Kill Spotters first |
| 5 | Fully loot every major ARC body |
| 6 | Keep cores, stash heavy junk |
| 7 | Repeat until risk rises |
| 8 | Extract with time to spare |
FAQ
What is the best ARC Raiders XP farm after wipe?
The Hidden Bunker farm on Spaceport is one of the best PvE options after wipe. It gives reliable XP from Bastion and Bombardier kills plus extra XP from fully looting their parts.
Where is the best spot for the Hidden Bunker farm?
The best spot is the rear side of the Departures building on Spaceport. Bastions and Bombardiers spawn nearby, and the area has enough cover to control fights.
Do I need a Hullcracker for this farm?
No. A Level 4 Hullcracker is ideal because it kills heavy ARC units fast, but any reliable heavy-damage weapon can work. Budget setups are slower and riskier.
How much XP can I get from this route?
Most solid runs land around 60K–80K+ XP. A strong run with multiple fully looted Bastions and Bombardiers can hit around 79K XP or more.
What loot should I prioritize?
Prioritize Bastion Cores, Bombardier Cores, and rare components. Stash or drop heavy low-value parts when encumbered. Never trade a core for junk.
Summary
The ARC Raiders Hidden Bunker Spaceport farm is simple and strong: hold the rear Departures area, kill Bastions and Bombardiers, fully loot every body for XP, stash low-value weight, and extract before the raid turns hostile.
A clean run can deliver 60K–80K+ XP and 100K+ loot value. Stay disciplined. Keep the cores. Leave before greed deletes the run.

Most Popular Posts
- ARC Raiders Update 1.42: Phantom Targets Farming Guide (Glitched Wasps, Rewards, Regional Conditions)
- ARC Raiders Hullcracker Blueprints: Fastest Way to Complete The Major's Footlocker
- ARC Raiders Best Pop Trigger Strategy: Fast Phantom Targets Damage Guide
- ARC Raiders Subway Skin Guide: Unlock the Subterranean Outfit
- ARC Raiders Looting Mk. 3 Survivor Blueprint Guide: Best Blue Gate Route and Drop Locations
- ARC Raiders Medium & Heavy Gun Parts Blueprint Guide: Best Farm Route, Locations, and Refiner Crafting
Popular Category Lists
- ARC Raiders / (354)
- Grow a Garden / (294)
- CoD: Black Ops 7 / (167)
- Star Citizen / (163)
- MLB 26 / (159)
- Monopoly Go / (153)
- ARK Survival Ascended / (128)
- Steal a Brainrot / (99)
- Blox Fruits / (74)
- Adopt Me / (74)
- Forza Horizon 6 / (72)
- Sailor Piece / (68)
- Grow a Garden 2 / (68)
- Diablo IV / (62)
- CoD: BLACK OPS 6 / (55)
- Aion 2 / (53)
- Path of Exile 2 / (48)
- Monster Hunter Wilds / (46)
- Windrose / (44)
- COD: Modern Warfare 4 / (43)






