0
Created: Nov 6,2026 | ARC Raiders
ARC Raiders Bantam Best Loadout, Anvil and PvP Guides

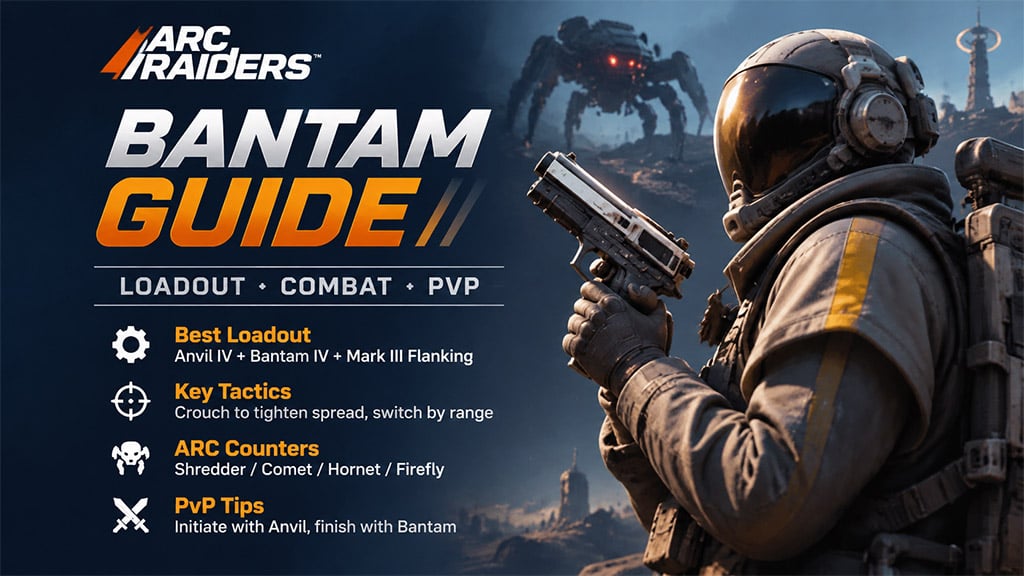
Best Bantam loadout: Anvil IV + Bantam IV + Mark III Flanking. Use the Anvil at mid-range, switch to the Bantam up close, and crouch to tighten your eight-round magazine's shot spread.
- Best Bantam Loadout
- Bantam Stats and Firing Tips
- How to Improve Bantam Accuracy
- Bantam vs. ARC Enemies
- Shredder
- Comet
- Hornet
- Firefly
- Best Bantam PvP Strategy
- 1. Against Aggressive Players
- 2. Against Retreating Players
- 3. Against Corner Holders
- Real Raid Results: Buried City and Blue Gate
- Buried City: Bantam vs. Bobcat IV
- Blue Gate: Successful Extraction
- Bantam Mistakes to Avoid
- FAQ (Frequently Asked Questions)
- 1. Is the Bantam good in ARC Raiders?
- 2. What is the best weapon to pair with the Bantam?
- 3. What is the best augment for the Bantam?
- 4. How many rounds does the Bantam hold?
- 5. Can the Bantam kill a Comet in one magazine?
Best Bantam Loadout
Equip these three items for the recommended cowboy build.
| Equipment | Recommended setup | Combat role |
|---|---|---|
| Primary | Anvil IV | Mid-to-long range |
| Secondary | Bantam IV | Close-range damage |
| Augment | Mark III Flanking | Faster weapon switching |
| Swap bonus | 33% | Reported switching-speed increase |
Use both hand cannons together. The Anvil covers the Bantam's range limitations, while Mark III Flanking reportedly increases switching speed by 33%.
Bantam Stats and Firing Tips
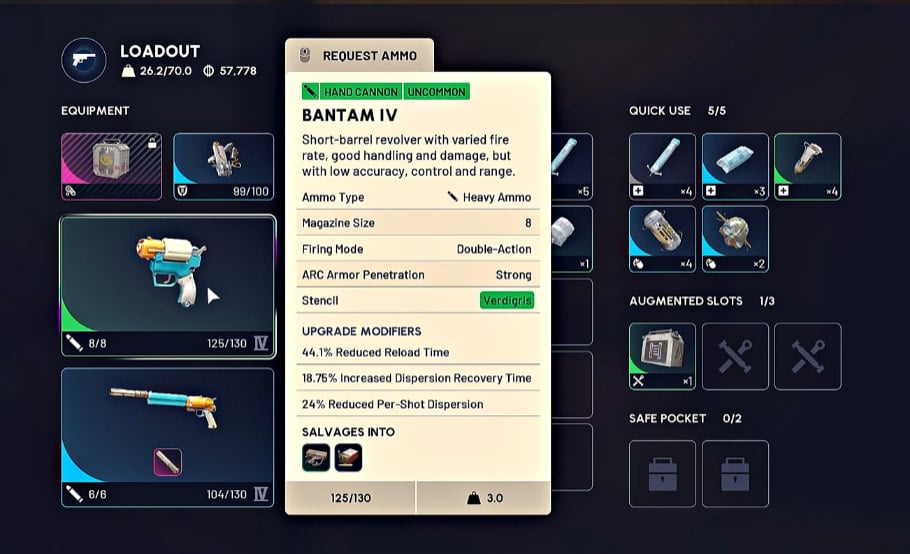
The Bantam carries eight rounds and reloads its entire magazine in one sequence, unlike the Anvil's individual round-loading system.
| Characteristic | Bantam |
|---|---|
| Magazine | 8 rounds |
| Ammunition | Heavy |
| Reload | Full-magazine reload |
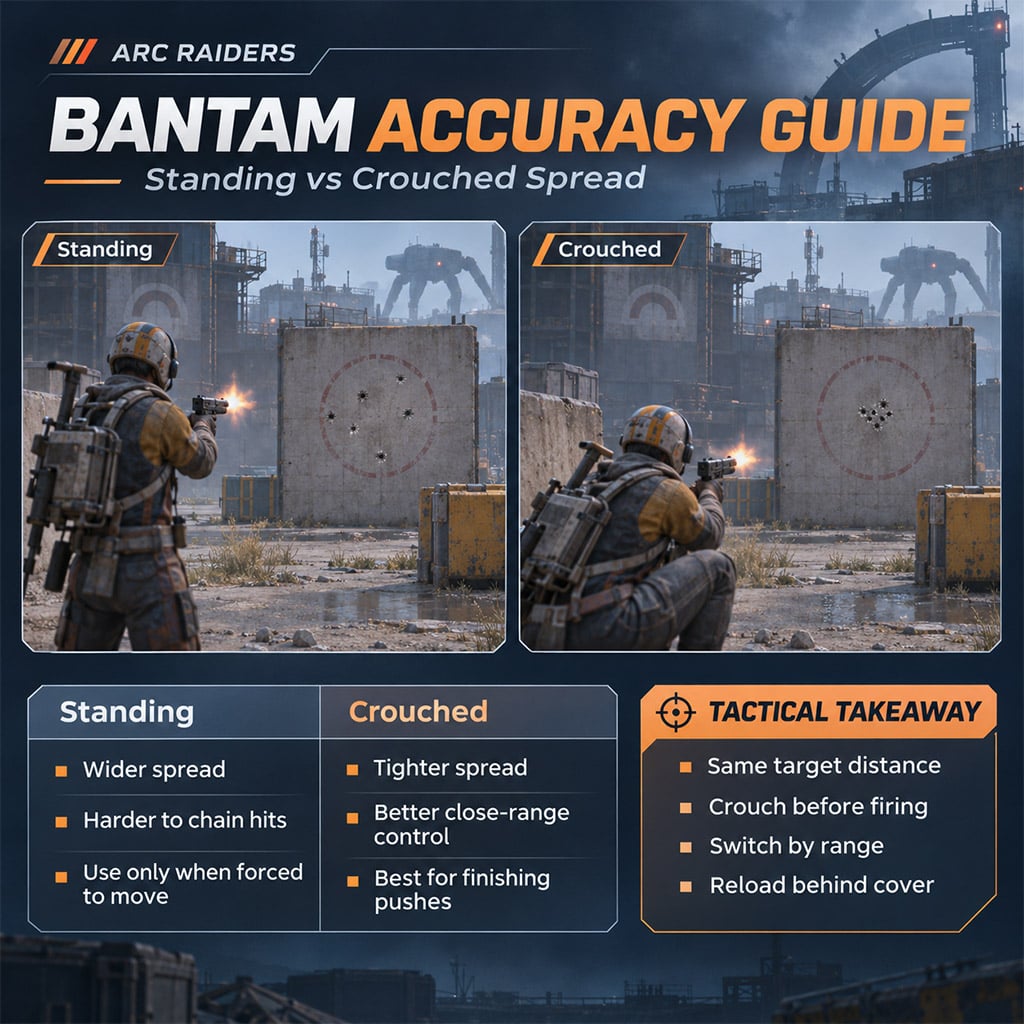
| Standing spread | Wider |
| Crouched spread | Tighter |
| Best role | Close-range combat |
Prioritize crouching over panic-firing. Our firing tests showed noticeably tighter spread when crouched.
How to Improve Bantam Accuracy
- Crouch: Tighten shot dispersion before firing.
- Aim deliberately: Keep your crosshair centered on the target.
- Control ammunition: Avoid wasting shots against moving enemies.
- Reload behind cover: Never expose yourself unnecessarily.
Bantam vs. ARC Enemies
Our ARC tests demonstrated strong close-range damage against four enemy types.
| ARC enemy | Test result | Best tactic |
|---|---|---|
| Shredder | Approximately two magazines | Close distance and land accurate shots |
| Comet | Eliminated within 8 rounds | Wait for its opening |
| Hornet | Strong armor damage | Maintain accurate aim |
| Firefly | Significant rotor damage | ADS and target rotors |
Prioritize the Comet for ammunition efficiency. Our test eliminated one within a single eight-round magazine.
Shredder
- Get close: Concentrate shots on the target.
- Manage reloads: Use cover before replenishing the magazine.
- Avoid missed shots: The recorded encounter required approximately two magazines.
Comet
- Wait for its opening: Do not waste ammunition prematurely.
- Unload all eight rounds: Concentrate your shots during the damage opportunity.
Hornet
- Track the target: Moving enemies make consistent hits harder.
- Avoid wasted shots: Switch to the Anvil if you cannot maintain accuracy.
Firefly
- Maintain distance: Avoid walking into flamethrower range.
- Aim down sights: Target the rotors instead of relying on hip-fire.
- Reposition: Use cover when the Firefly pressures you.
Best Bantam PvP Strategy
Use the Anvil to initiate fights and the Bantam to finish close-range engagements. Mark III Flanking supports faster transitions between both weapons.
| PvP situation | Weapon | Action |
|---|---|---|
| Mid-range enemy | Anvil | Land opening shots |
| Aggressive push | Bantam | Prepare for close combat |
| Retreating opponent | Anvil | Maintain pressure without chasing |
| Enemy behind corner | Bantam | Prepare for close-range contact |
| Multiple enemies | Situational | Prioritize cover and survival |
| Open sightline | Anvil | Avoid unnecessary pushes |
1. Against Aggressive Players
- Hold cover: Let opponents approach your position.
- Switch early: Prepare the Bantam before they reach point-blank range.
- Crouch and fire: Tighten spread during the engagement.
2. Against Retreating Players
Our Blue Gate encounter exposed the Bantam's biggest weakness: chasing opponents who maintain distance.
- Stay on the Anvil: Maintain pressure without forcing close-range combat.
- Use cover: Avoid crossing open ground.
- Stop chasing: Let the opponent disengage rather than surrendering positioning.
3. Against Corner Holders
- Prepare the Bantam: Expect close-range combat.
- Check additional angles: Avoid rushing into multiple opponents.
- Preserve cover: Never sacrifice positioning for an uncertain elimination.
Pro tip: A retreating opponent is not automatically a Bantam opportunity. Keep the Anvil equipped until the distance favors your secondary weapon.
Real Raid Results: Buried City and Blue Gate
Our two raid tests demonstrated the loadout's PvP potential and the importance of extraction discipline.
Buried City: Bantam vs. Bobcat IV
One opponent carried a well-equipped Bobcat IV:
- Compensator III
- Stable Stock III
- Light Mag III
The Bantam loadout secured the elimination despite the opponent's equipment.
However, multiple third-party engagements eventually cost the player the raid.
Lesson: Stop pursuing unnecessary fights when carrying valuable loot.
Blue Gate: Successful Extraction
The second raid produced several successful fights against opponents carrying:
- Rattler IV
- Beretta IV
- Renegade
The player also secured a Survivor Augment Blueprint and extracted with four loaded weapons and multiple attachments.
| Raid result | Outcome |
|---|---|
| Weapons extracted | 4 |
| Attachments | Multiple |
| Blueprint | Survivor Augment Blueprint |
| Extraction | Successful |
| PvP | Multiple eliminations |
The better decision was extracting instead of searching for another fight. The Buried City raid demonstrated the cost of ignoring that rule.
Bantam Mistakes to Avoid
| Mistake | Fix |
|---|---|
| Using Bantam at long range | Switch to Anvil |
| Standing during close-range fights | Crouch before firing |
| Hip-firing at Fireflies | Aim for rotors |
| Chasing retreating enemies | Maintain Anvil pressure |
| Reloading in the open | Find cover |
| Pushing multiple opponents | Reposition or disengage |
| Fighting with valuable loot | Prioritize extraction |
Biggest mistake: Treating the Bantam as a replacement for the Anvil instead of a specialized close-range weapon.
FAQ (Frequently Asked Questions)
1. Is the Bantam good in ARC Raiders?
Yes. The Bantam delivers strong close-range damage with an eight-round magazine, but performs poorly when forced into unfavorable long-range engagements.
2. What is the best weapon to pair with the Bantam?
The Anvil IV is the recommended pairing because it handles mid-to-long-range fights while the Bantam specializes in close-range damage.
3. What is the best augment for the Bantam?
Mark III Flanking is the recommended augment for the Anvil-Bantam combination, with a stated 33% weapon-switching bonus.
4. How many rounds does the Bantam hold?
The Bantam holds eight rounds and reloads its magazine in one sequence rather than loading individual rounds like the Anvil.
5. Can the Bantam kill a Comet in one magazine?
Yes. Our Comet test achieved an elimination within eight rounds at close range.


I’m Kwame Asante, a Ghanaian Staff Writer at GGWTB covering anime combat, fighting games, and adventure progression. My guides connect combos and ability choices with the grind behind them: which upgrades open up your build, and which can wait. A rare unlock is exciting—but it needs to earn its place in your lineup.
Most Popular Posts
- ARC Raiders Update 1.42: Phantom Targets Farming Guide (Glitched Wasps, Rewards, Regional Conditions)
- ARC Raiders Best Pop Trigger Strategy: Fast Phantom Targets Damage Guide
- ARC Raiders Subway Skin Guide: Unlock the Subterranean Outfit
- ARC Raiders Frozen Trail Update Guide: Pendola Pass, Frigate & Meta Loadouts
- ARC Raiders Ascending the Mountain: Fast Loot Routes and Item Guide
- ARC Raiders Broken Guidance System and Dual Anvil Build Guide
Popular Category Lists
- ARC Raiders / (368)
- Grow a Garden / (298)
- CoD: Black Ops 7 / (167)
- Star Citizen / (166)
- MLB 26 / (159)
- Monopoly Go / (153)
- ARK Survival Ascended / (131)
- Steal a Brainrot / (100)
- Adopt Me / (75)
- Blox Fruits / (74)
- Forza Horizon 6 / (72)
- Sailor Piece / (68)
- Grow a Garden 2 / (68)
- Diablo IV / (62)
- Aion 2 / (61)
- CoD: BLACK OPS 6 / (55)
- COD: Modern Warfare 4 / (51)
- Maplestory Classic / (49)
- Path of Exile 2 / (48)
- Monster Hunter Wilds / (46)