0
0 Created: Jul 21,2026 | ARK Survival Ascended
ARK Survival Ascended Best Lunar Solo Base Spot on Genesis 1

Genesis 1 Lunar looks great until your bed refuses to spawn. That's the trap. Beds fail in most perfect cliff spots — so before you move a single vault, test the spawn. This guide skips the fluff and gives you the exact build order that keeps solo/duo bases alive.
- Why Lunar Cliffs Work for Solo PvP
- The Bed Problem (Read This First)
- Base Spot Checklist
- Farm This First
- Claiming the Spot: Step-by-Step
- 1. Scout First, Trust Nothing
- 2. Place Platform High
- 3. Test the Bed — Before Anything Else
- 4. Transfer Loot in Stages
- Turret & Generator Layout
- Coverage Priorities
- Run 3 Generators, Not 1
- Plant X: Cheap Passive Defense
- Move Order: Starter → Main Base
- Mistakes That Kill Solo Bases
- Progression After Going Online
- FAQ
- What's the best Genesis 1 Lunar spot for solo players?
- Why are working beds so critical here?
- How many turrets do I need to start?
- Why run 3 generators instead of 1?
- When should I move loot to the new base?
- Summary
Why Lunar Cliffs Work for Solo PvP
Lunar terrain is vertical and awkward — that's the point.
- Fewer approach angles = turrets cover more ground per unit
- Cliff platforms block most ground tames outright
- Low traffic zone — most tribes skip Lunar for caves
- Open sightlines let you spot scouts early
You're not owning the map. You're buying survival time.
The Bed Problem (Read This First)
Many cliff spots look solid but won't let you respawn. Non-negotiable rule: test the bed before you build anything else. A gorgeous platform with a dead bed is just decoration you'll cry about later.
Base Spot Checklist
| Requirement | Target | Why |
|---|---|---|
| Working beds | 1–3 confirmed | No respawn = no defense |
| Platform height | As high as reachable | Kills Stego jump-access |
| Approach angles | 1–2 max | Turrets stay efficient |
| Generator safety | Covered, not exposed | Keeps turrets online |
| Layout space | Room for vaults + turrets | Lets you scale up |
Farm This First
| Priority | Resource | Notes |
|---|---|---|
| 1 | Metal | Smelt before transfer |
| 2 | Electronics | Tek creatures if possible |
| 3 | Polymer | Organic works fine early |
| 4 | Cementing Paste | Keep a surplus |
| 5 | Gasoline | Overpack this |
| 6 | Bullets | Split across turrets |
| 7 | Beds | Bring 4+ |
| 8 | Cliff Platform | Placement > everything |
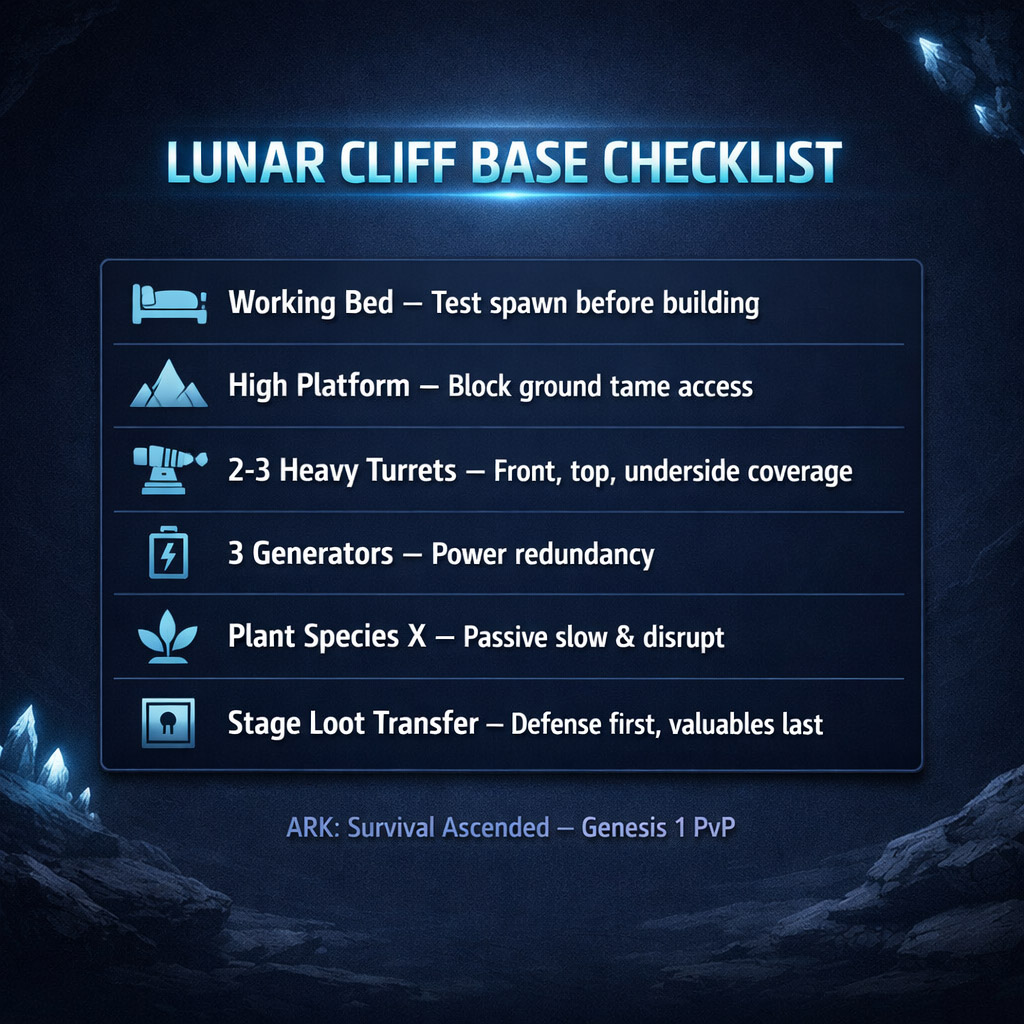
Minimum viable base: 2–3 Heavy Turrets, 2 Generators, 3 Beds, 300+ ammo/turret, 2–4 Plant X, 100+ gas.
Solid base: 4–6 turrets, 3 generators, 6 beds, 800+ ammo/turret.
Claiming the Spot: Step-by-Step
1. Scout First, Trust Nothing
Look for a high wall, narrow approach, and blocked tame landing zones. Genesis building logic will still betray you — assume nothing until tested.
2. Place Platform High
Higher = harder for Stegos to jump, harder for ground tames to reach, better downward turret angles. Too low, and it's just a free loot box with extra steps.
3. Test the Bed — Before Anything Else
| Result | Action |
|---|---|
| Works immediately | Proceed |
| Works in one small zone | Wall it off, build around it |
| Doesn't work | Move platform or abandon |
| Worked, then broke after building | Re-test after every major structure change |
If only a tiny patch spawns you, that patch is now your entire base core. Protect it like it's your only vault.
4. Transfer Loot in Stages
Platform → bed confirmed → generator → first turret → ammo → 2nd/3rd turret → vault → high-value loot → Plant X → metal upgrades.
Never front-load loot before turret #1 is live. One scout ends your run otherwise.
Turret & Generator Layout
Coverage Priorities
| Turret | Job |
|---|---|
| Front-facing | Blocks direct push |
| Top/side | Stops drop-ins |
| Lower-angle | Covers underside climbs |
| Generator-cover | Protects power |
| Inner turret | Punishes anyone who reaches the platform |
Common mistake: every turret facing outward, zero coverage if someone lands inside. Always keep one turret pointed in.
Run 3 Generators, Not 1
| Setup | Risk |
|---|---|
| 1 generator | High — single point of failure |
| 2 generators | Moderate |
| 3 generators | Recommended for solo cliff builds |
One generator down shouldn't mean all turrets go dark. Redundancy buys time — that's the whole game.
Plant X: Cheap Passive Defense
Not a damage tool — a disruption tool. Slows movement, reveals scouts, forces raiders to waste time clearing it.
Place it: near approach angles, above turret lines, around the generator, near beds/vaults, and on any sketchy side route. If it's already growing in a weird Lunar spot — keep it. Free defense is free defense.
Move Order: Starter → Main Base
1. Beds + basic tools
2. Turrets + ammo
3. Generator + gas
4. Electronics/polymer/paste
5. Weapons/armor
6. Tames/cryos
7. Crafting stations
8. Everything else
Leave behind: low-value mats, spare tools, anything replaceable. If the starter gets found mid-move, you want the main base functional — not fully loaded.
Mistakes That Kill Solo Bases
- Building before testing beds — the #1 killer, no exceptions
- Platform too low — invites Stegos and climbers
- One generator — one kill = total blackout
- Loot before defense — a platform with no ammo is a shelf
- Ignoring the underside — most raids come from the blind angle
- Assuming hidden = safe — scouting is aggressive now, build like you'll be found
Progression After Going Online
Stage 1 — Stabilize: more ammo, more gas, more beds, metal upgrades, extra Plant X.
Stage 2 — Expand: more turrets, better angles, split power lines, extra vaults.
Stage 3 — Start Raiding: only once the base can survive without you. Bring grapples, backup kits, cryos, explosives you can afford to lose.
Skip Stage 1 and rush PvP, and you won't have a base to come back to.
FAQ
What's the best Genesis 1 Lunar spot for solo players?
A high cliff platform where beds actually work. Height and hiding don't matter if you can't respawn there.
Why are working beds so critical here?
No respawn = no comeback. One failed raid attempt and you're permanently locked out if beds don't function. Test before committing loot.
How many turrets do I need to start?
2–3 Heavy Turrets minimum — front, top/side, and lower angle. Ammo matters as much as turret count.
Why run 3 generators instead of 1?
One kill shouldn't drop your whole turret grid. Three generators mean partial coverage survives even if one goes down.
When should I move loot to the new base?
Only after bed confirmed + generator running + first turret online. Defense items move first, valuables move last.
Summary
Function beats appearance, every time. Find a high Lunar cliff spot, test the bed first, place the platform as high as you can reach, and get 2–3 turrets running fast. Run multiple generators. Cover the top, front, and underside. Move loot in stages — defense before valuables.
Find a spot where beds actually work? Treat it like gold. That's the base that's still standing when everything else goes wrong.


The GGWTB Editorial Team features 10 full-time gaming editors and 23 specialist contributors, delivering hands-on tested walkthroughs, easter egg breakdowns, and game updates.
LUKE — who spearheads our in-depth ARK Survival Ascended, COD: Modern Warfare 4 guides, and patch notes—every guide is rigorously verified on live servers for accuracy.

Most Popular Posts
- ARK Genesis Part 1 Mission Loot Guide: Best Farms for Flak, Tech & Hazard Gear
- ARK Survival Ascended Lunar Biome Cave Locations: All 6 Caves From World Teleporter
- ARK: Survival Ascended Bjarnheim Farming Guide: Element, Pearls, Metal & Boss Routes
- ARK: Survival Ascended Lumina Dinos Guide: Spawn Locations, Taming Steps & Umbra Synergy
- ARK Survival Ascended Best Genesis Missions for Loot and Hexagons
- Thylacoleo Location on Genesis 1 (ASA): Spawn Coordinates, Force-Spawn Method & Fast Taming Guide
Popular Category Lists
- ARC Raiders / (344)
- Grow a Garden / (292)
- CoD: Black Ops 7 / (167)
- Star Citizen / (160)
- MLB 26 / (159)
- Monopoly Go / (152)
- ARK Survival Ascended / (126)
- Steal a Brainrot / (98)
- Blox Fruits / (74)
- Adopt Me / (73)
- Forza Horizon 6 / (72)
- Sailor Piece / (68)
- Grow a Garden 2 / (68)
- Diablo IV / (62)
- CoD: BLACK OPS 6 / (55)
- Path of Exile 2 / (48)
- Monster Hunter Wilds / (46)
- Aion 2 / (46)
- Windrose / (44)
- Donut SMP / (41)