0
0 Created: Aug 4,2026 | ARK Survival Ascended
ARK Survival Ascended Genesis Secret Drakeling Hoard Key Farm: Fastest XP Route

Forget grinding for hours. This Genesis loop turns a basic Megalodon into a Hoard-key machine. No elite tames, no fancy saddles — just bleed damage, a well-timed finishing blow, and Tek Claws doing the conversion work.
Here's the whole system, stripped down to what actually matters.
- The Loop in One Sentence
- Gear Checklist
- Where to Go
- Why This Works (The Mechanic)
- Step-by-Step Execution
- Fast Reference Table
- Mistakes That Kill Your Run
- Recommended Builds
- Loot Payoff
- FAQ
- Why use a Megalodon instead of a stronger tame?
- Why can't the Megalodon land the final hit?
- How much XP does one Alpha Mosa actually give?
- What if Alpha Mosas stop being passive/bugged?
- Is this farm viable solo?
- Bottom Line
The Loop in One Sentence
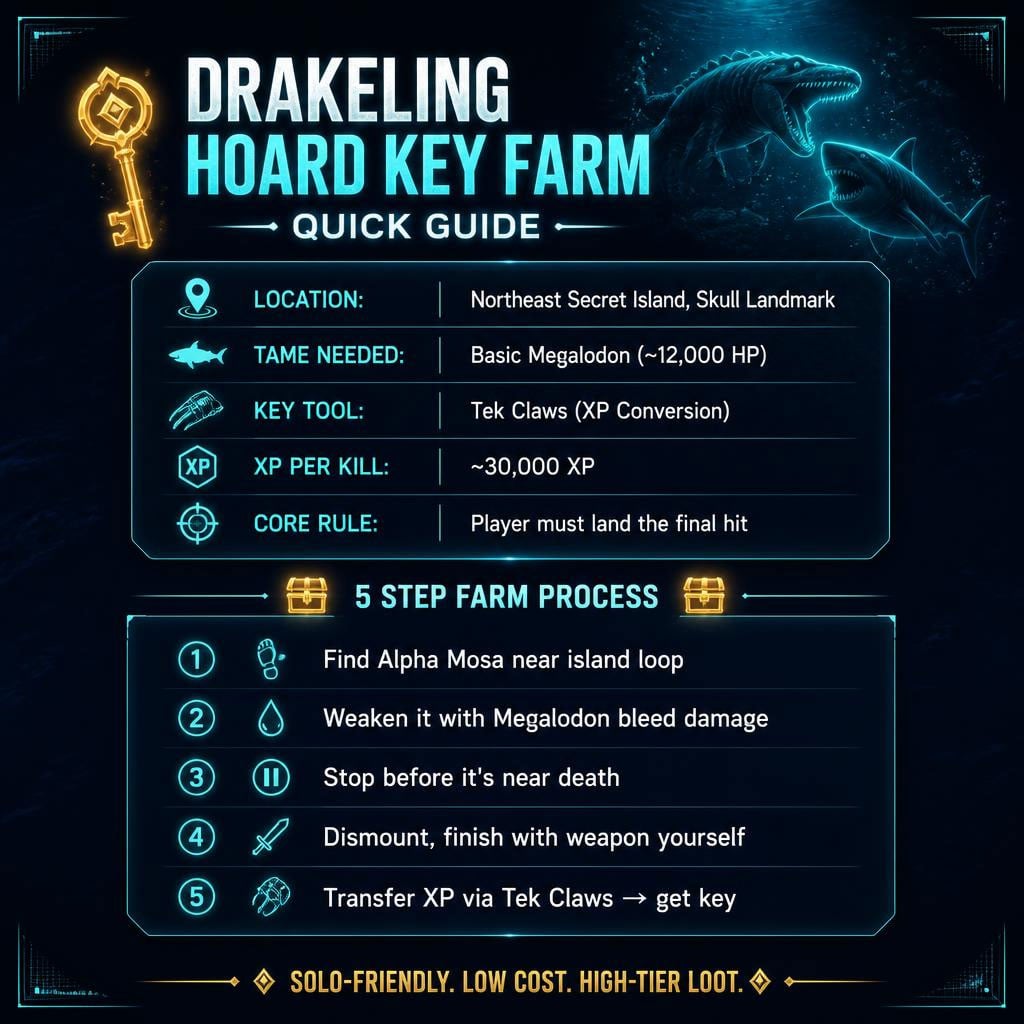
Weaken an Alpha Mosa with your Megalodon → finish it yourself → dump the XP through Tek Claws → get a key → open the chest.
That's it. The entire farm collapses if you get one detail wrong: letting the Megalodon land the kill. More on that below.
Gear Checklist
| Item | Minimum Spec | Why |
|---|---|---|
| Megalodon | ~12,000 HP | Enough buffer to tank a hit or two |
| Saddle | Primitive is fine | Better saddle = more margin for error |
| Weapon | Sword, pike, or shotgun | You need this for the finishing blow |
| Tek Claws | Non-negotiable | Converts stored XP into the key |
| Tek Binoculars / Magnifying Glass | Optional | Lets you check Alpha Mosa HP before the kill shot |
| Scuba / O2 support | Recommended | You're finishing this underwater |
No Tek Claws = no key. Check your hotbar before you leave base.
Where to Go
Secret northeastern island. Look for the giant skull landmark — that's your confirmation you're in the right spot.
- Start at roughly 59.6 latitude, north side of the island.
- Swim a full loop clockwise or counter-clockwise.
- Alpha Mosas typically show up within 1–2 minutes if spawns are active.
Don't bail early. A full lap almost always turns one up.
Why This Works (The Mechanic)
Alpha Mosasaurs carry huge HP pools — which means huge XP payouts when killed. On this route, they're often oddly passive and barely fight back.
Because Megalodons apply bleed, they chew through that HP bar fast without needing insane bite damage. That's the whole trick: bleed does the grinding, you do the finishing.
The catch: if the Megalodon or bleed lands the kill, you get zero XP credit. The system only rewards the player's final hit.
Step-by-Step Execution
1. Start north, scan as you swim.
Move slow enough to check above and below your Meg — Alphas hide near terrain and the waterline.
2. Ignore everything except Alpha Mosas.
Regular Mosas, sharks, whatever — not worth your time. Stay on target.
3. Bite it down with the Megalodon.
Let bleed stack. Watch your own HP too — if the Alpha connects a couple times, don't panic, just reposition.
4. Check HP before it gets low.
If your Meg hits for ~13,000 and the Alpha's sitting at ~8,000 HP, that next bite kills it. Stop here.
5. Dismount. Finish it yourself.
Sword, pike, shotgun — whatever you've got. If it's bugged and passive, this is trivial. If it fights back, stay close to your Meg for a quick remount.
Expect roughly 30,000 XP per kill in this pattern.
6. Convert with Tek Claws:
1. Equip Tek Claws
2. Cycle to Stored Experience
3. Aim at your tame
4. Transfer
5. Receive key
6. Follow the marker to the chest
Fast Reference Table
| Stage | Action | Watch For |
|---|---|---|
| 1 | Reach NE island | Skull landmark = correct zone |
| 2 | Loop from north side | Full circuit before giving up |
| 3 | Meg bites Alpha | Let bleed do the work |
| 4 | Check HP | Stop before it's one-shot territory |
| 5 | Player finishes kill | This step secures the XP |
| 6 | Tek Claws transfer | No Claws = no key |
| 7 | Follow key marker | Chest spawns on arrival |
Mistakes That Kill Your Run
| Mistake | Consequence | Fix |
|---|---|---|
| Letting bleed finish the kill | Zero XP | Stop attacking earlier than feels necessary |
| Weak Meg, reckless push | Risk of dying mid-fight | Retreat and heal if HP drops fast |
| No Tek Claws | Can't convert XP at all | Check hotbar before leaving base |
| No oxygen | Drowning mid-finish | Bring scuba or chowder |
| Bailing too early | Missed spawns | Complete the full loop first |
The bleed mistake is the #1 run-killer. If the Alpha's low, do not sneak in one more bite.
Recommended Builds
| Tier | Setup | Feel |
|---|---|---|
| Minimum | 10–12K HP Meg, primitive saddle | Workable, stay sharp |
| Comfortable | 15K+ HP, decent saddle, Tek Binoculars | Consistent and smooth |
| Tribe Setup | Two Megs or mate-boosted pair, scuba | Very forgiving |
| High-End | Imprinted Meg, Tek gear | Fast, near risk-free |
Better saddle ≠ faster kills — it just buys you room to screw up without dying.
Loot Payoff
Drakeling Hoard chests drop high-tier weapons, armor, saddles, and Tek-related rewards. The value isn't one chest — it's how fast you can chain multiple runs.
Best for:
- Undergeared players needing a gear spike
- Tribes prepping for late-game Genesis content
- Anyone wanting repeatable loot without a full aquatic army
FAQ
Why use a Megalodon instead of a stronger tame?
Bleed damage makes basic Megalodons surprisingly effective against high-HP targets. No need for an expensive aquatic tame — the mechanic does the heavy lifting.
Why can't the Megalodon land the final hit?
Because the XP reward only triggers off the player's finishing blow. If bleed or the Meg's bite kills it, that XP is gone.
How much XP does one Alpha Mosa actually give?
In tested runs, roughly 30,000 XP per kill — enough to move the key process forward through Tek Claws.
What if Alpha Mosas stop being passive/bugged?
The method still works, just gets riskier. Bring a stronger Meg, better saddle, and healing support if they start fighting normally.
Is this farm viable solo?
Yes — it's one of the more solo-friendly high-value farms in Genesis. Bring oxygen support and a reliable finishing weapon, and skip unnecessary fights.
Bottom Line
This farm works because it turns one of the ocean's scariest creatures into a low-cost, high-reward XP pipeline. Circle the island, drop the Alpha with bleed, finish it yourself, convert through Tek Claws.
One rule matters more than anything else: never let the kill happen automatically. Master that, and this becomes one of the fastest, cheapest ways to chase top-tier loot in Genesis.


The GGWTB Editorial Team features 10 full-time gaming editors and 23 specialist contributors, delivering hands-on tested walkthroughs, easter egg breakdowns, and game updates.
LUKE — who spearheads our in-depth ARK Survival Ascended, COD: Modern Warfare 4 guides, and patch notes—every guide is rigorously verified on live servers for accuracy.

Most Popular Posts
- ARK: Survival Ascended Bjarnheim Farming Guide: Element, Pearls, Metal & Boss Routes
- ARK: Survival Ascended Lumina Dinos Guide: Spawn Locations, Taming Steps & Umbra Synergy
- ARK: Survival Ascended Giant Queen Bees: Find and Tame in Genesis 1
- ARK Survival Ascended Magmasaur Guide: Egg Theft, Raising, and Metal Farming Tips
- ARK Astraeos Artifact Locations: 13 Caves, Routes, and Prep
- ARK Survival Ascended Desmodus Spawn Locations, Taming Method, and Best Uses
Popular Category Lists
- ARC Raiders / (355)
- Grow a Garden / (294)
- CoD: Black Ops 7 / (167)
- Star Citizen / (163)
- MLB 26 / (159)
- Monopoly Go / (153)
- ARK Survival Ascended / (128)
- Steal a Brainrot / (99)
- Blox Fruits / (74)
- Adopt Me / (74)
- Forza Horizon 6 / (72)
- Sailor Piece / (68)
- Grow a Garden 2 / (68)
- Diablo IV / (62)
- CoD: BLACK OPS 6 / (55)
- Aion 2 / (53)
- Path of Exile 2 / (48)
- Monster Hunter Wilds / (46)
- Windrose / (44)
- COD: Modern Warfare 4 / (43)