0
0Blox Fruits Fastest Way to Second Sea: The Max Efficiency Route Guide
- HILL
- Share
- Blox Fruits
- 01/26/26
- 1779
Blox Fruits Starting over at level 1 with endgame trinkets feels illegal—in the best way. You feel like a god, one-shotting mobs that usually take minutes to whittle down. But the First Sea has a funny way of reminding us who is really in charge: it's not your damage output; it's the spawn timers, travel distances, and scaling mechanics.

In this guide, we are breaking down a practical, repeatable approach to pushing levels fast. We will walk through what decisions actually matter, what broke during our 3-hour speedrun test, and why having the strongest items still doesn't guarantee you'll breeze through the level gates. We are writing this as a field report: here is what we tested, where we stalled, and exactly how you can avoid the traps that wasted our time.
- Damage Isn't the Only Speed Stat
- Why this matters
- The Build Philosophy: Adapt or Stall
- Trinkets: Treat them as Stat Injections
- Stats: When to Pivot
- What the Test Run Proved (The Numbers)
- The Twist: The Wheel of Pain
- Practical Route: Progression That Respects Reality
- Prioritization Table
- A Simple Decision Tree
- Fruits & Weapons: What Actually Helped
- Dark vs. Ice/Light Style Kits
- Weapon Upgrades
- The Real Bottlenecks (And How to Fix Them)
- Bottleneck 1: Spawn Pacing
- Bottleneck 2: Boss Timers
- Bottleneck 3: The Death Tax
- Build Sheets
- Stat Allocation Templates
- FAQ
- Closing Takeaways
↖ Damage Isn't the Only Speed Stat
Speedrunning progression is not just about seeing big yellow numbers. It is about XP per minute, and that is a three-part equation that most players miscalculate:
- 1. Kill speed (Your DPS and uptime)
- 2. Spawn density & respawn delay (How quickly targets reappear)
- 3. Route efficiency (Time spent sailing, climbing, and running back to quest givers)
↖ Why this matters
If you find yourself waiting for spawns to reappear, then adding extra damage barely moves the needle. You are capped by the game's clock, not your gear. Conversely, if you find yourself dying to bosses because you went glass cannon, the run back from the spawn point wipes out all the time you saved with high damage. That is the classic First Sea trap.
↖ The Build Philosophy: Adapt or Stall
We didn't just stick to one build; we rotated stats and trinkets based on what the account needed at that specific moment.
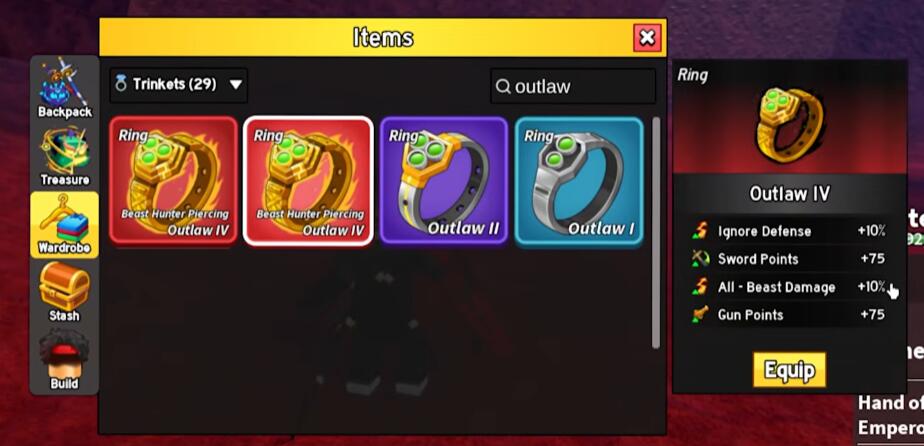
↖ Trinkets: Treat them as Stat Injections
In our run, we relied on swapping gear to match our primary damage source. We used high-stat rings (e.g., +240 Melee or Sword) and, crucially, an accessory with a +10% XP bonus. That 10% might sound small, but over the course of 700 levels, it essentially deletes hours of grinding.
Decision Rule:
- If you are mainly using Fists/Combat: Stack Melee rings.
- If you are mainly using Sword M1s: Stack Sword rings.
- If you are relying on Fruit skills: Prioritize Fruit damage trinkets (but watch your energy consumption).
↖ Stats: When to Pivot
We saw a distinct pattern during the run. In the early islands, damage stacking allowed us to delete quests instantly. However, by the mid-First Sea, enemies stopped getting one-shot, and bosses started hitting like trucks.
If you discover bosses are taking 30–60 seconds to kill AND you are dying even once, then you must shift points into Defense. A single death can erase the progress of three quest turn-ins.
↖ What the Test Run Proved (The Numbers)
We tracked this run with a strict timer to see if max gear could carry us.
- Target: Reach Second Sea (approx. Level 700) in 3 hours.
- Actual Result:Level 578 in 3 hours.
Key Milestones:
- Level 60: Reached in ~15 minutes (Early game gear scaling is absurd).
- Level 173: Reached in ~40 minutes.
- The Wall: Progress slowed drastically once travel times increased and boss fights required kiting.
↖ The Twist: The Wheel of Pain
To simulate bad luck or changing conditions, we used a random wheel to remove pieces of gear every 30 minutes. This exposed a critical truth: Your best gear is only the best if it matches your stats. Losing a Sword bonus while you are spec'd into Sword stats is like driving with the handbrake on. You have to be ready to respec immediately.
↖ Practical Route: Progression That Respects Reality
Below is a route blueprint focused on behavior, not just geography. The fastest route depends on minimizing downtime.
↖ Prioritization Table
| Stage | Primary Goal | Common Mistake | What We Do Instead |
|---|---|---|---|
| Early Islands (Lv 1–60) | Rush quests, keep moving. | Overthinking fruit choices. | Use the best M1 (Basic Attack) source you have; turn in quests instantly. |
| Mid Islands (Lv 60–175) | Maintain XP/min. | Farming spread-out mobs. | Pick zones with tight enemy packs; avoid long walks to quest NPCs. |
| Prison Zones (Lv 175–300+) | Farm bosses efficiently. | Dying to boss burst damage. | Add Defense stats; chain bosses only when respawns align. |
| Travel-Heavy Zones | Avoid dead time. | Sailing too early. | Only travel when you are strictly eligible for the next quest band. |
| Late First Sea (Lv 450+) | Prevent stall. | Relying on long cooldowns. | Use an M1-heavy fruit (Light/Ice/Buddha) to keep damage constant. |
↖ A Simple Decision Tree
1. Are we waiting on NPC spawns?
Yes → Move to a denser area or pivot to a boss loop.
2. Are we dying to bosses?
Yes → Add Defense and use safer skill cycles (stuns/range).
3. Did we lose a key damage source?
Yes → Immediately swap the build to match remaining bonuses.
4. Do we have an M1-capable fruit?
Yes → Consider moving stats into Fruit to stabilize clear speed.
↖ Fruits & Weapons: What Actually Helped
We tested a few pivots that mattered more than the raw numbers on the screen.
↖ Dark vs. Ice/Light Style Kits
Dark-like kits are excellent for PvP combos, but their lack of M1 pressure makes grinding feel sluggish if your sword or melee stats aren't maxed.
In contrast, Ice/Light-style kits (with M1 swords or fast hit cadence) improve quest throughput significantly.
If you discover your build becomes skill-only, your downtime will spike. You end up waiting on cooldowns or energy regen. M1 kits smooth out that curve, allowing you to click-to-kill while skills recharge.
↖ Weapon Upgrades
A common trap is picking the higher tier weapon that actually swings slower. If you find your new sword feels clunky, it is usually a downgrade for grinding—even if the individual hit damage is higher. Quests reward kills per minute, not damage per screenshot.
↖ The Real Bottlenecks (And How to Fix Them)
↖ Bottleneck 1: Spawn Pacing
When only three NPCs exist at once, your god-tier damage stops mattering because you run out of targets.
The Fix: Choose areas where targets are clustered, even if the quest XP is slightly lower. Walking 10 seconds to the next pack is 10 seconds of zero XP.
↖ Bottleneck 2: Boss Timers
Some bosses have long spawn windows. Waiting for them is rarely optimal unless the XP payout is massive.
The Fix: Treat bosses as bonus spikes, not the main meal. Only farm them if you can cycle between the boss and normal mobs without standing still.
↖ Bottleneck 3: The Death Tax
We cannot stress this enough: a single death can erase minutes of progress due to travel time.
The Fix: Keep the XP accessory on, but don't be stubborn. If a boss chunks 50% of your HP in one hit, put points into Defense immediately.
↖ Build Sheets
↖ Stat Allocation Templates
These aren't perfect PvP builds. They are speedrun-safe templates designed to keep you moving.
| Situation | Stat Focus | Why |
|---|---|---|
| One-shotting NPCs | All-in Damage (Sword/Melee) | Maximizes XP/min when survival isn't an issue. |
| Bosses hitting hard | 70% Damage / 30% Defense | Prevents deaths and keeps momentum. |
| Lost Weapon Trinket | Pivot to Fruit Main | Aligns bonuses with your actual damage source. |
| Low Energy | Balanced Melee/Defense | Ensures you can dash and dodge without waiting. |
↖ FAQ
1. Why didn't max trinkets carry you to Second Sea in 3 hours?
Because First Sea speed is capped by spawn density, travel time, and death penalties. Max trinkets inflate your damage, but they don't make NPCs spawn faster or make your boat sail faster.
2. Should we always wear the +10% XP accessory?
Yes, unless it causes repeated deaths. If you find you are dying to bosses because you lack a Defense/Health accessory, then trading that 10% XP for survivability is actually faster overall.
3. What is the biggest mistake that slows most runs?
Staying too long in a travel-heavy zone or doing scattered quests. If you discover you spend more time walking than fighting, the route is wrong.
4. Is an M1 fruit required?
Not strictly, but it is a massive stabilizer. If you lose your sword or melee bonuses, an M1-capable fruit (like Light or Ice) prevents your grind from becoming entirely dependent on cooldowns.
5. How should we react after losing a key trinket or stat?
Immediately respec your playstyle.
Lost Sword bonus? Stop forcing sword DPS.
Lost Fruit bonus? Don't sink more points into Fruit.
Lost damage overall? Add Defense and lean on safer, slower clears.
↖ Closing Takeaways
Max gear makes the opening stretch explode with progress, but the First Sea eventually turns into a time-management problem, not a damage check. When we hit Level 578 at the 3-hour mark, the story wasn't gear isn't strong enough—it was downtime scales harder than stats.
Next time we attempt this challenge, we would lock in two parallel damage plans (M1 fruit + one weapon path), budget Defense earlier for boss islands, and aggressively route around slow spawns, even if the quest text looks efficient on paper. Speed is about flow, not just force.
Most Popular Posts
- Blox Fruits Update 30 Guide: Release Date, New Fruit, Venom Rework, Dark Rework
- Blox Fruits Venom Rework Update Guide: Release Window, Magnet Fruit, and What to Prepare
- Blox Fruits Update 30 Guide: Magnet Fruit, Venom Rework, Dark Rework, Release Prep
- Blox Fruits Meta Builds Ranked: Best PvP Builds for Public Servers
- Blox Fruits Update 30 Guide: Fourth Sea Rumors, New Fruits, Pink Portal, and What to Prepare
- Blox Fruits Update 32 Guide: Venom Rework, Magnet Fruit, Sea Reworks, PvP Return
Popular Category Lists
- Grow a Garden / (286)
- ARC Raiders / (266)
- CoD: Black Ops 7 / (166)
- Monopoly Go / (146)
- MLB 26 / (145)
- Star Citizen / (116)
- Steal a Brainrot / (89)
- ARK Survival Ascended / (74)
- Sailor Piece / (68)
- Forza Horizon 6 / (63)
- Diablo IV / (61)
- Blox Fruits / (60)
- CoD: BLACK OPS 6 / (55)
- Adopt Me / (53)
- Path of Exile 2 / (48)
- Monster Hunter Wilds / (46)
- Windrose / (44)
- Grow a Garden 2 / (42)
- Path of Exile / (40)
- Bee Swarm Simulator / (36)