0
0 Created: Aug 31,2026 | EverQuest Legends
EverQuest Legends Diamondine Earring Guide: Farm Route, Lasna Shirun & BiS Ear Comparison

Ear slots are the graveyard of mid-game gearing. Your weapons improve, your chest improves, and your ears stay stuck at level 20. The Diamondine Earring fixes that in one repeatable farm: it drops from Lasna Shirun, carries Affliction Efficiency I, and scales into plus-versions the deeper you push instance tiers.
We have run this route enough times to know exactly where it kills people. Here is the full loop: tier selection, waypoints, fake walls, room break, and the honest comparison against La Nunga's ruby earring.
Why This Earring Is Worth the Run
Why chase an ear item when the slot feels interchangeable? Because this one does three jobs at once:
- Affliction Efficiency I — a real damage focus if you lack Efficiency II or III elsewhere
- Scalable plus-versions (+4, +5, +6 and beyond) tied to instance tier and repeated farming
- Utility slot flexibility — it can hold clickies or focus effects, so it is not a dead stat stick
If you play a DoT caster, hybrid, or any character consolidating utility, this is one of the cleanest upgrades available. One player in our source pool farmed a +4 and combined up through +7. Every repeat kill pushes the slot forward instead of producing vendor trash.
Here is what you are actually farming, condensed:
| Version | Source | Best For | Risk |
|---|---|---|---|
| Base Diamondine Earring | D0/D1 instances | Level 30–35, early Affliction Efficiency I | Low |
| Mid-tier version | D1–D3 | Level 35–45 with decent gear | Moderate |
| High plus-version | D4+ | Level 50 farmers chasing +4 and up | Moderate, mostly route-based |
Farm the version you can control today; the upgrade path will still be there tomorrow.
Pick Your Tier Before You Pick a Fight
Lasna Shirun sits around level 35–36 with instance scaling. She is not the problem. Her room is.
| Your Situation | Tier | Why |
|---|---|---|
| Level 30–35, modest gear | D0–D1 | Secure the base earring and focus effect early |
| Level 35–45 | D1–D3 | Better rolls, still manageable pulls |
| Level 50, strong solo kit | D4+ | Fast farming, best plus-version odds |
| Level 50, no crowd control | D3–D4 | You cannot split what you cannot control |
If you keep eating three to six mobs on room entry, your tier is too high or your approach is too direct. Drop down, secure the item, return later. That is not a pride check — it is a farming efficiency check.
The Route: Two Waypoints, Not One
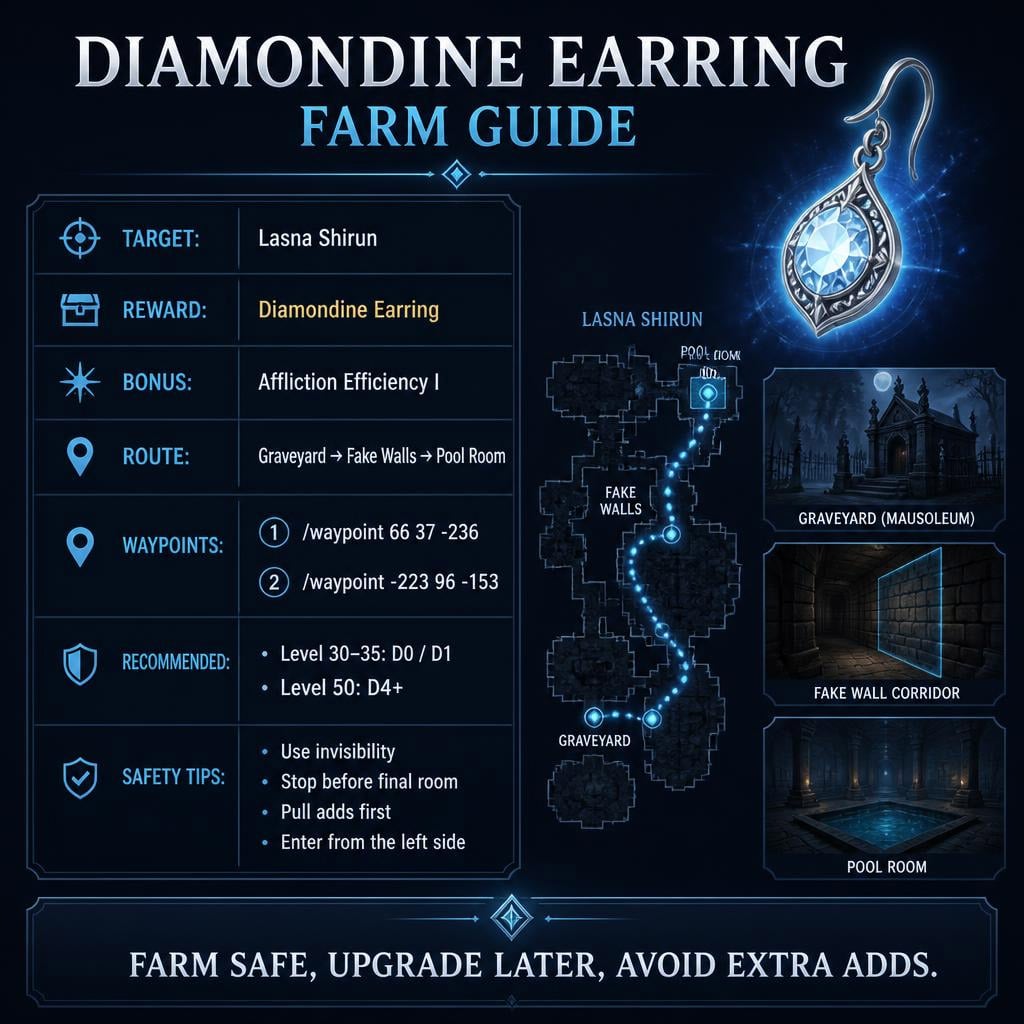
Here is the catch: waypointing directly to Lasna Shirun often fails because of the zone's layered geometry. The fix is a two-step route.
Step 1 — Go invisible. Most of the route mobs con indifferent while you are invis, but move like something can break. Refresh early if your invis has duration issues.
Step 2 — Waypoint to the graveyard: /waypoint 66 37 -236
Follow the yellow line to the gates and mausoleum. Some zone notes list a middle coordinate variant near 337/377 — test it if the first version misbehaves on your client.
Step 3 — Waypoint toward the target: /waypoint -223 96 -153
This deliberately stops short of her room. Lasna Shirun sees through invisibility and can aggro through the final fake wall. Arriving close is the goal. Arriving inside is a corpse run.
Fake Walls: Do Not Sightsee
The final stretch bends through multiple false walls, and every side room exists to waste your time or add bodies to your fight.
The movement pattern:
1. Through the first fake wall
2. Zoom in on your map
3. Through the second fake wall, across the corridor
4. Left, then right, following the yellow line upward
5. Stop before the final pool-room approach
We are extracting value, not exploring. Stay on the line, skip the doors, preserve the invis.
Where to stop: just before mobs from the pool room and stairs become relevant. Ask yourself one honest question here — can you handle five mobs at once? If not, you pull from range.
Breaking the Room
Expect Lasna Shirun plus three adds, with extra danger from the right-side door, nearby roamers, and stair mobs. One careless step chains all of it.
The safe break:
1. Stop outside. Never drop invis inside the danger zone.
2. Target one edge mob and pull it back to the hallway.
3. Kill clean, check for roamers, pull again.
4. Clear the shadow mage and guards before touching the boss.
5. Enter left, never right — the right door feeds extra adds.
6. Engage Lasna Shirun once the room is empty.
Class-specific shortcuts:
| Class Type | Best Play | Fatal Mistake |
|---|---|---|
| Enchanter / CC caster | Mez adds, kill in order | Breaking on top of a pack |
| Necromancer / kiter | Snare-split singles | Fighting in the doorway |
| Tank / melee | Clear first, then commit | Charging toward the right door |
| Pet classes | Send pet, pull back | Pet pathing through side rooms |
| Healer / hybrid | Root and grind pulls | Letting casters free-cast |
Isolated, she is easy. The zone joining in is what kills you — patience beats stats unless you are overleveled.
The Kill and the Farm Loop
Lasna Shirun often behaves like an enchanter-type NPC, though her class may vary. Once she drops, the loop is simple:
1. Loot the Diamondine Earring and check its plus-version
2. Wait out respawn or reset per your instance rules
3. Repeat the route or camp safely
4. Combine copies to push higher plus-versions if your server supports it
Observed drop rates across roughly 5–10 kills were consistent enough to treat this as a real farm, not a lottery. Boring consistency fills bags.
Diamondine vs La Nunga's Ruby Earring
La Nunga, a troll NPC near Upper Guk, takes one ruby at a time for a random reward — the earring, a Midnight Mallet, or a Brute Chopper. Use an enchanter illusion to appear as a troll, and bring around 10 rubies (100+ platinum each on many economies). Never hand in multiples at once.
| Feature | Diamondine Earring | La Nunga Ruby Earring |
|---|---|---|
| Method | Kill Lasna Shirun | Ruby turn-in gamble |
| Reliability | Common drop from target | One of several random rewards |
| Key benefit | Affliction Efficiency I, scaling plus-versions | Strong early stats, Spirit Tap charges |
| Cost | Route risk and time | Ruby platinum sink |
| Best for | Long-term progression | Quick quest-style upgrade |
La Nunga's earring is the convenient pick. The Diamondine is the one with a future — it scales, and hers does not.
The Four Mistakes That Kill Runs
Direct waypointing. The single-jump path fails. Use the graveyard-first sequence above.
Trusting invis too deep. It carries you through the route, not through her room. She sees you.
Entering on the right. That door feeds adds. Clear left, always.
Farming above your weight. Repeated deaths for a +4 are slower than clean farming at a lower tier. Secure first, scale second.
FAQ
Where does the Diamondine Earring drop?
From Lasna Shirun, reached via the graveyard and fake-wall route in the revamped custom zone. Use the two-step waypoint sequence.
What level do I need?
Level 50 farms high-tier plus-versions comfortably. Level 30–35 should take a D0/D1 base version for early Affliction Efficiency I access.
Does Lasna Shirun see invisibility?
Yes. Treat her room and the final fake wall as see-invis territory. Stop early and pull.
Is it better than La Nunga's earring?
For long-term progression, yes — plus-version scaling and Affliction Efficiency I outlast the ruby earring's flat stats.
Run It Now
Pick the tier you can control, set the two waypoints, stay on the yellow line, clear left, and kill her isolated. The first earring is the hardest one; after that, the route becomes muscle memory and a dangerous room becomes a repeatable upgrade loop. Make the ear slot carry its weight.

Most Popular Posts
- EverQuest Legends Trio Guide: Stop Overthinking, Start Playing
- EverQuest Legends Plane of Sky Solo Guide: Key Farming, Class Unlocks & Boss Priority
- EverQuest Legends Motes Guide: Stop Wasting Motes on Upgrades
- EverQuest Legends Soldiers Brooch Guide: Get and Max DPS
- EverQuest Legends Kerran Unlock: The Fast Route (No Zone-Hopping)
- EverQuest Legends Shadow Knight/Shaman/Necromancer Build: DoT-Tank Progression Guide
Popular Category Lists
- ARC Raiders / (345)
- Grow a Garden / (292)
- CoD: Black Ops 7 / (167)
- Star Citizen / (161)
- MLB 26 / (159)
- Monopoly Go / (152)
- ARK Survival Ascended / (126)
- Steal a Brainrot / (98)
- Blox Fruits / (74)
- Adopt Me / (73)
- Forza Horizon 6 / (72)
- Sailor Piece / (68)
- Grow a Garden 2 / (68)
- Diablo IV / (62)
- CoD: BLACK OPS 6 / (55)
- Path of Exile 2 / (48)
- Monster Hunter Wilds / (46)
- Aion 2 / (46)
- Windrose / (44)
- Donut SMP / (41)