


 0
0Grow a Garden Pet Ability Tier List: Full Ranking, Synergy Builds, and Strategy
- Cecila
- Share
- Grow a Garden
- 09/16/25
- 4699
If you've ever stared at your garden wondering why your progress plateaus while others explode with huge fruits, stacked mutations, and fat egg pipelines, you're in the right place. This guide ignores trade clout, color rarity, or it looks cute bias. We judge GaG pets on one thing: ability value per slot. You'll get a structured model (cooldown efficiency, stacking ceiling, replaceability, economy impact, mutation leverage, and future volatility) plus ready‑to-run team templates. Whether you're a newcomer unlocking slots, a midgame event grinder, or a late‑game optimizer pushing huge chance loops, you'll find your next five concrete upgrades here.
- How Rankings ability tier list?
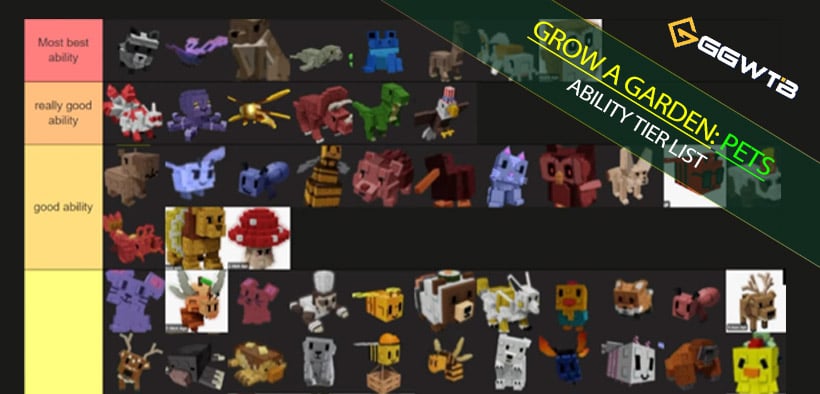
- Tier Labels
- S Tier (Most Best Abilities)
- A Tier (Really Good)
- B Tier (Good / Mid+)
- C Tier (Mid / Situational)
- D Tier (Useless / Power-Crept)
- Strategic Systems
- Pets Commonly Overrated
- Pets Commonly Underrated
- Future Watchlist (Potential Meta Risers)
- FAQs
- Summary
↖ How Rankings ability tier list?
Scoring Dimensions (each pet mentally graded 0–5):
- 1. Cooldown Efficiency: How often you get meaningful triggers per hour.
- 2. Multiplicative/Unique Scaling: Does it multiply a separate stage of a pipeline (e.g., Rainbow multiplier after additive bonuses)?
- 3. Stack Potential: Can multiple copies compound returns without harsh diminishing returns?
- 4. Replaceability: Is there a strictly better pet at the same job? Lower replaceability = higher value.
- 5. Economic Impact: Eggs back, fruit theft, reclaim saving, mutation acceleration = tangible time/value saved.
- 6. Future Sensitivity: Likelihood meta shifts buff or nerf it (high upside sleeper vs locked utility).
↖ Tier Labels
| Tier | Label | Description |
|---|---|---|
| S | Most Best / Core Staples | Warps core progression loops; build teams around it. |
| A | Really Good | High slot value, widely usable, or essential in one pillar (hatching, huge fruit, refunds, mutation). |
| B | Good / Mid+ | Solid when aligned with a goal; not always worth permanent slots. |
| C | Mid / Situational | Niche, event-limited, or power-crept; keep a copy, don't main-slot. |
| D | Useless / Replaceable | Cosmetic, outdated, or strictly overshadowed. |
↖ S Tier (Most Best Abilities)
These define the modern meta. If you lack them, your progression ceiling is lower—period.
| Pets | Ability | Use | Pair With | Mistake |
|---|---|---|---|---|
| Brontosaurus | Increases hatch weight (up to 30% cap across copies). | Fill early slots during egg sessions until cap, then swap out for Koi. | Barn Owl, Seal, Koi | Keeping Brontos in during non-hatching phases wastes slot equity. |
| Barn Owl | Boosts shop pet hatched/obtained weight. | Best used before bulk buying seasonal shop pets. | Seal, Brontosaurus | Treating Barn Owl as a permanent slot instead of pre-purchase tech burst. |
| Koi | Chance to return eggs to the field on hatch. | Sustains rolling momentum during long hatch sessions. | Brontosaurus, Bald Eagle | Using Koi before maxing hatch slots (≥12) reduces efficiency. |
| Bald Eagle | Flat hatch speed acceleration across many slots. | Combine with Blood Kiwi for optimal cadence in high slot counts. | Blood Kiwi | Over-prioritizing Bald Eagles when you have low hatch slots. |
| Butterfly | Applies Rainbow (multiplicative stage multiplier). | Essential for late-game huge fruit pushes. | Queen Bee | Assuming the 5 mutation cost makes it wasteful—it’s a separate multiplier tier. |
| Raccoon | Fruit theft/economic injection. | Use during timed bursts to trivialize acquisition milestones. | Kitsune (weaker alternative) | Idling Raccoon in public servers disrupts ecosystem pacing. |
| Seal | Egg refund chance—efficiently liquidates duplicate stockpiles. | Use before mass-selling eggs for refunds. | Brontosaurus, Barn Owl | Not optimizing Seal weight via Brontosaurus/Barn Owl pipeline. |
| Echo Frog | Instant grow cycle (plant + fruit simultaneously). | Stagger multiple Echo Frogs for rolling cooldown offsets. | Triceratops | Overusing in low-density gardens where instant growth isn’t impactful. |
| Squirrel | Infinite reclaimers. | Slot during teardown/build phases to save consumables. | None | Using Squirrel as a permanent slot instead of event-based utility. |
| T-Rex | Mutation spreading. | Scale with garden footprint size for best results. | Queen Bee | Overkill in early gardens with low plant density. |
| Blood Hedgehog | Extreme prickly plant scaling. | Vital for huge fruit pushes and pancake multiplier synergy. | None | Investing in regular Hedgehog, which is power-crept. |
| Dragonfly | Gold fruit generation on sub-5-minute cycle. | Efficient for casual gold orchard seeding. | None | Neglecting its pulse-play potential for casual sessions. |
| Shroom | Self-boost scaling via mushroom stacking. | Create a “shroom battery corner” for pre-charging before growth bursts. | None | Underestimating Shroom due to setup complexity. |
Koi + Bronto + Barn Owl Hybrid System (Meta Engine)
Not a single pet, but the integrated triad shaping session-based play loops: Weight Setup (Bronto/Barn Owl) → Sustain (Koi) → Cycle Acceleration (Eagle / Kiwi). If you structure sessions intentionally, you outpace static roster players significantly.
Barn Owl + Bronto Dual Weight Stack (Listed Separately on Purpose)
They influence distinct pipelines (shop vs hatch). Having both moves you into a heavier pet ecosystem faster than peers—this creates a compounding advantage over weeks.
↖ A Tier (Really Good)
Still excellent; less universally warping or has stronger alternatives in slot contention.
| Pets | Ability | Use | Pair With | Mistake |
|---|---|---|---|---|
| Blood Kiwi | Dual function: flat hatch speed + cooldown slice ability. | Best when slot count <10 or during early-midgame phases. | Bald Eagle | Over-prioritizing in late-game with high slot counts. |
| Queen Bee | Pollinated + cooldown reduction synergy. | Accelerates Butterfly/Echo Frog cadence. | Butterfly, Echo Frog | Underestimating importance in Rainbow multiplier setups. |
| Moon Cat | Generalist growth multiplier. | Good for broad builds but outperformed by specialists. | Triceratops, Shroom | Using in targeted builds where specialized pets are better. |
| Bald Eagle | Flat hatch speed acceleration. | Strong standalone pet outside optimized loops. | Blood Kiwi | Neglecting synergy with Blood Kiwi for optimal hatch cadence. |
| Mimic Octopus | Copies strong abilities. | Useful for replicating high-value pets like Raccoon. | Raccoon | Limited by its own longer cooldown vs original pet. |
| Capybara | Pet leveling engine. | Shines with high pancake stacks. | Blood Owl | Using without pancake stacks reduces efficiency. |
| Blood Owl | Strong leveling acceleration. | Stackable for grind phases. | Capybara | Over-stacking in late-game when leveling is less critical. |
| Triceratops | Staggered fruit-only focus loops. | Competes with Echo Frog in targeted fruit builds. | Echo Frog | Underestimating its fruit-only specialization. |
| T-Rex | Mutation spreading. | Useful in mutation-heavy builds. | Queen Bee | Downgrading in low mutation reliance metas. |
| French Fry Ferret | Late-level instant jump. | Best for high-age threshold finishing. | None | Using during grind phases instead of endgame bursts. |
| Lemon Lion | Valuable mutation source. | Supports mutation-heavy setups. | Lobster | Ignoring supply issues for its ability. |
| Lobster | Dual mutation: meteor/molten. | Reduces manual spray consumption. | Lemon Lion | Not optimizing for dual mutation setups. |
| Koi | Chance to return eggs to the field on hatch. | Useful in long hatch sessions. | Brontosaurus, Bald Eagle | Using without full synergy adoption reduces value. |
| Butterfly | Applies Rainbow (multiplicative stage multiplier). | Essential for late-game huge fruit pushes. | Queen Bee | Undervaluing its multiplicative layering potential. |
↖ B Tier (Good / Mid+)
Worth keeping; deploy when scenario matches niche.
| Pets | Ability | Use | Pair With | Mistake |
|---|---|---|---|---|
| Giant Ant | Candy/Resin multiplicative harvest cycles. | Boosts harvest efficiency in resource-heavy builds. | Shroom | Underutilizing in resin-heavy mutation setups. |
| Moth | Team feeding QoL; AFK sustaining. | Supports long AFK sessions with feed automation. | Sushi Bear | Neglecting Moth in setups reliant on sustained feeding. |
| Night Owl | Inferior to Blood Owl but serviceable early. | Early-game leveling support. | Starfish | Over-investing in Night Owl instead of transitioning to Blood Owl. |
| Fennec Fox | Edge utility; borderline A in mutation bridging builds. | Useful for mutation-heavy setups. | Lemon Lion | Using outside mutation-focused builds reduces effectiveness. |
| Pack Bee | Inventory stretch in early event hand-ins. | Supports inventory management during events. | None | Keeping Pack Bee in slots post-event reduces utility. |
| Shiba Inu | Seed digging > Golden Lab. | Efficient seed acquisition for garden setups. | None | Underestimating Shiba Inu compared to Golden Lab. |
| Dragonfly | Gold fruit generation on sub-5-minute cycle. | Efficient for casual gold orchard seeding. | None | Neglecting its pulse-play potential for casual sessions. |
| Scarlett Macaw / Haikosen Macaw | Verdant/Cloud Touch situational in fusion paths. | Useful in specific fusion builds. | Butterfly, Queen Bee | Overvaluing in non-fusion setups. |
| Spaghetti Sloth | Unique mutation pathing. | Mid-to-high utility in completionist mutation atlas. | Fennec Fox | Failing to use its unique mutation pathing in targeted builds. |
| Sushi Bear | Light feed support when you lack Moth. | Temporary feed support in early setups. | Moth | Using Sushi Bear long-term when Moth is unlocked. |
| Starfish | Rapid early leveling to unlock slots. | Accelerates slot unlocking in early-game phases. | Night Owl | Over-prioritizing Starfish in mid-to-late game. |
| French Fry Ferret | Late-level instant jump. | Best for high-age threshold finishing. | None | Using during grind phases instead of endgame bursts. |
| Shroom | Self-boost scaling via mushroom stacking. | Create a “shroom battery corner” for pre-charging before growth bursts. | Giant Ant | Underestimating Shroom due to setup complexity. |
↖ C Tier (Mid / Situational)
Functional but rarely first-pick. Use during narrow tasks only.
| Pets | Ability | Use | Pair With | Mistake |
|---|---|---|---|---|
| Silver Otter | Refund crops—minor economy boost. | Useful for small-scale resource recovery in crop-heavy builds. | None | Overvaluing in builds with high fruit reliance. |
| Regular Ant | Fruit multi-harvest but weak in low-value fruit meta. | Limited utility in fruit-focused builds. | None | Using in setups where high-value fruit is required. |
| Red Fox | Seed shop seed fetch; weekend admin events reduce need. | Temporary utility during seed shortages. | Shiba Inu | Keeping beyond event-specific use cases. |
| Snail | Refund meh seeds. | Low-tier seed economy support. | None | Using in builds with high-tier seeds or mutation reliance. |
| Peacock | Normal form unimpressive; Titanic changes calculus. | Potentially useful in Titanic mutation setups. | Mandrake | Underestimating its value in Titanic-focused builds. |
| Orangutan | Craft refund; niche in anti-bee crafting loops. | Supports crafting-heavy setups. | None | Neglecting its niche utility in specific crafting loops. |
| Ostrich | Mutation acceleration obsolete once pool saturated. | Useful only in early mutation phases. | Mandrake | Using in saturated mutation pools. |
| Two Can | Tropical plant niche—dormant until meta swing. | Limited utility in current meta. | None | Over-investing due to niche potential. |
| Axelotl / Hamster / Seahorse-like mid feeders | Incidental utility. | Temporary feeders for mid-game setups. | Moth | Using long-term instead of transitioning to higher-tier feeders. |
| Cockatrice | Some utility; overshadowed. | Limited use in mutation-heavy builds. | Mandrake | Using in setups with stronger mutation pets available. |
| Mandrake / Griffin | Mutation source but not build-defining. | Baseline mutation support. | Peacock | Overestimating their role in mutation-heavy builds. |
| Shroom | Self-boost scaling via mushroom stacking. | Improves with mastery and pre-charge stacking. | Giant Ant | Underutilizing pre-charge stacking potential. |
| Phoenix / Drake | Cooking not yet central. | Potential utility in future cooking-focused metas. | None | Using outside cooking setups. |
| Swan | Harvest tool reclaim niche too narrow. | Limited use in harvest-heavy builds. | None | Overvaluing in non-harvest-focused setups. |
| Squirrel | Reorganizing inventory QoL. | Top-tier for players frequently reorganizing inventory. | None | Underutilizing for players who rarely reorganize inventory. |
| Kadama / Tanguru | Mutation event sleeper picks. | Hold for future mutation events. | None | Failing to reserve for event-specific value. |
↖ D Tier (Useless / Power-Crept)
Either strictly replaced, too weak numerically, or overshadowed by sprays / weather.
| Pets | Ability | Use | Pair With | Mistake |
|---|---|---|---|---|
| Cow | Tiny local growth vs instant-grow meta. | Outclassed by instant growth pets. | None | Using in builds reliant on rapid growth. |
| Regular Hedgehog | Blood Hedgehog strictly better. | Minimal utility in comparison to upgraded version. | Blood Hedgehog | Neglecting upgrade path. |
| Regular Kiwi | Blood Kiwi upgrade exists. | Inferior to its Blood variant. | Blood Kiwi | Using instead of upgrading. |
| Panda | Minimal impact. | Weak contribution to any build. | None | Keeping in active slots. |
| Regular Frog | Echo Frog upgrade available. | Outdated compared to Echo Frog. | Echo Frog | Using instead of upgrading. |
| Regular Bee / Honey Bee | Queen Bee eclipse. | Weak utility compared to Queen Bee. | Queen Bee | Neglecting upgrade path. |
| Cooked Owl | Downgraded owl. | Minimal utility. | Blood Owl | Using instead of superior owl variants. |
| Kitsune | Outclassed by Raccoon. | Inferior utility in resource setups. | Raccoon | Using instead of Raccoon. |
| Football | Joke utility. | No meaningful use. | None | Keeping in active slots. |
| Flamingo | Instant growth alternatives better. | Weak in growth-focused builds. | Pixie | Using instead of stronger growth pets. |
| Sea Turtle | Pet leveling inferior method. | Outclassed by other leveling strategies. | None | Using for leveling when better options exist. |
| Seagull | Weak seed returns. | Poor contribution to seed economy. | Shiba Inu | Using in seed-heavy builds. |
| Regular Cat / Dog / Bunny / Deer variants | Cosmetic. | No meaningful use. | None | Keeping in active slots. |
| Golden Lab | Shiba power-crept. | Inferior to Shiba Inu. | Shiba Inu | Using instead of Shiba Inu. |
| Nihon | No ability. | Purely cosmetic. | None | Keeping in active slots. |
| Pixie | Echo/Trike better at instant growth. | Outclassed by stronger instant growth pets. | Echo Frog | Using instead of better instant growth options. |
| Seedling | Swap-only—no net gain. | Limited utility in resource setups. | None | Using in resource-heavy builds. |
| Golem | Travel latency erases theoretical benefit. | Minimal contribution to travel-heavy setups. | None | Using for travel efficiency. |
| Golden Goose | Low egg value vs rarity. | Weak contribution to resource setups. | None | Overvaluing rarity. |
| Jackalope / Apple Gazelle | Outdated focus. | Minimal utility in current meta. | None | Using in outdated builds. |
| Green Bean | Inferior instant growth. | Outclassed by stronger growth pets. | Pixie | Using instead of better instant growth pets. |
| Cardinale / Ladybug / Basic Moles / Black Bunny | Cosmetic clutter. | No meaningful use. | None | Keeping in active slots. |
↖ Strategic Systems
Hatch Cycle Engine (Session Architecture)
- Phase 1 (Setup 2–3 min): Slot Brontos + Barn Owl (if buying).
- Phase 2 (Weight Lock): Hatch until desired heavies appear (track log).
- Phase 3 (Throughput): Swap to Bald Eagle + Koi + 1–2 Blood Kiwi.
- Phase 4 (Liquidation): Swap in Seal Brigade → Sell → Revert.
- Action Macro: (Bronto Core) → (Accelerate) → (Refund) → (Rebuild).
If you skip Phase 1 you lose compounding power over weeks; weight advantage cascades.
Huge Fruit Loop (Bone Blossom / Resin / Prickly Focus)
Echo Frog xN + Blood Hedgehog(s) + Shroom (pre-charged) + Mutation Support (Butterfly, Queen Bee).
Pattern:
- 1. Lay plant + sprinklers + mutation anchor.
- 2. Trigger Echo Frog chain (staggered).
- 3. Reapply Rainbow cycle as soon as decay risk emerges.
- 4. Hedgehog multiplies prickly growth base; Shroom amplifies burst timing.
If you notice diminishing returns (no huge proc after X cycles), rotate to a fresh plant to avoid sunk time fallacy.
Mutation Spread & Layering
- Butterfly (Rainbow), Lobster (Meteor/Molten), Scarlet Macaw (Verdant path), T-Rex (horizontal spread).
- Queen Bee to reduce cooldown desync; avoid overstacking sources that do not multiply distinct layers.
- Prioritize unique mutation category coverage before doubling same-category procs.
Resource Economy Core
- Raccoon (burst), Kitsune (inferior—skip).
- Seal (refund), Koi (hatch field persistence), Squirrel (reclaimer economy).
- Orangutan (conditional anti-bee crafting), rarely worth permanent slot.
- If a slot doesn't either save ≥5 minutes per hour or generate a unique multiplier, re-evaluate it.
Leveling Pipelines
- Early: Starfish + Blood Owl cluster for fast slot unlock.
- Mid: Transition to Capybara if pancake stack ≥10; else maintain Owls.
- Late: French Fry Ferret for final age jumps (burst injection > diminishing XP ramp).
- Avoid: Sea Turtle trap (looks thematic, underperforms numerically).
Event Reconfiguration Mode
- Temporary Squad: Squirrel, Seal (if disposing), Moth/Sushi Bear (feed sustain), 1 Mutation Spreader (T-Rex), Inventory Booster (Pack Bee if hand-ins), Spare Bald Eagle (if eggs still cycling).
- Flow: Clear → Reclaim (Squirrel) → Layout Build → Mutation Seeding → Swap back to production roster.
↖ Pets Commonly Overrated
- - Flamingo (Instant growth vibe—math weaker than Echo/Trike).
- - Regular Peacock (Titanic exception is separate conversation).
- - Kitsune (Chakra novelty doesn't offset weaker cycle vs Raccoon).
- - Sea Turtle (Leveling illusion).
- - Golem (Travel time erases idea).
- - Seedling (Net zero mutation churn).
↖ Pets Commonly Underrated
- - Shroom (Pre-charge scaling misunderstood).
- - Squirrel (Seen as QoL; actually macro time bank).
- - French Fry Ferret (Late-age pivot).
- - Barn Owl (Shop weight compounding undervalued).
- - Koi (People slot it too early—true power in sustained high-slot hatching).
↖ Future Watchlist (Potential Meta Risers)
- - Orangutan (If crafting pipelines deepen).
- - Peacock (If a universal cooldown system rework favors burst stacking).
- - Tropical Set (Two Can if a new high-value tropical plant emerges).
- - Tanguru / Kadama (If an event rewards “any mutated” bulk turn-ins).
- - Cooking Pets (Chef Gorilla / Drake) if cooking becomes multi-stage multiplier.
↖ FAQs
Q1: I only have 6 slots unlocked. What's the priority order?
Bronto > Blood Kiwi > Bald Eagle (1) > Butterfly > Echo Frog > Koi (once you start longer sessions).
Q2: How many Brontos is enough?
Stop once cumulative weight boost approaches cap (30%). Typical sweet spot: 4–6 depending on individual weights.
Q3: Should I ever run Kitsune if I have Raccoon?
Only if role-playing or filling a temporary empty slot. Raccoon's shorter cooldown and higher pull quantity wins.
Q4: Are Dragonfly and Lobster redundant?
No. Dragonfly = Gold fruit cadence; Lobster = Mutation supply. Distinct pipelines.
Q5: When do I switch from Blood Owls to Capybara for leveling?
If pancake stacks ≥10 and target pet age ≥40; earlier than that, Blood Owls often outperform due to smoother curve.
Q6: Is Seal value nerf risk real?
Likely medium risk long term; keep a lean heavy set (8) but don't over-hoard duplicates.
Q7: Do I keep Peacock hoping for future buff?
One copy max. Don't allocate weight or leveling resources now.
Q8: Why is Butterfly S while some lists put it A?
Because Rainbow multiplies the aggregated pre-stage sum; it's not equivalent to adding another additive growth. That structural distinction is multiplicative leverage.
Q9: Should I run Squirrel permanently?
No. Treat it like a tool—slot during garden teardown/rebuild windows only.
Q10: How many Echo Frogs is overkill?
Past 4–5 you encounter diminishing attention bandwidth. Better to diversify with mutation sustain than pure spam.
↖ Summary
You now have a slot-value mindset: identify whether a pet accelerates a pipeline (hatching, huge growth, mutation layering, refunds) or merely decorates a process. Build session-based rosters—stop running static lineups across fundamentally different tasks. Acquire and master the S tier core (Bronto, Barn Owl, Koi, Bald Eagle, Butterfly, Echo Frog, Raccoon, Seal, Shroom, Blood Hedgehog) as foundational infrastructure. Phase in situational A/B tools as your goals shift: leveling bursts, mutation waves, event rebuild cycles. Cull D tier clutter early to avoid dilution of focus and resources. If you apply the hatch engine loop, huge fruit rotation discipline, and refund liquidation cycle consistently, you'll feel your account compound faster than players chasing rarity aesthetics.

Most Popular Posts
- Grow a Garden 2 Release Date Guide: Why Saturday Is the Likely Launch Window
- Grow a Garden Bizzy Bee Event: Honey Coins, Bee Eggs, Seeds, Upgrades, and Rewards
- Grow a Garden Bee Dungeon Guide: Best Wave 100 Strategy, Bee Shards, and Team Setup
- Grow A Garden Best Pet Mutations 2026: Ranked Guide for Power, Trading, and AFK Farming
- Grow a Garden Bee Stats Guide: Best Bees Ranked by Damage, HP, and DPS
- Grow a Garden Busy Bee Part 2 Guide: Royal Jelly, Best Pets, New Seeds, and Prep Strategy
Popular Category Lists
- ARC Raiders / (304)
- Grow a Garden / (286)
- CoD: Black Ops 7 / (166)
- MLB 26 / (151)
- Monopoly Go / (148)
- Star Citizen / (131)
- ARK Survival Ascended / (93)
- Steal a Brainrot / (92)
- Sailor Piece / (68)
- Forza Horizon 6 / (68)
- Diablo IV / (62)
- Blox Fruits / (62)
- Grow a Garden 2 / (58)
- Adopt Me / (58)
- CoD: BLACK OPS 6 / (55)
- Path of Exile 2 / (48)
- Monster Hunter Wilds / (46)
- Windrose / (44)
- Path of Exile / (40)
- Donut SMP / (37)


