0
0 Created: Oct 28,2025 | Grow a Garden
Grow a Garden Pets Trading Values Tier List (Halloween Update): Breakpoints, Demand Signals

Let's call it what it is: trading reshaped Grow a Garden—for many, not in a good way. You still want clear values and practical routes to move up, so here's the tier list that reflects reality after 48 hours. we aggregate internet values, compare them with what actually clears in public servers, and overlay utility breakpoints that make Grow a Garden pets trade above their paper price. If you find a lobby that doesn't match this guide, it means you either got a premium or took a loss versus real-world averages. Don't shoot the messenger; use the numbers to win more trades.
- How to Read This Tier List: Two Markets, One Strategy
- Fast Fallers You Should Exit First
- Stable Anchors (and When They Outperform)
- Utility That Quietly Wins: Weight and Effect Breakpoints
- Niche Tools: When to Use and When to Pass
- Ascended and Huge: Read the Room
- Raccoon vs Kitsune: The Slide in Motion
- Headless Horseman (HH): Popularity Creates Floors
- Ghostly Dark Sprien: Price Ceiling = Robux, Not Hype
- The Newest Three: Supply Curves and What to Exploit
- Actionable Trade Paths (what actually clears)
- FAQ
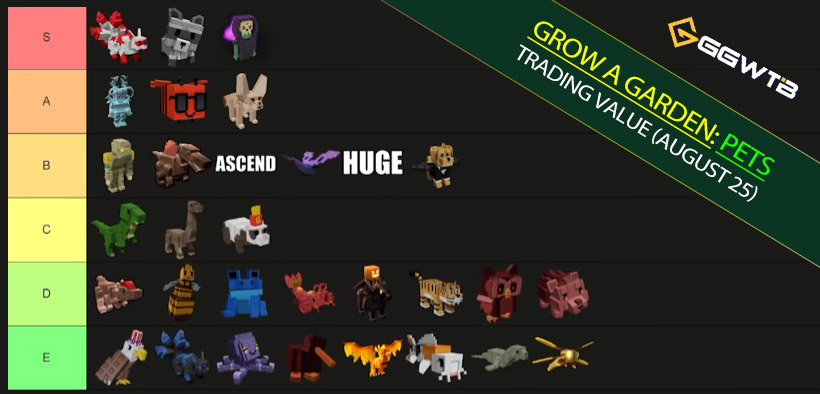
How to Read This Tier List: Two Markets, One Strategy
- - Conclusion: Online values = supply-weighted averages. Public servers = emotion, scarcity, and convenience premiums.
- - Why it matters: Paradise egg farming flooded Mimics; admin/shop drops distort supply in bursts.
- - What to do: Anchor to online values; sell into server sentiment. If a lobby overpays for Dragonflies, take it and don't look back.
Fast Fallers You Should Exit First
| Pet | Current Value | Reason | Action |
|---|---|---|---|
| Dragonfly | 5 Dragonflies ≈ 1 T-Rex | Oversupply from mass hatching | Offload where casuals bid up; bundle with utility pets. Don't hold. |
| Mimic | E-tier, ≈ Corrupted Kitsune | Flooded by Paradise egg grinds | Move it quickly; decay is ongoing despite public server demand. |
Stable Anchors (and When They Outperform)
| Pet | Current Tier/Value | Details | Action |
|---|---|---|---|
| Corrupted Kitsune | High E-tier | Trades well in public servers; reliable for upsizing. | Use as a pivot piece to climb value tiers. |
| Disco Bee | A-tier (declining) | Current ratio: Raccoon ≈ 2× Disco Bee (Raccoon sliding). | Monitor value; trade strategically before further decline. |
| Butterfly | Bottom B-tier | Typically 2:1 to Disco Bee; 2–3:1 versus French Fry Ferret. | Use as a clean add-in for trades. |
| Spinosaurus | B-tier | Slightly above Butterfly; difference is marginal. | Use as a negotiator's chip in trades. |
| Queen Bee | D-tier | Iconic with okay demand; serves as filler. | Not ideal for climbing value tiers; use as a minor add-in. |
Utility That Quietly Wins: Weight and Effect Breakpoints
| Pet | Current Tier/Value | Breakpoints/Details | Action |
|---|---|---|---|
| Seals | E-tier baseline; premium if H1 ≥ 1.71 kg | Eight heavy seals hit target percent caps, raising trade value even without rainbow. | Weigh-check before pricing; don't undercut heavy pieces. |
| Bald Eagle | Top of E-tier | Best egg hatcher; ideal for setups with 13 egg slots. | Overpay slightly if your field setup maximizes throughput. |
| Koi | Low A-tier/E-tier unless heavy | Breakpoints: 1) H1 ≥ 1.21 kg + Rainbow → 6.25% reached 2) H1 ≥ 1.18 kg + Nightmare → 6.25% reached | If H1 ≥ 1.18 kg, apply Nightmare and age to 100; heavy Koi command premiums. |
| Brontosaurus | C-tier but scarce | To reach 30% cap: 1) Four at H1 ≥ 2.25 kg (no Rainbow) 2) Four at H1 ≥ 1.2 kg (with Rainbow) 3) Four at H1 ≥ 1.1 kg (with Nightmare) | Evaluate weight and effects; prioritize heavy Brontos for hatching comps. |
If one Nightmare Bronto hits 10% solo, you can run three instead of four—big value jump. Action: Trade by percentage, not just weight.
Niche Tools: When to Use and When to Pass
| Pet | Current Tier/Value | Details | Action |
|---|---|---|---|
| T-Rex | Top of C-tier | Mutation spreader; value ≈ Bronto due to strong egg hatching demand for Bronto. | Use strategically in mutation setups or trade at Bronto-level value. |
| Tiger | D-tier | Can apply any mutation on the field; great budget fixer for mutation-driven gardens. | Leverage as a low-cost mutation tool or filler in trades. |
| Echo Frog | D-tier | Useful for cycling big fruits. | Keep a small set for utility purposes. |
| Lobster | D-tier | Useful effect but thin demand. | Use as trade add-ins, not primary pieces. |
| Phoenix | Cosmetic premium | Popular visuals; holds value in aesthetic-driven lobbies. | Target aesthetic-focused players for higher trade value. |
| Blood Owl/Kiwi/Hedgehog | D-tier | Limited quantities, casual appeal; low demand versus Bald Eagles' utility. | Trade casually; prioritize functional pets over these. |
Ascended and Huge: Read the Room
- Ascended: conceptually B-tier, demand very very low. If you ladder with these, you'll sit on them.
- Huge: start below Butterfly; wide variance by effect/origin. Store-bought via Barn Owls usually lower. Always comp by effect, not tag.
Raccoon vs Kitsune: The Slide in Motion
- Now: Disco Bee : Raccoon ≈ 1 : 0.5; Raccoon continues to fall while Kitsune is steadier.
- Practical trade math: 2 Raccoons + Butterfly or Spino → Kitsune. If someone asks for more, they're pricing the slide into the deal.
- Action: If you hold Raccoons, rotate into Disco/Spino/Kitsune sooner; if buying, negotiate harder.
Headless Horseman (HH): Popularity Creates Floors
- - Random HH — D-tier (Tiger range) even after 3 weeks, thanks to Nightmare utility and hype.
- - Heavy HH — e.g., H1 ≈ 2.77 kg from Bronto hatching + Nightmare = strong jump in demand.
- - Action: Hatch HH with Brontos on field, apply Nightmare, age up, then package into higher-tier upgrades.
Ghostly Dark Sprien: Price Ceiling = Robux, Not Hype
- - Online listings are scarce → prices look crazy. But Robux availability pegs it near top of A-tier by cost basis.
- - In-game trades often below that peg. Action: Treat Robux value as ceiling; don't pay S-tier claims in public lobbies.
The Newest Three: Supply Curves and What to Exploit
| Pet | Current Tier/Value | Details | Action |
|---|---|---|---|
| Doggo | Bottom of B-tier | Real demand near zero due to oversupply; undercut cascades expected. | Trade only if buyer missed the event; otherwise hold or use as adds. |
| Lich | S-tier (below Raccoon, inflated) | Shop crystals have appeared multiple times; supply will ramp and value will decline. | Flip into the S narrative if possible; otherwise expect gradual devaluation. |
| Mummy | Top of B-tier (above Spino) | Structurally strong demand for 8-piece sets to hatch heavier chest pets; population stays modest due to chest access difficulty. | Accumulate toward the 8-piece set; utility should age better than Barn Owl waves. |
Actionable Trade Paths (what actually clears)
- Mid to Kitsune:
- Path A: 2 Raccoons + Butterfly/Spino → Kitsune
- Path B: Disco Bee + Spino + Butterfly → Kitsune (press ratios in sliding markets)
- Utility ladder:
- Heavy Koi (H1 ≥ 1.18 kg + Nightmare, age 100) → bundle with Bald Eagle → trade up into A/B pieces
- Bronto sets hitting 30% cap → convert into Disco/B-tier anchors
- Quick flips:
- Lich (now) if you can hit sub-Raccoon S-tier asks; exit before crystal supply wave
- HH heavy rolls + Nightmare → premium exit in aesthetic/meta lobbies
FAQ
Q1: My lobby overpays for Dragonfly—take it or wait?
- Take it. That's sentiment premium over aggregate value. If you see consistent overpays across multiple lobbies, reassess; otherwise treat it as a one-off win.
Q2: Rainbow or Nightmare first on heavy pieces?
- Aim at thresholds: Koi 1.21 kg + Rainbow or 1.18 kg + Nightmare (both reach 6.25%); Bronto 1.1/1.2/2.25 kg routes to 30%. If both options hit the same cap, pick the cheaper-to-apply or faster-to-age route in your economy.
Q3: Are Ascended pets a safe hedge?
- Not in liquidity terms. They appraise at B but move slowly. If you must, price with a discount buffer and be ready for longer hold times.
Q4: I have 2 Raccoons but no Butterfly/Spino—what adds work?
- Cosmetics with stable demand (Phoenix) or small utility (Echo Frog sets) can close gaps, but Butterfly/Spino are cleaner because traders can comp them quickly.
Q5: How many Mummies should I actually target?
- Eight is the point. If you only have four, you'll still see utility—but premiums show up when you present a complete set.
Q6: When do I off-ramp Lich?
- When you see more Lich crystals in rotation or listings thinning slower. If your offers shift from A-tier anchors to mid B adds, it's time to exit.
Trade like a builder, not a collector. Use online averages as your anchor, read public server emotion to time exits, and push pets across real utility thresholds—weight and effect caps are where value multiplies. If a lobby breaks this guide, great: bank the premium or buy the dip, depending on which side you're on. Your safest ladders right now: heavy Koi and Bronto reaching caps, Bald Eagles for throughput, and complete sets where utility stacks (Mummy x8). Rotate out of sliding narratives (Dragonfly, Mimic, Raccoon drift) into steadier anchors (Kitsune, Disco/Spino bundles). That's how you climb without paying the hype tax.


The GGWTB Editorial Team features 10 full-time gaming editors and 23 specialist contributors, delivering hands-on tested walkthroughs, easter egg breakdowns, and game updates.
Jordan — who spearheads our in-depth Grow a Garden, Steal a Brainrot guides, and patch notes—every guide is rigorously verified on live servers for accuracy.
Most Popular Posts
- Grow a Garden Secret Badge Walkthrough: Carrot Weight & Puzzle Guide
- Grow a Garden Get Secret Seeds & Rare Pets Guides: DLC Codes + Trading Guide
- Grow a Garden Enfield Guide: Everfallen Roll Rules & Level Loss
- Grow a Garden Moon Harvest Part 4 Guide: Gear Odds, Reset Rewards, Cornling Strategy, New Seeds
- Grow a Garden: Beanpod Chest Farming and Elder Beanstalk Guides
- Grow a Garden Arctic Fox Guide: Best AFK Setup for Seeds, Gears, Eggs & Pet XP
Popular Category Lists
- ARC Raiders / (350)
- Grow a Garden / (294)
- CoD: Black Ops 7 / (167)
- Star Citizen / (162)
- MLB 26 / (159)
- Monopoly Go / (152)
- ARK Survival Ascended / (127)
- Steal a Brainrot / (99)
- Blox Fruits / (74)
- Adopt Me / (74)
- Forza Horizon 6 / (72)
- Sailor Piece / (68)
- Grow a Garden 2 / (68)
- Diablo IV / (62)
- CoD: BLACK OPS 6 / (55)
- Aion 2 / (50)
- Path of Exile 2 / (48)
- Monster Hunter Wilds / (46)
- Windrose / (44)
- Donut SMP / (41)