0
0 Created: Nov 14,2025 | Grow a Garden
Grow a Garden Trading Values Tier List (Safari Part 2): Weight, Cooldowns, and Market Values

Let's put the headline upfront: elephants changed the economy. A regular Elephant pushes most Grow a Garden pets to roughly 39kg; a rainbow-hatched Elephant pushes to roughly 60kg. Layer Nightmare on top and entire tiers reshuffle. Why should you care? Because the same pet can jump from E to S tier based on weight and cooldown, and that gap is worth several Kitsune in trades. Below is a structured value map with hands-on observations from public servers and listing sites, so you can decide what to stash, what to sell, and what to target next.
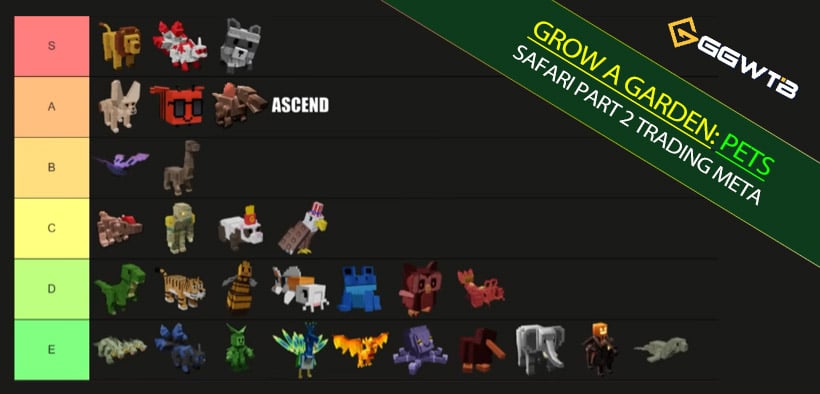
Read the Market by Tier → Condition → Trade Value
Anchor your decisions on conditions, not names. Ask first: weight + Nightmare + cooldown threshold.
Benchmarks
- High: Kitsune (Kits), Raccoon
- Mid: Butterfly, Disco Bee
- Low: C/D/E filler (e.g., Queen Bee, generic Seals)
Two universal weight cutoffs
- 39kg: reachable by regular Elephant (the everyone can do it ceiling).
- 60kg: reachable by rainbow-hatched Elephant (the advanced ceiling; still needs toys to hit 15s often).
Cooldown reality
- True 15s Peacock/Mimic is a production monster. But it requires Nightmare and enough weight; toys are the last mile.
- 23 min vs 20 min on long-cooldown pets changes little during 15s teams—don't overpay for those 3 minutes.
What this means: always identify kg + Nightmare + whether toys are needed to cross a key cooldown. Then compare to real online price bands to spot overpays and bargains.
| Pet | Condition | Typical Online Ask | Notes |
|---|---|---|---|
| French Fry Ferret | 39kg Nightmare | > Raccoon (S-tier) | 20 vs 23 min gap is marginal |
| Seal | ~2kg, 8% single | ≈ Butterfly (B-tier) | Underweight ≈ E-tier |
| Echo Frog | 39kg Nightmare (~15s) | 2–3 Kits listed; 1–2 live | Reproducible |
| Bald Eagle | 39kg Nightmare | ≈ 1 Kits | Egg-hatch ×9 |
| Bronto | 38.54kg Nightmare (10% each) | ≈ 1 Kits + Fennec | Two-piece is unicorn-tier |
| Koi | ~2kg Nightmare (8%) | ≈ Raccoon | Synergy value with Bronto |
| Peacock | 39/60kg Nightmare | ≈ 1 Kits / ≈ 2 Kits | True 15s ≥ 6 Kits |
| Mimic | 60kg Nightmare | ≈ 1 Kits + Raccoon + Butterfly | Often toy-15s |
| Lion | Pre-public | ≈ 2 Kits | Will tank post-unlock |
Tier-by-Tier With Real Trade Bands
Format per pet: Base tier → Condition → Market value → Why it prices that way → What to do.
| Pet | Tier | Key Condition | Market Value | Why | Action |
|---|---|---|---|---|---|
| French Fry Ferret | C | 39kg (Regular Elephant) or 60kg (Rainbow) + Nightmare | 39kg: > Raccoon (S); 60kg: higher but modest gain | 20 vs 23 min CD gap is small in 15s teams | Make 39kg Nightmare and flip for Raccoon+; avoid 60kg premiums |
| Seal | E | ~2kg + Nightmare, single Seal hits 8% | ≈ Butterfly (if 8%); underweight ≈ worthless | Most Seals miss 8%, few qualified ones command value | Price at Butterfly only with proof of 8% |
| Pachythosaurus | C | N/A (speculative) | Above T-Rex; could rise on crafting hype | Low population + potential update utility | Light hold; sell into update momentum |
| Disco Bee | A | N/A | 2 Butterflies for 1 Disco is overpay | Supply surged; demand softened | Offer 1 Butterfly + small add, not 2:1 |
| Butterfly | B | N/A | Down to Dragonfly-currency level | Market devaluation | Use as liquid trading chip |
| Ascended | A | N/A | ≈ Butterfly | Undercutting and low demand | Exit quickly for Butterfly-equivalent |
| Echo Frog | D | 39kg Nightmare via regular Elephant (toys for 15s) | Listed 2–3 Kits; trades 1–2 Kits | Now reproducible; supply crushes premium | Buy ≤2 Kits; don't expect 3 Kits to move |
| Bald Eagle | Low C | 39kg/60kg + Nightmare | 39kg ≈ 1 Kits; 60kg > 3 Raccoon | Egg-hatch ×9 multiplier drives value | Target 39kg for ROI; 60kg for min-max |
| Brontosaurus | Low B | 38.54kg Nightmare (10% each) ×3 → 30% | Single unit ≈ 1 Kits + Fennec (≈ 1 Kits + Raccoon on some lists) | Three-piece breakpoint; two-piece is near-impossible | Hunt 38.54kg Nightmare; ignore two-piece dreams |
| Koi | D | ~2kg + Nightmare → single 8% | ≈ Raccoon per 8% unit | High synergy with Bronto 30% + egg-back stacks | Sellers show proof; buyers negotiate slightly under Raccoon |
| T-Rex / Tiger | D | N/A | Low | Shackles reduce mutation-spread value | Skip for progression; keep for themes |
| Headless Horseman | E→B | 1kg (E), 2kg (≈ Butterfly), 2.5–2.7kg (≈ Raccoon) | Scales sharply with weight | Heavier hatches are rare and valued | Verify weight/hatch context before paying up |
| Elephant | E | Regular 2kg maxed (+3.5kg ability); Rainbow variant niche | Regular ≈ Butterfly; Rainbow ultra expensive | Utility converts directly to market value | Treat heavy regular as blue-chip; avoid buying Rainbow listings |
| Lion | S | Robux-only (now) | ≈ 2 Kits | Artificial scarcity; will tank post-unlock | Sellers cash out; buyers wait for public release |
15-Second Engines: Peacock and Mimic Price Ladders
Why 15 seconds? Because cooldown equals throughput equals currency. But separate near 15s with toys from true 15s.
Peacock
Base: E
- 39kg Nightmare (regular Elephant): ≈ 1 Kits; needs toys to approach 15s
- 60kg Nightmare (rainbow-hatched Elephant): ≈ 2 Kits; also needs toys
- True 15s: Nightmare 76.2kg minimum (76.1kg is 16s)
- Market: true 15s ≥ 6 Kits (5 possible, 4 rare)
- Do: On budget, buy 39/60kg variants and use toys; don't bankrupt yourself for true 15s unless you need peak output.
Mimic
Base: E
- 39kg Nightmare: priced above a Raccoon
- 60kg Nightmare: ≈ 1 Kits + Raccoon + Butterfly (just shy of 2 Kits), often toy-drivable to 15s
- Do: Compare against Peacock pricing—Mimic can be the better value window when Peacock is overhyped.
Trading Tactics: Arbitrage Between Listings and Live Trades
Target listed high, traded lower
- Echo Frog 15s, Bald Eagle 39kg, Mimic 60kg are frequently cheaper in player trades than in posts.
Risk control through proofs
- Ask for: weight screenshot, Nightmare status, age, calculator cooldown seconds. If missing, price it one bracket down.
Don't pay for illusionary deltas
- French Fry Ferret 20m vs 23m isn't worth a big premium in 15s compositions.
Team-building priority
- Prioritize Bronto three-piece (30%) over chasing the near-impossible two-piece.
Value normalization
- 2 Disco ≈ 1 Raccoon is optimistic; reality is closer to 2 Disco slightly under. 4 Butterfly ≈ 1 Raccoon is safer.
FAQ
- Why are 39kg and 60kg the market breakpoints?
- They map to regular vs rainbow-hatched Elephant ceilings, which define reproducibility and price floors.
- Should you pay premiums for 20-minute Ferrets over 23-minute?
- In 15s trigger chains, it's usually 1–2 extra procs at best—not worth hefty premiums.
- Why are Echo Frog 15s getting cheaper?
- Regular Elephant + Nightmare makes them mass-producible; supply growth depresses asks.
- Is the Bronto two-piece viable?
- Theoretically needs ~86–87kg Nightmare each; even rainbow-hatched Elephant can't reach. Treat as legend-tier collectibles.
- Should you buy Lion now?
- If it's Robux-sourced, you're paying investor markup. Wait for public unlock; price should drop fast.
Wrap-up
If your goal is to climb with minimal cost, build around reproducible thresholds: 39kg Nightmare is the universal sweet spot, 60kg is the advanced bracket, and true 15s is a rare, expensive luxury. Decompose every pet into four variables—weight, Nightmare, toy-adjusted cooldown, and trade equivalent—and you'll consistently find edges between listing sites and live lobbies. Play that math a few cycles and Kitsune/Raccoon stop looking rare; they become the natural output of disciplined trading.


The GGWTB Editorial Team features 10 full-time gaming editors and 23 specialist contributors, delivering hands-on tested walkthroughs, easter egg breakdowns, and game updates.
Jordan — who spearheads our in-depth Grow a Garden, Steal a Brainrot guides, and patch notes—every guide is rigorously verified on live servers for accuracy.
Most Popular Posts
- Grow a Garden Secret Badge Walkthrough: Carrot Weight & Puzzle Guide
- Grow a Garden Get Secret Seeds & Rare Pets Guides: DLC Codes + Trading Guide
- Grow a Garden Enfield Guide: Everfallen Roll Rules & Level Loss
- Grow a Garden Moon Harvest Part 4 Guide: Gear Odds, Reset Rewards, Cornling Strategy, New Seeds
- Grow a Garden: Beanpod Chest Farming and Elder Beanstalk Guides
- Grow a Garden Arctic Fox Guide: Best AFK Setup for Seeds, Gears, Eggs & Pet XP
Popular Category Lists
- ARC Raiders / (351)
- Grow a Garden / (294)
- CoD: Black Ops 7 / (167)
- Star Citizen / (162)
- MLB 26 / (159)
- Monopoly Go / (152)
- ARK Survival Ascended / (128)
- Steal a Brainrot / (99)
- Blox Fruits / (74)
- Adopt Me / (74)
- Forza Horizon 6 / (72)
- Sailor Piece / (68)
- Grow a Garden 2 / (68)
- Diablo IV / (62)
- CoD: BLACK OPS 6 / (55)
- Aion 2 / (50)
- Path of Exile 2 / (48)
- Monster Hunter Wilds / (46)
- Windrose / (44)
- Donut SMP / (41)