


 0
0How to Create a Private Server in Grow a Garden?
- Cecila
- Share
- Grow a Garden
- 06/23/25
- 12102
If youve ever wished for a quieter patch of soil in Zombies Vs. Gnomes, a private server is your wish come true. With one small click, you can lock the doors behind you, keep distractions at bay, or invite only your closest buddies to help seed, water, and watch crops push through the earth. Setting this up wont cost a single Robux and, honestly, it only takes a minute to pull off. Ready? Let the green-thumb magic begin.
- Step 1: Visit the Grow a Garden Game Listing
- Step 2: Find the Servers Link
- Step 3: Spin Up Your Private Server
- Step 4: Tweak Your Server Settings
- Step 5: Access Your Private Server
- Enjoy Your Private Garden
- Final Thoughts
↖ Step 1: Visit the Grow a Garden Game Listing
Fire up your browser or the Roblox app and search for Grow a Garden. Once the colorful thumbnail catches your eye, click through to the games homepage. Do a quick account check-log in first, or the private-server button will stay hidden and useless.
↖ Step 2: Find the Servers Link
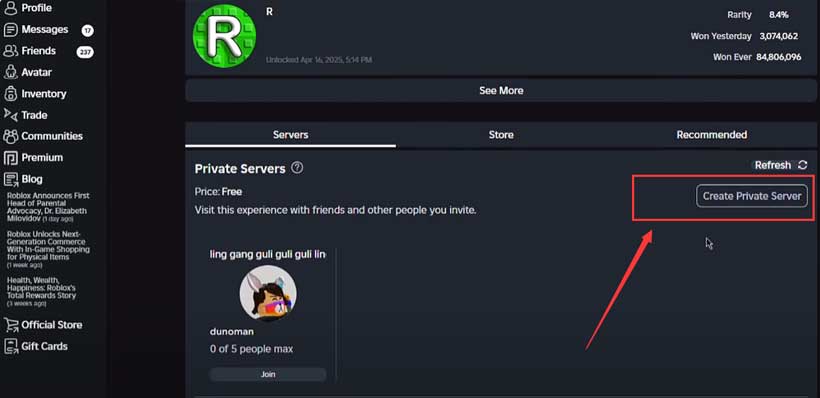
Scroll a little ways down the page until the Servers tab pops into view. This section is like the backstage door for server admins. Click that tab, and watch the screen fill with all the lobbies currently running plus one shiny Create Private Server button just waiting for your signal.
↖ Step 3: Spin Up Your Private Server
Head over to the Servers tab and bang on that shiny Create Private Server button. A pop-up will nudge you to slap a name on your new playground, so pick something that sounds cool-or maybe just makes sense for the game. Hit Buy Now when you are ready, and breathe easy: the whole thing costs zero Robux, so your wallet stays closed.
↖ Step 4: Tweak Your Server Settings
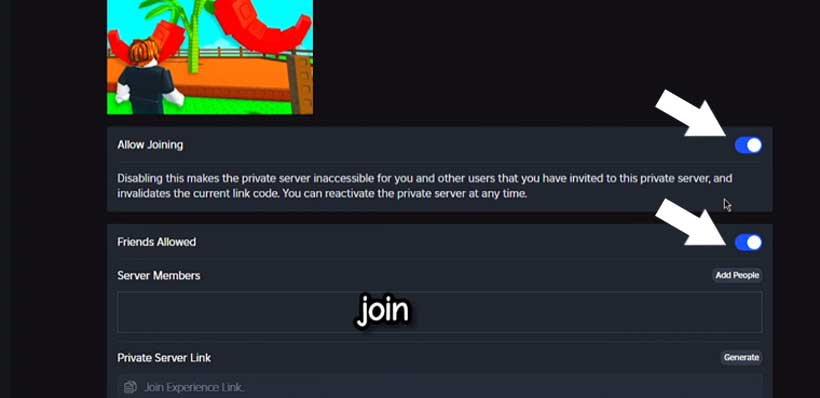
Once the server is live, a menu of sliders and switches appears. You can decide who gets to wander in:
- Friends Only: Flip this on if you want only the pals already on your friend list to hang out with you.
- No Access: Crank this option up if you need total quiet and dont mind being the lone player in your own world.
These little toggles sketch out the crowd in your server, letting you shape each session around exactly who you feel like playing alongside.
↖ Step 5: Access Your Private Server
When everything looks good, pop back over to the Servers tab. Scroll a bit until you spot your newly minted private server. Hit Join and the door to your quiet patch opens wide.
↖ Enjoy Your Private Garden
Nice work-youve stepped inside your own corner of Grow a Garden. Here, crops grow at your pace, fruit waits for your hands, and other players are nowhere to be found. Whether you invite pals or fly solo, the calm space lets you play exactly how you like.
↖ Final Thoughts
Creating a private server in Grow a Garden is one quick way to level up your Roblox fun. Follow these few moves, seize the reins, and let your virtual garden blossom in peace. If this walkthrough helped, pass it along to a friend who could use an easy boost. Happy gardening!

Most Popular Posts
- Grow a Garden 2 Release Date Guide: Why Saturday Is the Likely Launch Window
- Grow a Garden Bizzy Bee Event: Honey Coins, Bee Eggs, Seeds, Upgrades, and Rewards
- Grow a Garden Bee Dungeon Guide: Best Wave 100 Strategy, Bee Shards, and Team Setup
- Grow A Garden Best Pet Mutations 2026: Ranked Guide for Power, Trading, and AFK Farming
- Grow a Garden Bee Stats Guide: Best Bees Ranked by Damage, HP, and DPS
- Grow a Garden Busy Bee Part 2 Guide: Royal Jelly, Best Pets, New Seeds, and Prep Strategy
Popular Category Lists
- Grow a Garden / (286)
- ARC Raiders / (262)
- CoD: Black Ops 7 / (166)
- Monopoly Go / (146)
- MLB 26 / (145)
- Star Citizen / (112)
- Steal a Brainrot / (89)
- Sailor Piece / (68)
- ARK Survival Ascended / (67)
- Diablo IV / (61)
- Forza Horizon 6 / (60)
- Blox Fruits / (60)
- CoD: BLACK OPS 6 / (55)
- Adopt Me / (53)
- Path of Exile 2 / (48)
- Monster Hunter Wilds / (46)
- Windrose / (44)
- Path of Exile / (40)
- Grow a Garden 2 / (40)
- Bee Swarm Simulator / (36)


