0
0 Created: Jul 22,2026 | ARC Raiders
How to Get 3 Stars Easily on the New ARC Raiders Trials This Week

New week, new Trials. Four of the five are quick — the Jump Mine one is the only real headache, especially if you just reset through Expedition and lost your explosive bench progress.

- Trial 1: Light Impact Grenade Kills — Ticks, Pops, Fireballs
- Trial 2: Hospital Containers
- Trial 3: Search Computers
- Trial 4: Melee Damage to ARC Enemies
- Shredder Method (Best for Solo/Duo)
- Matriarch Method (Groups Only)
- Trial 5: Jump Mine Damage (The Annoying One)
- What You Need
- The Numbers
- Execution
- Optimal Weekly Route
- Mistakes That Waste Your Week
- FAQ
- What's the easiest Trial this week?
- Which mine counts for the Jump Mine Trial?
- What's the best melee target?
- Where do Hospital containers count?
- How many Jump Mine hits do I need?
- Summary
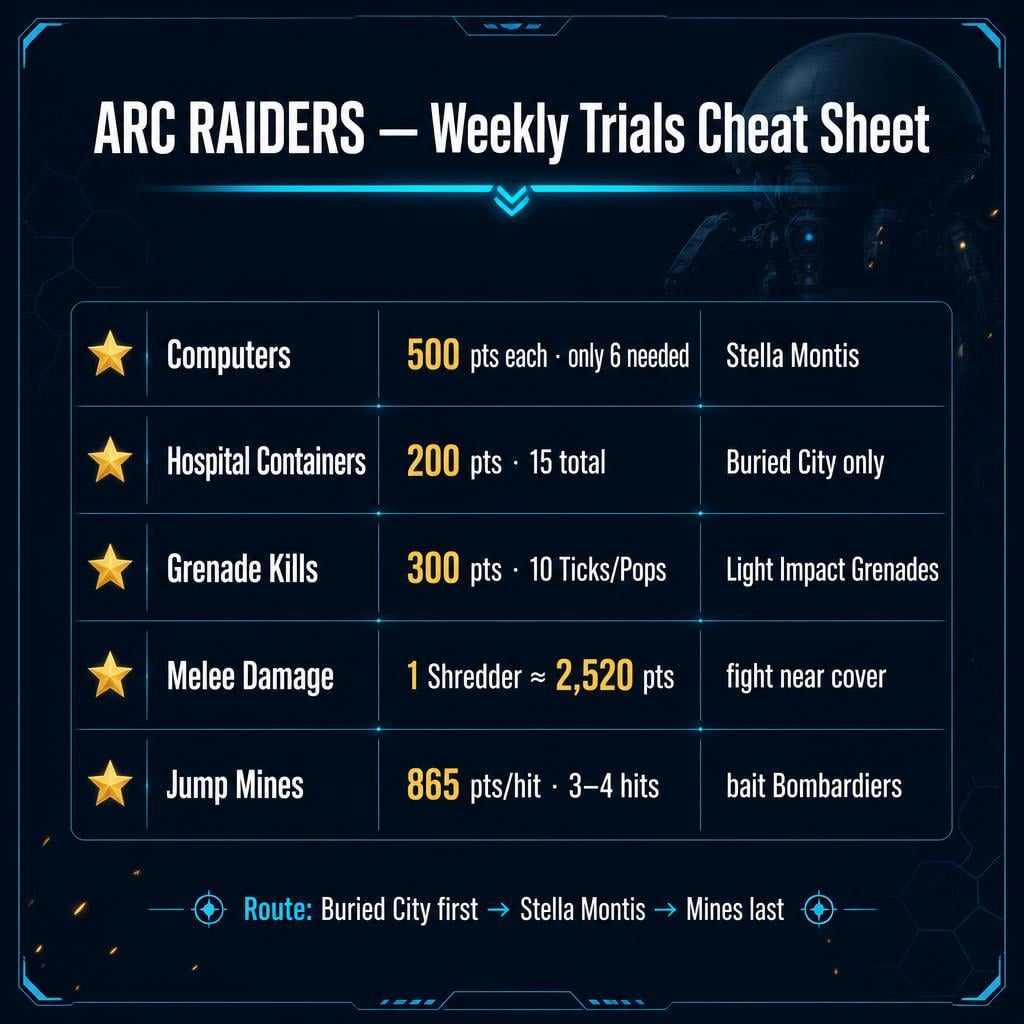
Here's the scoring cheat sheet from our runs:
| Trial | Points | 3-Star Requirement | Best Spot |
|---|---|---|---|
| Light Impact Grenade kills (Ticks/Pops/Fireballs) | 300/kill | ~10 kills | Stella Montis |
| Hospital containers | 200 each | ~15 containers | Buried City Hospital |
| Search computers | 500 each | ~6 computers | Stella Montis |
| Melee ARC damage | ~2,520 from one Shredder | 1 Shredder + a few swings | Stella Montis / Matriarch |
| Jump Mine damage | ~865/hit | 3–4 hits | Bombardiers |
Do computers and containers first. Save mines for last.
Trial 1: Light Impact Grenade Kills — Ticks, Pops, Fireballs
300 points per kill. 10 kills = 3 stars.
Run Stella Montis. Tick and Pop density is unmatched, especially around the Seed Vault.
Key rules:
- Buy grenades from Apollo — no meaningful daily cap, stock up.
- Don't panic-shoot Tick swarms. Grenade first, gun second.
- Pops moving toward you? Lead the throw.
- Area dry? Rotate. Don't wait around.
Fireballs count too, but Ticks and Pops are free points. Take the easy targets.
Trial 2: Hospital Containers
200 points each. 15 containers = 3 stars.
One critical rule: only the Buried City Hospital counts. Medical containers elsewhere look identical — they don't score. If your points aren't ticking up, your location is wrong, not the container.
The route: spawn, beeline to the Hospital, open everything, extract. Skip side buildings.
| Raid Type | Pros | Cons |
|---|---|---|
| Day | Easy navigation | More player traffic |
| Night | Less competition | Riskier |
Hospital already looted? Reset immediately. This Trial is a race, not a fight.
Trial 3: Search Computers
500 points each. Only 6 needed. This used to be a miserable scavenger hunt — now one clean run finishes it.
Best map: Stella Montis. Tech-heavy interiors mean computers cluster naturally.
The loop:
1. Drop in, hit office/control rooms.
2. Search every computer. Skip low-value loot.
3. Six searches → extract.
Seeing opened doors and looted desks? Someone beat you there. Rotate or reset — don't tunnel a dead zone.
Trial 4: Melee Damage to ARC Enemies
Sounds suicidal. It isn't — if you pick the right target.
Shredder Method (Best for Solo/Duo)
One nearly-solo Shredder kill gave us ~2,520 points — basically the whole Trial in one fight.
Execution:
1. Find a Shredder near cover.
2. Clear the small ARC trash first.
3. Swing, back off, heal, repeat.
4. Never trade damage in the open.
Matriarch Method (Groups Only)
Break the armor above the core, melee the exposed spot. Massive scoring potential, but it's a boss fight — bring a squad.
| Method | Best For | Risk |
|---|---|---|
| Shredder farming | Solo/duo | Medium |
| Matriarch exposed core | Squads | High |
| Small ARC cleanup | Final few points | Low |
One or two hits from 3 stars? Punch a small ARC. Don't die to a boss for 100 points.
Trial 5: Jump Mine Damage (The Annoying One)
First, the trap: Jump Mine means the Explosive Mine. Pulse and Jolt Mines don't count.
What You Need
| Requirement | Source |
|---|---|
| Explosive Mine blueprint | Red lockers / industrial containers |
| Level 3 explosive bench | Workshop progression |
| Big ARC target | Bombardiers are ideal |
If you just reset via Expedition, sort your bench first. No shortcut here.
The Numbers
One mine hit on a Bombardier: 345 damage → 865 Trial points. You need 3–4 clean hits.
Execution
1. Find a Bombardier — big body, lighter armor, easy to bait.
2. Place the mine on its path — not while under fire.
3. Lure it in. Corners and narrow lanes make its pathing predictable.
4. Confirm progress, repeat.
High-score gamble: pull multiple Shredders into one corridor on Stella Montis and mine the cluster. Riskier, bigger payout.
Bring more mines than you think you need. Wasted angles kill runs.
Optimal Weekly Route
| Order | Trial | Why |
|---|---|---|
| 1 | Hospital containers | One Buried City run, done |
| 2 | Computers | Six searches on Stella Montis |
| 3 | Grenade kills | Same map, same run if lucky |
| 4 | Melee damage | Shredders while you're there |
| 5 | Jump Mines | Craft-dependent — save for last |
Buried City once, then live on Stella Montis. Three Trials overlap on the same map — stack them in one raid whenever possible.
Mistakes That Waste Your Week
- Opening medical containers outside Buried City Hospital → zero progress.
- Shooting Ticks instead of grenading them → burning free targets.
- Using Pulse/Jolt Mines for the mine Trial → doesn't count.
- Meleeing in open ground → free respawn screen.
- Placing mines randomly → bait the enemy onto the mine, always.
Score not moving? Wrong location, wrong item, or wrong enemy. Check before you grind.
FAQ
What's the easiest Trial this week?
Computer searches. 500 points each, only 6 needed — one Stella Montis run finishes it.
Which mine counts for the Jump Mine Trial?
Only the Explosive Mine. Pulse and Jolt Mines don't deal the required explosive damage. You need the blueprint plus a Level 3 explosive bench.
What's the best melee target?
Shredders. One mostly-solo kill gave ~2,520 points — nearly the full Trial. Matriarch exposed-core phases score higher but demand a squad.
Where do Hospital containers count?
Only the Buried City Hospital. Each container gives 200 points; you need about 15.
How many Jump Mine hits do I need?
3–4. One good hit on a Bombardier scored ~865 points. Bombardiers are the best target — big, baitable, lightly armored.
Summary
Easy week overall. Six computers, one clean Hospital run, and 10 grenade kills on Stella Montis knock out three Trials fast. One Shredder nearly completes melee. The only grind is Jump Mines — get the Explosive Mine blueprint, upgrade your bench to Level 3, and bait Bombardiers for 3–4 hits. Loot first, mine last, full stars.


The GGWTB Editorial Team features 10 full-time gaming editors and 23 specialist contributors, delivering hands-on tested walkthroughs, easter egg breakdowns, and game updates.
ELSA — who spearheads our in-depth COD: BLACK OPS 7, ARC Raiders guides, and patch notes—every guide is rigorously verified on live servers for accuracy.

Most Popular Posts
- ARC Raiders Update 1.42: Phantom Targets Farming Guide (Glitched Wasps, Rewards, Regional Conditions)
- ARC Raiders Hullcracker Blueprints: Fastest Way to Complete The Major's Footlocker
- ARC Raiders Best Pop Trigger Strategy: Fast Phantom Targets Damage Guide
- ARC Raiders Subway Skin Guide: Unlock the Subterranean Outfit
- ARC Raiders Looting Mk. 3 Survivor Blueprint Guide: Best Blue Gate Route and Drop Locations
- ARC Raiders Medium & Heavy Gun Parts Blueprint Guide: Best Farm Route, Locations, and Refiner Crafting
Popular Category Lists
- ARC Raiders / (347)
- Grow a Garden / (292)
- CoD: Black Ops 7 / (167)
- Star Citizen / (161)
- MLB 26 / (159)
- Monopoly Go / (152)
- ARK Survival Ascended / (127)
- Steal a Brainrot / (98)
- Blox Fruits / (74)
- Adopt Me / (73)
- Forza Horizon 6 / (72)
- Sailor Piece / (68)
- Grow a Garden 2 / (68)
- Diablo IV / (62)
- CoD: BLACK OPS 6 / (55)
- Path of Exile 2 / (48)
- Monster Hunter Wilds / (46)
- Aion 2 / (46)
- Windrose / (44)
- Donut SMP / (41)