0
0Sailor Piece Sea 2 Guide: Best First Hour Route, Fastest Start, and What to Skip
- MARIE
- Share
- Sailor Piece
- 04/18/26
- 9881
When a big update drops, most players waste time without noticing it. They explore too much, test every new system, spend resources too early, and only start real progression after the first hour is already gone.
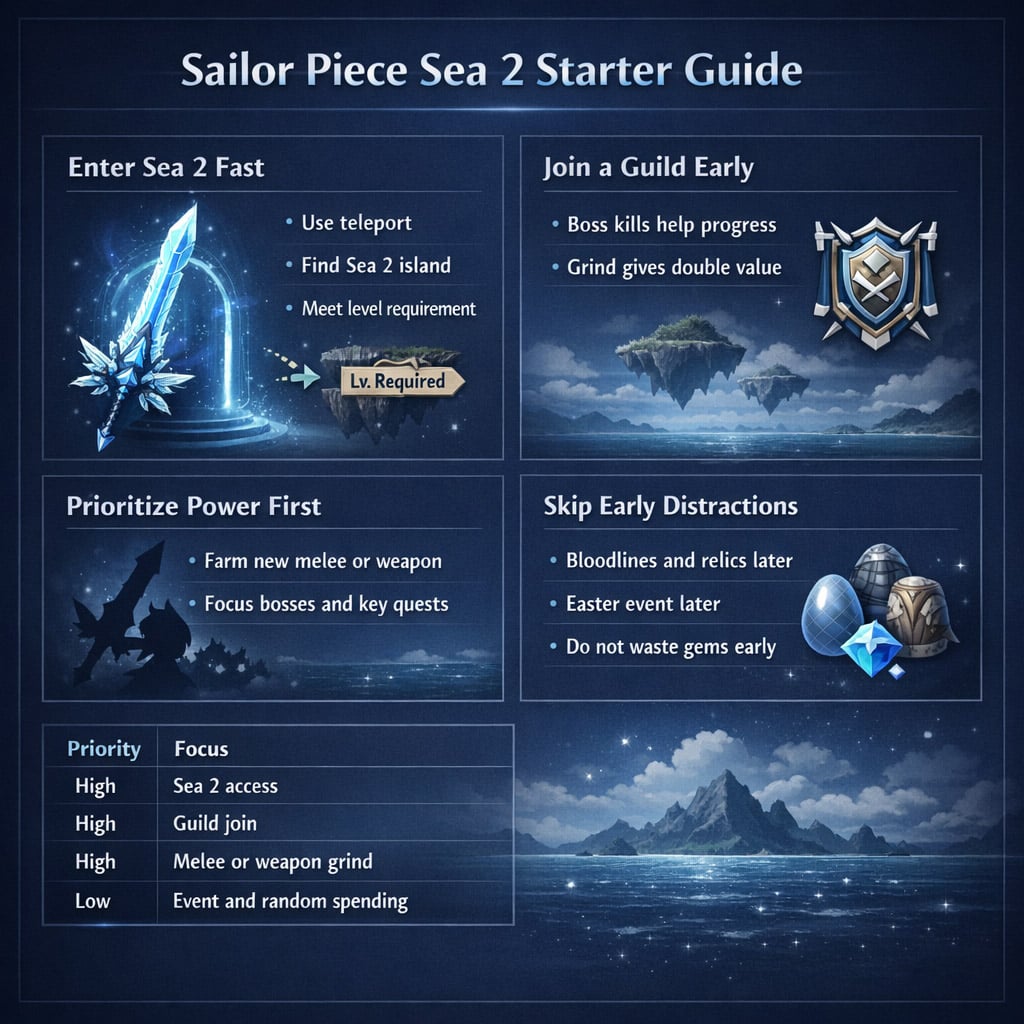
The better approach is much simpler: get into Sea 2 fast, lock in early progression, and ignore distractions until your build is stronger.
- Best First-Hour Route
- 1. Enter Sea 2 as fast as possible
- 2. Join a guild immediately
- 3. Prioritize the new melee or weapon grind
- What to Skip Early
- Bloodlines and relics
- Easter event
- Random spending
- Fast Sea 2 Checklist
- FAQ
- What should I do first in Sailor Piece Sea 2?
- Is joining a guild really important on day one?
- What is the best first grind in Sea 2?
- Should I do the Easter event right away?
- Should I spend gems and materials early?
- Final Takeaway
From experience, this is what works best in launch updates like this. The players who feel ahead are usually not the ones doing everything first. They're the ones who get their first power spike first.
↖ Best First-Hour Route
Let's keep this practical. If your goal is fast progression, this is the route to follow.
↖ 1. Enter Sea 2 as fast as possible
This should be your only focus at the start.
If there's a new Sea 1 island that leads into Sea 2, go there immediately through teleport. Don't stay in Sea 1 checking random content. Don't start the event. Don't test side systems.
If Sea 2 has a level requirement, make sure you're ready before the update goes live. If you log in underleveled, you're already behind.
| Step | What to Do | Why It Matters |
|---|---|---|
| 1 | Open teleport | Saves time immediately |
| 2 | Find the new Sea 2 entry island | Unlocks the update path |
| 3 | Talk to the NPC / meet the requirement | Gains access to Sea 2 |
| 4 | Enter Sea 2 right away | Starts real progression |
The key point here is simple: until you are inside Sea 2, nothing else has higher value.
↖ 2. Join a guild immediately
As soon as you arrive, join a guild before you start grinding seriously.
This matters because a lot of your normal gameplay may also count toward guild progress. Boss kills, mob farming, tower content, and other activities often give account progress and guild value at the same time.
That means joining later is just lost efficiency.
| Activity | Helps Your Account | Helps Guild |
|---|---|---|
| Boss farming | Yes | Yes |
| Enemy grinding | Yes | Yes |
| Rush / tower content | Yes | Usually |
| Cosmetic or aura-related tasks | Sometimes | Often |
From a veteran-player perspective, this is one of the easiest efficiency wins in any update. You're already doing the grind, so it makes sense to double-count it.
↖ 3. Prioritize the new melee or weapon grind
After that, go straight for the new melee style or weapon route.
This is usually the most reliable early progression because it gives a direct combat boost. And once your damage improves, everything else gets easier: bosses die faster, quests are smoother, and later farming becomes less painful.
Sea 2 may have multiple new islands, but don't split your time evenly between all of them. Focus on the island tied to the upgrade you want most.
If you're deciding between exploring and farming power, choose power first.
| Priority | Best Early Focus | Reason |
|---|---|---|
| High | New melee / weapon | Direct power increase |
| High | Bosses tied to unlocks | Clear progression path |
| Medium | General exploration | Useful, but not urgent |
| Low | Blind system testing | Too risky on day one |
This is usually where the first real gap forms between efficient players and everyone else.
↖ What to Skip Early
A strong launch route is not only about what to do. It's also about what to ignore for now.
↖ Bloodlines and relics
These systems may be strong, but on day one they're usually inefficient to force too early. The problem is not the systems themselves. The problem is that nobody fully understands the best path yet.
So if you spend materials too early, you may end up locking yourself into a weak route.
A safer play is to get your melee or weapon upgrade first, then come back once the value is clearer.
↖ Easter event
This is another easy trap.
Event content is fine, but in the first hour it usually gives less value than direct progression. If the event involves egg hunting, hidden steps, or running around the map, it's probably not the best use of launch time.
If you want the cleanest start, save the event for after your first power jump.
↖ Random spending
Don't burn all your gems, crates, rerolls, or saved materials the moment the update drops.
Wait until you know:
- which bosses matter
- which unlock route is actually strong
- which items are worth investing into
Good update starts are not only about speed. They're also about resource discipline.
↖ Fast Sea 2 Checklist
Here's the short version to follow when servers open:
| Order | Action | Goal |
|---|---|---|
| 1 | Enter Sea 2 immediately | Unlock new content fast |
| 2 | Join a guild | Get value from every grind |
| 3 | Farm the new melee or weapon route | Secure early power |
| 4 | Focus bosses and key quests | Build momentum |
| 5 | Save relics, bloodlines, and event content for later | Avoid wasting time |
This route works because it keeps your first hour focused on guaranteed progression, not guesswork.
↖ FAQ
↖ What should I do first in Sailor Piece Sea 2?
Get into Sea 2 as fast as possible. That comes before exploring, events, or testing new systems.
↖ Is joining a guild really important on day one?
Yes. If your normal farming also gives guild progress, then joining early gives better long-term value.
↖ What is the best first grind in Sea 2?
Usually the new melee or weapon route, especially if it's tied to bosses or a clear unlock path.
↖ Should I do the Easter event right away?
Not if your goal is efficient progression. It's better after your first power upgrade.
↖ Should I spend gems and materials early?
No. Wait until you know which routes and items are actually strong.
↖ Final Takeaway
The best Sea 2 start is not about doing everything. It's about doing the right things in the right order. We get into Sea 2 quickly, join a guild early, push the first strong melee or weapon route, and leave side systems until they're worth the time.
That first clean power spike changes the rest of the update. Once you get it, the rest of Sea 2 starts opening up much more smoothly.
Most Popular Posts
- Sailor Piece AFK Boss Rush & Infinite Tower Guide: Best Build, Reset Floor, and Farming Setup
- Sailor Piece Sword & Melee Tier List (2026): Best Weapons for Farming, AFK, and Endgame
- Sailor Piece Bounty Guide: Fastest Way to Farm Bounty in SEA 2
- How to Unlock Sea 2 in Sailor Piece Fast: Best Route, Boss Drops, and Active Codes
- Sailor Piece Sea 2 Guide: Best First Hour Route, Fastest Start, and What to Skip
- Sailor Piece Sea 2 AFK Farming Guide: Best Spots, Sea Beast Spawns, and Fastest Drop Routes
Popular Category Lists
- Grow a Garden / (285)
- ARC Raiders / (260)
- CoD: Black Ops 7 / (166)
- Monopoly Go / (146)
- MLB 26 / (142)
- Star Citizen / (109)
- Steal a Brainrot / (88)
- Sailor Piece / (68)
- ARK Survival Ascended / (63)
- Forza Horizon 6 / (59)
- Blox Fruits / (59)
- Diablo IV / (58)
- CoD: BLACK OPS 6 / (55)
- Adopt Me / (51)
- Path of Exile 2 / (48)
- Monster Hunter Wilds / (46)
- Windrose / (43)
- Path of Exile / (40)
- Grow a Garden 2 / (36)
- Donut SMP / (35)