0
0 Created: Jan 1,2026 | Steal a Brainrot
Steal A Brainrot Challenge OG Brainrots Guides: Wheel, Luck, Premium Blocks

The Steal a Brainrot OG Brainrots Challenge looks like pure chaos—spin a wheel, get a random OG, start fresh, race to a massive money goal, and the loser deletes a top Brainrot on their main. But after running challenges like this, I'm convinced it's not who's luckiest, it's who makes fewer bad decisions under time pressure.
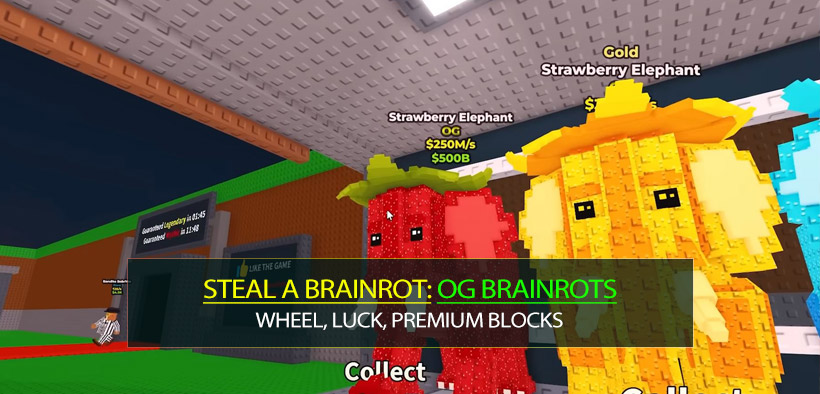
Your OG pull sets the starting line, sure. An OG making billions per second is a different universe from one making a few million. What actually decides the winner, though, is how you convert limited resources (especially 2,000 Robux) into stable money-per-second growth without punting the run on ego plays.
Below is the exact framework I use: how to play from ahead, how to recover from a weak OG, what to buy, what to ignore, and how to reduce the pain if the penalty involves deleting something you love.
- 1) Translate the Challenge Into One Simple Win Condition
- 2) OG Power Gaps: Why Some Players Feel Cooked Immediately
- 3) How to Spend Rb Coins: Two Builds I Actually Recommend
- Build A: Compound Growth (Luck first, then a small box)
- Build B: Ceiling Jump (Small Luck + 1–2 premium blocks)
- 4) Why I Don't Recommend the Wheel (Even When You're Desperate)
- If/Then rule to stop wheel-tilt
- 5) Time Windows Matter More Than People Admit
- My priority order
- 6) Repeatable Run Template
- Minute 0–2: Start the money engine
- Minute 2–8: The investment window (where winners are made)
- Minute 8 → end: Only do actions that increase rate
- 7) The Deletion Penalty: How I Reduce the Pain Before It Happens
- Two rules I follow
- FAQ
- 1) I pulled a weak OG. Can I still win?
- 2) Should I buy Luck or premium/festive blocks?
- 3) Is the wheel ever worth it?
- 4) Why do some people pull insane stuff and I don't?
- 5) What's the least painful thing to delete if I lose?
- Summary
1) Translate the Challenge Into One Simple Win Condition
At its core, the challenge is:
- Everyone gets one OG from a wheel spin
- Everyone starts on a fresh account
- Goal: build from $0 up toward something huge (often $1T)
- Winner = most money by the end
- Loser = deletes a high-value Brainrot on their main account
Here's the important part: money is a function of (income rate × time).
That means the game isn't asking Can you get lucky once? It's asking Can you invest correctly early so your income rate stays higher for the rest of the timer?
2) OG Power Gaps: Why Some Players Feel Cooked Immediately
OGs can differ by orders of magnitude. In one run I tracked, the spread looked like this:
| OG tier (example) | Income rate (per second) | What it feels like | Most common mistake |
|---|---|---|---|
| Top OG (e.g., Gold Strawberry Elephant) | ≈ $2.8B/s | You print money instantly | Get cocky and waste Robux/time |
| Mid OG (e.g., Diamond Strawberry Elephant) | ≈ $0.8B/s | Strong, but needs smart scaling | Overthink purchases, miss windows |
| Weak OG (e.g., Skib level) | ≈ $3.5M/s | You fall behind fast | Panic-gamble (wheel spam / box spam) |
What this means:
- If you're in the billions/sec range, your job is to avoid throwing.
- If you're in the millions/sec range, your job is to raise your ceiling, because playing safe can still be a guaranteed loss.
3) How to Spend Rb Coins: Two Builds I Actually Recommend
Most players get pulled toward three things:
1) Luck multipliers
2) Premium/Festive Lucky Blocks
3) Spin-the-Wheel (because it's flashy)

I'll be blunt: Spin-the-Wheel is usually the worst EV (expected value) play unless you know the prize pool is boosted for blocks or top-tier drops.
Build A: Compound Growth (Luck first, then a small box)
Best when: you have a strong/mid OG and you want consistency.
What I do:
1. Buy Luck multipliers first (anything that improves drop quality over time).
2. With remaining Robux, consider one premium/festive block at most.
3. Stop. Let your OG + better drops do the work.
Why this works: Luck acts like compounding. It improves what you see across the whole run, not just one moment.
Build B: Ceiling Jump (Small Luck + 1–2 premium blocks)
Best when: you pulled a weak OG and need an out.
What I do:
1. Buy minimum Luck so your baseline isn't miserable.
2. Open 1–2 premium/festive blocks to try for a game-changing unit.
3. If you whiff, immediately pivot back to stable growth. No tilt-buying.
This means you're taking a controlled shot at a comeback without letting variance eat your entire run.
4) Why I Don't Recommend the Wheel (Even When You're Desperate)
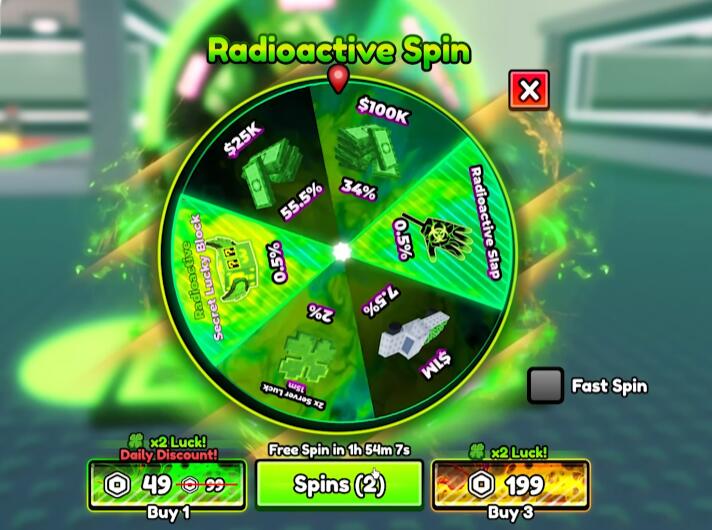
The wheel isn't bad because it can't hit. It's bad because:
- Robux is scarce
- Many wheel outcomes are tiny cash rewards
- Tiny cash rewards are meaningless when you're already generating billions/sec
- Meanwhile, you're skipping guaranteed scaling (Luck) or high-upside scaling (premium blocks)
If/Then rule to stop wheel-tilt
- If your wheel spins return small cash 2–3 times in a row, then stop immediately and buy Luck/blocks instead.
- If you catch yourself thinking next spin has to hit, then you're not strategizing—you're gambling.
5) Time Windows Matter More Than People Admit
The sneakiest advantage isn't always the OG—it's noticing limited-time stuff early (event clicks, temporary boosts, short timers). When something expires in seconds, you don't get to optimize later.
My priority order
1. Anything with a clear countdown (seconds/minutes remaining)
2. Easy click/collect resources that convert to rewards
3. Then long-term base optimization
If you realize there are 9 seconds left and you're still deciding, you're already late. This means decisive action beats perfect action.
6) Repeatable Run Template
Here's the rhythm I follow. It's not fancy, but it's consistent.
Minute 0–2: Start the money engine
1. Place your OG immediately so income starts ticking.
2. Grab any obvious starter rewards/claims the UI points at.
3. Don't wander. Don't roleplay. You're building rate.
Minute 2–8: The investment window (where winners are made)
1. Spend Robux using Build A or Build B.
2. If boxes don't pay out, stop after your planned number.
3. Immediately place any new earners/boosts into your base.
Minute 8 → end: Only do actions that increase rate
- Collect income regularly
- Upgrade/replace low earners
- Ignore anything fun that doesn't increase your money-per-second
Let me ask the uncomfortable question: did you spend your best minutes trying to prove you're lucky, instead of increasing income rate? If yes, that's usually why you're behind.
7) The Deletion Penalty: How I Reduce the Pain Before It Happens
Because the punishment is on your main, I treat this like risk management.
Two rules I follow
1. Make a safe-to-delete list before the challenge starts.
Don't decide while emotional.
2. Protect items with high scarcity (mutations/traits/rainbow variants).
If it's hard to replace, it's a bad delete target.
| Candidate type | What I choose | Reason |
|---|---|---|
| Similar income, low rarity | Delete first | Replaceable, low emotional damage |
| High-trait / rainbow / rare mutation | Avoid deleting | Replacement cost is brutal |
| New favorite you just got | Avoid deleting | Highest tilt factor |
| Best asset on the floor | Only if forced | It nukes your account progress |
FAQ
1) I pulled a weak OG. Can I still win?
Yes, but your path isn't slow and safe.
If you're multiple tiers behind, you need a controlled ceiling jump (small Luck + 1–2 premium blocks), then stabilize.
2) Should I buy Luck or premium/festive blocks?
- If you're already ahead or your OG is strong, then prioritize Luck for consistency.
- If you're clearly behind, then open 1–2 premium blocks for upside, but don't spam.
3) Is the wheel ever worth it?
Only when you've verified the wheel's prize pool heavily favors high-upside items.
Otherwise, it tends to trade scarce Robux for meaningless cash rewards.
4) Why do some people pull insane stuff and I don't?
Variance. You can't control outcomes—you can control exposure.
My rule: decide your max number of boxes before you open the first one, and stick to it.
5) What's the least painful thing to delete if I lose?
Delete something replaceable: similar income, low rarity, no rare traits.
Avoid deleting high-mutation/rainbow items unless you truly have no choice.
Summary
The OG Brainrot Challenge is won by converting time and Robux into money-per-second as early as possible. Strong OGs win by not throwing; weak OGs win by taking one controlled shot at a ceiling jump, then scaling consistently.
Most Popular Posts
- Steal a Brainrot Fusion Guide: How to Fuse Dragon Aquanini and Max Its Traits
- Steal a Brainrot Best Los Tangcitos Crafting Guide: Recipes, Traits, Mutations, and Odds
- Steal a Brainrot Los Dragons Unit Recipe and Craft Guides
- Steal a Brainrot Tier List for Brainrots: Best Units Ranked by Aura
- Steal a Brainrot Crafting Rare Los Cornis: Fusion Odds & Best Combos That Actually Work
- Steal a Brainrot Guide: Rebirth Requirements, Lucky Blocks & Steals
Popular Category Lists
- ARC Raiders / (343)
- Grow a Garden / (292)
- CoD: Black Ops 7 / (167)
- Star Citizen / (160)
- MLB 26 / (159)
- Monopoly Go / (152)
- ARK Survival Ascended / (126)
- Steal a Brainrot / (98)
- Blox Fruits / (74)
- Adopt Me / (73)
- Forza Horizon 6 / (72)
- Sailor Piece / (68)
- Grow a Garden 2 / (68)
- Diablo IV / (62)
- CoD: BLACK OPS 6 / (55)
- Path of Exile 2 / (48)
- Monster Hunter Wilds / (46)
- Aion 2 / (45)
- Windrose / (44)
- Donut SMP / (41)