0
Created: Oct 25,2026 | ARC Raiders
ARC Raiders Amplified Anvil Guides: Splitter vs X-Rounds—Worth It?

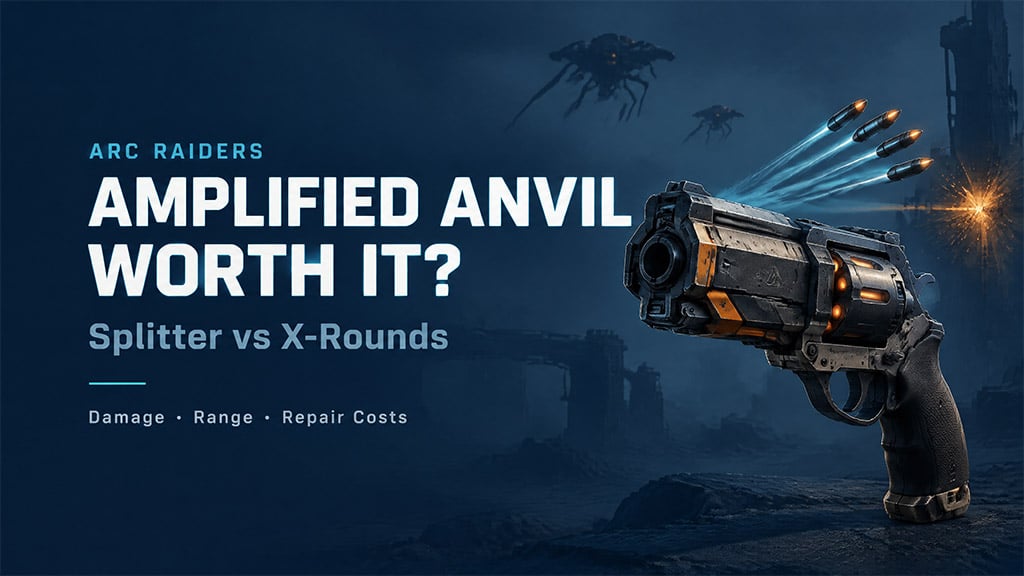
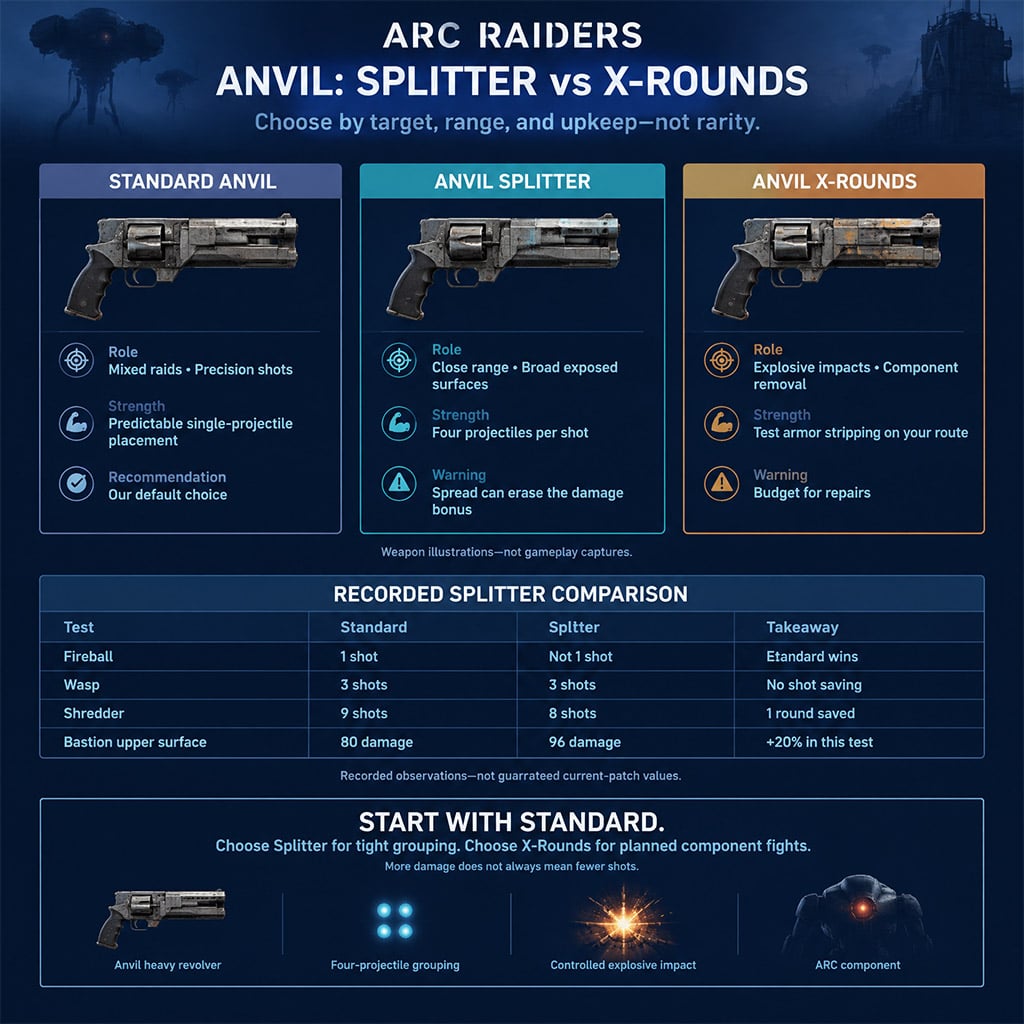
We recommend the standard Anvil for mixed raids, the Splitter for close-range exposed targets, and X-Rounds for component-focused fights when you can afford maintenance. If you expect amplification to improve every matchup, keep your materials: the recorded results show trade-offs, not a universal upgrade.
The figures below are based on in-game field testing, though exact breakpoints may shift with future balance patches.
- Which Anvil Should You Bring?
- Match the upgrade to your firing position
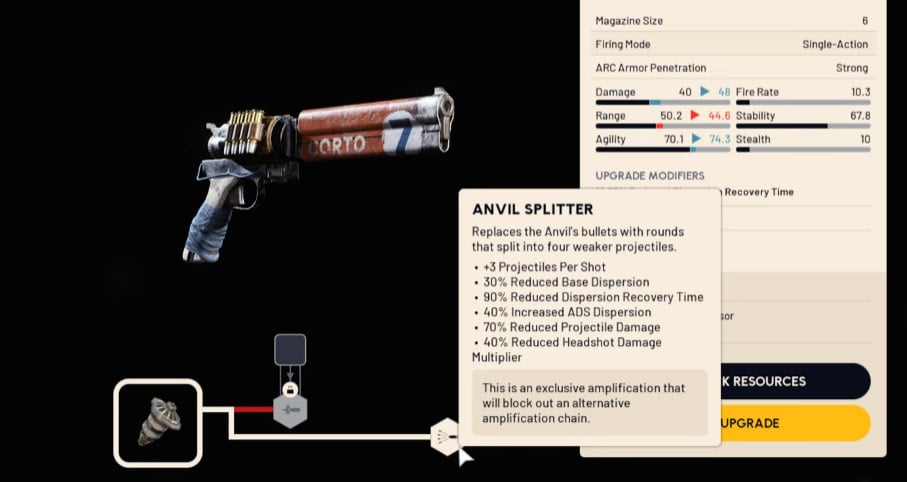
- Anvil Splitter: More Damage Does Not Mean Fewer Shots
- The hidden cost of one missed projectile
- Make every projectile count
- Anvil X-Rounds: Judge the Component, Not the Explosion
- Strip, expose, then reposition
- Keep aiming—and account for smoke
- PvP and Maintenance: Where the Upgrade Can Lose Value
- Compare the whole raid bill
- Run a short route before committing
- FAQ (Frequently Asked Questions)
- Is the Amplified Anvil worth it in ARC Raiders?
- Does the Anvil Splitter deal 20% more damage?
- Can the Anvil Splitter one-shot a Fireball?
- Does Anvil X-Rounds two-shot players?
- How expensive is the Amplified Anvil to repair?
Which Anvil Should You Bring?
We should choose the weapon around the shots we can reliably land—not its rarity.
| Version | Best use | Main failure point | Our pick |
|---|---|---|---|
| Standard Anvil | Mixed targets and precise single-projectile hits | No amplification-specific benefit | Default raid weapon |
| Anvil Splitter | Broad, exposed surfaces at close range | Projectiles miss small targets or spread across armor | Specialist option |
| Anvil X-Rounds | Explosive impacts and component removal | Uneven kill results and expensive upkeep | Planned ARC-farming runs |
We would keep the standard Anvil unless your route gives the amplification a clear job.
Match the upgrade to your firing position
If your fights happen across courtyards or against moving flyers, we favor the standard Anvil's predictable projectile placement. If you can approach a large exposed surface safely, the Splitter has a stronger case.
For X-Rounds, plan around component removal, not the assumption that explosions eliminate the need to aim.
1. Choose your primary enemy.
2. Identify the component or surface you will shoot.
3. Check whether cover lets you maintain that angle.
4. Budget for repair and replacement before deploying.
A useful upgrade improves the fight you actually take.
Anvil Splitter: More Damage Does Not Mean Fewer Shots
In side-by-side testing against Fireballs, Wasps, and Shredders: only the Shredder showed a lower kill count, dropping from nine shots to eight. The Fireball result went the other way.
Here are the observations that matter for loadout decisions.
| Target or test | Standard Anvil | Splitter | Decision |
|---|---|---|---|
| Fireball | One-shot kill | Failed to one-shot | Use standard for this breakpoint |
| Shredder | Nine shots | Eight shots | Modest saving in this run |
| Wasp, centered hits | Three shots | Three shots | No recorded ammunition saving |
| Bastion upper surface | Reported damage: 80 | Reported damage: 96 | Favor Splitter when the full group connects |
| Bastion yellow joint | Reported damage: 60 | Reported damage: 18 at the attempted distance | Close in or use standard |
| Surveyor sequence | Observed damage: 80 | Damage hits: 71, 50, 50 | Do not assume an armor advantage |
We would not trade reliable precision for the Splitter's damage ceiling unless you can keep its projectile group on target.
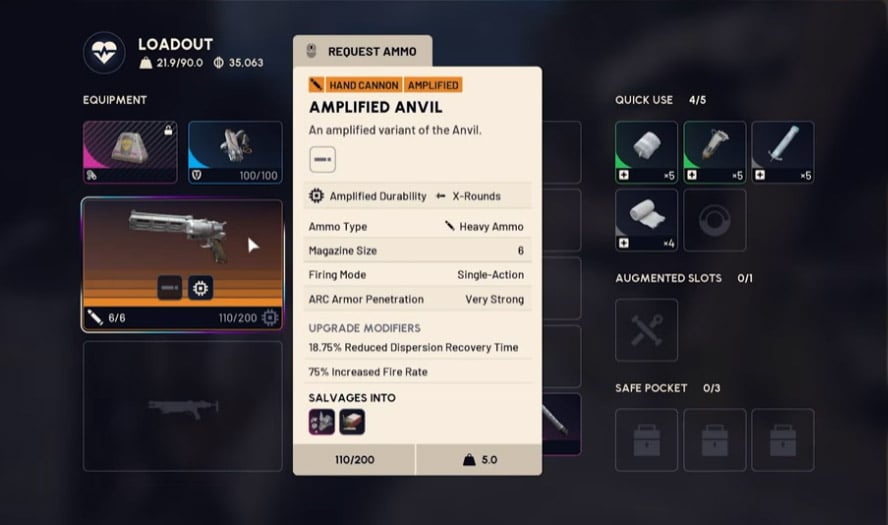
The hidden cost of one missed projectile
The Splitter fires four projectiles per shot. Under an equal-damage assumption, a full group dealing 120% of standard damage falls to 90% when one projectile misses—before armor interactions enter the calculation.
That is an illustration, not a confirmed damage formula, but it explains the practical risk: a small grouping error can erase the bonus.
We checked the 80-to-96 comparison against the kill counts. The 20% damage increase produced no Wasp shot saving, and eight rather than nine Shredder shots represents roughly 11% fewer rounds, not 20%.
Make every projectile count
If your Splitter struggles on small weak points, we recommend changing the angle rather than firing faster.
1. Approach through hard cover.
2. Aim down sights at a broad damageable surface.
3. Wait for movement to settle.
4. Fire, then recenter before the next shot.
5. Count clean hits separately from misses.
Check the reload breakpoint, too. With a six-shot magazine, both an eight-shot and nine-shot kill require a reload; the saving does not remove that interruption.
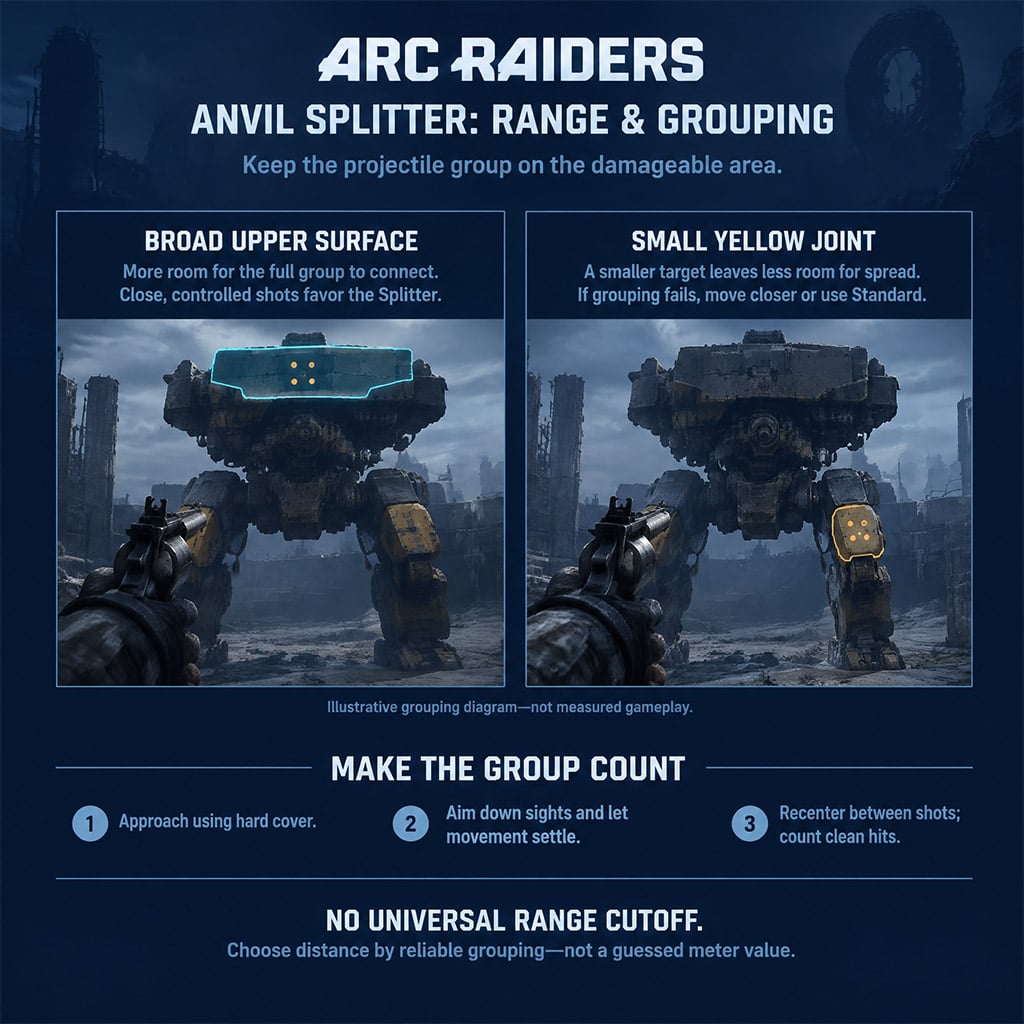
Anvil X-Rounds: Judge the Component, Not the Explosion
Field results with X-Rounds can vary wildly depending on hit placement: some Shredder engagements take roughly nine shots, while clean component hits can produce. rapid kills and repeated armor stripping. That does not establish a dependable all-target damage advantage.
Component removal is the better test.
Strip, expose, then reposition
If you bring X-Rounds against a flyer or large ARC, we recommend tracking what the first shots destroy. Removing a propulsion component or exposing a damage zone can change the encounter before the target dies.
Use this sequence:
1. Aim at a visible armor-covered component.
2. Confirm whether the impact strips armor or removes the part.
3. Shift onto the newly exposed area.
4. Reload behind cover.
5. Compare total rounds and time with your standard Anvil approach.
Why does this matter? A shot that changes the enemy's movement or gives you a safer angle has value beyond its immediate health damage.
Keep aiming—and account for smoke
Explosive impacts do not turn near misses into reliable hits. One evaluation specifically found hip fire inaccurate, while several fights showed impact smoke obscuring the next target area.
If smoke hides the component, reset your sightline instead of firing through it blindly. We would test Extended Barrel III for longer shots, but the observed improvement in projectile travel does not prove a fixed effective-range threshold.
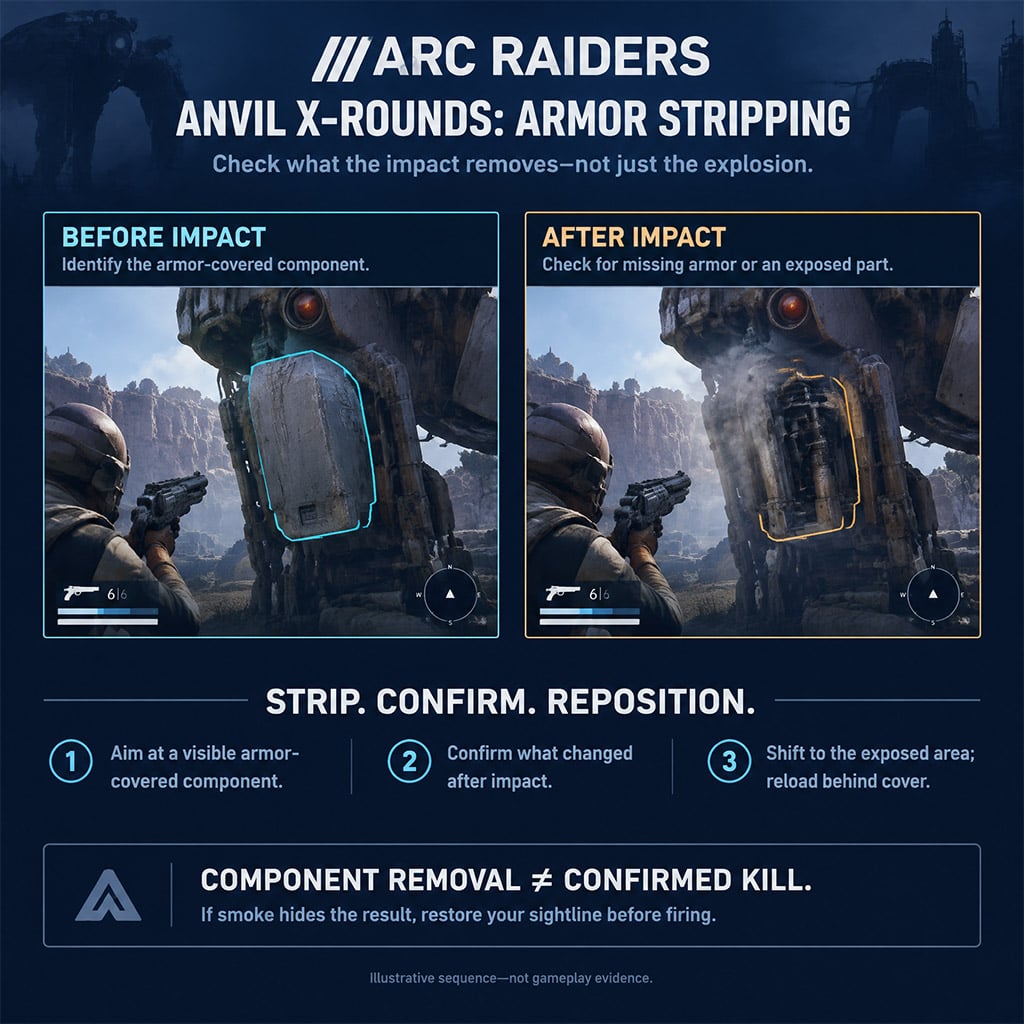
PvP and Maintenance: Where the Upgrade Can Lose Value
In PvP encounters, variables like starting health, shield state, and teammate chip damage make TTK inconsistent, shield state, and teammate damage. Those conditions were not consistently established, so the observed two-hit downs do not prove a universal two-shot kill.
If you use the Splitter in PvP, favor fights where the full group connects. With X-Rounds, treat splash as a secondary benefit—not permission to abandon direct hits.
Compare the whole raid bill
A weapon's purchase cost is only the entrance fee. A heavily damaged X-Rounds Anvil can cost up to 21 fragments to repair and an 11-fragment recycling return for that damaged weapon.
These figures describe one recorded condition, not a fixed repair price.
| Cost check | Recorded observation | What we would do |
|---|---|---|
| Splitter application | Three Turbine Compressors and an amplification module mentioned | Check the complete bench recipe |
| X-Rounds research purchase | 5,000 research points and five Rocketeer Drivers reported | Confirm the current research screen |
| X-Rounds application | Three Fossilized Lightning reported | Check for additional requirements |
| Damaged X-Rounds repair | 21 fragments required in one example | Inspect the price at your durability |
| Recycling that weapon | 11 fragments returned | Do not assume recycling funds a full repair |
We would postpone amplification if one repair would exhaust your material reserve.
Run a short route before committing
If you want to make X-Rounds your farming weapon, first run a repeatable route with the standard Anvil, then repeat it with the amplified version.
Record rounds fired, completion time, durability loss, and recovered loot. Faster kills are not a resource-saving upgrade when the repair bill consumes the extra profit.
FAQ (Frequently Asked Questions)
Is the Amplified Anvil worth it in ARC Raiders?
The Amplified Anvil is worth considering for a specific role, not as an automatic replacement. We favor the standard Anvil for mixed raids, the Splitter for close exposed targets, and X-Rounds for component-focused runs with a maintenance budget.
Does the Anvil Splitter deal 20% more damage?
The recorded Bastion surface test showed 96 damage versus 80, a 20% increase in that situation. We would not apply that bonus to every shot because projectile misses and armor interactions change the result.
Can the Anvil Splitter one-shot a Fireball?
The recorded Splitter comparison failed to one-shot a Fireball, while the standard Anvil succeeded. If that breakpoint matters to your route, we recommend the standard weapon rather than assuming the Splitter improves it.
Does Anvil X-Rounds two-shot players?
The available two-hit downs do not establish a guaranteed two-shot kill against players. We would need known starting health, shield state, distance, and hit placement before treating that result as a reliable breakpoint.
How expensive is the Amplified Anvil to repair?
Repair cost must be checked at the weapon's current durability; one recorded X-Rounds example required 21 fragments. The same damaged weapon returned 11 fragments when recycled, so we would not assume dismantling one amplified weapon pays for another's full repair.

I’m Priya Raman, an Indian Content Strategist at GGWTB covering fantasy MMORPGs, classic online games, and guild-focused play. I plan coverage around class roles, group coordination, and long-term character growth. A strong solo build is only part of the picture—I focus on what you bring to a party and which investments stay useful as your guild takes on tougher content.
Most Popular Posts
- ARC Raiders Update 1.42: Phantom Targets Farming Guide (Glitched Wasps, Rewards, Regional Conditions)
- ARC Raiders Subway Skin Guide: Unlock the Subterranean Outfit
- ARC Raiders Frozen Trail Update Guide: Pendola Pass, Frigate & Meta Loadouts
- ARC Raiders Ascending the Mountain: Fast Loot Routes and Item Guide
- ARC Raiders Broken Guidance System and Dual Anvil Build Guide
- ARC Raiders Frozen Trail Prep Guide: Skills, Weapon Upgrades & Map Shifts
Popular Category Lists
- ARC Raiders / (374)
- Grow a Garden / (300)
- Star Citizen / (172)
- CoD: Black Ops 7 / (168)
- MLB 26 / (159)
- Monopoly Go / (153)
- ARK Survival Ascended / (132)
- Steal a Brainrot / (101)
- Adopt Me / (78)
- Blox Fruits / (74)
- Forza Horizon 6 / (72)
- Sailor Piece / (68)
- Grow a Garden 2 / (68)
- Aion 2 / (65)
- Diablo IV / (62)
- COD: Modern Warfare 4 / (59)
- CoD: BLACK OPS 6 / (55)
- Maplestory Classic / (50)
- Path of Exile 2 / (48)
- Monster Hunter Wilds / (46)