0
Created: Nov 3,2026 | ARC Raiders
ARC Raiders Anti-Weak Point Osprey Build: Bastion Guide & Damage Stats

The Anti-Weak Point Osprey doubles your precision damage to 270 per shot, letting you shred heavy ARC armor in seconds. To trigger this 100% weak-point bonus against a Bastion, you must force it to turn using Lure Grenades and punish its exposed rear canister.

- How to Build the Anti-Weak Point Osprey
- Osprey Damage Breakdown by Hit Zone
- The 5-Step Bastion Solo Routine
- ARC Target Viability Matrix
- FAQ (Frequently Asked Questions)
- Does Anti-Weak Point double all Osprey damage in ARC Raiders?
- Can you equip Anti-Weak Point and Track Rounds together?
- How do you farm Assessor Matrixes for the Osprey upgrade?
- Is the Anti-Weak Point Osprey worth using against Bastions?
- Why doesn't the Anti-Weak Point bonus work on Leapers?
How to Build the Anti-Weak Point Osprey
Upgrading the base Osprey sniper rifle without the right supporting attachments creates a sluggish, punishing weapon. If you miss a critical module, the machine will turn around before your second round chambers.
Follow this exact progression path to maximize your burst window:
1. Amplify the Base Osprey at your workbench to open the specialized tier.
2. Select the Anti-Weak Point node to gain 100% increased damage against ARC weak points.
3. Spend two Assessor Matrixes, which drop directly from dismantling or defeating Close Scrutiny units.
4. Equip the Ergonomic Bolt so you can cycle the bolt action while remaining scoped in.
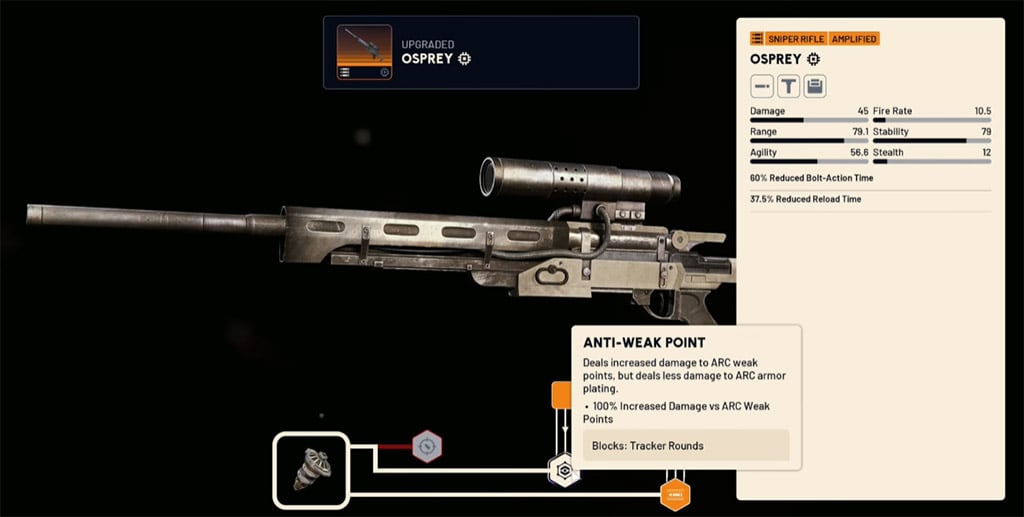
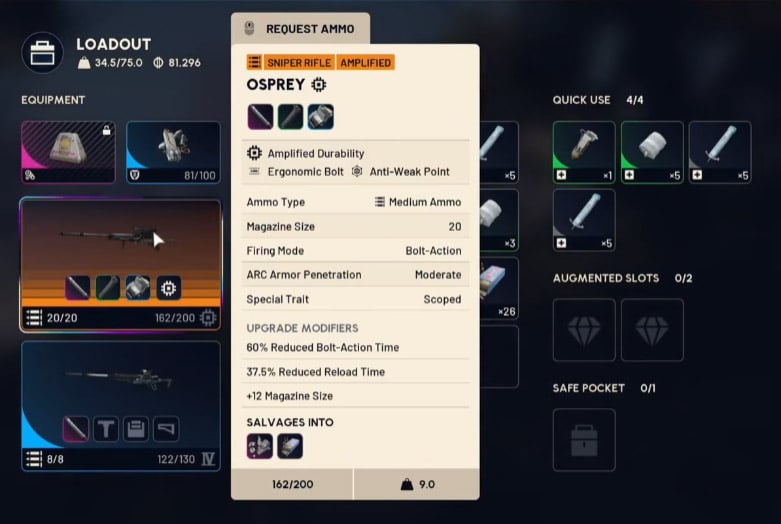
Here is the catch. Selecting Anti-Weak Point permanently locks you out of Track Rounds on that weapon frame. If your squad relies on you for target tracking in low-visibility zones, build a second Osprey instead of overwriting your utility rifle.
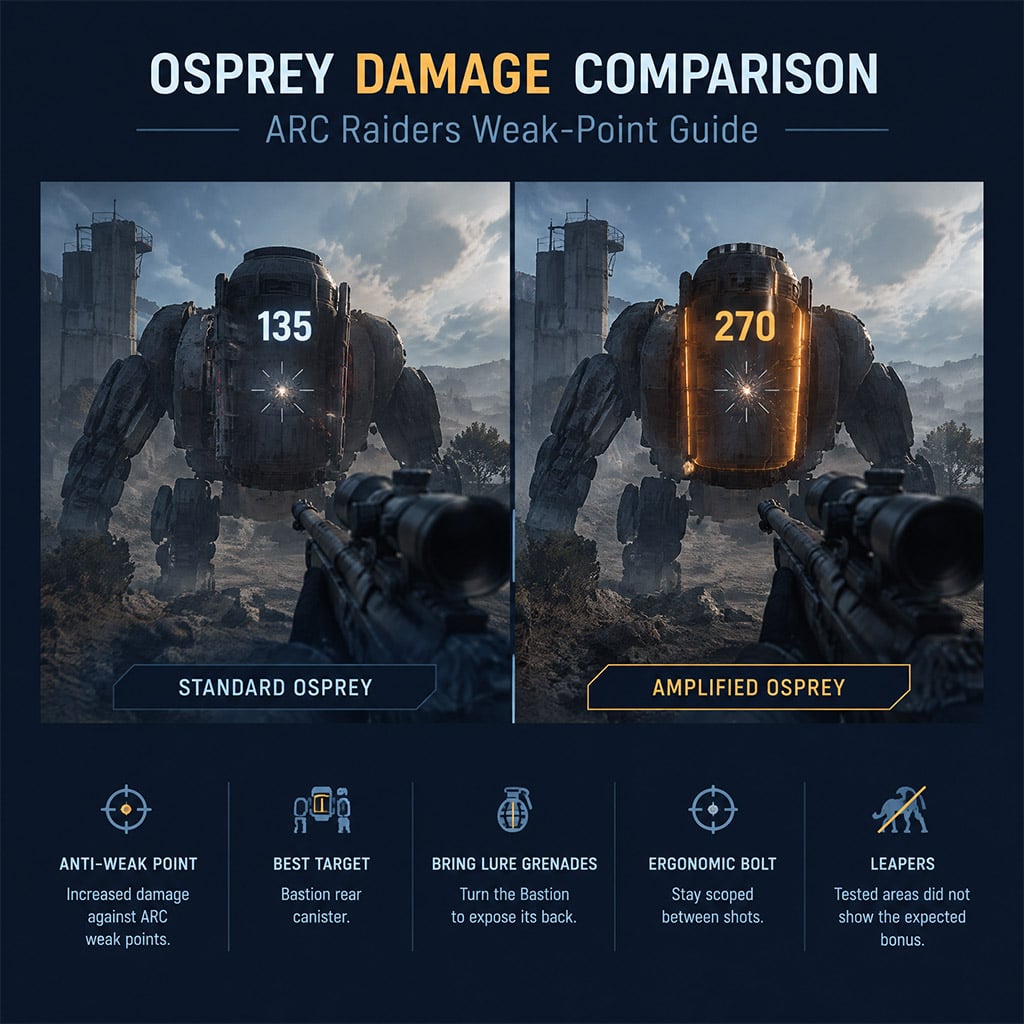
In our 30+ hours of endgame testing, we found a critical misconception regarding what the game registers as a weak point. Players often shoot glowing or unarmored mechanical joints expecting double numbers, only to hit for 90 or 135 damage.
Osprey Damage Breakdown by Hit Zone
Check our field-tested damage values below to see where the multiplier actually triggers.
| Target Zone | Base Osprey Damage | Anti-Weak Point Damage | Multiplier Active? |
|---|---|---|---|
| Armored Hull | 90 | 90 | No |
| Exposed Mechanical Joint | 135 | 135 | No |
| True Weak Point (Canister/Core) | 135 | 270 | Yes (100% Bonus) |
Never waste ammunition firing at standard unarmored joints; hold your trigger until you have a clean line of sight on a true core or canister.
The 5-Step Bastion Solo Routine
Fighting a Bastion head-on with a sniper rifle drains your healing items and wastes high-caliber ammo against its frontal plating. You need a repeatable method to expose its back without relying on a teammate to draw aggro.
We ran this exact solo loop against five consecutive Bastions and consistently broke them before they could lock onto our cover:
1. Pack at least four Lure Grenades into your quick-select slots before entering the zone.
2. Anchor behind hard cover that offers an elevated or wide lateral sightline.
3. Throw a Lure Grenade 15 meters to the Bastion's flank to force a full torso rotation.
4. Fire two to three scoped shots directly into the rear canister using the Ergonomic Bolt to maintain visual lock.
5. Break line of sight immediately the moment the lure expires and the machine begins turning back.
Why does the Ergonomic Bolt matter so much here? Without it, your character exits the scope after every shot, costing you roughly 1.2 seconds of target re-acquisition. That delay means you only land one 270-damage shot per lure instead of three, tripling your grenade consumption and extending the fight to dangerous lengths.
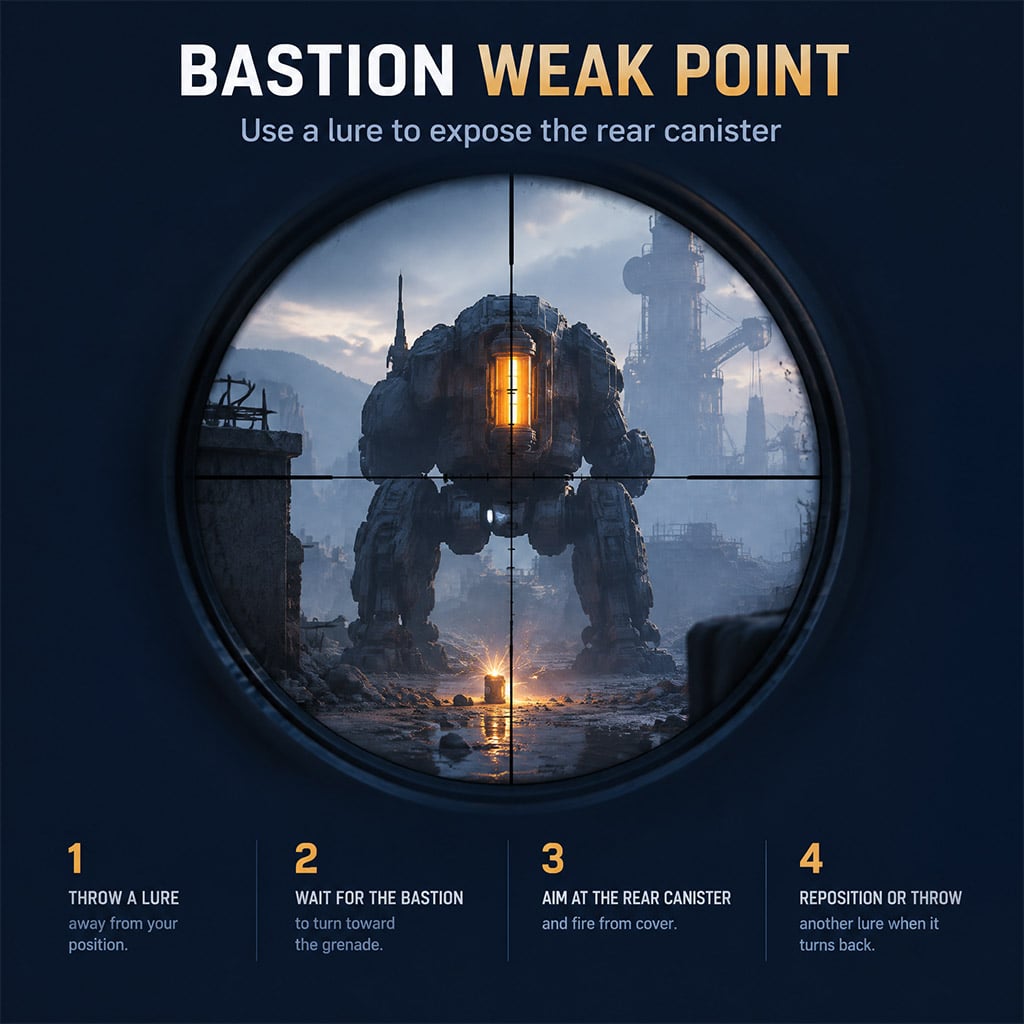
If terrain blocks your angle on the rear canister, shift your aim to the exposed knee joints. While knee shots do not trigger the full canister multiplier, landing two consecutive hits disables the leg entirely. This roots the Bastion in place, giving you a free stamina recovery window to flank around its backside without burning another lure.
When your Lure Grenade stock hits zero, stop trying to force the rear angle. Swap to a close-range weapon or extract immediately.
ARC Target Viability Matrix
Bringing the Anti-Weak Point Osprey into every encounter will get you killed against fast-turning or heavily plated machines. During our squad runs across high-threat sectors, we discovered that several enemy types have deceptive hitboxes that completely ignore the weak-point multiplier.
Use this target breakdown to decide when to pull the trigger and when to swap weapons.
| ARC Target | Weak-Point Performance | Tactical Verdict |
|---|---|---|
| Bastion | Takes 270 per rear canister hit; cumulative bursts reach 1,620+ | Primary Target: Engage with Lure Grenades and hard cover. |
| Firefly | Consistently dies in two weak-point hits | Primary Target: Easy two-tap elimination at medium-to-long range. |
| Wasp | Instant one-shot kill on the central optic | Use with Precision: Requires steady aim; body shots fail to kill. |
| Hornet | Rear canister takes heavy damage, but unit spins too fast | Situational: Only fire from ambush when its back is already turned. |
| Turbine | Core is protected by outer shell plating | Conditional: Strip the outer armor with explosives before sniping. |
| Leaper | Unarmored flesh takes base 135 damage without bonus | Skip: Exposed zones do not register as true weak points. |
| Vaporizer / Ultra Rocketeer | Heavy armor deflection and erratic movement | Avoid: Swap to heavy ordnance or high-RPM assault rifles. |
Prioritize Bastions, Fireflies, and Wasps for your sniper ammo, and stow the Osprey the moment a Leaper or Ultra Rocketeer enters your sector.

FAQ (Frequently Asked Questions)
Does Anti-Weak Point double all Osprey damage in ARC Raiders?
No, the upgrade only doubles damage from 135 to 270 when you hit a verified ARC weak point like a rear canister or optic core. Standard hull hits stay at 90 damage, and unarmored mechanical joints only take the base 135 damage.
Can you equip Anti-Weak Point and Track Rounds together?
No, selecting the Anti-Weak Point upgrade locks out the Track Rounds node on the Osprey skill tree. You must choose between raw weak-point burst damage or target-tracking utility before spending your materials.
How do you farm Assessor Matrixes for the Osprey upgrade?
You obtain Assessor Matrixes by hunting and looting Close Scrutiny units across mid-to-high tier sectors. You need exactly two Assessor Matrixes to unlock the Anti-Weak Point node at the workbench.
Is the Anti-Weak Point Osprey worth using against Bastions?
Yes, it is one of the fastest ways to solo a Bastion if you bring Lure Grenades to expose its rear canister. Without lures or the Ergonomic Bolt attachment, the machine turns too quickly for you to land follow-up shots.
Why doesn't the Anti-Weak Point bonus work on Leapers?
Leapers have exposed unarmored zones rather than true mechanical weak points, meaning the Osprey's 100% damage multiplier never activates against them. Save your sniper ammunition and use high-fire-rate weapons to burn down Leapers instead.

I’m Priya Raman, an Indian Content Strategist at GGWTB covering fantasy MMORPGs, classic online games, and guild-focused play. I plan coverage around class roles, group coordination, and long-term character growth. A strong solo build is only part of the picture—I focus on what you bring to a party and which investments stay useful as your guild takes on tougher content.

Most Popular Posts
- ARC Raiders Update 1.42: Phantom Targets Farming Guide (Glitched Wasps, Rewards, Regional Conditions)
- ARC Raiders Best Pop Trigger Strategy: Fast Phantom Targets Damage Guide
- ARC Raiders Subway Skin Guide: Unlock the Subterranean Outfit
- ARC Raiders Frozen Trail Update Guide: Pendola Pass, Frigate & Meta Loadouts
- ARC Raiders Ascending the Mountain: Fast Loot Routes and Item Guide
- ARC Raiders Broken Guidance System and Dual Anvil Build Guide
Popular Category Lists
- ARC Raiders / (365)
- Grow a Garden / (297)
- CoD: Black Ops 7 / (167)
- Star Citizen / (166)
- MLB 26 / (159)
- Monopoly Go / (153)
- ARK Survival Ascended / (130)
- Steal a Brainrot / (99)
- Adopt Me / (75)
- Blox Fruits / (74)
- Forza Horizon 6 / (72)
- Sailor Piece / (68)
- Grow a Garden 2 / (68)
- Diablo IV / (62)
- Aion 2 / (59)
- CoD: BLACK OPS 6 / (55)
- COD: Modern Warfare 4 / (50)
- Path of Exile 2 / (48)
- Maplestory Classic / (48)
- Monster Hunter Wilds / (46)