0
0 Created: Aug 26,2026 | ARC Raiders
ARC Raiders Bluegate Blueprint Farming Guide: Best Route, Loot Priorities, and Storm Strategy

Bluegate is one of the most consistent blueprint farming maps in ARC Raiders. The winning approach is simple: start in Village, search every garbage can and backpack, enter contested rooms only when safe, then extract as soon as the run becomes valuable.

This is not a locked-room gamble. It is a repeatable route built around high container volume, flexible rotations, and survival.
- Why Bluegate Is Strong for Blueprint Farming
- Best Loadout for Bluegate Blueprint Runs
- Best Bluegate Blueprint Farming Route
- Stage 1: Farm Village Containers
- Never Skip Garbage Cans
- Stage 2: Sweep Back Alleys and Broken Houses
- Stage 3: Treat the Key Room as Optional
- Stage 4: Check Reinforced Reception and Head House
- Stage 5: Use the Red Tunnel and Puzzle Route Conditionally
- Stage 6: Finish Through Maintenance Wing
- Bluegate Electromagnetic Storm Strategy
- How to Farm During a Storm
- Bluegate Loot Priority
- PvP Safety Rules for Blueprint Farming
- Practical Survival Habits
- Best Time to Extract
- Fast Bluegate Route Checklist
- Common Bluegate Farming Mistakes
- FAQ
- Is Bluegate the best map for blueprint farming in ARC Raiders?
- Where should I start a Bluegate blueprint run?
- Are garbage cans worth searching on Bluegate?
- Should I farm Bluegate during an Electromagnetic Storm?
- When should I extract during a blueprint run?
- Summary
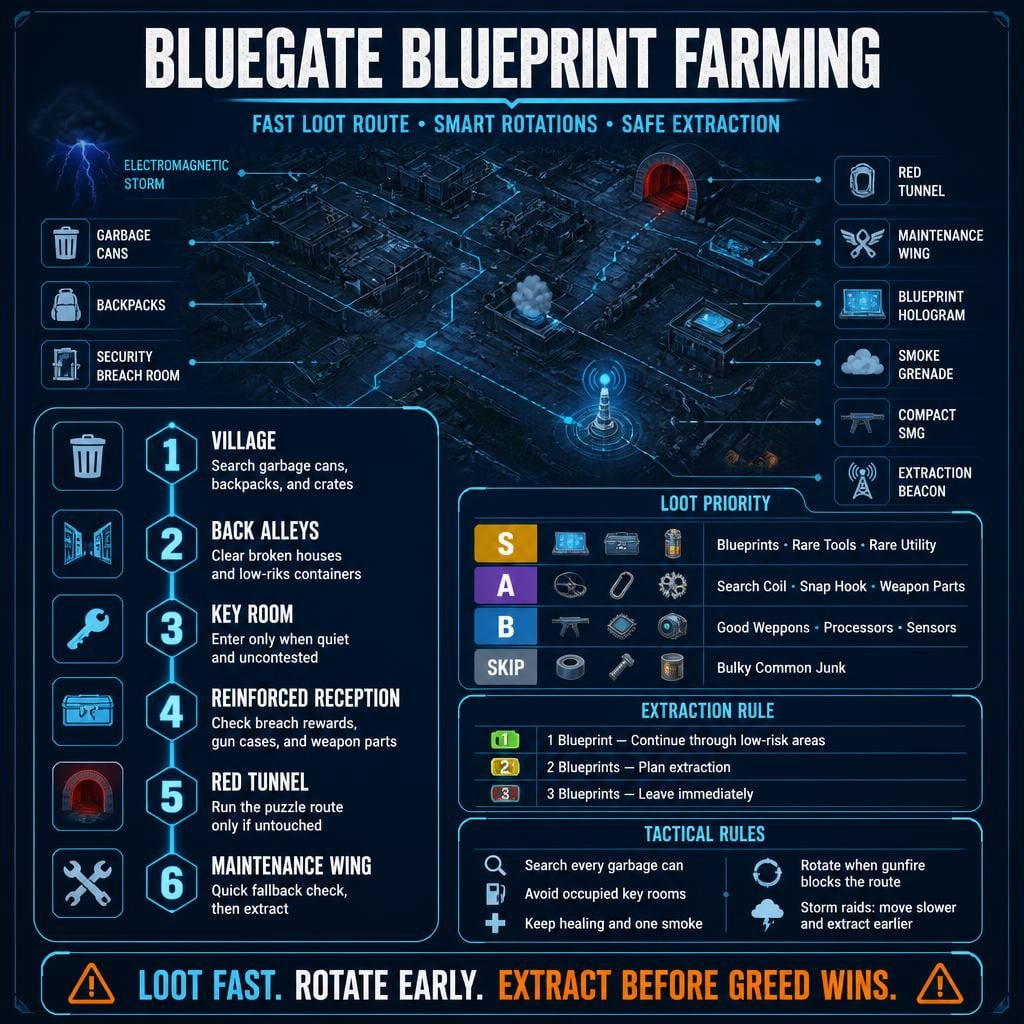
Why Bluegate Is Strong for Blueprint Farming
Bluegate gives you many fast loot checks without forcing a keycard room or prolonged PvP. Its compact zones also make it easy to abandon a bad position and continue farming elsewhere.
| Strength | Why It Matters | Practical Result |
|---|---|---|
| Dense Village loot | Many containers in a small area | Fast early blueprint checks |
| Frequent garbage cans | Strong utility and blueprint-related drops | Always search them |
| Multiple rotation paths | Easier to avoid occupied areas | Higher survival rate |
| Security breach rooms | Weapons and valuable parts | Strong optional mid-route loot |
| Maintenance Wing | Often skipped or cleared lightly | Reliable fallback zone |
The key is volume. One premium room gives you one contested opportunity. A full Bluegate route gives you dozens of smaller, safer loot rolls.
Best Loadout for Bluegate Blueprint Runs
Do not overgear for a farming run. Bring enough equipment to survive an ambush while keeping inventory space open for blueprints, tools, parts, and weapons.
| Slot | Recommended Choice | Reason |
|---|---|---|
| Primary | Bobcat or close-to-mid-range weapon | Strong in alleys, stairs, and interiors |
| Healing | Stems and basic heals | Covers chip damage and bad rotations |
| Utility | Smoke grenades | Breaks sightlines during retreats and extraction |
| Backpack | Medium or larger | Holds blueprints and compact valuables |
| Armor | Practical mid-tier armor | Protection without risking an expensive kit |
The Bobcat fits Bluegate's tight spaces, but it is a defensive tool—not permission to chase every gunshot.
Core rule: if a fight does not protect your route or extraction, skip it.
Best Bluegate Blueprint Farming Route
Use this route as a framework:
1. Village
2. Back alleys and broken houses
3. Key room surroundings
4. Reinforced Reception and Head House
5. Red tunnel and puzzle route
6. Maintenance Wing
7. Extraction
| Stage | Area | Main Objective | Risk |
|---|---|---|---|
| 1 | Village | Garbage cans, backpacks, crates | Low–medium |
| 2 | Alleys and broken houses | Extra low-risk containers | Low |
| 3 | Key room area | Conditional high-value loot | Medium–high |
| 4 | Reinforced Reception / Head House | Breach rooms, weapons, parts | High |
| 5 | Red tunnel / puzzle route | Optional tech and weapon loot | Medium |
| 6 | Maintenance Wing | Fallback loot and extraction setup | Medium |
Do not follow the route blindly. Shots, footsteps, opened containers, and ARC activity should determine your next move.
Stage 1: Farm Village Containers
Village is the best opening zone when your spawn supports it. It offers dense loot without requiring special access.
Search methodically. Ordinary containers are the backbone of this farm.
| Loot Source | Priority | Action |
|---|---|---|
| Garbage cans | Very high | Search every one |
| Backpacks | High | Always check |
| Crates and boxes | Medium | Open when the area is safe |
| Broken-house containers | Medium | Add them to your sweep |
| Loose items | Situational | Take only useful or valuable items |
Never Skip Garbage Cans
Garbage cans look worthless. On Bluegate, they are not.
Across repeated runs, they have produced enough rare utility and blueprint-related drops to justify mandatory checks. They are also fast to search and often appear in clusters.
Check both cans when you find a pair. If nearby containers are already open, assume another player is ahead and move immediately.
Stage 2: Sweep Back Alleys and Broken Houses
Leave the main street and use the alleys behind Village. These paths provide extra loot while reducing exposure to common player routes.
| Object or Area | Action | Decision Rule |
|---|---|---|
| Alley containers | Search quickly | Skip when gunfire is close |
| Broken buildings | Sweep once | Leave if traversal becomes slow |
| Backpacks | Always search | Excellent value for the time spent |
| Opened containers | Skip | Another player is ahead |
| Smoke grenades | Keep when possible | Essential for disengaging |
Do not repeatedly force awkward windows or climbing angles. Failed movement creates noise and leaves you exposed.
This stage is about cheap loot rolls. Get in, check the containers, and keep moving.
Stage 3: Treat the Key Room as Optional
The key room area has strong loot potential and predictable player traffic. Approach it as a conditional stop, not the center of the run.
| Situation | Best Action | Reason |
|---|---|---|
| Door closed and area quiet | Enter if you have access | Strong value opportunity |
| Door open and loot missing | Leave | Poor return for time spent |
| Player holding the room | Rotate | Defender controls the angles |
| ARC enemies active nearby | Wait or bypass | Noise attracts third parties |
| Blueprint already secured | Avoid added risk | Extraction now matters more |
Listen before entering. Footsteps, weapon swaps, doors, ARC aggression, and sudden silence can all reveal nearby players.
Do not fight for the room after finding a blueprint. Bluegate has enough alternative loot to make that gamble unnecessary.
Stage 4: Check Reinforced Reception and Head House
Reinforced Reception and Head House offer some of the route's best weapon and component loot. They are also among its most dangerous locations.
| Loot Type | Priority | Notes |
|---|---|---|
| Security breach rewards | High | Strong weapon and part potential |
| Gun cases | High | Check when uncontested |
| Weapon parts | High | Compact and useful |
| Osprey or similar weapons | Medium–high | Keep based on condition and space |
| Heals, smokes, grenades | Medium | Supports survival and extraction |
Enter only when you can loot and leave quickly.
If players are moving behind doors or fighting outside, abandon the area. Waiting several minutes for a breach room usually destroys the efficiency of the run.
Breach rule: fast entry and exit means profit. A prolonged standoff means bait.
Stage 5: Use the Red Tunnel and Puzzle Route Conditionally
The red tunnel can lead to puzzle loot, technology items, and weapon checks. Run it only when the route appears untouched.
| Sign | What It Means | Response |
|---|---|---|
| Computer still active | Puzzle may be available | Complete it if safe |
| Containers open | Route was probably looted | Move on |
| Dead ARC enemies | Players may still be nearby | Slow down or rotate |
| Sentry fire | Active combat nearby | Avoid unless necessary |
| No loot and no sound | Area may be cleared | Check once, then leave |
This section is optional. After securing a blueprint, do not extend the raid for a low-confidence puzzle check.
Stage 6: Finish Through Maintenance Wing
Maintenance Wing is the route's fallback area. Players often skip it or move through without clearing every container.
| What You Find | What It Indicates | Best Move |
|---|---|---|
| Closed, untouched lockers | Low recent traffic | Loot quickly |
| Open lockers | Another player passed through | Leave |
| Items dropped on the floor | Someone managed inventory here | Watch for nearby players |
| ARC enemies alive | Possibly less player traffic | Clear only when efficient |
| Extraction nearby | The run is nearly complete | Prioritize leaving |
Do not perform a full search when the wing is already open and empty. Use it as a final loot check and a bridge toward extraction.
Bluegate Electromagnetic Storm Strategy
Electromagnetic Storm raids do not guarantee better loot in every container. Their main effect is changing visibility, movement, and player behavior.
| Factor | Advantage | Risk |
|---|---|---|
| Reduced visibility | Easier to disengage | Harder to identify threats |
| Chaotic movement | Players may miss loot | More unpredictable third parties |
| Greater reliance on sound | Patient players gain information | Loud looting exposes your position |
| Disrupted routes | Fewer standard rotations | Harder to follow a clean path |
| Dangerous extractions | Smokes become stronger | Ambushes are harder to detect |
How to Farm During a Storm
- Move through known cover, not open shortcuts.
- Stop and listen before entering buildings.
- Keep at least one smoke grenade for extraction.
- Avoid puzzle rooms when visibility and sound are already compromised.
- Extract earlier after securing a blueprint.
- Do not sprint continuously. Storm noise can hide enemy movement, but it also hides yours.
Storm raids are most profitable after you know the normal route. If the storm slows your decisions, farm standard Bluegate raids until the path becomes automatic.
Bluegate Loot Priority
Inventory discipline determines whether a good run becomes a profitable one.
| Tier | Items | Action |
|---|---|---|
| S-tier | Blueprints, rare tools, rare utility | Always keep |
| A-tier | Search Coil, Snap Hook, weapon parts | High priority |
| B-tier | Good-condition weapons, Osprey-type finds | Keep when space allows |
| C-tier | Processors, sensors, springs | Useful filler |
| D-tier | Common junk, bulky low-value items | Drop first |
After finding a blueprint:
1. Reorganize your bag immediately.
2. Drop bulky low-value items.
3. Keep healing and at least one smoke.
4. Identify the safest extraction route.
5. Stop entering optional high-risk areas.
An item should justify its space through crafting value, combat use, extraction utility, or sale value. Otherwise, discard it.
PvP Safety Rules for Blueprint Farming
The objective is not to avoid every player. It is to avoid fights where the enemy has better cover, information, or positioning.
| Situation | Fight or Leave? | Reason |
|---|---|---|
| Enemy surprised at close range | Fight if advantaged | A fast kill may secure the route |
| Enemy holding the key room | Leave | Defender controls the entry angle |
| Multiple blueprints secured | Avoid fighting | Extraction is the priority |
| Two groups fighting nearby | Wait or rotate | Third-party only with a safe exit |
| Low healing | Leave | Poor survival odds |
| Extraction is close | Avoid contact | Do not gamble the payout |
Practical Survival Habits
- Pause at doors and listen.
- Avoid looting while standing in open lanes.
- Keep an exit behind you before entering a room.
- Use smoke to cross, retreat, or extract—not to sit still.
- Do not re-peek an angle after the enemy has identified you.
- Rotate when the fight stops being quick.
A Bobcat can rescue a bad encounter. It cannot fix a bad decision.
Best Time to Extract
A full backpack is not the goal. Extracted value is the goal.
| Run Status | Recommended Action |
|---|---|
| One rare blueprint found early | Continue through low-risk sections only |
| Two blueprints found | Start moving toward extraction |
| Three blueprints found | Leave unless the route is blocked |
| Nearby fights increasing | Rotate out |
| Healing running low | Extract |
| Bag full of high-value items | Extract immediately |
The biggest mistake in blueprint farming is continuing after the run is already successful.
Once you have two blueprints, stop exploring without a clear reason. At three blueprints, greed is the main remaining threat.
Fast Bluegate Route Checklist
Use this order until the route becomes automatic.
| Step | Action | Objective |
|---|---|---|
| 1 | Enter Village through cover | Avoid early exposure |
| 2 | Search garbage cans, backpacks, and crates | Maximize fast loot rolls |
| 3 | Sweep alleys and broken houses | Add low-risk value |
| 4 | Check the key room area | Enter only when safe |
| 5 | Rotate to Reinforced Reception | Search breach and gun-case locations |
| 6 | Use the red tunnel if untouched | Optional puzzle and weapon loot |
| 7 | Check Maintenance Wing briefly | Final fallback loot |
| 8 | Extract after securing high-value items | Protect the run |
Adapt the route to the raid:
- Opened containers: move faster or change zones.
- Gunfire ahead: rotate before contact.
- Blueprint found early: cut high-risk stages.
- Low healing: skip Reception and Head House.
- Safe extraction nearby: take it.
Common Bluegate Farming Mistakes
| Mistake | Why It Fails | Better Habit |
|---|---|---|
| Skipping garbage cans | Loses efficient loot rolls | Search every can on the route |
| Forcing the key room | Creates defender-favored PvP | Enter only when uncontested |
| Staying after major finds | Converts profit into risk | Extract after strong hits |
| Carrying bulky junk | Blocks space for valuable items | Prioritize compact loot |
| Ignoring sound cues | Leads to ambushes | Stop and listen regularly |
| Fighting for ego | Reduces survival and profit | Fight only with an advantage |
If you survive but rarely find blueprints, increase your container volume.
If you regularly die with blueprints, improve your extraction timing.
FAQ
Is Bluegate the best map for blueprint farming in ARC Raiders?
Bluegate is one of the strongest options for repeatable blueprint farming. It offers dense container clusters, several rotation paths, and useful fallback areas without requiring every run to revolve around a locked room.
Where should I start a Bluegate blueprint run?
Start in Village when your spawn allows it. Search garbage cans, backpacks, crates, and broken-house containers before moving through the back alleys toward the key room area.
Are garbage cans worth searching on Bluegate?
Yes. Garbage cans are fast to search and can produce valuable utility and blueprint-related drops. Their efficiency comes from the number of checks you can complete with minimal exposure.
Should I farm Bluegate during an Electromagnetic Storm?
Storm runs are worthwhile after you know the normal route. Reduced visibility can help you disengage, but it also makes ambushes and extractions harder to read. Bring smoke and extract earlier after valuable finds.
When should I extract during a blueprint run?
Begin extraction planning after two blueprints. Leave immediately after three, unless your route is blocked. Also extract when healing is low, nearby fights are escalating, or your bag already contains high-value loot.
Summary
The most reliable ARC Raiders Bluegate blueprint farming route starts in Village, passes through the back alleys, checks the key room only when safe, and uses Reinforced Reception, the red tunnel, and Maintenance Wing as conditional stops.
Remember the rules:
- Search every garbage can and backpack.
- Prioritize blueprints, rare tools, Search Coils, Snap Hooks, and weapon parts.
- Never force an occupied key room or breach area.
- Use smoke grenades to disengage and extract.
- Plan your exit after two blueprints.
- Leave after three blueprints.
Bluegate rewards disciplined farming. Loot quickly, rotate early, and extract before greed turns a profitable run into somebody else's haul.


The GGWTB Editorial Team features 10 full-time gaming editors and 23 specialist contributors, delivering hands-on tested walkthroughs, easter egg breakdowns, and game updates.
ELSA — who spearheads our in-depth COD: BLACK OPS 7, ARC Raiders guides, and patch notes—every guide is rigorously verified on live servers for accuracy.

Most Popular Posts
- ARC Raiders Update 1.42: Phantom Targets Farming Guide (Glitched Wasps, Rewards, Regional Conditions)
- ARC Raiders Hullcracker Blueprints: Fastest Way to Complete The Major's Footlocker
- ARC Raiders Best Pop Trigger Strategy: Fast Phantom Targets Damage Guide
- ARC Raiders Subway Skin Guide: Unlock the Subterranean Outfit
- ARC Raiders Looting Mk. 3 Survivor Blueprint Guide: Best Blue Gate Route and Drop Locations
- ARC Raiders Medium & Heavy Gun Parts Blueprint Guide: Best Farm Route, Locations, and Refiner Crafting
Popular Category Lists
- ARC Raiders / (356)
- Grow a Garden / (294)
- CoD: Black Ops 7 / (167)
- Star Citizen / (163)
- MLB 26 / (159)
- Monopoly Go / (153)
- ARK Survival Ascended / (128)
- Steal a Brainrot / (99)
- Blox Fruits / (74)
- Adopt Me / (74)
- Forza Horizon 6 / (72)
- Sailor Piece / (68)
- Grow a Garden 2 / (68)
- Diablo IV / (62)
- CoD: BLACK OPS 6 / (55)
- Aion 2 / (53)
- Path of Exile 2 / (48)
- Monster Hunter Wilds / (46)
- Windrose / (44)
- COD: Modern Warfare 4 / (44)