0
0 Created: Sep 14,2026 | ARC Raiders
ARC Raiders Bobcat Vaporizer Shield Guide: Wolfpack timing, Solo rotation, Squad roles

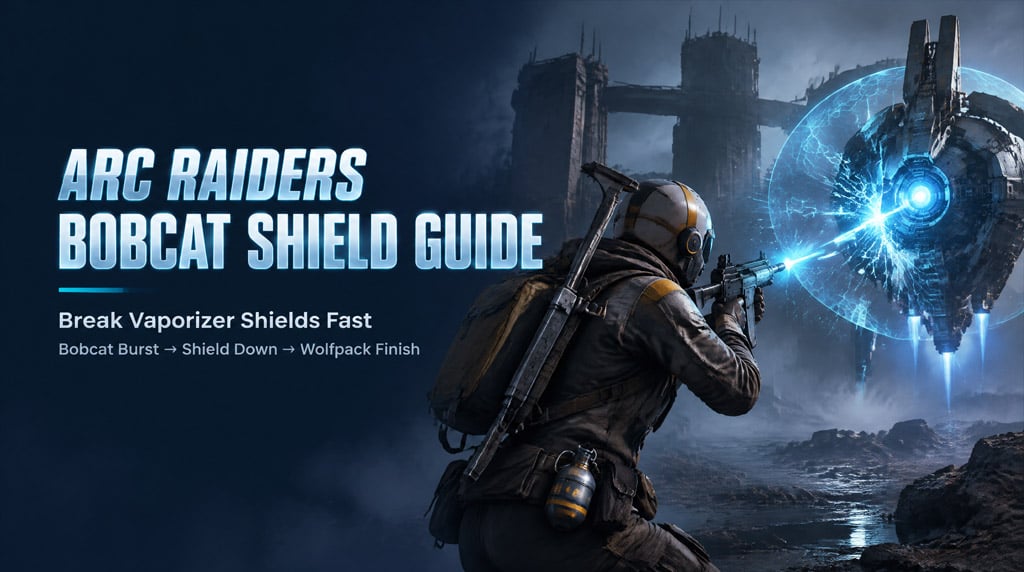
The Bobcat removed Vaporizer shields faster than the Torrent and other weapons in the supplied gameplay tests. Reload first, maintain continuous fire until the shield drops, then commit a Wolfpack Grenade or high-damage secondary.
No available official documentation confirms a Bobcat-specific shield modifier, exact vulnerability timer, or permanent weapon ranking. This guide therefore treats those results as repeatable gameplay observations, not published mechanical values.
- The Bobcat Shield-Break Method
- Why the Bobcat Works
- Mistakes That Ruin the Rotation
- Best Bobcat Loadout for Vaporizers
- Is the Kinetic Converter Required?
- Solo Vaporizer Strategy
- Prepare the Fight
- Trigger, Break, Finish
- Recover From a Failed Wolfpack
- Duo and Trio Rotations
- Best Duo Rotation
- Best Trio Rotation
- Fighting Multiple Vaporizers
- Three-Target Rotation
- When Not to Attempt It
- Trials and Farming Decisions
- Use a Risk-Adjusted Kit
- Know When to Skip a Vaporizer
- Alternatives to Wolfpack Grenades
- Treat Component Fire as Control
- Post-Patch Testing Method
- Verification Standard
- FAQ (Frequently Asked Questions)
- Is the Bobcat the fastest weapon for breaking Vaporizer shields?
- Does the Bobcat need a Kinetic Converter?
- Can one Wolfpack Grenade kill a Vaporizer?
- Can solo players use the Bobcat method?
- When should you avoid this strategy?
The Bobcat Shield-Break Method
Most failed Vaporizer kills follow the same pattern: the player throws a Wolfpack too early, fires from a poor angle, or triggers the shield with a partial magazine.
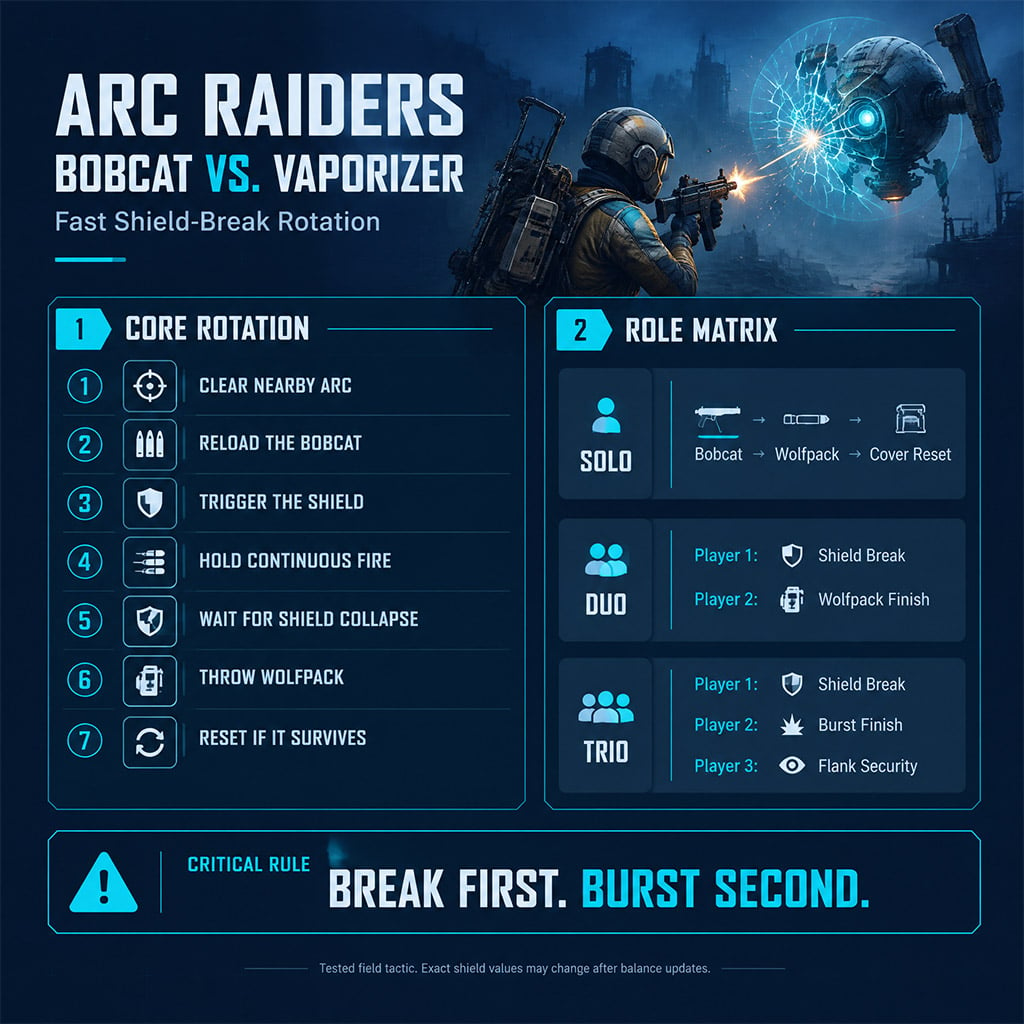
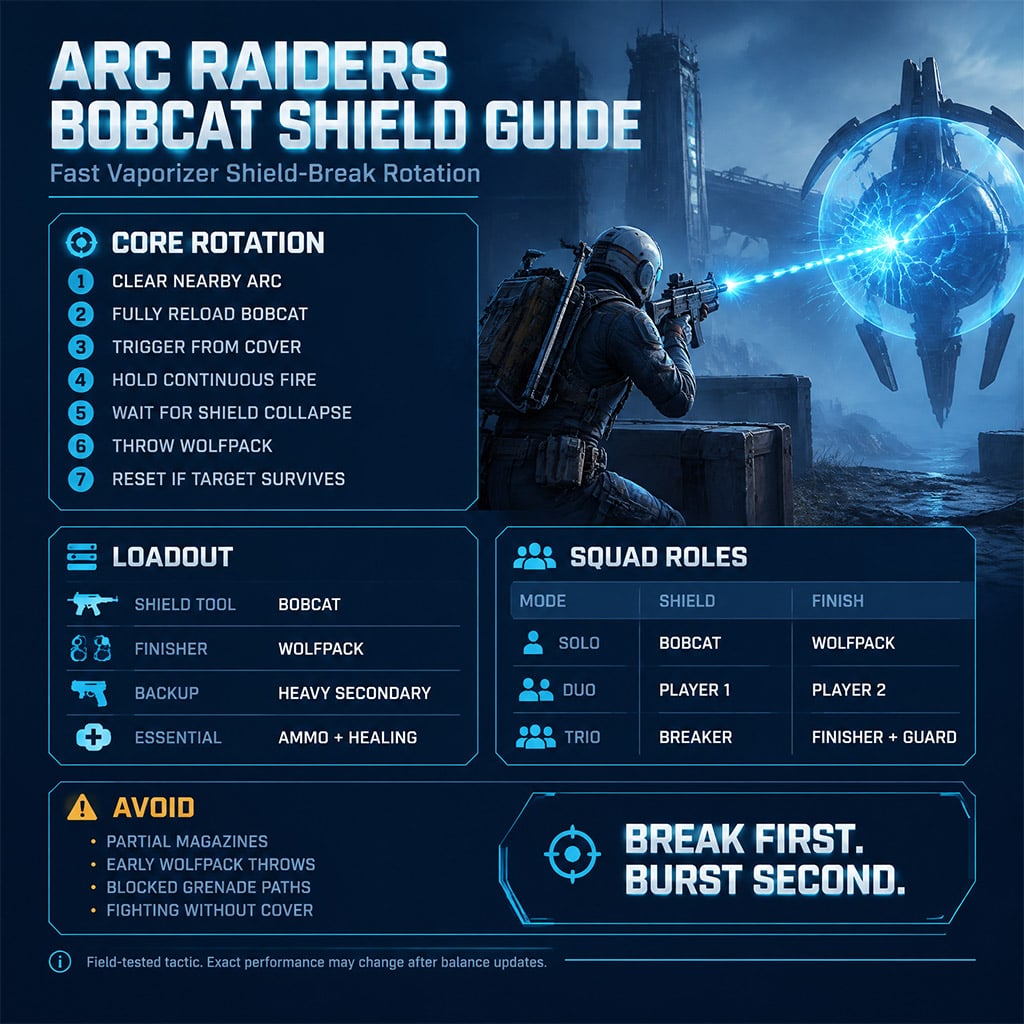
Use this rotation:
1. Clear nearby ARC units.
2. Reload the Bobcat fully.
3. Prepare your finishing weapon or grenade.
4. Trigger the Vaporizer from hard cover.
5. Hold continuous fire on the shield.
6. Stop firing when the barrier disappears.
7. Throw the Wolfpack or switch to your secondary.
8. Reset behind cover if the target survives.
Break first. Burst second.
Why the Bobcat Works
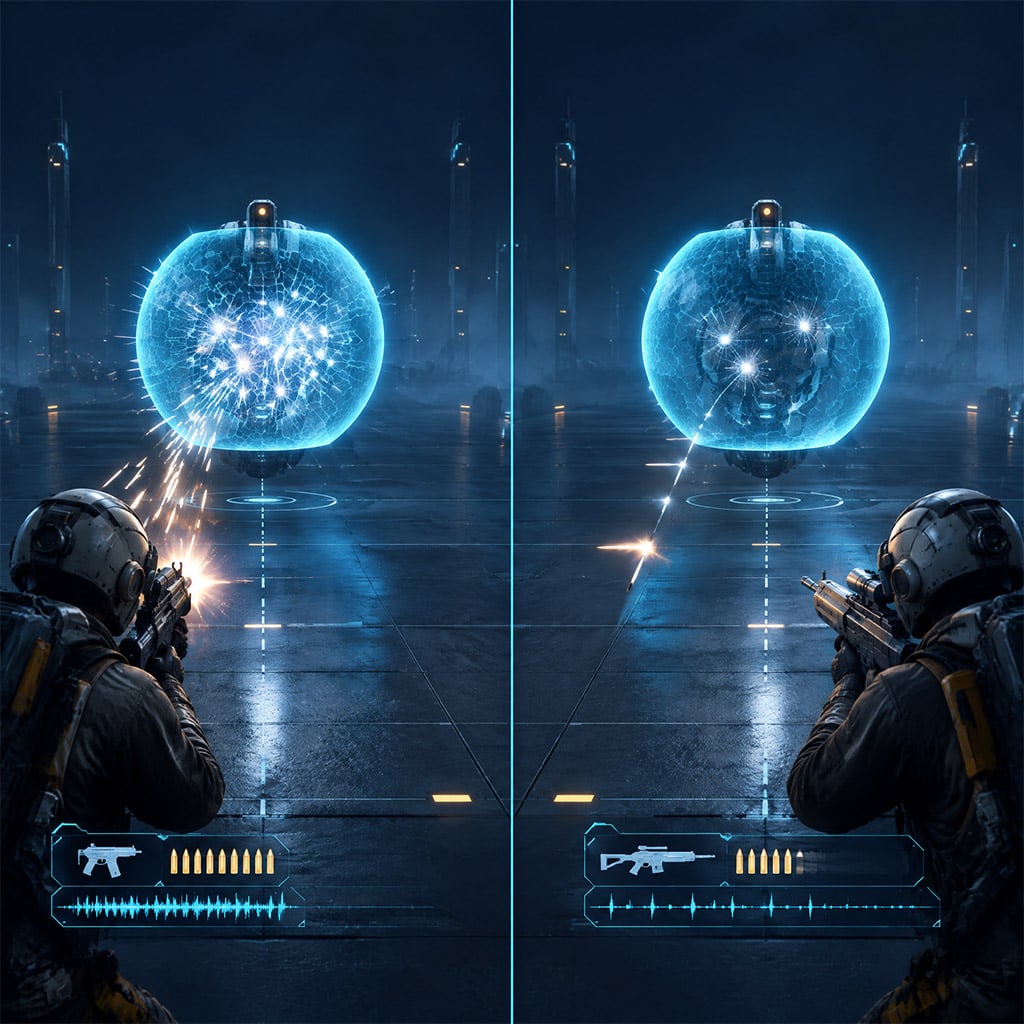
The tested results suggest that the shield responds strongly to rapid projectile contact. That would explain why the Bobcat outperformed harder-hitting but slower alternatives during the shield phase.
The exact calculation remains unknown. The shield may count hits, apply disruption per projectile, or use another system that favors high fire rate.
What matters in practice is simpler: continuous accuracy beats paper damage against the shield. If recoil pulls half your magazine off target, the Bobcat loses its main advantage.
Mistakes That Ruin the Rotation
Avoid these errors:
- Do not trigger the shield with a partial magazine.
- Do not throw the Wolfpack while the barrier is active.
- Do not fire hesitant bursts unless recoil forces a correction.
- Do not aim at small components during the shield phase.
- Do not stand beside terrain that can block the Wolfpack.
- Do not keep spraying the Bobcat when a stronger finisher is ready.
The Bobcat has a specific job: remove the defensive layer quickly. Your second damage source should handle the exposed target.
Best Bobcat Loadout for Vaporizers
A strong Vaporizer kit separates shield removal from health damage. It also carries enough ammunition and healing to survive an imperfect first cycle.
| Slot | Recommended Choice | Purpose | Main Trade-Off |
|---|---|---|---|
| Shield weapon | Bobcat | Rapid shield removal in the tested encounters | High ammunition consumption |
| Tested attachment | Kinetic Converter | Matches the successful field setup | Not proven necessary |
| Burst finisher | Wolfpack Grenade | Heavy exposed-target damage | Valuable and sensitive to bad pathing |
| Repeatable finisher | High-damage secondary | Preserves Wolfpacks during farming | May require another cycle |
| Activation tool | Low-cost aggro option | Triggers the shield without spending the finisher | Consumes inventory space |
| Sustain | Healing and spare ammunition | Covers failed or interrupted attempts | Leaves less room for loot |
Use Wolfpacks for Trials, clustered targets, or urgent kills. Pair the Bobcat with a conventional secondary when farming efficiency matters more than burst speed.
Is the Kinetic Converter Required?
The successful test setup used a fully upgraded Bobcat with a Kinetic Converter. The attachment was not isolated against an otherwise identical build, so it cannot be credited as the cause of the interaction.
Equip it when it improves your normal Bobcat performance. Do not sacrifice ammunition, healing, or a stronger finisher merely to copy an unproven attachment requirement.
Solo Vaporizer Strategy
Solo players face the greatest risk during transitions. The shield may collapse quickly, but swapping equipment, landing the finisher, and avoiding retaliation still create openings for the Vaporizer.
Prepare the Fight
Engage only when you have:
- Hard cover within one sprint
- A fully loaded Bobcat
- A prepared finisher
- An unobstructed throwing lane
- Enough ammunition for another shield cycle
- A safe retreat route
Clear minor ARC units before starting. If another heavy machine controls your escape path, reposition or abandon the attempt.
Trigger, Break, Finish
Provoke the Vaporizer from cover, then aim at the broadest stable section of its shield. Hold the trigger and track the barrier rather than chasing individual components.
As soon as the shield disappears, stop firing and use your finisher. Throw the Wolfpack from an open angle; rocks, railings, walls, and elevation changes can interfere with delivery.
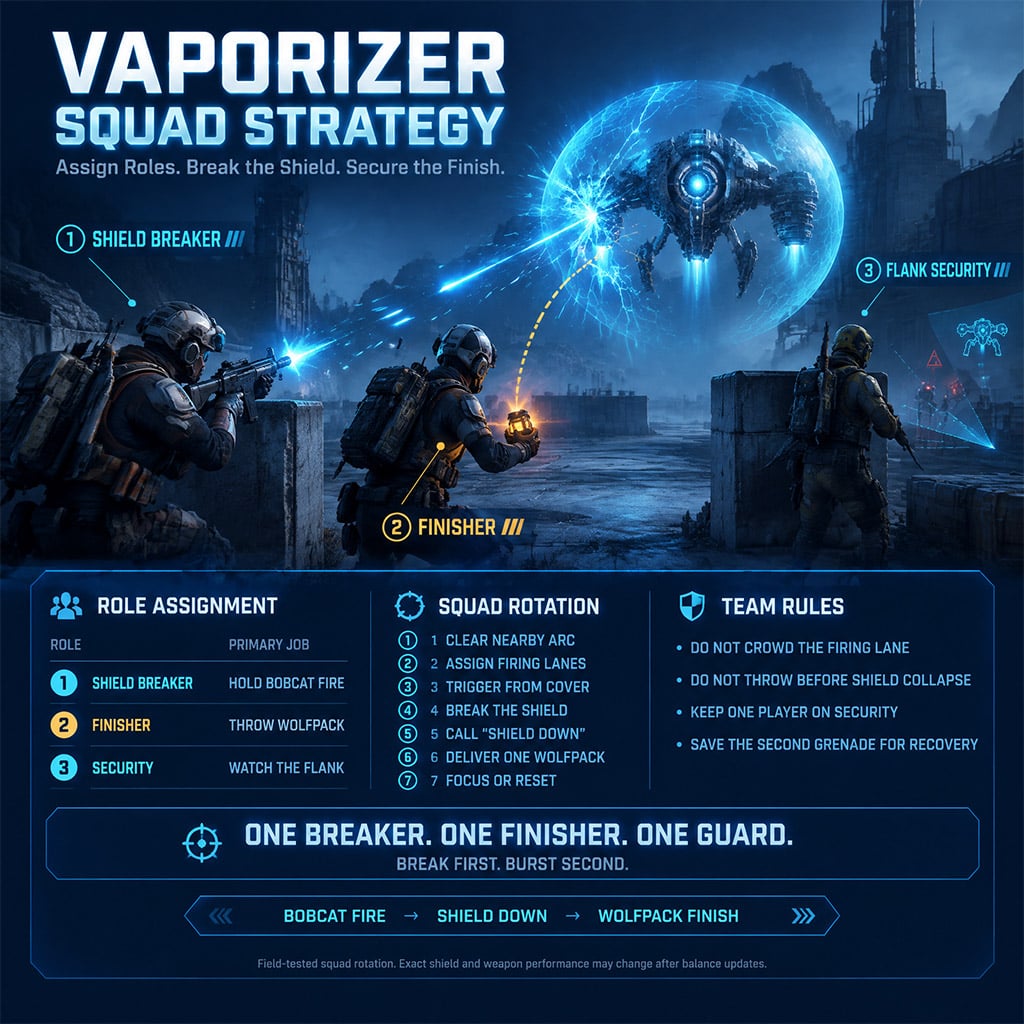
Recover From a Failed Wolfpack
A clean Wolfpack finished the Vaporizer in some documented encounters, while other throws produced incomplete results. Terrain, target movement, delivery behavior, and previous damage can change the outcome.
If the target survives, break line of sight immediately. Heal, reload, and prepare another full rotation instead of chasing the kill through incoming fire.
Abort when:
- Another heavy ARC unit joins the fight.
- Enemy Raiders gain an angle on your cover.
- You lack ammunition for another shield break.
- Terrain blocks the finishing attack.
- Your remaining healing cannot support another exchange.
A failed grenade is manageable. A forced follow-up from open ground usually is not.
Duo and Trio Rotations
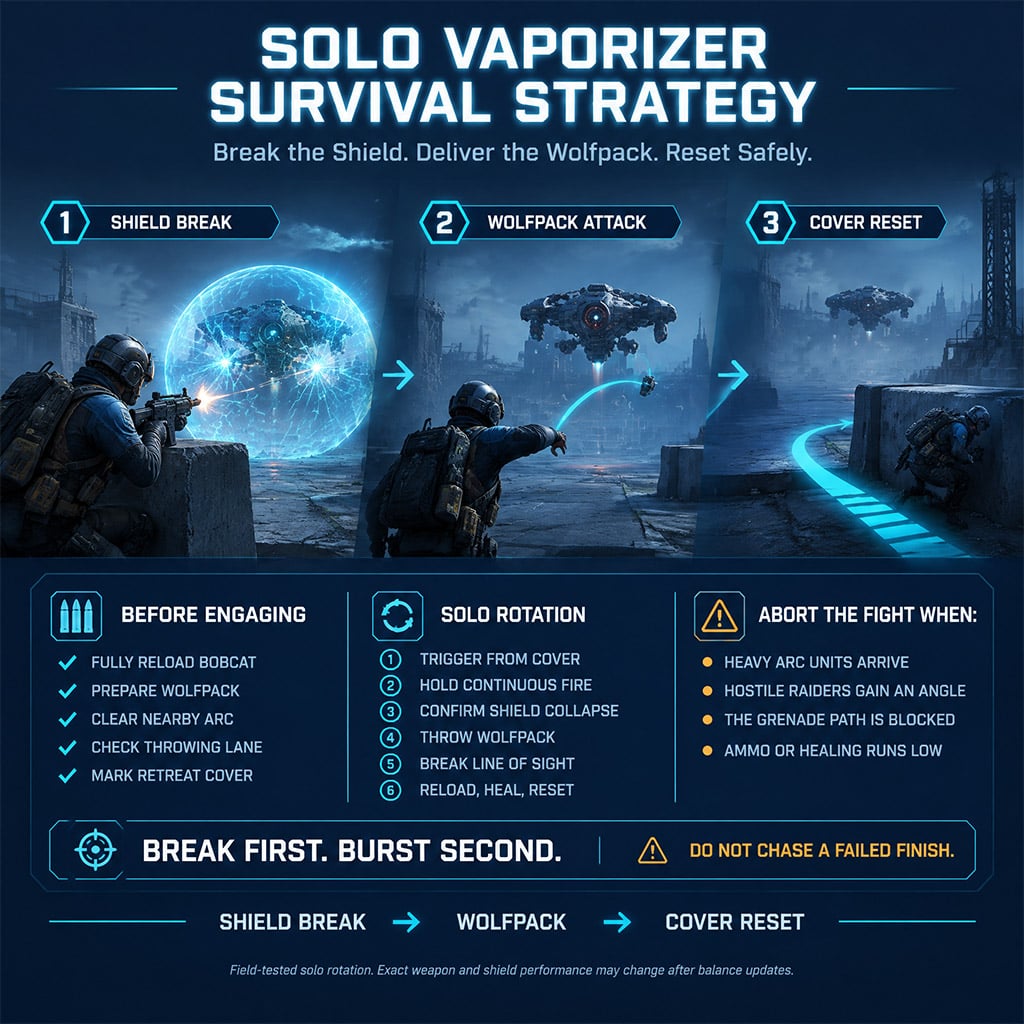
Squads should assign separate shield, damage, and security roles. Once one Bobcat can remove the barrier quickly, extra shield fire offers less value than a faster finisher or protected flank.
| Squad Setup | Shield Role | Damage Role | Best Use |
|---|---|---|---|
| Duo | One Bobcat user | One Wolfpack user | Isolated Vaporizer |
| Balanced trio | One shield breaker | One finisher and one guard | Contested or ARC-heavy areas |
| Aggressive trio | Two shield breakers | One finisher | Urgent priority kill |
| Split trio | One Bobcat per target | Assigned follow-up damage | Clustered Vaporizers |
Use the balanced trio in normal raids. Reserve split targeting for grouped Vaporizers with clear firing and retreat lanes.
Best Duo Rotation
Assign one player to each combat phase:
1. The finisher triggers the shield.
2. The Bobcat player maintains continuous fire.
3. The Bobcat player calls the collapse.
4. The finisher throws one Wolfpack.
5. Both players attack if the target survives.
Do not throw both Wolfpacks at once by default. Save the second grenade for a failed delivery, surviving target, or additional Vaporizer.
Best Trio Rotation
Against one Vaporizer, use three distinct jobs:
- Player One: Bobcat shield breaker
- Player Two: Wolfpack finisher
- Player Three: ARC control, flank security, and backup damage
The third player should protect the setup rather than crowd the firing lane. Preventing one interruption often saves more resources than adding another magazine to an already fast shield break.
Fighting Multiple Vaporizers
Several Vaporizers become easier to manage when a trio breaks separate shields in parallel. Without target assignments, two players often spray the same barrier while another machine remains fully protected.
Three-Target Rotation
Use short, fixed assignments:
1. Mark the targets left, center, and right.
2. Assign one Bobcat user to each shield.
3. Confirm clear firing and retreat lanes.
4. Trigger the group.
5. Maintain fire on assigned barriers.
6. Call each shield collapse.
7. Deliver finishers to exposed targets.
8. Focus survivors in the original order.
Do not switch targets because another barrier appears close to breaking. Stable assignments prevent duplicated fire and keep every threat under pressure.
When Not to Attempt It
Skip the multi-target rotation when:
- The Vaporizers are spread too far apart.
- One player lacks a full magazine.
- Terrain blocks explosive delivery.
- Other heavy ARC units control the area.
- Hostile Raiders can attack the setup.
- The squad lacks a shared retreat route.
The supplied encounters support parallel shield breaking, but not a guaranteed multi-target kill time. Team accuracy, spacing, grenade delivery, and outside interference determine the result.
Trials and Farming Decisions
Fast kills do not always produce efficient farming runs. Consumable cost, ammunition use, spawn density, survival, and extraction matter just as much.
Use a Risk-Adjusted Kit
For routine farming, carry:
- One Bobcat
- Ammunition for several shield cycles
- A limited number of Wolfpacks
- One reliable secondary
- Healing
- Mobility or defensive utility
Do not carry your entire Wolfpack supply unless the active objective justifies the loss risk. Splitting premium consumables across several deployments protects your progress from one ambush or failed extraction.
Know When to Skip a Vaporizer
Do not attack every target you find. Skip the engagement when hostile Raiders control nearby angles, heavy ARC units overlap the area, or the likely reward cannot repay the ammunition and grenade cost.
This decision matters most late in a successful raid. Once you have valuable loot or completed the objective, extraction may offer more value than another fight.
Trials scoring, schedules, trader prices, and item values can change between updates. Check the current in-game interface before building a farming route around fixed rewards.
Alternatives to Wolfpack Grenades
The Bobcat remains valuable without a Wolfpack because it still shortens the protected phase. Your best finishing option depends on cost, squad size, and available inventory space.
| Method | Shield Performance | Finishing Power | Best Scenario |
|---|---|---|---|
| Bobcat plus Wolfpack | Fastest in the supplied tests | High when delivery succeeds | Trials and priority targets |
| Bobcat plus heavy secondary | Fastest in the supplied tests | Consistent | Repeatable farming |
| Bobcat plus squad fire | Fastest in the supplied tests | High across several players | Coordinated teams |
| Torrent plus finisher | Slower in the supplied comparisons | Depends on the finisher | Bobcat unavailable |
| Single-weapon method | Variable | Variable | Low-cost improvised runs |
Choose the Bobcat and heavy-secondary pairing when repeatability matters more than maximum burst damage.
Treat Component Fire as Control
The supplied encounters suggest that sustained wing or component fire can disturb a Vaporizer's movement. The effect was inconsistent and less pronounced than similar pressure against lighter ARC machines.
Use component fire to interrupt an attack or create space. If the target does not react quickly, return to direct damage instead of wasting ammunition trying to force a stagger.
Post-Patch Testing Method
Changes to fire rate, recoil, magazines, projectiles, shields, explosives, or ARC behavior could alter this tactic. Re-test it after any update affecting those systems.
Use a controlled comparison:
1. Fight the same Vaporizer type.
2. Mark a fixed firing distance.
3. Start with full magazines.
4. Record shield-break time.
5. Record ammunition consumed.
6. Run at least three clean attempts per weapon.
7. Exclude interrupted fights.
8. Compare median results rather than the fastest run.
Change one variable per test. Swapping the weapon, attachment, range, and squad size together cannot show which factor caused the difference.
Verification Standard
This article uses the supplied gameplay tests for the Bobcat-versus-Torrent comparison, Wolfpack follow-ups, solo encounters, and grouped Vaporizer tactics. Those tests consistently favored the Bobcat during the shield phase.
No accessible official documentation confirmed a Bobcat-specific shield modifier, exact vulnerability duration, guaranteed one-Wolfpack kill, or permanent fastest-weapon ranking. Unsupported numerical claims have therefore been removed rather than presented as facts.
FAQ (Frequently Asked Questions)
Is the Bobcat the fastest weapon for breaking Vaporizer shields?
The Bobcat was the fastest option in the supplied comparison tests. It beat the Torrent and other tested weapons, but no accessible official source confirms that ranking as a permanent mechanic.
Does the Bobcat need a Kinetic Converter?
No evidence confirms that the Kinetic Converter is required. It appeared in the successful test setup, but it was not compared against an otherwise identical Bobcat without the attachment.
Can one Wolfpack Grenade kill a Vaporizer?
One clean Wolfpack finished exposed Vaporizers in some tested encounters, but the result is not guaranteed. Previous damage, terrain, target movement, and delivery behavior affect whether the full attack connects.
Can solo players use the Bobcat method?
Yes, the rotation works solo when every transition is prepared before activation. Reload first, fight beside hard cover, clear the grenade path, and reset if the opening damage cycle fails.
When should you avoid this strategy?
Avoid it when heavy ARC units overlap, hostile Raiders control the area, or the expected reward cannot justify the consumable cost. Use the Bobcat with a conventional secondary when you need a cheaper, repeatable farming setup.

I’m Sofia Bergström, a Swedish Managing Editor covering FPS, competitive shooters, and extraction shooters for GGWTB. My guides focus on loadout trade-offs, positioning, and when to commit—or cut your losses. A weapon’s stats tell only part of the story; I focus on how it fits your role and the fight ahead.

Most Popular Posts
- ARC Raiders Update 1.42: Phantom Targets Farming Guide (Glitched Wasps, Rewards, Regional Conditions)
- ARC Raiders Best Pop Trigger Strategy: Fast Phantom Targets Damage Guide
- ARC Raiders Subway Skin Guide: Unlock the Subterranean Outfit
- ARC Raiders Medium & Heavy Gun Parts Blueprint Guide: Best Farm Route, Locations, and Refiner Crafting
- ARC Raiders Ascending the Mountain: Fast Loot Routes and Item Guide
- ARC Raiders Frozen Trail Update Guide: Pendola Pass, Frigate & Meta Loadouts
Popular Category Lists
- ARC Raiders / (356)
- Grow a Garden / (295)
- CoD: Black Ops 7 / (167)
- Star Citizen / (163)
- MLB 26 / (159)
- Monopoly Go / (153)
- ARK Survival Ascended / (128)
- Steal a Brainrot / (99)
- Blox Fruits / (74)
- Adopt Me / (74)
- Forza Horizon 6 / (72)
- Sailor Piece / (68)
- Grow a Garden 2 / (68)
- Diablo IV / (62)
- CoD: BLACK OPS 6 / (55)
- Aion 2 / (54)
- Path of Exile 2 / (48)
- Monster Hunter Wilds / (46)
- Windrose / (44)
- COD: Modern Warfare 4 / (44)