0
0 Created: Sep 13,2026 | Maplestory Classic
MapleStory Classic World Best Leveling Maps by Class, Party size and Clear Speed

The best leveling map in MapleStory Classic World is the densest map where you can kill consistently without losing time to misses, ladders, or empty platforms. Use Kerning Subway for concentrated spawns, Ant Tunnel for melee-friendly party grinding, and smaller hidden maps when you cannot fill a six-player group.
This guide reflects our analysis and hands-on experience across both closed online tests. Nexon states that test content can change before launch, so we treat exact monster populations as test-build observations rather than permanent live-server values.
- How to Choose the Right Leveling Map
- Run a Five-Minute Efficiency Test
- Treat Accuracy as Damage
- Best Victoria Island Leveling Maps at a Glance
- Best Beginner Leveling Maps
- Henesys Hunting Ground 1
- Perion Street Corner
- The Tree That Grew 1–3
- Kerning City Construction Site
- Forest 1
- Best Kerning Construction and Subway Maps
- Northern Top of Construction Site
- Caution Falling Down
- Line 1 Area 1
- Transfer Area
- Line 2 Area 1 vs. Line 1 Area 2
- Line 2 Area 3
- Line 1 Area 4
- Best Sleepywood and Perion Maps
- Damp Forest
- Dark Cave
- Ant Tunnel 1
- Ant Tunnel 4
- Land of Wild Boar
- The Burnt Land 2
- Drake Hunting Ground
- Best Ellinia and Forgotten-Area Maps
- Monkey Swamp 1
- Forgotten Entrance 2
- Forgotten Entrance 1
- Prime Evil Forest 1
- Decayed Tunnel 2
- Forest of Evil 2
- Another Sanctuary
- Is Hot Sand Worth Training At?
- How to Run a Leveling Party Correctly
- Recheck Your Map After Major Upgrades
- Data Status and Source Policy
- FAQ (Frequently Asked Questions)
- What is the best leveling map in MapleStory Classic World?
- When should I move to a higher-level training map?
- Are party maps faster than solo maps?
- Which leveling maps are best for melee classes?
- What should I do when the best map is crowded?
How to Choose the Right Leveling Map
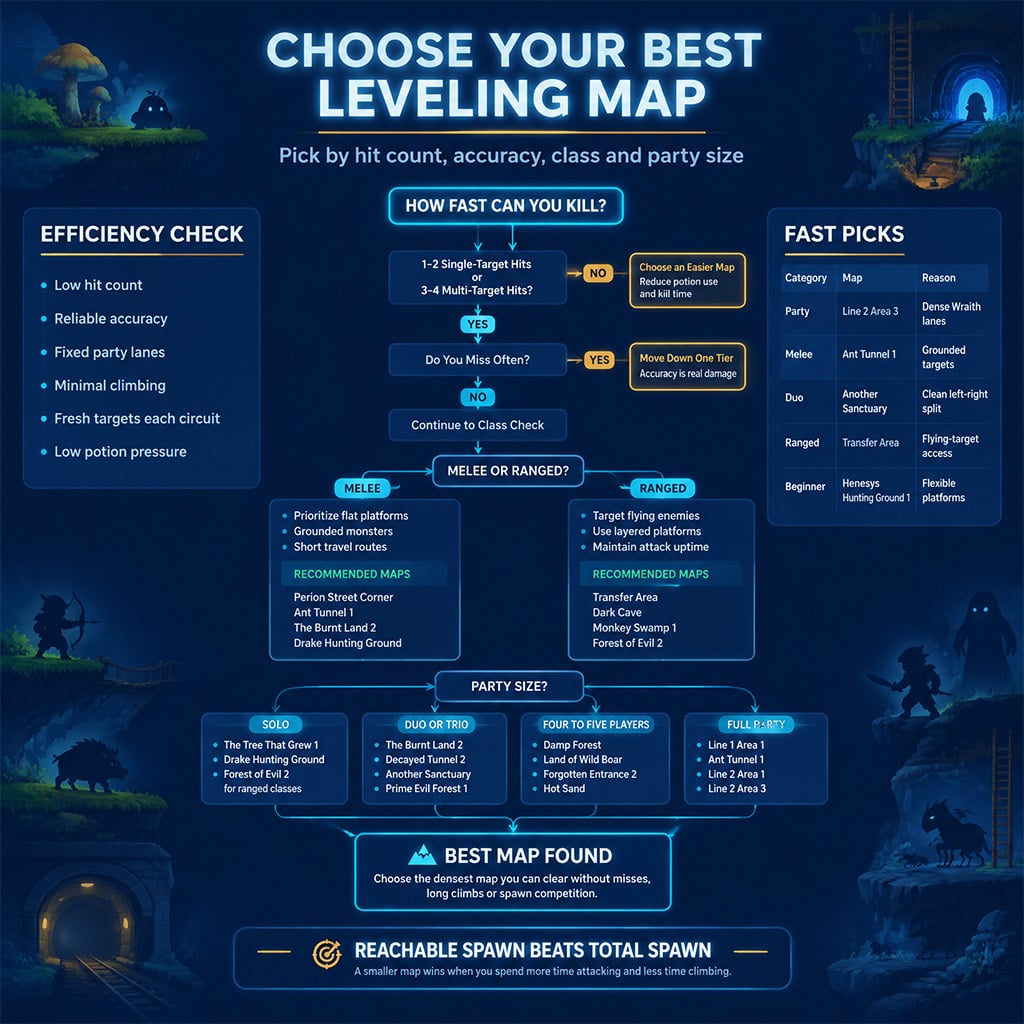
Character level is a poor map selector by itself. Weapon strength, skill investment, accuracy, attack range, party coverage, and platform layout can move your optimal training spot several levels in either direction.
Use these clear-speed limits:
- Single-target attacks: one or two hits per regular monster
- Multi-target attacks: three or four hits per group
- Accuracy: misses should be uncommon
- Movement: attacking should occupy most of the rotation
- Spawn access: new targets should be available when you finish each circuit
If a regular monster takes five or six clean hits, move down one tier. Extra experience per kill rarely compensates for doubled combat time, higher potion use, and increased knockback.
Run a Five-Minute Efficiency Test
Do not judge a map from its opening spawn. Run complete rotations for five minutes and check:
1. Kills per circuit
2. Miss frequency
3. Potion use
4. Time spent without a target
5. Time lost to ladders, vines, portals, or lane overlap
6. Monsters left alive outside your practical route
Why does this matter? Reachable spawn beats total spawn.
During our review of Victoria Island's available hunting grounds, compact horizontal maps repeatedly outperformed larger stages with comparable monster populations. A monster stranded three ladders away adds nothing to your current experience rate.
Treat Accuracy as Damage
Every miss deals zero damage. That sounds obvious, yet players routinely move to Junior Neckis and other accuracy-sensitive targets because they can survive the incoming damage.
Test your hit rate across several spawn cycles. If misses repeatedly extend a two-hit kill into four or five attacks, return to the previous map.
Survival is not the threshold. Reliable contact is.
Best Victoria Island Leveling Maps at a Glance
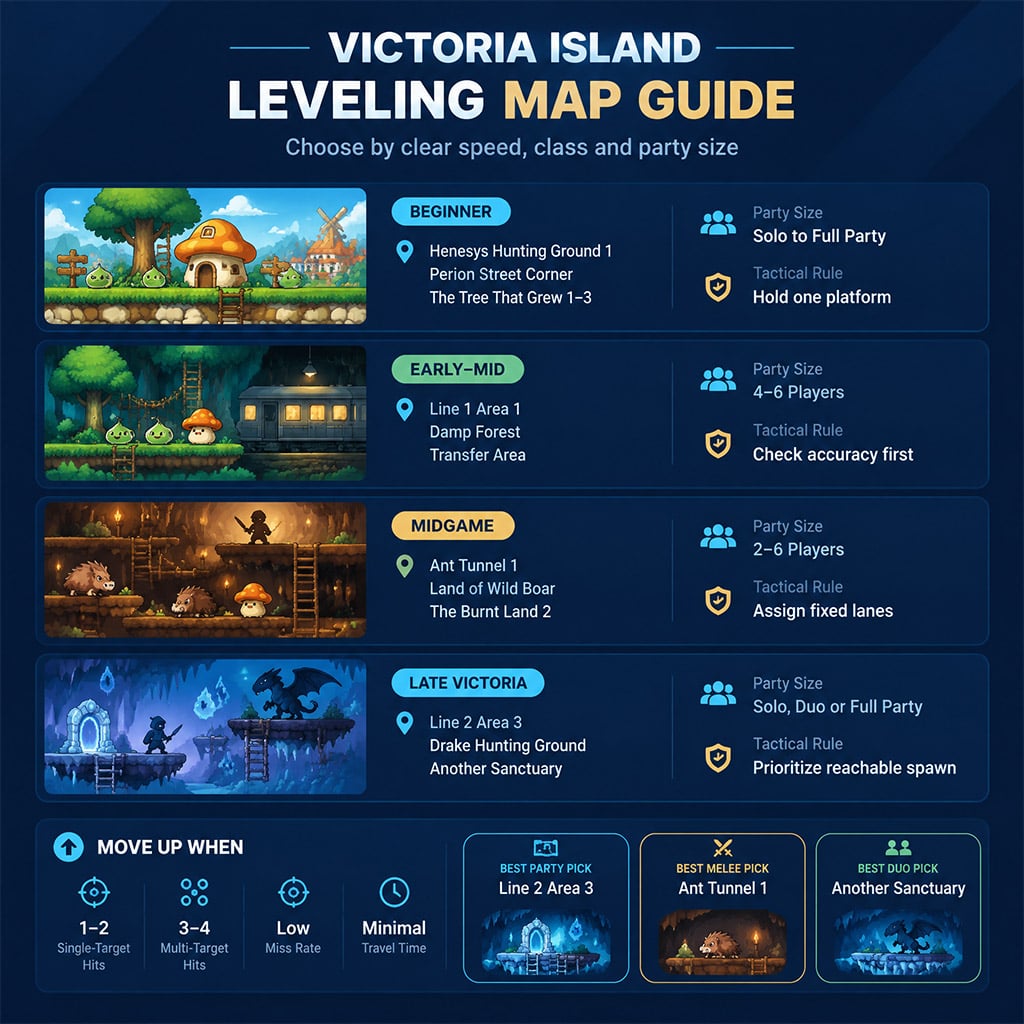
Start with the table below, then use the detailed sections to check class fit, party size, and failure points.
| Progression | Map | Best Group | Best Fit | Skip When |
|---|---|---|---|---|
| Beginner | Henesys Hunting Ground 1 | Party | Mixed beginner characters | Every suitable platform is occupied |
| Beginner | Perion Street Corner | Party | Melee and horizontal attacks | Dark Stumps are already too weak |
| Beginner | The Tree That Grew 1–3 | 1–6 | Flexible group sizes | Your group cannot cover the selected version |
| Early | Kerning City Construction Site | Party | Platform-based farming | Scaffold lanes are contested |
| Early | Forest 1 | Full party | Organized fixed-lane groups | You are solo or cannot cover the L-shaped platforms |
| Early | Line 1 Area 1 | Party | Dense Bubbling farming | Competition causes regular downtime |
| Early-mid | Damp Forest | 4 | Accurate mixed parties | You miss Junior Neckis frequently |
| Mid | Transfer Area | 6 | Ranged classes | You rely on short-range melee attacks |
| Mid | Dark Cave | 3–4 | Small ranged parties | Sturges repeatedly leave your attack range |
| Mid | Ant Tunnel 1 | 6 | Melee-heavy parties | You cannot cover all three sections |
| Mid | Ant Tunnel 4 | 6 | Strong coordinated parties | Support players spend too long roaming |
| Mid | Land of Wild Boar | 4–5 | Balanced parties | Junior Boogies overwhelm the group |
| Mid | The Burnt Land 2 | 2–3 | Duos and trios | Your group can efficiently clear a denser map |
| Mid-late | Line 2 Area 1 | 6 | Accurate mixed parties | Jr. Neckis expose poor accuracy |
| Mid-late | Line 1 Area 2 | 6 | Ranged-heavy parties | Sturges disrupt your melee rotation |
| Mid-late | Monkey Swamp 1 | 2–3 | Ranged characters | Awkward platforms break your attacks |
| Mid-late | Forgotten Entrance 2 | 4 | Warp-assisted parties | Players do not know the warp routes |
| Mid-late | Forgotten Entrance 1 | 3 | Balanced trios | Flying targets stall every section |
| Mid-late | Prime Evil Forest 1 | 3 | Horizontal attacks | Your group cannot cover both lower sides |
| Mid-late | Decayed Tunnel 2 | 2 | Stable duos | You must clear both sides alone |
| Late Victoria | Drake Hunting Ground | 1–2 | Compact solo or duo farming | You chase remote monsters |
| Late Victoria | Hot Sand | 4–5 | Organized parties | You are solo |
| Late Victoria | Line 2 Area 3 | 6 | High-density Wraith farming | Lane competition restricts spawn access |
| Late Victoria | Line 1 Area 4 | 6 | Wraith-map fallback | Line 2 Area 3 is open and uncontested |
| Late Victoria | Forest of Evil 2 | 1–3 ranged | Flying-monster farming | Your class lacks reliable range |
| Late Victoria | Another Sanctuary | 2 | Efficient duo coverage | You cannot hold both sides |
Default to Line 2 Area 3 for late Victoria Island party grinding, but leave immediately if crowding prevents your group from controlling fixed lanes.
Best Beginner Leveling Maps
Crowding is the main early-game problem. Trying to control an entire public map usually lowers your experience rate because you spend more time chasing monsters than killing them.
Henesys Hunting Ground 1
Henesys Hunting Ground 1 sits one map left of Henesys. In the reviewed test configuration, its platforms progressed from Snails and Shrooms near the bottom to Slimes, Orange Mushrooms, Stumps, and Green Mushrooms higher up.
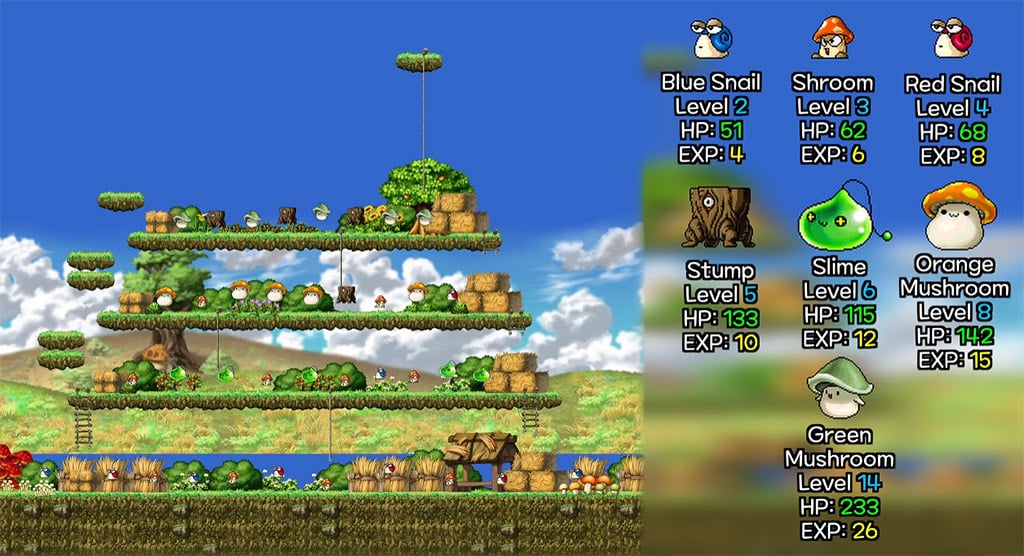
Claim one platform that matches your clear speed. Ranged characters should use elevated grass and hay-bale positions instead of dropping after every target.
Across both closed tests, we found that holding one productive platform generated steadier kills than running from the bottom to the top. Leave when every suitable lane has multiple players competing for the same spawn.
Perion Street Corner
Perion Street Corner is reached one map right of Perion through the upper-right route. Its long ground floor suits melee classes and attacks with strong horizontal reach.
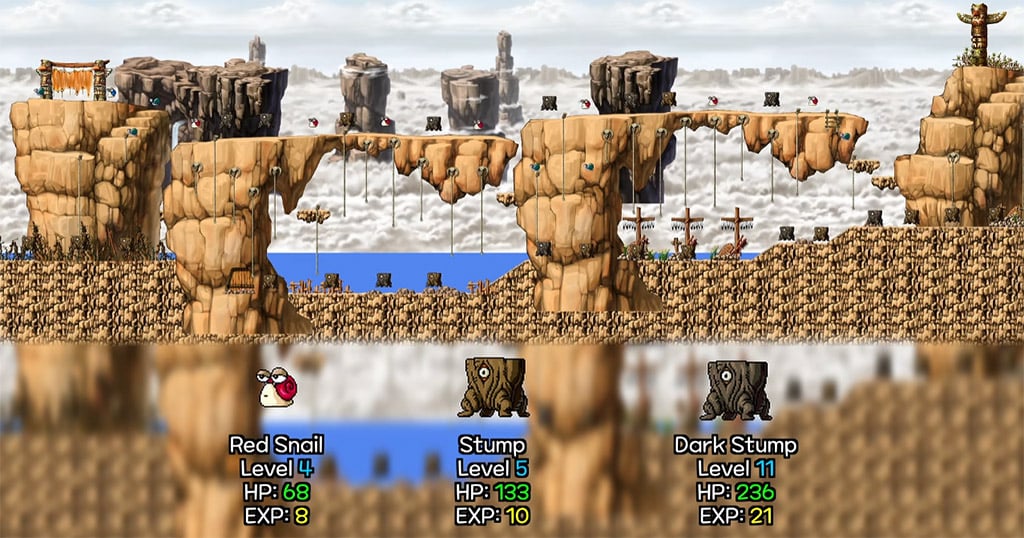
Divide the floor into four zones:
- Left
- Center-left
- Center-right
- Right
Place one or two players on each upper platform. If several ground players follow the same Dark Stumps, the outer lanes remain alive and the map stops cycling efficiently.
Use this map when Henesys is saturated or climbing interrupts your class's attacks.
The Tree That Grew 1–3
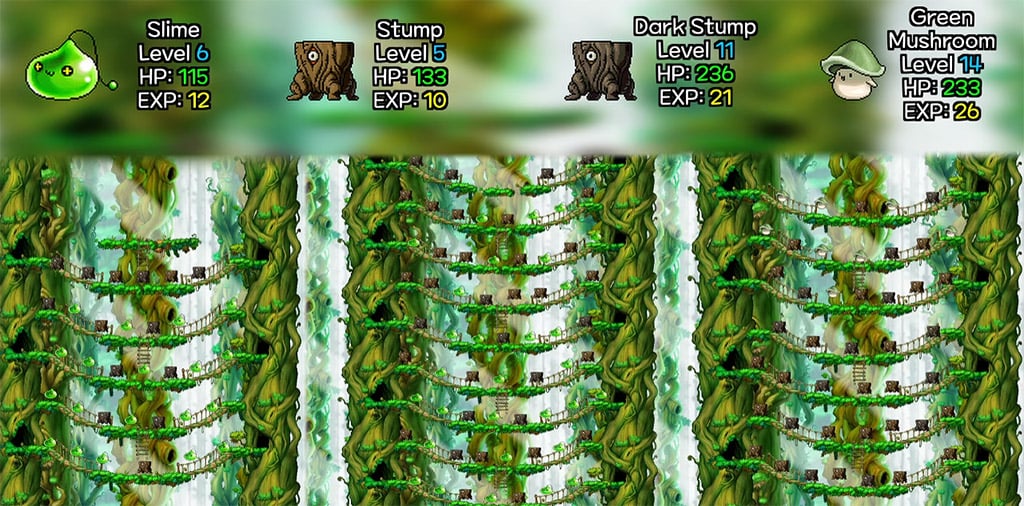
The Tree That Grew maps are reached from the upper-left side of Ellinia. Choose the version by group capacity, not by which number looks more advanced.
| Version | Best Group | Reason to Use It |
|---|---|---|
| The Tree That Grew 1 | Solo or small party | Short rotation with less uncovered spawn |
| The Tree That Grew 2 | Full party | More platforms for fixed assignments |
| The Tree That Grew 3 | Stronger early characters | Better once Slimes become inefficient |
Learn the tree-hole directions before training. Using the wrong route can reverse your circuit and leave assigned platforms unattended.
The counterintuitive choice is often Map 1. A smaller hunting ground beats Map 2 or 3 when your group cannot reach most of the larger map's spawn.
Kerning City Construction Site
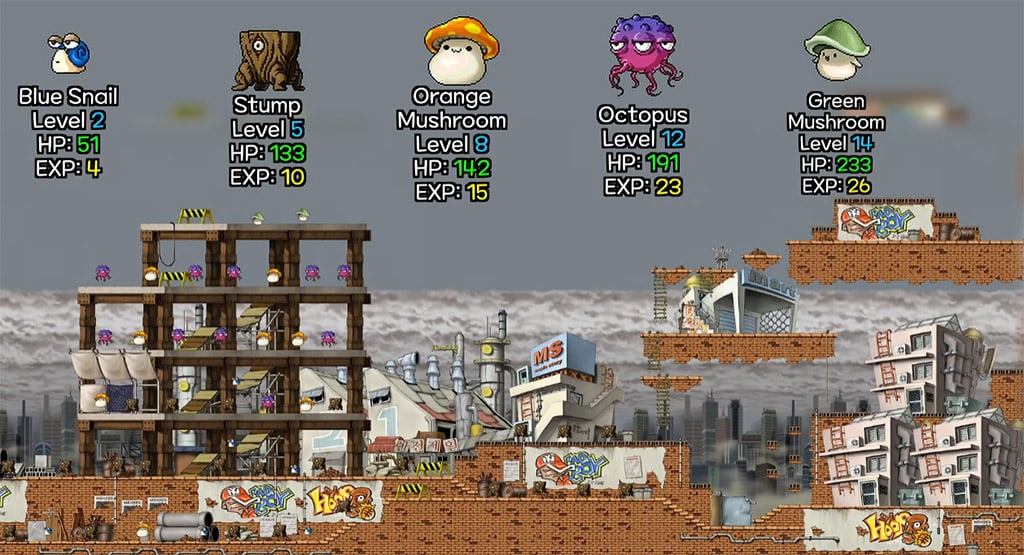
Kerning City Construction Site lies one map left of Kerning City. Its productive area is the left scaffold, where Orange Mushrooms, Octopi, and a small number of Green Mushrooms appeared during testing.
Assign one player to each active scaffold lane. Keep one or more players at ground level for the weaker monsters, and ignore the empty space on the right.
During our construction-map review, the scaffold produced the cleanest rotation because each short climb led directly to another spawn area. Leave when platform competition forces players to attack the same targets.
Forest 1
Forest 1 looks inefficient because its L-shaped platforms fragment the spawn. Its Pigs and Ribbon Pigs make it worthwhile only when a party covers the important sections.
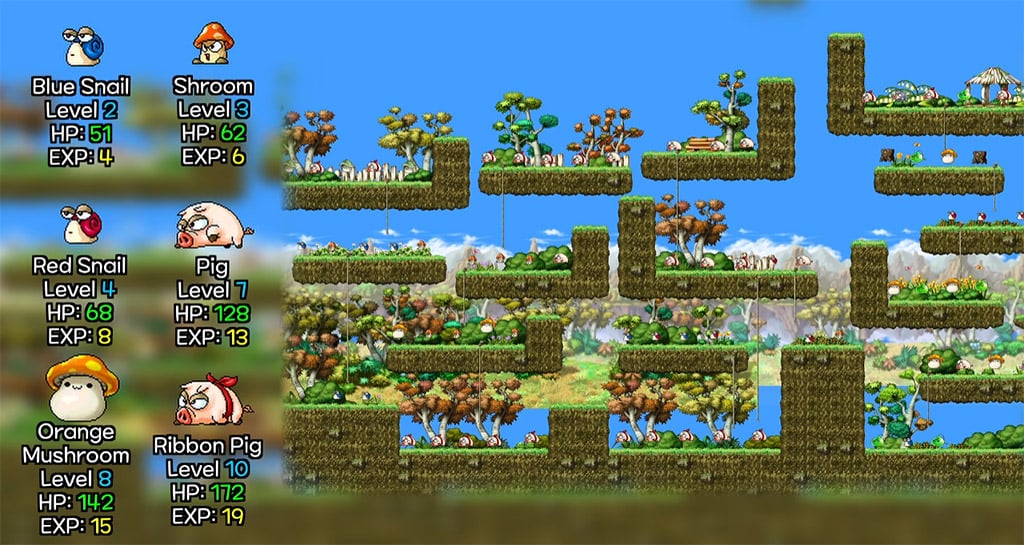
Use these assignments:
- Top-left
- Top-middle
- Center
- Bottom-left
- Bottom-right
Ignore the Iron Hog area if reaching or clearing it damages the main rotation. Full-map clearing is not automatically optimal; abandoning one low-efficiency corner can increase party-wide kills.
Skip Forest 1 when solo.
Best Kerning Construction and Subway Maps
Kerning's subway maps offer some of Victoria Island's strongest spawn concentration. Their weakness is popularity, so compare the spawn you can reach—not the map's reputation.
Northern Top of Construction Site
During testing, this hidden construction map was accessed near the Thief Job Instructor area. It contained Octopi, Orange Mushrooms, and Blue Mushrooms.
Use a six-player split:
- Two players at the top
- Two in the middle
- Two at the bottom
- Stronger characters assigned to Blue Mushroom lanes
Do not give your highest-damage player the easiest platform. Place damage where monsters survive longest so every section clears at a similar pace.
Caution Falling Down
Caution Falling Down used a hidden entrance near the caution sign inside Kerning City Construction Site. Its layout and monster mix closely resembled Northern Top of Construction Site, but the structure was inverted.
Use the same two-two-two split. Treat it as a fallback when the other construction map is occupied.
The hidden entrance or monster placement may change before launch because Nexon classifies closed-test content as subject to revision.
Line 1 Area 1
Line 1 Area 1 was one of the best early subway maps in the reviewed build because it contained only Bubblings. A uniform monster pool gives every player the same accuracy, damage, and positioning requirements.
Kill what appears within your assigned platform range. Do not cross several lanes to contest one monster.
In our repeated subway rotations, local control beat full-map roaming even when the roaming player had higher damage. Leave when you regularly finish a spawn cycle without an available target.
Transfer Area
Transfer Area contained flying Sturges and strongly favored ranged classes. Split a full party between the upper and lower regions, then divide each half into three local zones.
Melee characters lose time when Sturges change height or drift outside short attack ranges. High damage does not solve poor contact time.
Ranged parties should use Transfer Area. Melee parties should choose Ant Tunnel.
Line 2 Area 1 vs. Line 1 Area 2
Both maps focus on Jr. Wraiths, but their secondary monsters create different class requirements.
| Map | Secondary Monster | Better For | Main Failure Point |
|---|---|---|---|
| Line 2 Area 1 | Jr. Neckis | Accurate mixed parties | Misses extend every rotation |
| Line 1 Area 2 | Sturges | Ranged-heavy parties | Flying targets stall melee players |
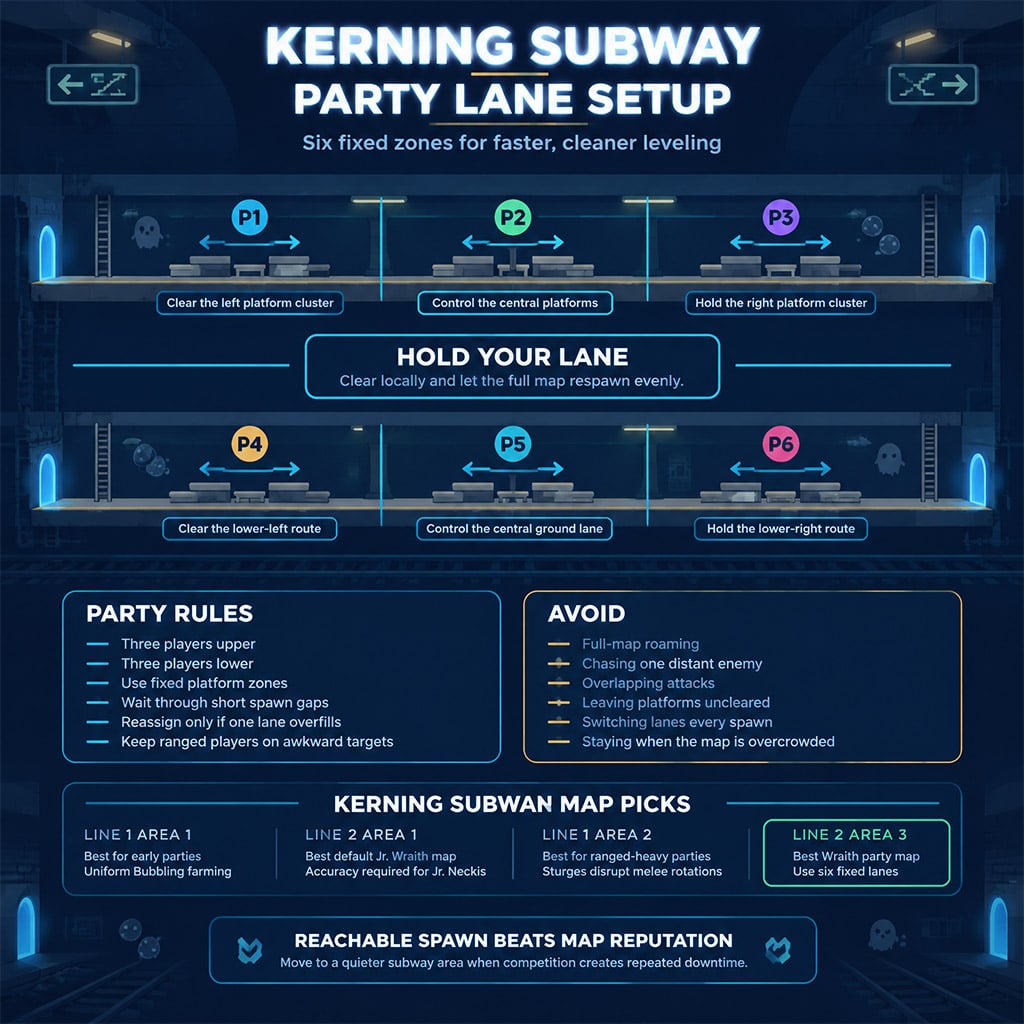
For either map, place three players in the upper half and three in the lower half. Give each player a local platform cluster rather than half the entire stage.
Choose Line 2 Area 1 by default. Use Line 1 Area 2 only when ranged characters can remove Sturges without chasing them.
Line 2 Area 3
Line 2 Area 3 delivered the strongest Wraith rotation in the reviewed closed-test build. Run it with six fixed assignments: three upper lanes and three lower lanes.
Do not leave your zone every time it empties. Crossing into another lane causes overlapping attacks, delays your return, and leaves your own platforms unattended when monsters respawn.
During our full-party layout analysis, the fastest player sometimes gained more by waiting briefly than by invading a neighboring section. Activity looks productive; synchronized clearing produces the better result.
Hold your lane.
Line 1 Area 4
Line 1 Area 4 is the practical Wraith-map fallback. The tested configuration produced a weaker rotation than Line 2 Area 3, but an uncontested second-choice map can beat a crowded top-tier map.
We removed unsupported claims about the exact spawn-count difference because Nexon has not published permanent totals. Judge both maps by available targets per circuit.
Move to Line 1 Area 4 when competition creates repeated downtime in Line 2 Area 3.
Best Sleepywood and Perion Maps
Many deeper Sleepywood maps contain stronger monsters but impose heavy movement costs. Stop at compact hunting grounds unless your party can cover every important section.
Damp Forest
Damp Forest works best with four players:
- One at the top
- One in the middle
- Two at the bottom
Junior Neckis are the map's readiness check. Attack them across several spawn cycles before committing to a long session.
Across the closed tests, we found that accuracy—not survival—separated viable characters from weak clears here. If you miss regularly, move back even when the monsters cannot kill you.
Dark Cave
Dark Cave combines Sturges, Horny Mushrooms, and Zombie Mushrooms. It works with three or four players assigned to the left, center, right, and bottom.
The map requires fewer players than Transfer Area, but Sturges still favor ranged attacks. Skip it if flying targets repeatedly force you to jump or wait.
Use Dark Cave when you have ranged damage but cannot assemble a full subway party.
Ant Tunnel 1
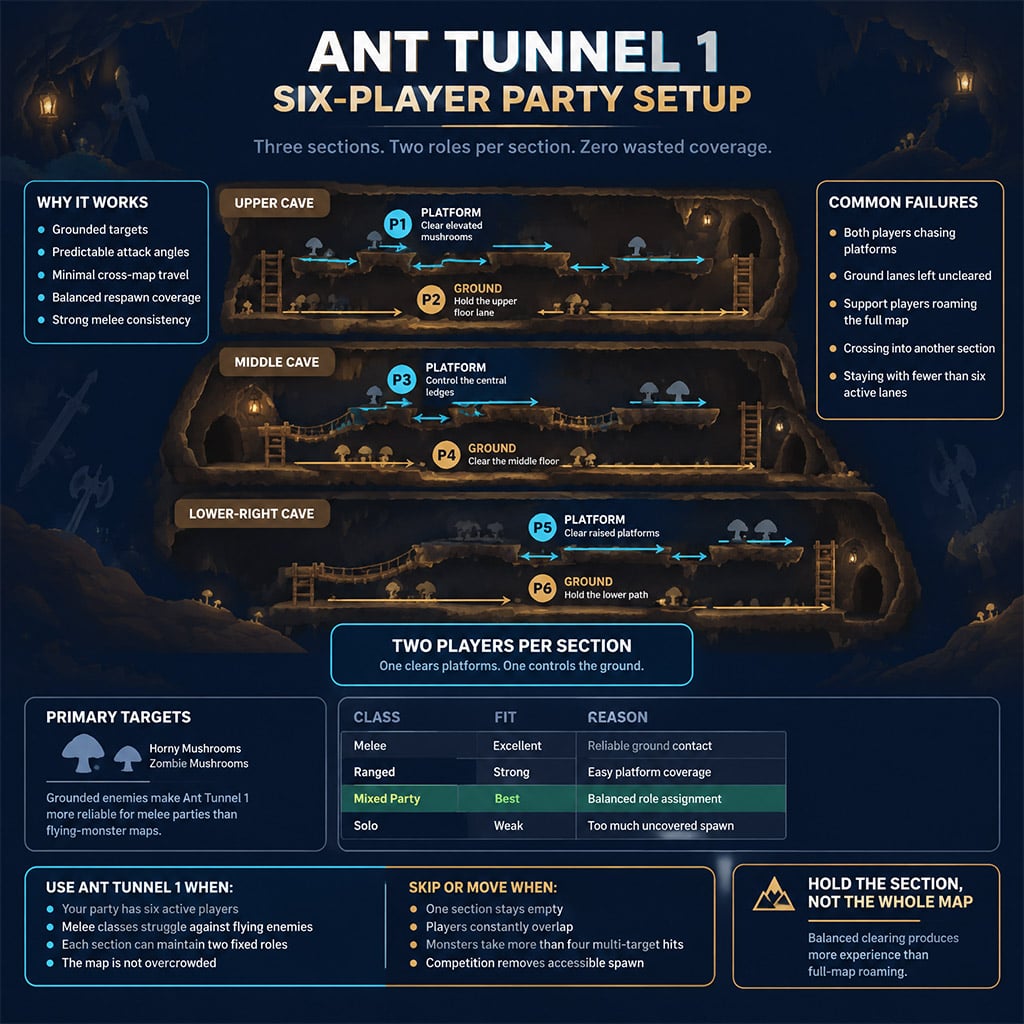
Ant Tunnel 1 is the safer midgame choice for melee-heavy groups. Divide its three sections between six players:
- One player handles the platforms.
- One player handles the ground.
- Repeat that pairing in all three sections.
Grounded Horny Mushrooms and Zombie Mushrooms offer more predictable contact than Sturges. In our side-by-side map assessment, that consistency kept weaker melee parties productive even when their raw damage trailed ranged groups.
Ant Tunnel 4
Ant Tunnel 4 provides more space but has less obvious divisions. Assign one player to each of four primary zones, then restrict one support player to the upper half and another to the lower half.
Never let both support players patrol the entire map. The travel time erases the benefit of the additional space.
This comparison shows when each cave map works.
| Map | Best Feature | Trade-Off |
|---|---|---|
| Ant Tunnel 1 | Clear three-section structure | Popular and easy to fill |
| Ant Tunnel 4 | More room for strong parties | Harder to coordinate |
| Transfer Area | Strong ranged uptime | Poor melee contact |
| Dark Cave | Works with 3–4 players | Mixed spawn and flying targets |
Choose Ant Tunnel 1 for control. Use Ant Tunnel 4 only when your party can exploit the extra room.
Land of Wild Boar
Land of Wild Boar is reached through the hidden doorway near Perion Street Corner. Its main targets are Wild Boars, supported by Dark Axe Stumps and occasional Junior Boogies.
Use four or five players:
- One at the top
- One in the middle
- Two or three at the bottom
Junior Boogies can interrupt the party with debuffs. Nearby players should remove them immediately, but the whole group should not abandon its lanes.
Dark Axe Stumps remain close enough to the target progression to work as useful filler. That makes this map more stable than mixed hunting grounds filled with significantly weaker monsters.
The Burnt Land 2
The Burnt Land 2 contains Fire Boars and Dark Axe Stumps. It works best with two or three players.
Place one player on the upper platform. Split the bottom between the remaining players, or divide it into left and right zones.
This map does not offer the highest theoretical density. Its advantage is that a duo can activate nearly all useful spawn without waiting for a full party.
Drake Hunting Ground
Drake Hunting Ground is one of the better compact options in deeper Sleepywood. Solo players should focus on the central platforms and ignore remote monsters that require long detours.
A duo can divide the upper and lower routes. One player handles the central lower platforms, while the other covers the upper platforms and nearby edge spawns.
During our route review, forcing a full-map clear lowered attack uptime. The central Drake loop is the map's real value.
Best Ellinia and Forgotten-Area Maps
Ellinia's later maps punish short-range classes with irregular platforms, flying enemies, and specialized warp routes. Attack geometry matters as much as monster level.
Monkey Swamp 1
Monkey Swamp 1 offers a strong Lupin population, but its platforms are awkward for short-range melee attacks. Use a ranged duo or trio and assign each player a limited sweep.
A small number of Junior Neckis appeared near the bottom in the tested configuration. Ignore them if reaching that section breaks your Lupin rotation.
Use Monkey Swamp 1 for ranged density, not as a universal upgrade.
Forgotten Entrance 2
Forgotten Entrance 2 contained Glow Shrooms, Lupins, and Raffles. Its glowing plants functioned as warp points during testing.
Use four positions:
- Top
- Middle-left
- Middle-right
- Bottom
Learn each warp destination before timing your session. During our route analysis, ignoring the warps converted a practical party map into a slow vertical climb.
Forgotten Entrance 1
Forgotten Entrance 1 suits a three-player group. Assign one player to the top-right, one to the middle, and one to the bottom-left.
Raffles, Golden Sturges, and Aquamanders occupied a relatively close progression range in the reviewed build. That reduces the low-value filler problem found on less focused mixed maps.
Flying Golden Sturges can still disrupt melee players. Put a ranged character in the section where they accumulate instead of rotating the whole party.
Prime Evil Forest 1
Prime Evil Forest 1 works with three players. Split the lower left and right between two characters, then assign the upper platforms to the third.
The relatively flat lower area rewards attacks with strong horizontal reach. Use it when Forgotten Entrance 2 offers more monsters but worse routing for your class.
Better attack angles can beat higher nominal density.
Decayed Tunnel 2
Decayed Tunnel 2 naturally divides into two sides. One player takes the left, and one takes the right.
Solo farming forces repeated cross-map travel and leaves one side alive for too long. Bring a reliable partner or use a smaller map.
Forest of Evil 2
Forest of Evil 2 paired flying Maladies with Zombie Lupins in the reviewed configuration. Its tree holes provided faster upward movement than manual climbing.
Ranged characters can solo it, but a duo or trio creates better coverage across the upper, middle, and lower sections. Melee characters should skip it unless their skills can hit enemies above or below the platform.
During our class-matchup review, reliable ranged contact outperformed higher melee damage. The melee characters lost too much time waiting for Maladies to enter attack range.
Another Sanctuary
Another Sanctuary works best as a duo. Assign one player to the left and one to the right.
Rotten Mushrooms and Sporewoods provided the main value, while Golden Sturges occupied a smaller share of the tested monster population. The compatible target levels and clean split make this one of the better understated duo maps.
Do not solo unless your mobility lets you clear both halves without leaving one side idle.
Is Hot Sand Worth Training At?
Hot Sand is worth using only with an organized party of four or five. Torties and Clangs occupy a useful shared progression range, but the platform layout imposes a heavy movement cost.
Use these assignments:
- One player on the upper platforms
- One at middle-left
- Two along the bottom
- One at middle-right
A sixth player may create overlap unless the current spawn behavior supports another fixed lane. Solo players should avoid the map entirely.
Good monsters do not rescue a bad solo route.
How to Run a Leveling Party Correctly
A full party is not automatically faster. Random roaming creates duplicated attacks, abandoned platforms, and uneven respawn pressure.
Set positions before farming:
1. Divide the map into fixed sections.
2. Place stronger players against tougher monsters.
3. Give flying-monster lanes to ranged classes.
4. Restrict support players to one half of large maps.
5. Observe two complete spawn cycles.
6. Reassign only when one section repeatedly accumulates targets.
If your lane empties briefly, wait. Cross into another section only when your area remains empty across repeated cycles or a teammate cannot keep pace.
The party does not need equal kill counts. It needs balanced clearing across the map.
Recheck Your Map After Major Upgrades
A weapon upgrade or key skill point can change your best map more than several character levels. Test the next hunting ground whenever your attacks cross a meaningful damage threshold.
Compare:
- Hits per kill
- Miss frequency
- Potion consumption
- Monsters killed per rotation
- Movement time
- Available spawn after accounting for competition
When a target drops from three attacks to two, a previously inefficient map may become your best option immediately. If nothing crosses that threshold, changing maps may only add difficulty.
Data Status and Source Policy
This guide reflects the August 2026 Closed Online Test #2 configuration and observations collected across both closed tests. Nexon confirmed that Victoria Island was included and stated that test content may change before the official release.
We use three evidence levels:
1. Nexon announcements for test dates, available regions, jobs, systems, and development status.
2. Closed-test observations for Classic World map layouts, monster combinations, and practical party rotations.
3. Legacy MapleStory references for established map names and route context when Classic World documentation is incomplete.
Exact spawn totals are excluded unless Nexon publishes them or they can be reproduced in the released Classic World client. When we call one map stronger, we mean it produced the better practical rotation in the reviewed configuration—not that its spawn count is guaranteed to remain unchanged.
Primary references:
- Nexon Closed Online Test #2 Release Notes
- Nexon Victoria Island Exploration Report
- MeowDB MapleStory Classic World Release Guide
Nexon's official announcements take priority over third-party route databases. After release, confirm hidden entrances and monster placement in the current client before committing to a long training session.
FAQ (Frequently Asked Questions)
What is the best leveling map in MapleStory Classic World?
Line 2 Area 3 produced the strongest late-Victoria Wraith rotation in the reviewed closed-test build. Earlier characters should use Line 1 Area 1, Ant Tunnel 1, or a compact beginner map where they maintain low hit counts and constant spawn access.
When should I move to a higher-level training map?
Move when regular monsters die in one or two single-target hits or three to four multi-target hits without frequent misses. Stay at the previous map if the new location increases potion use, movement time, or periods without a target.
Are party maps faster than solo maps?
Party maps are faster only when players hold fixed sections and clear the full map at a balanced pace. If members roam or compete for the same platforms, a smaller solo or duo map will produce better results.
Which leveling maps are best for melee classes?
Perion Street Corner, Ant Tunnel 1, The Burnt Land 2, and Drake Hunting Ground offer the strongest melee-friendly layouts in this route. Avoid Sturge and Malady maps when your skills cannot maintain contact across changing heights.
What should I do when the best map is crowded?
Move to an uncontested fallback instead of fighting for partial spawn. Line 1 Area 4 can replace Line 2 Area 3, while Ant Tunnel 4, Dark Cave, and smaller hidden maps cover different party sizes and class matchups.

I’m Emily Zhang, an American Research Writer at GGWTB covering Korean MMORPGs and games based on classic franchises. My guides focus on class choices, leveling routes, and long-term character progression. I look at what a class needs beyond its starter skills—and which upgrades are worth your materials before the next gear tier arrives.

Most Popular Posts
- MapleStory Classic World CBT2: The No-BS Guide to 3rd Job, Orbis, and Class Reworks
- MapleStory Classic World Early Best Maps, PQ, and Party Spot): The No-BS 1-30 Leveling Guide
- MapleStory Classic Early Leveling Guide: Best Maps, Fastest Route, Real Player Tips
- MapleStory Classic World Release Date Guide: Launch Date, Founder Access
- MapleStory Classic Mage Guide: 1st & 2nd Job Builds, AP & Routes
- MapleStory Classic World Priest Guide: Skills, Nerfs and Holy Arrow build
Popular Category Lists
- ARC Raiders / (356)
- Grow a Garden / (294)
- CoD: Black Ops 7 / (167)
- Star Citizen / (163)
- MLB 26 / (159)
- Monopoly Go / (153)
- ARK Survival Ascended / (128)
- Steal a Brainrot / (99)
- Blox Fruits / (74)
- Adopt Me / (74)
- Forza Horizon 6 / (72)
- Sailor Piece / (68)
- Grow a Garden 2 / (68)
- Diablo IV / (62)
- CoD: BLACK OPS 6 / (55)
- Aion 2 / (54)
- Path of Exile 2 / (48)
- Monster Hunter Wilds / (46)
- Windrose / (44)
- COD: Modern Warfare 4 / (44)