0
0 Created: Jul 24,2026 | ARC Raiders
ARC Raiders Melee Damage Trial Guide: Safest 140K+ Matriarch Method

The fastest way to break 100K–140K+ melee trial score is not farming small ARC enemies. It is abusing the Matriarch's huge melee score multiplier while sitting in a safe internal hitbox.
We are not trying to kill her fast.
We are trying to keep her alive long enough to farm melee hits.

- Best Target for ARC Raiders Melee Damage Trial
- Best Maps for the 140K+ Matriarch Melee Method
- Best Loadout for Matriarch Melee Trial
- Equalizer vs Torrent vs Patina
- How Many Stamina Stims to Bring
- Step-by-Step: Safest 140K+ Matriarch Melee Strategy
- 1. Scout Before You Commit
- 2. Break the Armor Plating
- 3. Enter the Safe Internal Spot
- 4. Farm the Correct Melee Angle
- 5. Manage Stamina, Gas, and Timing
- Expected Score and Results
- Solo vs Squad Matriarch Trial Runs
- Solo
- Squad
- Common Mistakes That Kill the Run
- When to Extract
- FAQ
- What is the fastest way to get 140K+ melee damage score in ARC Raiders?
- Do I need the Equalizer for this method?
- What is the best map for the Matriarch melee trial?
- How many stamina stims should I bring?
- Can this be done solo?
- Summary
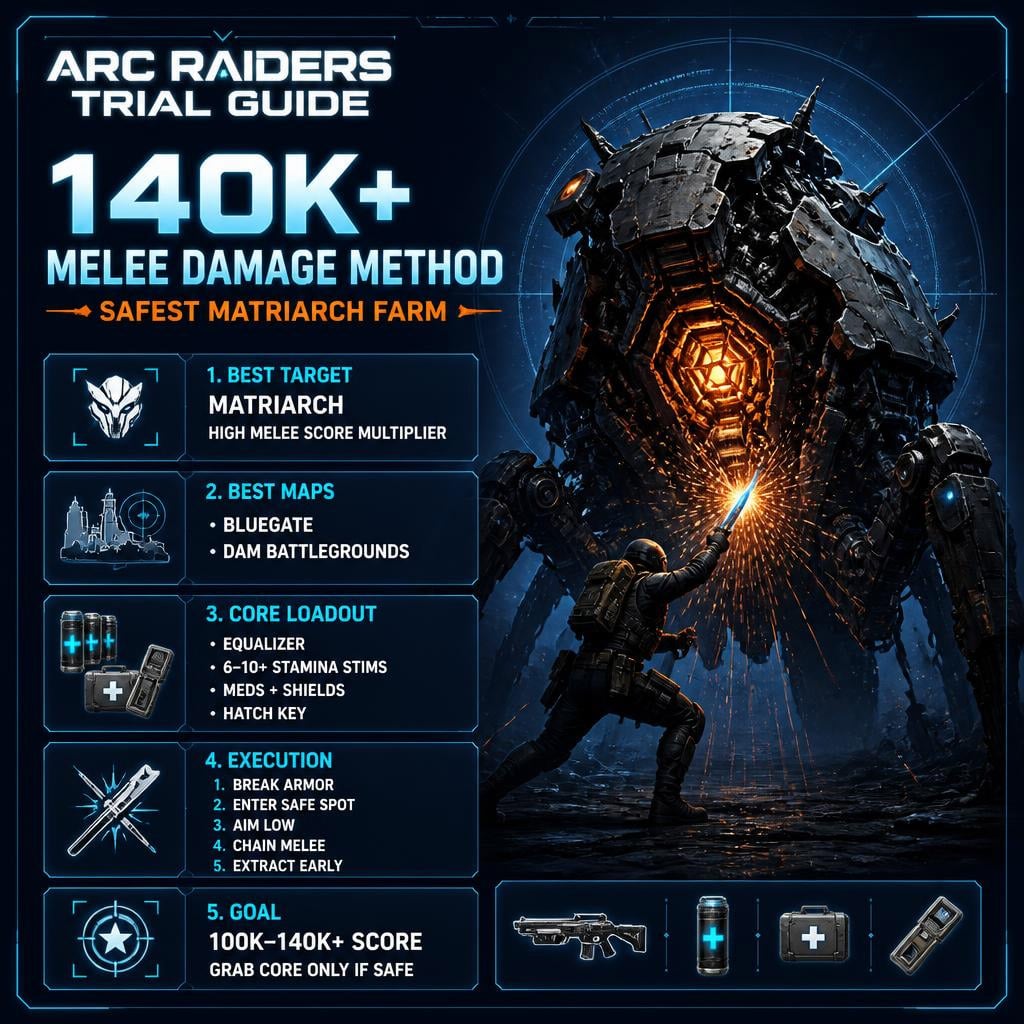
Best Target for ARC Raiders Melee Damage Trial
The Matriarch is the best target because each melee hit gives far more score than normal ARC enemies.
| Target | Trial Value | Risk | Use |
|---|---|---|---|
| Small ARC | Low | Low | Bad for high score |
| Medium ARC | Medium | Medium | Backup only |
| Large ARC | High | High | Situational |
| Matriarch | Very High | Manageable with safe spot | Best for 140K+ |
Why it works:
- Massive melee score multiplier
- Large body makes safe positioning possible
- Long enough fight to chain stims
- Can also reward strong XP and Matriarch core loot
If the Matriarch is uncontested, commit fast.
Best Maps for the 140K+ Matriarch Melee Method
Pick spawns where players are less likely to burn the boss down.
| Map / Area | Why It Works | Contest Level | Verdict |
|---|---|---|---|
| Bluegate | Players often farm augment blueprints instead | Medium | Best overall |
| Dam Battlegrounds | Many squads ignore the Matriarch | Low–Medium | Very good |
| Hot PvP zones | Too many rotations | High | Avoid |
| Exposed random spawns | Hard to control | Variable | Risky |
Bluegate is the cleanest option right now. Many players are undergeared after expeditions or focused on blueprint farming. That gives us a wider melee window.
If you hear heavy weapons, Equalizers, or multiple squads shooting, your score ceiling drops fast.
Best Loadout for Matriarch Melee Trial
Bring gear that helps you do three things: open the armor, survive entry, keep swinging.
| Item | Priority | Reason |
|---|---|---|
| Equalizer | S-tier | Fastest armor plating break |
| Stamina stims | S-tier | More swings, more score |
| Meds | High | Gas and chip damage happen |
| Shields | High | Safer approach and exit |
| Hatch key | High | Clean extraction after score |
| Defib | Medium | Good for squad runs |
| Extra ammo | Low | This is not a gun DPS run |
Equalizer vs Torrent vs Patina
| Option | Effectiveness | Risk | Notes |
|---|---|---|---|
| Equalizer | Excellent | Low | Best and safest |
| Torrent | Good | Medium–High | Works, less forgiving |
| Patina | Usable | Medium | Slower setup |
| Normal guns | Poor | High | Not recommended |
Use Equalizer if you have it.
Torrent and Patina can work, but the entry is messier.
How Many Stamina Stims to Bring
The more stims we bring, the higher the score ceiling.
| Stims | Expected Result | Best For |
|---|---|---|
| 3–5 | Practice run | Budget attempts |
| 6–10 | Strong score | Most players |
| 10+ | Max push | 100K–140K+ attempts |
A good run can generate hundreds of points per melee sequence and push around 140K+ total score if nobody burns the Matriarch too early.
Do not waste stims during gas downtime.
Pop them when you are already in position and can instantly swing.
Step-by-Step: Safest 140K+ Matriarch Melee Strategy
1. Scout Before You Commit
Before firing, check the area.
Look for:
- Players already shooting the Matriarch
- Equalizer blasts
- Blaze grenades
- Heavy weapon fire
- Squads camping the corpse route
If nobody is seriously damaging her, go in.
If two squads are already fighting her, skip or settle for a lower score.
2. Break the Armor Plating
Use the Equalizer to remove the plating that blocks access to the internal melee spot.
Do this quickly.
A fast armor break means:
- Less time exposed
- Earlier access to the safe spot
- More melee uptime
- Lower chance another squad steals the boss
Once the opening is available, stop dumping damage.
We want score, not a fast kill.
3. Enter the Safe Internal Spot
Move into the exposed body section and tuck tight against the internal hitbox.
Good positioning feels obvious:
- Hits register consistently
- You hear clean impact feedback
- Score jumps every swing
- Matriarch damage becomes manageable
Bad positioning feels awful:
- Hits whiff
- Score barely moves
- Gas drains your stamina
- You get pushed or clipped by damage
If hits are weak, adjust lower and closer.
4. Farm the Correct Melee Angle
Hug the internal hitbox. Aim slightly downward.
Use normal or secondary melee depending on what registers better. The goal is not style. The goal is consistent score per stamina bar.
If you stop getting clean hits, move a little.
Do not overcorrect. Small movement is enough.
The best angle usually gives steady score gains without needing to leave the safe spot.
5. Manage Stamina, Gas, and Timing
This run is mostly stamina management.
Use this rhythm:
1. Wait for gas pressure to ease.
2. Pop stamina stim.
3. Reposition tight.
4. Melee nonstop.
5. Repeat until the Matriarch is nearly dead.
If gas is active, hold the stim for a second.
Stim value is wasted if you cannot swing.
If another squad starts damaging her, stop playing safe. Burn stims and farm every hit before she dies.
Expected Score and Results
A clean attempt can break 100K.
A strong uncontested run can reach 140K+.
| Factor | Score Impact | Fix |
|---|---|---|
| Stim count | Very high | Bring more |
| Uncontested boss time | Very high | Pick Bluegate or Dam |
| Hit consistency | Very high | Fix melee angle |
| Armor break speed | High | Use Equalizer |
| Melee/stamina perks | Medium–High | Build into them |
| Extraction plan | Practical value | Bring hatch key |
The Matriarch does not need to have endless HP.
The trial multiplier does the heavy lifting.
Solo vs Squad Matriarch Trial Runs
Solo
Best for personal score.
Pros:
- Full melee uptime
- Easier to stay quiet
- No teammate accidentally killing the boss
Cons:
- No revive
- Harder to control PvP
- Riskier extraction
Solo works best when you find the Matriarch early and uncontested.
Squad
Safer, but only if your team has discipline.
Best role split:
| Role | Job |
|---|---|
| Armor breaker | Opens the safe spot |
| Melee farmer | Farms trial score |
| PvP watch | Stops third parties |
| Support | Holds heals, shields, defib |
The main squad mistake is simple: teammates kill the Matriarch too fast.
Tell them clearly: do not burn the boss after the armor is open.
Common Mistakes That Kill the Run
| Mistake | Why It Fails | Correct Play |
|---|---|---|
| Killing Matriarch too fast | Less melee time | Stop shooting after entry opens |
| Too few stims | Low score ceiling | Bring 6–10 minimum |
| Bad melee angle | Hits do not count | Aim lower, hug hitbox |
| Stim during gas | Wasted stamina | Wait for clean swing window |
| Ignoring PvP | Lose loot or die | Listen and extract early |
| No hatch key | Bad escape options | Always bring one |
This is a score farm, not a normal boss fight.
Treat the Matriarch like a points machine.
When to Extract
Leave once the score is secured.
| Situation | Best Move |
|---|---|
| 100K+ score secured | Extract |
| 140K+ score secured | Extract immediately |
| Matriarch core obtained | Leave now |
| Multiple squads arrive | Do not greed |
| Low meds or no stims | Leave |
A dead Matriarch attracts players. Most squads will not do the hard part, but they will happily steal the payout.
Use the hatch key and get out.
FAQ
What is the fastest way to get 140K+ melee damage score in ARC Raiders?
Farm the Matriarch with the safe internal melee spot. Break her armor with an Equalizer, enter the exposed body section, then chain melee hits with stamina stims.
Do I need the Equalizer for this method?
No, but it is the best option. The Equalizer gives the fastest and safest armor break. Torrent and Patina can work, but they are riskier.
What is the best map for the Matriarch melee trial?
Bluegate is the best overall. Many players are busy farming augment blueprints, so the Matriarch is less likely to be rushed. Dam Battlegrounds is also strong.
How many stamina stims should I bring?
Bring 6–10 stims for a serious run. Bring 10+ if you want to push 100K–140K+. More stamina means more melee hits.
Can this be done solo?
Yes. Solo is often better for personal score because nobody else kills the Matriarch too quickly. The risk is extraction and third-party PvP.
Summary
The safest 140K+ ARC Raiders melee damage trial method is simple:
- Hunt the Matriarch
- Prefer Bluegate or Dam Battlegrounds
- Bring Equalizer, 6–10+ stamina stims, meds, shields, and a hatch key
- Break armor fast
- Enter the safe internal spot
- Aim low, hug the hitbox, and melee nonstop
- Extract once the score or core is secured
Do not play it like a normal boss kill.
Open the Matriarch, farm the multiplier, then leave before the lobby arrives.

Most Popular Posts
- ARC Raiders Update 1.42: Phantom Targets Farming Guide (Glitched Wasps, Rewards, Regional Conditions)
- ARC Raiders Hullcracker Blueprints: Fastest Way to Complete The Major's Footlocker
- ARC Raiders Best Pop Trigger Strategy: Fast Phantom Targets Damage Guide
- ARC Raiders Subway Skin Guide: Unlock the Subterranean Outfit
- ARC Raiders Looting Mk. 3 Survivor Blueprint Guide: Best Blue Gate Route and Drop Locations
- ARC Raiders Medium & Heavy Gun Parts Blueprint Guide: Best Farm Route, Locations, and Refiner Crafting
Popular Category Lists
- ARC Raiders / (349)
- Grow a Garden / (293)
- CoD: Black Ops 7 / (167)
- Star Citizen / (161)
- MLB 26 / (159)
- Monopoly Go / (152)
- ARK Survival Ascended / (127)
- Steal a Brainrot / (99)
- Blox Fruits / (74)
- Adopt Me / (73)
- Forza Horizon 6 / (72)
- Sailor Piece / (68)
- Grow a Garden 2 / (68)
- Diablo IV / (62)
- CoD: BLACK OPS 6 / (55)
- Path of Exile 2 / (48)
- Aion 2 / (48)
- Monster Hunter Wilds / (46)
- Windrose / (44)
- Donut SMP / (41)