0
0 Created: Jan 28,2026 | ARC Raiders
ARC Raiders New Augments: Looting MK 3 (Safekeeper) and Tactical MK 3 (Revival) Guide

The latest ARC Raiders update has introduced two exciting new augments: the Tactical MK 3 (Revival) and the Looting MK 3 (Safekeeper). These additions bring new tactical opportunities and utility to the game, but the big question is—how can you get your hands on their blueprints? Dive into this guide to learn about their features, where to find their blueprints, and the best key rooms to maximize your loot.
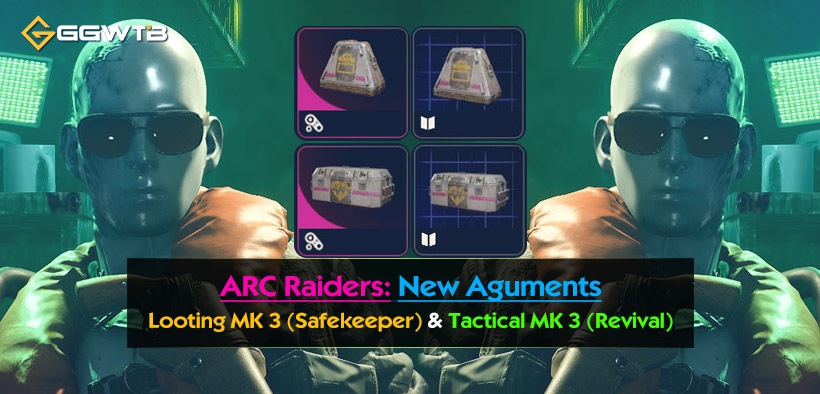
Tactical MK 3 (Revival)
The Tactical MK 3 (Revival) is all about utility, but it comes with some trade-offs.
Key Features:
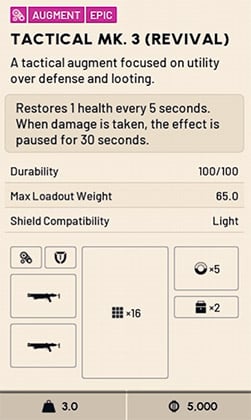
- Restores 1 health every 5 seconds (effect pauses for 30 seconds if damage is taken).
- Comes with an integrated defibrillator on a 240-second cooldown.
- Offers 5 quick-use slots and 2 safe pocket slots.
- Light shield compatibility only.
- Limited storage space: 16 main storage slots and a max loadout weight of 65.
While the integrated defibrillator is a neat feature, the augment's limited storage and shield compatibility make it less appealing compared to other options like the Survivor or Defensive augments. However, it could still be useful in specific scenarios where quick healing and utility take precedence.
Looting MK 3 (Safekeeper)
The Looting MK 3 (Safekeeper) is more niche but offers some interesting possibilities for PvP and high-risk situations.
Key Features:
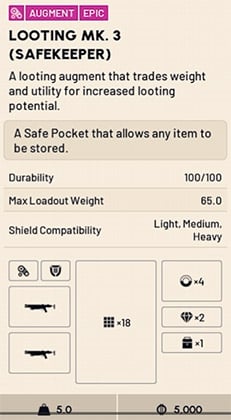
- 2 trinket slots and 1 safe pocket slot (which can store weapons!).
- Compatible with light, medium, and heavy shields.
- 18 main storage slots, 4 quick-use slots, and limited utility due to trinket-only slots.
This augment shines in scenarios where you want to safeguard high-value items like weapons. For instance:
- Store a powerful weapon like an Equalizer in your safe pocket during a Queen event.
- Secure rare loot or attachments from defeated players.
- Prepare for PvP encounters by keeping your best gear protected until you're ready to use it.
Despite its versatility, the Safekeeper falls short in overall looting potential compared to the Survivor or Tactical MK II Defensive augments. However, it's great for players looking to protect valuable gear in high-stakes situations.
Revival vs Safekeeper vs Common Alternatives
| Augment | Best Use Case | Key Perks | Main Downsides |
|---|---|---|---|
| Tactical MK3 (Revival) | Duo/squad utility, saving a Quick slot | Regen + built-in defib (240s), 5 Quick, 2 Safe | Light shields only, 16 storage, 65 weight cap |
| Looting MK3 (Safekeeper) | Queen events, PvP banking, protect one expensive item | Safe pocket can store weapons, heavy shield capable | Only 1 safe pocket, 4 Quick, trinket-only utility |
| Survivor (popular benchmark) | General best-in-slot for many players | Strong slots + storage (commonly preferred) | Competes in same loot pool (harder specific drop) |
| Tactical MK2 Defensive | Heavy shield looting/safer runs | Big storage + heavy shield synergy | Doesn't "bank a weapon" like Safekeeper |
If you're optimizing Consistent Loot Runs, Safekeeper isn't automatically better just because it's new. If you're optimizing Risk Control (protecting one high-value weapon), Safekeeper can be worth it.
How To Get the New Augment Blueprints?
To unlock these augments, you'll need to find their blueprints.
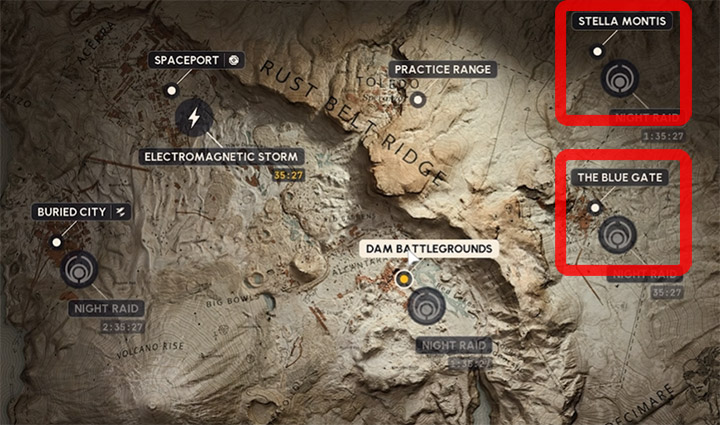
1. Loot Augment Containers:
The Revival and Safekeeper blueprints are part of the general augment loot pool, which means they can spawn in:
- Stella Montis lobby area.
- Blue Gate reinforced reception.
- Medical containers across the map.
2. Explore Medical Container Locations:
Some of the best areas to find medical containers include:
- Hospital: A hotspot for medical containers.
- Space Travel and Research: Scattered medical containers.
- Spaceport: Departure building and launch towers.
- Dam Battlegrounds: Testing Attics, Research, and Administration areas.
3. Random Drops from Other Containers:
Since the Cold Snap update, augment blueprints can also drop from industrial-style containers. While the drop rate is low, playing the game normally could yield some surprises.
Notes: Be prepared for a grind. With 77 blueprints in the loot pool (and competition from existing ones), finding the specific blueprint you need might take time. For example, it took me 7 hours of focused looting to find both new blueprints. Patience—and a bit of luck—will be your best allies.
Best Key Rooms For Augment Blueprints
Key rooms are a reliable way to increase your chances of finding augment blueprints. Here are some of the top locations to target:
| Key Room | Location | Details |
|---|---|---|
| Lobby Checkpoint Security | Stella Montis | Packed with augment containers—arguably the best spot for blueprint hunting. |
| Archives Key | Sandbox | Contains medical containers that might spawn augment blueprints |
| Confiscation Key | Bluegate | A few augment containers available here |
| Hospital Key Rooms | Buried City Hospital | Several medical containers are located here |
| Testing Attics Key Rooms | Dam Battlegrounds | Two rooms with medical containers—great for blueprint hunting |
Additional locations like Raiders Refuge and Ancient for Errors also have security and medical boxes that might contain augment blueprints. If you're near these areas, it's worth checking them out.
Loot Routes Based on Spawn Locations
| Atrium Spawn |
|
| Lobby Metro Station Spawn |
|
| Western Tunnel Spawn |
|
| Medical Spawn |
|
| Seed Vault Spawn |
|
Augment Container Spawn Locations
| Spawn Location | Key Rooms Nearby | Blueprint Chance |
|---|---|---|
| Atrium | Cafeteria, Ladder Room | Medium |
| Lobby Metro Station | Tunnel, Zipline Rooms | High |
| Western Tunnel | Cargo Dock, Atrium | Low |
| Medical Research | Lower Platforms, Medical Room | Medium |
| Seed Vault | Business Center Rooms | High |
Final Thoughts
The Tactical MK 3 (Revival) and Looting MK 3 (Safekeeper) bring new layers of strategy and utility to ARC Raiders, catering to different playstyles and scenarios. Whether you're grinding for blueprints in key rooms or exploring medical container hotspots, persistence will pay off.
Remember, with RNG at play, finding these blueprints might take time—but that’s part of the thrill! So gear up, hit those loot routes, and start experimenting with these new augments. Who knows? You might uncover creative ways to use them that give you an edge in the game.

Most Popular Posts
- ARC Raiders Update 1.42: Phantom Targets Farming Guide (Glitched Wasps, Rewards, Regional Conditions)
- ARC Raiders Hullcracker Blueprints: Fastest Way to Complete The Major's Footlocker
- ARC Raiders Best Pop Trigger Strategy: Fast Phantom Targets Damage Guide
- ARC Raiders Subway Skin Guide: Unlock the Subterranean Outfit
- ARC Raiders Spaceport Open Containers Guide: 19K+ Solo Trial Route
- ARC Raiders Looting Mk. 3 Survivor Blueprint Guide: Best Blue Gate Route and Drop Locations
Popular Category Lists
- ARC Raiders / (343)
- Grow a Garden / (292)
- CoD: Black Ops 7 / (167)
- Star Citizen / (160)
- MLB 26 / (159)
- Monopoly Go / (152)
- ARK Survival Ascended / (126)
- Steal a Brainrot / (98)
- Blox Fruits / (74)
- Adopt Me / (73)
- Forza Horizon 6 / (72)
- Sailor Piece / (68)
- Grow a Garden 2 / (68)
- Diablo IV / (62)
- CoD: BLACK OPS 6 / (55)
- Path of Exile 2 / (48)
- Monster Hunter Wilds / (46)
- Aion 2 / (45)
- Windrose / (44)
- Donut SMP / (41)