



 0
0 Created: Jul 13,2026 | ARC Raiders
ARC Raiders Secret Mechanics: PvP, Close Scrutiny Farming, and Spaceport Loot Routes

ARC Raiders is full of small item interactions that quietly decide fights. These are not fun facts. They save runs, steal loot routes, deny traps, and turn cheap gear into real pressure.
Use this as a field guide: problem → mechanic → execution → result.
- ARC Raiders Secret Mechanics Quick Table
- 1. Stun Bombardiers with Search Coil
- Pain Point
- Strategy
- Execution
- Result
- 2. Fire Faster with Dual Level 1 Anvils
- Pain Point
- Strategy
- Execution
- Result
- 3. Clear Hidden Traps with Blaze Grenades
- Pain Point
- Strategy
- Execution
- Result
- 4. Scale Spaceport Launch Tower Without Unlocking Doors
- Pain Point
- Strategy
- Execution
- Result
- 5. Use Snap Hook as a Weapon Against Small ARC
- Pain Point
- Strategy
- Execution
- Result
- 6. Block ARC Vision Cones with Placeable Items
- Pain Point
- Strategy
- Execution
- Result
- 7. Delete Ziplines with Crash Mat
- Pain Point
- Strategy
- Execution
- Result
- 8. Move Faster on Ziplines with Snap Hook
- Pain Point
- Strategy
- Execution
- Result
- 9. Farm Close Scrutiny with No Loadout
- Pain Point
- Strategy
- Execution
- Result
- 10. Hide Blaze Grenade Traps in Doors
- Pain Point
- Strategy
- Execution
- Result
- Best ARC Raiders Mechanics by Situation
- FAQ
- What is the best secret mechanic in ARC Raiders?
- How do you stun a Bombardier in ARC Raiders?
- Is the dual Level 1 Anvil trick worth using?
- How do you make a zipline disappear in ARC Raiders?
- Can you farm Close Scrutiny without risking gear?
- Summary
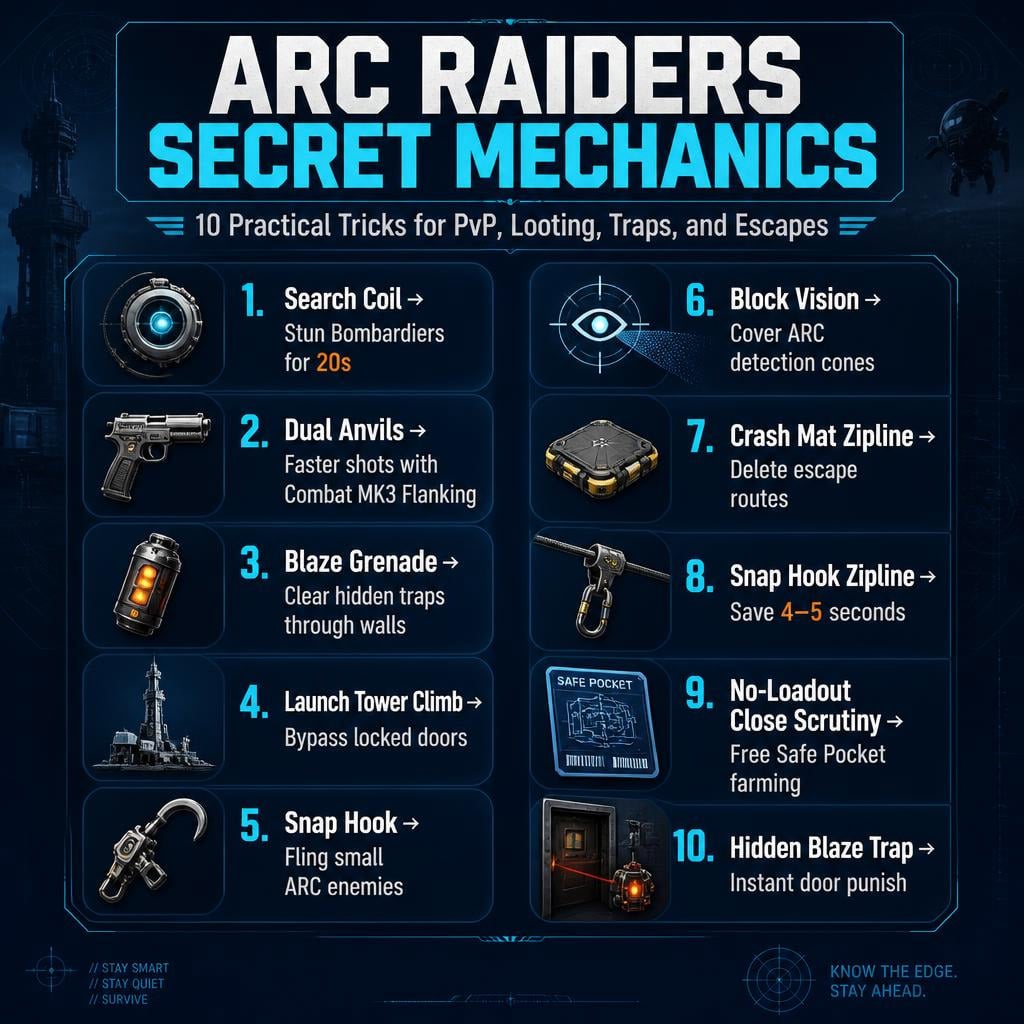
ARC Raiders Secret Mechanics Quick Table
| Mechanic | Use It When… | Payoff |
|---|---|---|
| Search Coil Bombardier stun | A Bombardier is blocking crater movement | Around 20 seconds of control |
| Dual Level 1 Anvils | You run Combat MK3 Flanking | Faster shots, extra ammo |
| Blaze Grenade trap clear | You hear mines behind walls or doors | Clears traps safely |
| Spaceport Launch Tower climb | Launch Tower event is active | Bypass locked doors |
| Snap Hook vs small ARC | Small ARC units rush you | Disrupts, flings, or kills |
| Block ARC vision cones | You need stealth over gunfire | Avoids detection |
| Crash Mat zipline delete | You are being chased | Removes escape route behind you |
| Snap Hook zipline boost | You need fast rotation | Saves 4–5 seconds |
| No-loadout Close Scrutiny | You want low-risk blueprint farming | Free Safe Pocket value |
| Hidden Blaze door trap | You are holding a room | Instant door punish |
1. Stun Bombardiers with Search Coil
Pain Point
Bombardiers eat time, ammo, and space. If one pins you in a crater, the fight gets messy fast.
Strategy
Stick a Search Coil to the Bombardier's rear weak spot.
Execution
- Get behind the Bombardier.
- Aim at the back weak point.
- Attach the Search Coil directly onto it.
- Use the stun window to shoot, rotate, revive, or leave.
Result
The Bombardier can be disabled for around 20 seconds. Terrain may stop its spinning behavior, making it sit still. That is free damage or a clean escape.
Best use: crater fights where killing it would cost too much ammo.
2. Fire Faster with Dual Level 1 Anvils
Pain Point
A single Anvil hits hard but fires slowly. In PvP, slow follow-up shots lose trades.
Strategy
Run two Level 1 Anvils with Combat MK3 Flanking and swap after every shot.
| Setup | Requirement |
|---|---|
| Weapon Slot 1 | Level 1 Anvil |
| Weapon Slot 2 | Level 1 Anvil |
| Augment | Combat MK3 Flanking |
| Input Pattern | Shoot → swap → shoot → swap |
Execution
- Equip one Level 1 Anvil in each weapon slot.
- Fire once.
- Swap immediately.
- Fire again.
- Repeat the rhythm.
Result
You get faster shot cycling than relying on one higher-level Anvil. You also gain six extra shots across both weapons.
Best use: aggressive PvP players who can weapon-swap cleanly under pressure.
3. Clear Hidden Traps with Blaze Grenades
Pain Point
You hear a mine behind a wall. You know someone is holding the room. Walking in is exactly what they want.
Strategy
Use a Blaze Grenade to clear traps through walls, doors, and tight angles.
| Trap | Blaze Grenade Result |
|---|---|
| Jolt Mine | Cleared safely |
| Gas Mine | Cleared safely |
| Noisemaker | Countered |
| Door trap | Triggered or destroyed |
| Wall-hidden trap | Removed without entering |
Execution
- Stop outside the room.
- Listen for trap audio.
- Throw the Blaze Grenade at the nearest wall, floor, or door edge.
- Wait for the trap to pop.
- Push only after the room is safe.
Result
You deny the defender's setup without giving them free damage.
Best use: locked rooms, suspicious doorways, and PvP campers.
4. Scale Spaceport Launch Tower Without Unlocking Doors
Pain Point
The Spaceport Launch Tower event attracts players. Doors become kill zones.
Strategy
Climb the outside route instead of using predictable entrances.
| Tool | Needed? | Why Bring It |
|---|---|---|
| Snap Hook | Optional | Speeds up the first section |
| Light kit | Helpful | Easier movement |
| Stamina items | Helpful | Safer climb |
Execution
- Use Snap Hook to reach the second level faster.
- Move into the climbable corner.
- Keep your back against the wall.
- Hold forward.
- Spam jump until you reach the top.
- Do not stop mid-climb.
Result
You contest Launch Tower loot without burning keys or walking into the obvious door fight.
Best use: Spaceport loot event, solo rotations, third-party setups.
5. Use Snap Hook as a Weapon Against Small ARC
Pain Point
Small ARC enemies waste ammo and reveal your position.
Strategy
Use Snap Hook to fling or kill certain smaller ARC units.
Execution
- Wait until the small ARC commits toward you.
- Fire Snap Hook at it.
- Use the disruption to move, heal, or finish it.
- Avoid shooting unless needed.
Result
You save ammo, reduce noise, and keep moving.
Best use: stealth farming, low-ammo runs, escapes under pressure.
6. Block ARC Vision Cones with Placeable Items
Pain Point
Some ARC enemies lock down paths with vision cones. Shooting them is loud and risky.
Strategy
Cover their detection light with a physical item.
| Item | Usefulness |
|---|---|
| Gas Mine | Reliable |
| Jolt Mine | Reliable |
| Fireworks Box | Situational |
| Other placeables | Depends on size and angle |
Execution
- Find the ARC's visible blue detection light.
- Place an item directly over it.
- Confirm the vision cone is blocked.
- Cross the path without shooting.
Result
The ARC fails to detect you through that blocked line.
Best use: stealth routes, low-noise farming, avoiding unnecessary PvE fights.
7. Delete Ziplines with Crash Mat
Pain Point
A zipline escape is worthless if the squad chasing you can use the same line.
Strategy
Place a Crash Mat under the zipline's lower anchor before using it.
Execution
- Drop a Crash Mat.
- Deploy the zipline so the bottom anchor sits on the mat.
- Take the zipline.
- Once you reach the other side, the zipline disappears.
Result
Your escape route closes behind you.
| Normal Zipline | Crash Mat Zipline |
|---|---|
| Enemies can follow | Route disappears |
| Reveals your path | Hides rotation |
| Bad for escapes | Strong for escapes |
Best use: rooftop escapes, chase breaks, hidden rotations.
8. Move Faster on Ziplines with Snap Hook
Pain Point
Normal zipline travel is predictable. In a chase, a few seconds decide everything.
Strategy
Use Snap Hook to accelerate zipline traversal.
| Zipline Type | Time Saved |
|---|---|
| Horizontal zipline | Around 4–5 seconds |
| Vertical zipline | Around 4 seconds |
| Escape route | Often fight-winning |
Execution
- Approach the zipline with Snap Hook ready.
- Use the hook to snap into the line faster.
- Carry momentum through the traversal.
Result
You reach cover, roofs, or extraction routes before the enemy can punish you.
Best use: PvP escapes, fast third-parties, vertical rotations.
9. Farm Close Scrutiny with No Loadout
Pain Point
Close Scrutiny blocks free loadouts. Going geared can feel bad if you are only hunting blueprints.
Strategy
Enter with nothing equipped. You still get a Safe Pocket.
Execution
- Remove all gear before queuing.
- Load into Close Scrutiny empty.
- Sprint to Combat Supplies.
- Grab meds, ammo, and a weapon.
- Put valuable blueprints into the Safe Pocket immediately.
Result
You risk almost nothing but still protect high-value finds.
| Category | No-Loadout Method |
|---|---|
| Gear risk | Nearly zero |
| Safe Pocket | Yes |
| Starting weapon | No |
| Starting backpack | No |
| Starting shield | No |
| Main value | Blueprint safety |
Best use: Dedo Labra hunts, blueprint farming, broke-player recovery runs.
10. Hide Blaze Grenade Traps in Doors
Pain Point
Obvious traps do not work on good players. They check the floor, back up, and punish you.
Strategy
Place the Blaze Grenade trap tight into the door frame or interaction zone.
| Placement | Result |
|---|---|
| Floor center | Easy to see |
| Doorway corner | Inconsistent |
| Door frame / edge | Fast trigger |
| Door interaction zone | Best ambush value |
Execution
- Close the door first.
- Aim into the door edge or frame.
- Place the trap tightly so it partially blends into the door area.
- Hold the room from a safe angle.
- Let the enemy open the door.
Result
The trap triggers as the door opens. Less reaction time. More guaranteed damage.
Best use: defending rooms, delaying pushes, punishing aggressive Raiders.
Best ARC Raiders Mechanics by Situation
| Situation | Use This | Why |
|---|---|---|
| Bombardier blocks your route | Search Coil stun | Creates a long control window |
| Trap audio behind wall | Blaze Grenade | Clears it safely |
| Chased across roofs | Crash Mat zipline delete | Cuts pursuit |
| Need faster rotation | Snap Hook zipline boost | Saves seconds |
| Launch Tower event | Outside climb | Avoids locked-door fights |
| Farming Close Scrutiny | No-loadout Safe Pocket | Low-risk value |
| Holding a room | Hidden Blaze trap | Punishes door entry |
| Avoiding ARC detection | Block vision cone | Keeps the route quiet |
FAQ
What is the best secret mechanic in ARC Raiders?
The most useful all-around mechanic is Blaze Grenade trap clearing. Hidden traps are common in PvP rooms, and clearing them through walls or doors removes the defender's biggest advantage.
How do you stun a Bombardier in ARC Raiders?
Attach a Search Coil to the Bombardier's rear weak spot. If placed correctly, it can stun or disrupt the Bombardier for around 20 seconds.
Is the dual Level 1 Anvil trick worth using?
Yes, if you run Combat MK3 Flanking and can weapon-swap quickly. Two Level 1 Anvils can fire faster than a single higher-level Anvil and provide extra total shots.
How do you make a zipline disappear in ARC Raiders?
Place a Crash Mat under the zipline's lower anchor point before deploying it. After you ride the zipline, it disappears and enemies cannot follow.
Can you farm Close Scrutiny without risking gear?
Yes. Enter with no loadout, rush Combat Supplies, and use the Safe Pocket to secure blueprints or rare finds. You start weak, but the risk is almost zero.
Summary
These ARC Raiders secret mechanics matter because they solve real raid problems fast.
- Search Coil controls Bombardiers.
- Dual Anvils boost firing tempo.
- Blaze Grenades delete hidden traps.
- Snap Hook improves movement and handles small ARC.
- Crash Mat removes ziplines after escape.
- No-loadout Close Scrutiny gives low-risk blueprint farming.
- Hidden Blaze traps punish door pushes.
The best players squeeze value out of every item. That is the edge here: fewer fair fights, cleaner escapes, safer pushes, and more loot leaving with us.


The GGWTB Editorial Team features 10 full-time gaming editors and 23 specialist contributors, delivering hands-on tested walkthroughs, easter egg breakdowns, and game updates.
ELSA — who spearheads our in-depth COD: BLACK OPS 7, ARC Raiders guides, and patch notes—every guide is rigorously verified on live servers for accuracy.

Most Popular Posts
- ARC Raiders Update 1.42: Phantom Targets Farming Guide (Glitched Wasps, Rewards, Regional Conditions)
- ARC Raiders Hullcracker Blueprints: Fastest Way to Complete The Major's Footlocker
- ARC Raiders Best Pop Trigger Strategy: Fast Phantom Targets Damage Guide
- ARC Raiders Subway Skin Guide: Unlock the Subterranean Outfit
- ARC Raiders Looting Mk. 3 Survivor Blueprint Guide: Best Blue Gate Route and Drop Locations
- ARC Raiders Medium & Heavy Gun Parts Blueprint Guide: Best Farm Route, Locations, and Refiner Crafting
Popular Category Lists
- ARC Raiders / (354)
- Grow a Garden / (294)
- CoD: Black Ops 7 / (167)
- Star Citizen / (163)
- MLB 26 / (159)
- Monopoly Go / (153)
- ARK Survival Ascended / (128)
- Steal a Brainrot / (99)
- Blox Fruits / (74)
- Adopt Me / (74)
- Forza Horizon 6 / (72)
- Sailor Piece / (68)
- Grow a Garden 2 / (68)
- Diablo IV / (62)
- CoD: BLACK OPS 6 / (55)
- Aion 2 / (53)
- Path of Exile 2 / (48)
- Monster Hunter Wilds / (46)
- Windrose / (44)
- COD: Modern Warfare 4 / (43)






