



 0
0GGWTB Editorial Team - AISLING
Created: Jul 28,2026 | ARK Survival Ascended

GGWTB Editorial Team - AISLING
The Dreadmare is not a normal ARK tame. No knockout, no berries. It's a kill-then-ritual creature that rewards prep and punishes rushing.

Here's the full rundown: spawn locations, the altar loop, ability breakdown, and whether this paid DLC creature actually breaks the game's balance.
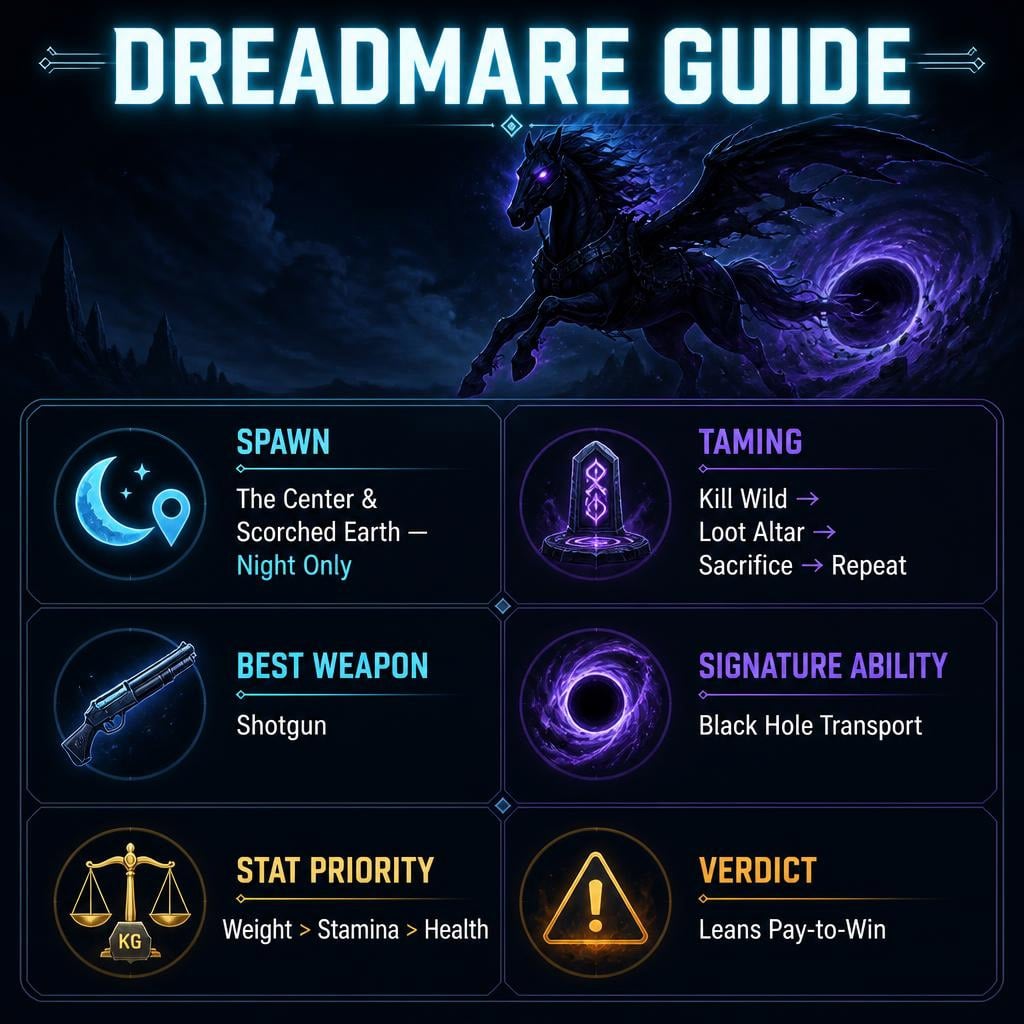
| Category | Details |
|---|---|
| Creature Type | Paid DLC fantasy flyer |
| Maps | The Center, Scorched Earth |
| Spawn Time | Night only |
| Taming Style | Kill wild → loot altar → sacrifice tributes → kill summons |
| Breedable | Yes |
| Signature Ability | Black Hole creature transport |
Its melee damage is unremarkable. Its value is mobility + utility + sustain rolled into one mount.
| Map | Location | Notes |
|---|---|---|
| The Center | Outer map regions, near obelisks | Wider tribute pool, more prep needed |
| Scorched Earth | Obelisk zones, open desert | Smaller, more predictable tribute list |
Search at night. Daytime searches will look empty even in active spawn zones — that's normal, not a bug.
Scout the area before engaging. You don't want to pull a wild Dreadmare into a pack of raptors.
| Stat | Base Value | Reality Check |
|---|---|---|
| Health | 1,250 | Below average — do not tank hits |
| Stamina | 600 | Massive — this is the whole point |
| Weight | 560 | Strong, and scales its transport capacity |
| Melee | Moderate | Abilities carry the fight, not attacks |
It flies like a Tapejara with multi-directional maneuvering and can dive-charge like a Rock Drake. Mobility is the stat that actually matters here.
A wild one is dangerous in packs or if you're underprepared — its abilities can turn a simple fight into a scramble. A high-quality shotgun is your best answer.
| Requirement | Why |
|---|---|
| Strong shotgun | Fast burst kills on summoned Dreadmares |
| 200+ shotgun shells | Higher levels = more summon cycles |
| Med brews (20+) | Fights get sloppy fast if under-healed |
| Boss tribute items | The altar pulls from the local boss pool |
| Remote taming spot | Keeps failed spawns away from your base |
Do not place the altar near your base. If the sacrifice timer expires, it can spawn the requested creature nearby — and that's not always a friendly one.
| Step | Action |
|---|---|
| 1 | Find + kill a wild Dreadmare at night |
| 2 | Loot the altar from its body |
| 3 | Move far from base, place altar |
| 4 | Wait for night, feed the requested tribute |
| 5 | Kill the summoned Dreadmare fast |
| 6 | Repeat until the final tame appears |
Higher-level Dreadmares need more cycles. A level 50 might take a couple of rounds; a level 150 will chew through your ammo stock.
Scorched Earth (easier — smaller pool):
The Center (bigger pool, prep harder):
| Item | Prep Tip |
|---|---|
| Therizino Claws | Farm packs in advance |
| Sarcosuchus Skins | Stockpile several |
| Allosaurus Brains | Hunt packs early |
| Titanoboa Venom | Bring swamp/cave gear |
| Tusoteuthis Tentacles | Most annoying — prep first |
Check an obelisk or supply drop for exact boss tribute requirements before you commit.
It circles overhead in a predictable path. Use that.
Clean, quick kills keep taming effectiveness high. Sloppy fights waste ammo and drop your progress.
| Ability | Trigger | Effect |
|---|---|---|
| Wind Blade | RMB hold + LMB | Ranged hit that heals you based on damage dealt |
| Fear (Terror Shield) | Ctrl + RMB | Fears nearby enemies — instant breathing room |
| Aura of Hate (Burn) | Ctrl + RMB variant | Burns nearby targets, then explodes; heals you |
| Black Hole Transport | Hold C on ally | Stores + moves an allied creature, inventory intact |
Slot-cap your Anky farming metal. Pull it into the black hole. Fly home. Drop it next to your forges.
No weight limit on the carry. No extra trips. This single ability rewrites your farming loop.
Carry capacity scales with the Dreadmare's Weight stat — level it aggressively if transport is your goal.
| Priority | Stat | Reason |
|---|---|---|
| 1 | Weight | Bigger Black Hole carry capacity |
| 2 | Stamina | Mobility is the whole kit |
| 3 | Health | Survivability buffer |
| 4 | Melee | Only after the above feel solid |
Skip melee-first builds. This creature wins through utility, not brawling.
PvE: near-mandatory quality-of-life upgrade. Fast travel, farming loop compression, easy escapes via Fear.
PvP: it can't grab players like a classic flyer, but mobility + sustain + logistics make it a real threat. The bigger issue isn't one fight — it's that owners farm faster and reposition faster across the whole server.
Straight answer: yes, it leans pay-to-win.
| Factor | Verdict |
|---|---|
| Farming efficiency boost | Massive (Black Hole) |
| Mobility advantage | High |
| Combat utility | Real (fear, burn, lifesteal) |
| Paid access only | Yes |
| Non-owners get equivalent? | No |
The problem isn't raw damage — it's that one paid creature stacks flyer + transport tool + combat sustain + disruption + breedable utility into a single package. That's a lot of jobs for one purchase.
It's fun. It's well-designed. It's also hard to call balanced.
| Mistake | Fix |
|---|---|
| Placing altar near base | Move to a remote open area |
| No tribute stockpile | Check obelisk requirements first |
| Weak weapon | Bring a strong shotgun |
| Daytime hunting | Spawns and rituals need night |
| Ignoring Weight | Kills your Black Hole utility |
The Center and Scorched Earth only, near obelisk regions and outer map zones, at night.
It can spawn the requested tribute creature nearby. Keep the altar far from your base — this can turn ugly fast.
A strong shotgun. The summoned Dreadmare circles predictably in the air, and shotgun burst damage punishes that pattern hard.
Yes. Black Hole transport moves allied creatures with their inventory intact, no weight penalty. Carry capacity scales with the Dreadmare's Weight stat.
In its current state, yes. It stacks farming efficiency, mobility, and combat utility into one paid creature that non-owners can't replicate.
The Dreadmare doesn't win fights through damage. It wins through time saved — faster farming, faster travel, faster escapes, and a Black Hole ability that erases weight limits on transport.
For PvE, it's close to essential once you understand the loop. For PvP, it's a mobility and logistics problem for everyone without one.
Prep your tributes, bring the shotgun, tame it far from home. Then let it carry your farming loadouts and never look back.
The GGWTB Editorial Team features 10 full-time gaming editors and 23 specialist contributors, delivering hands-on tested walkthroughs, easter egg breakdowns, and game updates.
Aisling — who spearheads our in-depth Monopoly Go, ARK Survival Ascended, Forza Horizon 6, Subnautica 2, Diablo IV guides, and patch notes—every guide is rigorously verified on live servers for accuracy.


Prepare for the ARK Survival Ascended Enigmasaur launch on November 6, 2026. Master the form-matching taming loop, ability retention rules, and cryo-prep strategy.

Learn the reported Magmasaur cryopod breeding trick, fix common failures, and check compatibility before moving breeders. Start with one eligible pair.
Compare Therizino and Mantis farming setups, avoid misleading yield claims, and measure Element per minute before spending resources on a replacement.
Follow Gargantar's taming cycle, prepare exact feeding sources, and troubleshoot swallowing, gear demands, and keratin rounds before risking valuable equipment.

Separate verified ARK patch mechanics from speculative leaks. Real data on the Therizinosaurus jump, Giga TLC status, and breeding baseline survival prep.
Check which DLC unlocks Cerberax and Gargantar, then follow the taming sequence for each. Includes prep checklists, failure points and a quick-reference table.

We use cookies to ensure website functionality and enhance your experience. Click "Accept All" to consent, or "Customize" to manage your preferences. See our Privacy Policy.


