


 0
0Fastest Ways to Get Safari Seed Packs in Grow a Garden: Proven Methods, Drop Rates
- Jordan
- Share
- Grow a Garden
- 11/10/25
- 844
You want Safari Seed Packs fast, reliably, and without wasting Graw a Garden pets or plants. The latest update quietly supercharged rewards in multiple systems, and that changes your optimal route. Below is a structured overview of how to stack the highest-odds methods—Safari Joe turn-ins, global event contributions, and smart shop buying—so your time pays out. Let's unpack the logic, the numbers, and the grind loops that actually work.
- Core Strategy at a Glance
- Method 1: Safari Joe Pet Turn-ins (Highest, Targeted Odds)
- Method 2: Global Event + Personal Contributions (Parallel Progress)
- Method 3: Safari Shop Timing (Guaranteed When Stocked)
- Grind Loop Blueprint: Put It All Together
- Data-Backed Expectations
- Common Mistakes and Fixes
- Priority Checklist
- FAQ
↖ Core Strategy at a Glance
The game now rewards higher pet value turn-ins more generously, while the global event adds parallel chances via personal milestones and a shop unlock. In practice, this means:
- You prioritize pet value 140 turn-ins with Safari Joe for the best multi-pack odds.
- You continuously feed the global event (especially during double-point mega harvests) for personal drops and to push the shop unlock.
- You watch the Safari Shop and buy immediately when the pack appears.
↖ Method 1: Safari Joe Pet Turn-ins (Highest, Targeted Odds)
This is where consistency meets math.
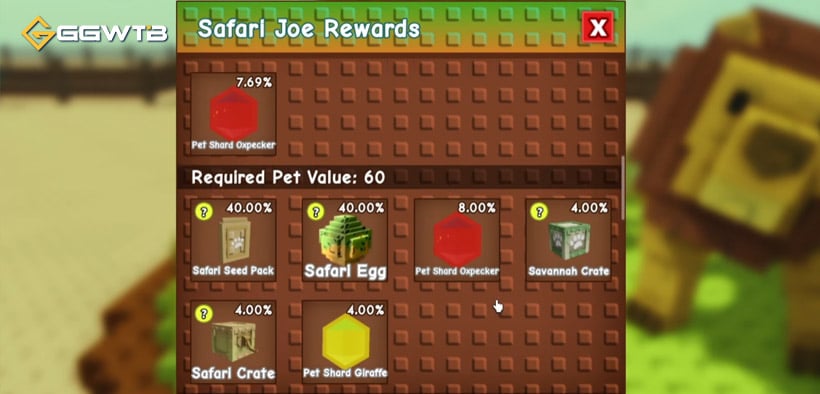
How it works
- Reward tiers scale with pet value.
- Example odds mentioned in the update:
- Pet value 0 → ~4.5% for a seed pack.
- Pet value 20 → ~10% for a seed pack.
- Pet value ~140 → 15% for a single-pack reward, plus access to multi-pack brackets:
- 30% chance to get 3 packs.
- 15% chance to get 4 packs.
Why this is your 1 route
- Unlike the shop's stock timing or personal reward RNG spikes, Safari Joe ties your odds to a controllable variable: pet value.
- Only at 140 do you unlock that 30% three-pack bracket, which dramatically improves packs-per-turn-in.
What to do (step-by-step)
1) Level pets before submitting.
- If your best pet is only ~40 value, hold; you're leaving multi-pack odds on the table.
2) Target 140 pet value for turn-ins.
- Command move: Queue several pets near 140 so you can chain turn-ins during your session.
3) Avoid rare/irreplaceable pets unless value justifies it.
- Keep your blood owl-tier rare saves if they're scarce in your roster.
4) Track results across 10–20 turn-ins.
- Use a simple sheet: value, outcome, packs gained. This makes your ROI obvious.
Risk control and pro tips
- Don't burn mid-value pets impulsively. Because the rewards scale, holding until 140 increases packs-per-pet markedly.
- If you're pet-poor, alternate with event farming (Method 2) while your pets level.
↖ Method 2: Global Event + Personal Contributions (Parallel Progress)
This keeps you earning while your pets level.
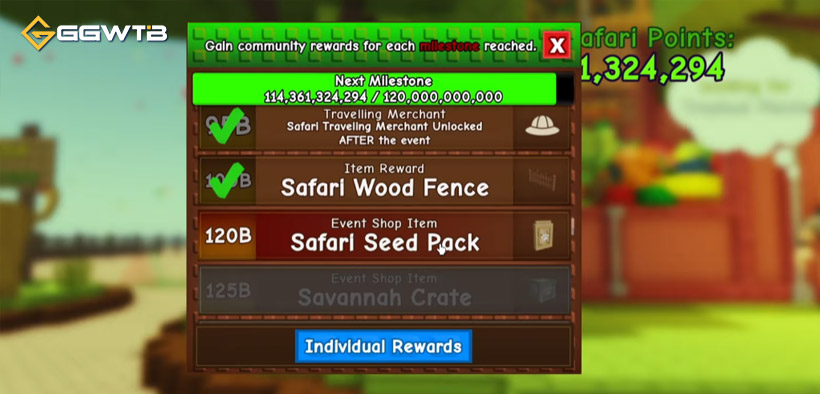
How it works
- Personal contribution rewards:
- 5% chance for 1 Safari Seed Pack.
- 1% chance for 3 Safari Seed Packs.
- Global progress unlocks the Safari Pack in the Safari Shop.
- Mega harvest windows give 2x contribution points.
Why it's valuable
- It's passive-friendly: you'd be harvesting anyway.
- Double-point windows accelerate both your personal RNG chances and the global unlock bar.
What to do (step-by-step)
1) Farm the correct category during the active boost.
- If the event calls for tropical, prioritize coconuts and similar categories. If you're unsure, test small batches and watch the progress bar response.
2) Submit during mega harvest for 2x points.
- If you notice a boost running, drop everything and dump inventory.
3) Use multiple save slots strategically.
- Load gardens with category-fitting plants to spike your submissions.
4) Monetize as you go.
- Sell overflow to bankroll sprinklers and upgrades that speed regrowth.
Practical cues from field play
- Coconuts often align with tropical; test and confirm by watching bar movement.
- Expect streaky RNG: you might pull watering cans (9% tier) back-to-back before packs roll in. That's normal variance—volume makes it even out.
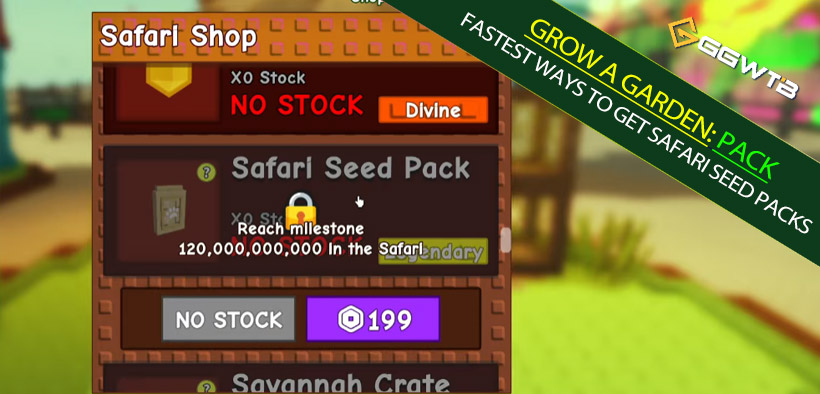
↖ Method 3: Safari Shop Timing (Guaranteed When Stocked)
No RNG once it's unlocked—just availability.
How it works
- Once the global event threshold is hit, the Safari Seed Pack gets added to the Safari Shop.
- You can buy it outright whenever it's in stock.
What to do (step-by-step)
1) Check the shop at session start and end.
2) Keep currency liquid.
- Selling inventory after submissions builds a buffer for instant buys.
3) Combine with Method 2.
- Your contributions help unlock the shop sooner; your shop buys then compound your total packs gained.
Why it matters
- Shop buys are the simplest, deterministic layer to stack on top of your Safari Joe pipeline.
↖ Grind Loop Blueprint: Put It All Together
- Pre-session
- Place Grandmaster Sprinklers to maximize regrowth for your next login.
- Identify which plants match the current event category.
- Session start
- Quick shop check for stock.
- Sweep your garden for category plants; fill inventory.
- Mid-session
- Submit during mega harvest (2x points) if active.
- Level pets in the background; avoid sub-140 turn-ins unless you're testing.
- Turn-in window
- Chain Safari Joe submissions with pets at 140 value to target 30% three-pack and 15% four-pack brackets.
- Cooldown
- Sell overflow, reinvest in sprinklers/upgrades, and prep the next batch.
↖ Data-Backed Expectations
- Sub-40 pet turn-ins: weak returns; mostly single-pack odds, lower %.
- ~140 pet value:
- 30% chance for 3 packs, 15% chance for 4 packs, plus other single-pack odds around 15%.
- This clusters your outcomes toward multi-pack wins and boosts packs/hour substantially.
- Personal event rewards:
- Treat 5% (1 pack) and 1% (3 packs) as bonus procs; rely on volume and double-point windows.
↖ Common Mistakes and Fixes
- Turning in pets too early
- Fix: Wait for ~140 to unlock the multi-pack brackets.
- Farming the wrong plant category
- Fix: Submit small test batches; if the event bar barely moves, switch crops.
- Ignoring mega harvest
- Fix: Keep an eye on the event UI; double points mean fewer runs for the same progress.
- Forgetting the shop
- Fix: Build a habit—check at start/end of each session.
↖ Priority Checklist
- Hit pet value 140 before Safari Joe turn-ins.
- Farm and submit the correct category, especially during double-point windows.
- Check Safari Shop regularly and keep funds ready.
- Use sprinklers for passive regrowth; rotate save slots for category coverage.
- Log results for 10–20 turn-ins to validate your ROI.
↖ FAQ
Q1: Is 40 pet value worth turning in?
- Only if you're testing the table or clearing inventory. The juice is at 140 value, where multi-pack odds unlock meaningfully.
Q2: I keep getting watering cans—am I doing something wrong?
- No. That's RNG. The solution isn't to stop, but to increase volume and time submissions with double-point windows while prepping 140-value pets.
Q3: How do I confirm a plant is tropical or event-matching?
- Submit a small batch and watch the event bar movement. If it jumps, you're aligned; if not, swap crops. Coconuts are a strong candidate when tropical is called.
Q4: What if the Safari Shop isn't unlocked yet?
- Contribute to the global event to push progress. Keep grinding; when it unlocks, buys are instant and stack with your Joe turn-ins.
Q5: Are rare pets safe to submit?
- If it's truly rare and irreplaceable, skip it unless it's your only path to 140. Use more common pets to hit the threshold and preserve your collection.
You'll move fastest by anchoring your grind around 140-value Safari Joe turn-ins, feeding the global event during 2x windows for parallel RNG procs, and snapping up stock from the Safari Shop the moment it appears. If you focus your pet leveling, align plant categories correctly, and keep your garden on a sprinkler cycle, your packs-per-hour will climb quickly.

Most Popular Posts
- Grow a Garden 2 Release Date Guide: Why Saturday Is the Likely Launch Window
- Grow a Garden Bizzy Bee Event: Honey Coins, Bee Eggs, Seeds, Upgrades, and Rewards
- Grow a Garden Bee Dungeon Guide: Best Wave 100 Strategy, Bee Shards, and Team Setup
- Grow A Garden Best Pet Mutations 2026: Ranked Guide for Power, Trading, and AFK Farming
- Grow a Garden Bee Stats Guide: Best Bees Ranked by Damage, HP, and DPS
- Grow a Garden Busy Bee Part 2 Guide: Royal Jelly, Best Pets, New Seeds, and Prep Strategy
Popular Category Lists
- ARC Raiders / (304)
- Grow a Garden / (286)
- CoD: Black Ops 7 / (166)
- MLB 26 / (152)
- Monopoly Go / (148)
- Star Citizen / (133)
- ARK Survival Ascended / (93)
- Steal a Brainrot / (92)
- Sailor Piece / (68)
- Forza Horizon 6 / (68)
- Diablo IV / (62)
- Blox Fruits / (62)
- Grow a Garden 2 / (59)
- Adopt Me / (58)
- CoD: BLACK OPS 6 / (55)
- Path of Exile 2 / (48)
- Monster Hunter Wilds / (46)
- Windrose / (44)
- Path of Exile / (40)
- Donut SMP / (37)


