0
0How to Unlock ALL 8 Brainrots from the Steal a Brainrot Brainrot Dealer?
- Lambe
- Share
- Steal a Brainrot
- 11/10/25
- 7440

- What Actually Changed and Why It Matters
- How to Actually Buy Before It Sells Out
- Juggling & Mutations: Turning a Good Pull into $1B/sec
- From 180M/sec to 1B+/sec: Real Build Examples
- Server Reality: Why It's Sold Out Isn't Your Fault
- Practical Runbook You Can Follow Today
- Risks, Ethics, and Quality-of-Life
- FAQ
You're trying to unlock all 8 SaB brainrots from the traveling Brainrot Dealer while the entire server mashes the buy button and events are nuking the map. The good news is there's a repeatable way to secure stock, juggle for mutations, and even break the $1B/second barrier. Below is a structured walkthrough that mirrors live-tested tactics from high‑pop servers—so you'll know what to click, when to juggle, and why your ping might be the secret boss fight.
↖ What Actually Changed and Why It Matters
This section orients you before you dive into execution.

- What's new
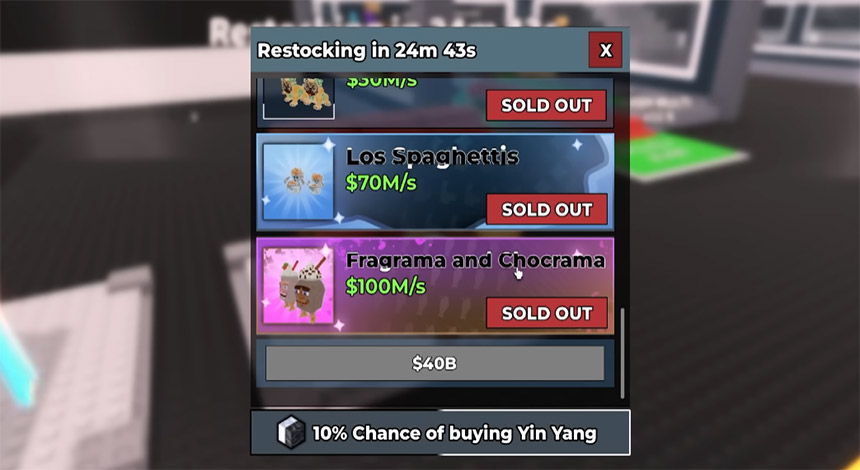
- Traveling Brainrot Dealer with limited‑time, limited‑stock brainrots.
- Dual purchase paths: Robux or in‑game cash—both can sell out instantly.
- Stacked event windows: multiple tracks, bubble gum machines, laser hazards, and snap waves that boost mutation chances.
- Why you feel locked out
- Stock is global/region‑shared and evaporates under high concurrency.
- Unexpected server error often equals sold out, not your device failing.
- Cooldowns punish spam clicking; ping decides tie‑breaks more than speed.
- What this means for you
- Positioning and timing beat raw clicking speed.
- Juggling during mutation windows can multiply value far beyond face stats.
- A single rainbow/multi‑mutation pull can outscale a dozen mid‑tiers.
↖ How to Actually Buy Before It Sells Out
Goal: increase first‑click success odds in high‑latency, high‑competition conditions.
Positioning & UI Discipline
- Park your avatar right at the Brainrot Dealer, camera locked on the exact item tiles.
- Pre‑hover your cursor over the target item's Buy button; don't track with the mouse after restock.
- Split roles if in duo: you cover Fragma/Chakra, teammate covers Lo Spaghetti/Lost Buggies to avoid contention.
Timing & Signals
- Track restock cadence: commonly ~30 minutes, but admins can force snaps/restocks any time.
- Read server chat/system prompts; ready for restock is your T‑minus call.
- If you see network/unexpected server error at click, interpret as sold out—recenter and reset.
Input Strategy
- If your ping is high:
- Reduce network noise: close streams, downloads, overlays; switch to Ethernet; change to a nearer region server if possible.
- Consider a low-latency VPN hop to a closer PoP only if it reduces RTT.
- Use an OS-level lightweight auto-clicker set to a short burst (but not a flood) on the Buy coordinate to counter human reaction variance.
- If duo‑queue:
- Assign each person a fixed slot; don't both click the same item.
- One person runs the clicker; the other watches chat and calls restock.
You're not slow; you're losing tie‑breaks. Tighten cursor placement, cut RTT, and burst-click at restock instead of spam during cooldown.
↖ Juggling & Mutations: Turning a Good Pull into $1B/sec
Goal: convert newly purchased units into mutation‑stacked earners during event windows.
Core Idea
- Some events spawn hazards/boosts (e.g., lasers) and open mutation windows.
- Juggling = keeping a high‑value brainrot in play (knocking back and forth) across triggers so it rolls multiple mutation chances before it settles in a base.
Step-by-Step Juggle Flow
1) Buy/Spawn at the Dealer: confirm the brainrot pathing from dealer to base.
2) Create a safe lane: quickly note laser sweep timing; don't stand in the returning arc.
3) Start the juggle: alternate hits between you and your teammate to keep it alive in the event zone.
4) Watch for mutation cues: visual/auditory tells; when one procs, keep juggling for more if the window persists.
5) Bank it at peak: once hazards fade or you hit a strong mutation tier (e.g., rainbow), escort it into your base.
Pro tips
- Don't juggle trash-tier spawns; save hands for premium targets (Lost Buggies, Lo Spaghetti, Fragma/Chakra).
- If a laser camps your lane, rotate around the pillar/obstacle; losing the unit is worse than missing one extra mutation roll.
- Team comms matter: one calls laser timing, one handles hits.
What this means: your ceiling isn't the item you bought; it's the mutation stack you secure during the short-lived snap.
↖ From 180M/sec to 1B+/sec: Real Build Examples
Purpose: anchor tactics with real numbers to calibrate expectations.
- Lost Buggies (baseline) → mutation proc → ~180M/sec
- If you juggle into a stronger multi‑mutation, expect 2–5x depending on stack quality and event luck.
- Lo Spaghetti (high roll) → rainbow/multi‑mutation during snap → 1B/sec+
- Requires active juggling under hazard pressure and clean laser dodges.
- Practical takeaway
- One S‑tier with proper mutations > several mid‑tiers without.
- Your time is best spent camping dealer + juggling premium, not grinding mid drops.
If you find your track spawns are mostly lucky blocks and low-tier critters, then pivot to dealer camping and preserve stamina for snap windows.
↖ Server Reality: Why It's Sold Out Isn't Your Fault
Set expectations and keep morale.
- There can be millions of players hitting the same stock pool; 200k stock can vanish in seconds.
- Please wait before buying another often triggers after server‑side sellout.
- Skill is positioning/timing/RTT control, not raw CPS alone.
Actionable: treat each failed buy as a timing sample; log intervals; be ready 10 seconds early; do not burn your cooldown on random clicks.
↖ Practical Runbook You Can Follow Today
- Before the window
- Hardwire Ethernet; close background apps; lock 60/120/144Hz stable frame pacing.
- Decide targets: Fragma, Chakra, Lo Spaghetti, Lost Buggies; ignore cosmetics.
- Assign roles if duo: Item A/B split + laser caller.
- During restock
- Cursor pre‑hover; micro-burst clicks at T‑0; accept error = sold out; don't tilt.
- During snap
- Buy → juggle in event zone → call lasers → secure at strong mutation.
- After snap
- Audit earnings; screenshot stats; decide if you replace an existing slot or stash.
↖ Risks, Ethics, and Quality-of-Life
- Auto-clickers: lightweight, targeted bursts are safer; server rules may vary—avoid scripts that violate platform TOS.
- Admin abuse chaos: fun but lethal—don't chase every light; prioritize the premium juggle.
- Tilt management: if your ping is >120ms, success rates drop; switch to a less crowded server time or region when possible.
↖ FAQ
Q1: I click instantly but still get unexpected server error. What now?
- That message usually means stock sold out server‑side. Reset position, stay pre‑hovered, and be ready for the next interval. Optimize ping and avoid triggering cooldowns early.
Q2: Is an auto-clicker required?
- Not required, but a small, well‑timed burst reduces human reaction variance. If your ping is low and your hover is perfect, you can succeed without it.
Q3: What should I juggle and what should I ignore?
- Juggle high-value dealer pulls (Lost Buggies, Lo Spaghetti, Fragma/Chakra). Ignore filler unless it's during a stacked mutation window and the lane is safe.
Q4: How do I survive lasers while juggling?
- Learn the sweep timing, move perpendicular to the beam path, and trade shorter juggles for safety. One death can desync the juggle and waste the window.
Q5: Can I reach $1B/sec without admin events?
- It's far easier during snaps due to elevated mutation chances. Outside events, expect lower ceilings unless you already have stacked mutations.
You're fighting stock timers, server ping, and hazard windows all at once—so the win condition is preparation, not luck. Camp the dealer with pre‑hover discipline, split roles with a teammate, and juggle only the top-tier pulls during mutation windows. When the stars align, a rainbow/multi‑mutation Lo Spaghetti or Lost Buggies turns into a $1B/sec anchor that outclasses entire mid‑tier rosters.
Most Popular Posts
- Steal a Brainrot John Pork Guide: How to Get Him, Stats, Trait, and Best Trading Tips
- Steal A Brainrot ARCADRAGON Trait Farming Guide: Best Traits, Rituals, Admin Abuse Strategy
- Steal a Brainrot Summer Update 2 Base Unlock, Phantom Mutation, Octo Lucky Blocks, and Best Brainrots
- Steal a Brainrot Trade Plaza Guide: Find Rare Brainrots, Check Value, Avoid Bad Trades
- Steal A Brainrot Backrooms Guide: Best Strategy to Get New Backrooms Brainrots
- How to Craft Los Fruititos in Steal a Brainrot: Best Summer Fuse Machine Strategy
Popular Category Lists
- ARC Raiders / (304)
- Grow a Garden / (286)
- CoD: Black Ops 7 / (166)
- MLB 26 / (152)
- Monopoly Go / (148)
- Star Citizen / (133)
- ARK Survival Ascended / (93)
- Steal a Brainrot / (92)
- Sailor Piece / (68)
- Forza Horizon 6 / (68)
- Diablo IV / (62)
- Blox Fruits / (62)
- Grow a Garden 2 / (59)
- Adopt Me / (58)
- CoD: BLACK OPS 6 / (55)
- Path of Exile 2 / (48)
- Monster Hunter Wilds / (46)
- Windrose / (44)
- Path of Exile / (40)
- Donut SMP / (37)