


 0
0Grow a Garden Pets Trading Guide: Tokens Value Tiers List and Flipping Strategy
- Cecila
- Share
- Grow a Garden
- 01/12/26
- 2374
The market in Grow a Garden didn't just move after the recent Seal and Koi nerf—it fundamentally re-priced. In Trade World, we are seeing a distinct separation: older, harder-to-get Grow a Garden pets are sprinting upward in value, while useful but common pets are creeping up much slower. Crucially, the displayed average prices in-game are now lagging significantly behind real asks.
If you are trying to trade based on last week's numbers, you are likely frustrated. You see an average price of X, but every seller demands Y. To fix this, we need to unpack a value list that you can actually use while hopping servers, negotiating, and deciding whether to level pets or flip them. We have combined our market analysis with a practical speedrun strategy to help you navigate this inflated economy without burning your budget.
- 1. The New Pricing Reality: Why Average is Dead
- The Pricing Glossary
- 2. The Master Value List (S to E Tiers)
- S-Tier & A-Tier: The High Value Spikes
- B-Tier: Utility & Volatility
- C & D Tier: The Moveable Middle
- E-Tier Tier: The Budget Fillers
- 3. The 30-Minute Trading System
- Defining Cheap (So You Don't Waste Money)
- The 3-Minute Hop Rule
- 4. Practical Buying Plans
- Plan A: The Store-of-Value Hunter (Budget: 800+)
- Plan B: The Utility Player (Budget: 100–300)
- Plan C: The Scrap Flipper (Budget: <100)
- FAQ
- Summary
↖ 1. The New Pricing Reality: Why Average is Dead
Before we look at the numbers, we must establish a consistent way to read the market. The biggest mistake players make right now is quoting the in-game average price to a seller who knows the market has spiked.
↖ The Pricing Glossary
To trade successfully, we distinguish between three metrics:
- Fair Price: What we can realistically complete trades at with some patience.
- Ask Price: What sellers commonly demand right now (often inflated due to hype).
- Trend: Whether a pet is rising, stable, or spiking based on post-nerf scarcity.
Why averages mislead you: Averages are backward-looking. If the market for a Kitsune jumps 200 tokens this week, the average calculation still includes last week's cheaper trades. This means you should negotiate starting from the Fair price, but you may need to budget near the Ask price if you need the item immediately.
↖ 2. The Master Value List (S to E Tiers)
Below is a structured list built from current price points. Use this as your server-hopping cheat sheet: we aim for Fair, we expect Ask, and we decide to hold or sell based on the Trend.
↖ S-Tier & A-Tier: The High Value Spikes
These pets have seen the most aggressive repricing. Holding them is generally safer than selling too early.
| Tier | Icon | Pet | Fair Tokens | Ask Tokens | Trend & Strategy |
|---|---|---|---|---|---|
| S |  | Kitsune | 800+ | 1,000 | Strong Hold. The average (~677) lags hard. If you find one <800, it's a steal. |
| S |  | Raccoon | 800+ | 1,000 | Strong Hold. Sellers rarely accept the average (~642). Scarcity is driving this up. |
| A |  | Fennec Fox | ~300 | 300+ | Rising. Moved up from the 200–250 range. Hard to find under 300. |
| A |  | Disco | ~250 | 250+ | Stable/High. The average (~221) underestimates real asks. |
↖ B-Tier: Utility & Volatility
This tier contains the most useful pets. Prices fluctuate heavily based on seller patience.
| Tier | Icon | Pet | Fair | Ask Tokens | Trend & Strategy |
|---|---|---|---|---|---|
| B |  | Ruby Squid | 150–200 | 200 | Utility Blue-Chip. Very useful. Priced for utility rather than just rarity. |
| B |  | Frost Dragon | ~150 | 200–300 | Overpriced. Sellers ask 300, but fair deals exist at 150 if you hop servers. |
| B |  | French Ferret | 100–150 | 150–200 | Confusing. Prices vary wildly based on weight/roll stats. Don't overpay for standard ones. |
| B |  | Corrupted Kitsune | 100–130 | 150 | Hype. Often overpaid due to mutation hype, despite lower utility. |
| B |  | Krampus | ~100 | 100+ | Slow Climb. Rose from ~80 to ~100. |
↖ C & D Tier: The Moveable Middle
These are critical for flipping. Liquidity is key here—buy only if you know it sells.
| Tier | Pet | Fair Tokens | Ask Tokens | Notes |
|---|---|---|---|---|
| C | Chimera | ~100 | 100+ | Fair is 100, but can be found for 80 from impatient sellers. |
| C | Wendigo / Ice Golem | 80–100 | ~100 | Niche utility. Good buys if you manage hunger mechanics well. |
| C | Mummy | 80–100 | 100+ | Climbed from ~60 due to chest size utility. |
| D | New Year's Dragon | 120–130 | 130+ | Surprisingly pricey given supply; averages lag behind. |
| D | Spinosaurus | 120–130 | 130+ | Volatile. Whiplashed from 70 back to over 100. |
| D | Phoenix / Hydra | 60–80 | 80 | Perceived as low utility. Harder to resell at high asks. |
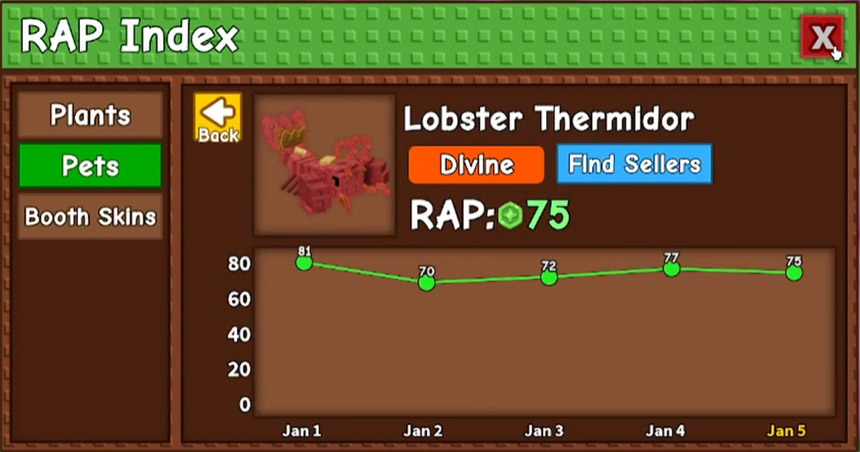
| D | Lobster (Mutation) | ~30 | ~70 | TRAP WARNING. Big gap between value and ask. Risky buy. |
| D | T-Rex | ~60 | 100 | Rising tide effect. Fair deals require hunting. |
| D | Mimic Octopus | 40–50 | ~50 | High supply means better bargaining power for buyers. |
↖ E-Tier Tier: The Budget Fillers
Best for small flips (buy for 5, sell for 15).
| Tier | Pet | Fair Tokens | Ask Tokens | Notes |
|---|---|---|---|---|
| E | Butterfly | ~30 | 40 | Top of E tier. |
| E | Lion | 20–30 | 30 | Recipe relevance (Chimera) props up the value. |
| E | Carnival Elephant | ~20 | 20+ | Rarely drops below 20 in practice. |
| E | Diamond Panther | 10–15 | 15–20 | Low demand due to ability; average price is actually accurate here. |
| E | Tiger / Koi / Eagle | 10–15 | 20 | Sellers reach for 20, but 10–15 is the real trade value. |
↖ 3. The 30-Minute Trading System
Knowing the prices is only half the battle. In an inflated market, the winner isn't the loudest seller—it's the player who buys with a system. We have tested a speedrun approach (using a small wallet of ~371 tokens) to see what actually works.
↖ Defining Cheap (So You Don't Waste Money)
If we don't strictly define cheap, we waste time staring at fair prices. We use two definitions:
1. Discount Cheap (For known value): A listing is a buy only if it is ≥20% below the Fair Price listed above.
Example: A Ruby Squid at 150 is fair, not cheap. We skip it. A Ruby Squid at 120 is a buy.
2. Flip Cheap (For clutter): A listing is a buy if it is priced so low (1–5 tokens) that we can resell it for a small profit even if nobody really wants the pet.
Example: A Wasp for 1 token is an instant buy because you can always find someone to pay 5–10.
↖ The 3-Minute Hop Rule
Time is your real currency. When we analyzed our trading runs, the biggest loss came from staying in bad servers. We use a strict loop:
Minute 0–1: Load in. Scan Rarity Descending to check for mispriced high-tiers (Kitsune, Raccoon).
Minute 1–2: Scan Price Ascending to check for 1–5 token steals (Shroomi, common clutter).
Minute 3: If nothing meets our Cheap definition, hop immediately.
Do not stay in Pro Servers. If you see a server full of high-weight pets and premium listings, leave. That is a server optimized for sellers, not buyers. You want Mixed or Newbie-heavy servers where pricing mistakes happen.
↖ 4. Practical Buying Plans
Different players have different goals. Pick the plan that matches your wallet.
↖ Plan A: The Store-of-Value Hunter (Budget: 800+)
Target: Kitsune, Raccoon.
Rule: If you find one <800, treat it as a rare window. If the ask is 1,000, only buy if you plan to hold for weeks.
Why: These assets are sprinting upward. You are protecting your wealth against inflation.
↖ Plan B: The Utility Player (Budget: 100–300)
Target: Ruby Squid, Mummy, Wendigo.
Rule: Take Ruby Squid at 150. Take Mummy under 90. Take Wendigo at 80–90 only if you can manage the hunger mechanic.
Why: You get immediate gameplay utility and a liquid asset you can sell later.
↖ Plan C: The Scrap Flipper (Budget: <100)
Target: Shroomi, Wasp, Peacock, Lion.
Rule: Buy clutter for 1–5 tokens. Buy mid-low tiers (like Lion) only if they are under 20.
Why: Liquidity beats theory. A Wasp bought for 1 token and sold for 8 is an 800% profit. This builds your bankroll faster than waiting for one big snipe.
↖ FAQ
Q: Why are Kitsune and Raccoon selling for 1,000 when the average says ~600?
The nerf changed the token economy and scarcity perception faster than the pricing data could update. Sellers anchor to the newest high trades, not the historical average. If you find one near the average, it is likely a mistake by the seller.
Q: Is the Lobster worth 70 tokens?
Generally, no. This is a value trap. Sellers ask ~70 because of the mutation potential, but the real utility value is closer to ~30. Unless you have a specific buyer lined up, you risk holding a bag that nobody wants to buy.
Q: How do I negotiate without wasting time?
Keep it short. If a seller is asking an inflated price, say: I can do X right now, instant trade. Speed is valuable to sellers. If you see two of the same pet at different prices, tell the expensive seller: Same pet is listed at Y right next to you. Match it and I buy.
Q: Why does it feel like there are no cheap pets anymore?
Because the market has re-priced. What you remember as cheap (e.g., Fennec Fox at 200) is gone. Cheap now means finding a Fennec at 280 when everyone asks 320. You must adjust your baseline or you will never make a trade.
↖ Summary
The post-nerf market in Grow a Garden* rewards discipline over luck. When you treat the average price as historical data rather than current reality, you stop losing trades.
To succeed now, follow this system:
1. Respect the Re-pricing: Accept that S-tiers are 800+ and mid-tiers have crept up.
2. Filter Ruthlessly: Use the Fair vs. Ask table to spot real deals.
3. Hop Frequently: Spend max 3 minutes per server. Avoid Pro servers where prices are optimized.
4. Buy Liquidity: In the lower tiers, only buy pets that you can resell instantly (like Lion or cheap clutter).
Cheap pets still exist, but they don't look like they used to. Keep your rules tight, ignore the average column, and let other players pay the impatience tax.

Most Popular Posts
- Grow a Garden 2 Release Date Guide: Why Saturday Is the Likely Launch Window
- Grow a Garden Bizzy Bee Event: Honey Coins, Bee Eggs, Seeds, Upgrades, and Rewards
- Grow a Garden Bee Dungeon Guide: Best Wave 100 Strategy, Bee Shards, and Team Setup
- Grow A Garden Best Pet Mutations 2026: Ranked Guide for Power, Trading, and AFK Farming
- Grow a Garden Bee Stats Guide: Best Bees Ranked by Damage, HP, and DPS
- Grow a Garden Busy Bee Part 2 Guide: Royal Jelly, Best Pets, New Seeds, and Prep Strategy
Popular Category Lists
- Grow a Garden / (286)
- ARC Raiders / (266)
- CoD: Black Ops 7 / (166)
- Monopoly Go / (146)
- MLB 26 / (145)
- Star Citizen / (116)
- Steal a Brainrot / (89)
- ARK Survival Ascended / (74)
- Sailor Piece / (68)
- Forza Horizon 6 / (63)
- Diablo IV / (61)
- Blox Fruits / (60)
- CoD: BLACK OPS 6 / (55)
- Adopt Me / (53)
- Path of Exile 2 / (48)
- Monster Hunter Wilds / (46)
- Windrose / (44)
- Grow a Garden 2 / (42)
- Path of Exile / (40)
- Bee Swarm Simulator / (36)


