0
0Monopoly GO Hogwarts Racers (Jan 7–Jan 12): Start/End, Rewards, and Win Rank#1 Guides
- Aisling
- Share
- Monopoly Go
- 01/07/26
- 2318
Monopoly Go Hogwarts Racers isn't a spin and pray minigame - it's a resource-and-timing event wearing a racing costume. When I place well, it's rarely because I got lucky; it's because I treated Flags like a budget, saved my push for the right race, and avoided the classic mistake of burning everything on Day 1.
- Event Time
- Final Ranking Rewards (Granted After Event Ends)
- The Practical Strategy Guide
- Build a Team You Can Predict, Not Just a Team You Like
- What I do (experience-based)
- Why this works
- If-then trigger
- Treat the 25-Hour Team-Up Phase Like a Flag-Printing Window
- Where flags typically come from
- A real play pattern I use
- Don't Blow All Flags Early; Budget Them Across Races (Especially Race 3)
- My budgeting rule (simple and effective)
- If-then trigger
- Common trap (A vs B)
- Lap Rewards: Pick What You Need, Not What Looks Shiny
- My selection order
- Why this works
- If-then trigger
- Dice Popper Multiplier: Control Variance Like a Pro
- How I actually set it
- A practical example from my runs
- Simple Race Day Checklist I Follow
- FAQ
- 1) When do final ranking rewards arrive?
- 2) Should I always save flags for Race 3?
- 3) Is switching teams worth it?
- 4) What's the safest multiplier strategy?
- Summary
Below is a clean time-zone breakdown (so you don't miss the window), the final ranking rewards, and the exact playbook I use to stay competitive without turning my dice inventory into a crime scene.
↖ Event Time
Here are the Event Start and End Times into major time zones.
| Time Zone | Start | End |
|---|---|---|
| UTC / GMT (UTC+0) | 2026-01-07 17:00 | 2026-01-11 19:55 |
| US Pacific (PST, UTC-8) | 2026-01-07 09:00 | 2026-01-11 11:55 |
| US Eastern (EST, UTC-5) | 2026-01-07 12:00 | 2026-01-11 14:55 |
| Central Europe (CET, UTC+1) | 2026-01-07 18:00 | 2026-01-11 20:55 |
| Japan (JST, UTC+9) | 2026-01-08 02:00 | 2026-01-12 04:55 |
| India (IST, UTC+5:30) | 2026-01-07 22:30 | 2026-01-12 01:25 |
| Sydney (AEDT, UTC+11) | 2026-01-08 04:00 | 2026-01-12 06:55 |
What this means in practice:
if you're in the Americas, this event effectively starts on Jan 7 locally, and ends mid-day on Jan 11.
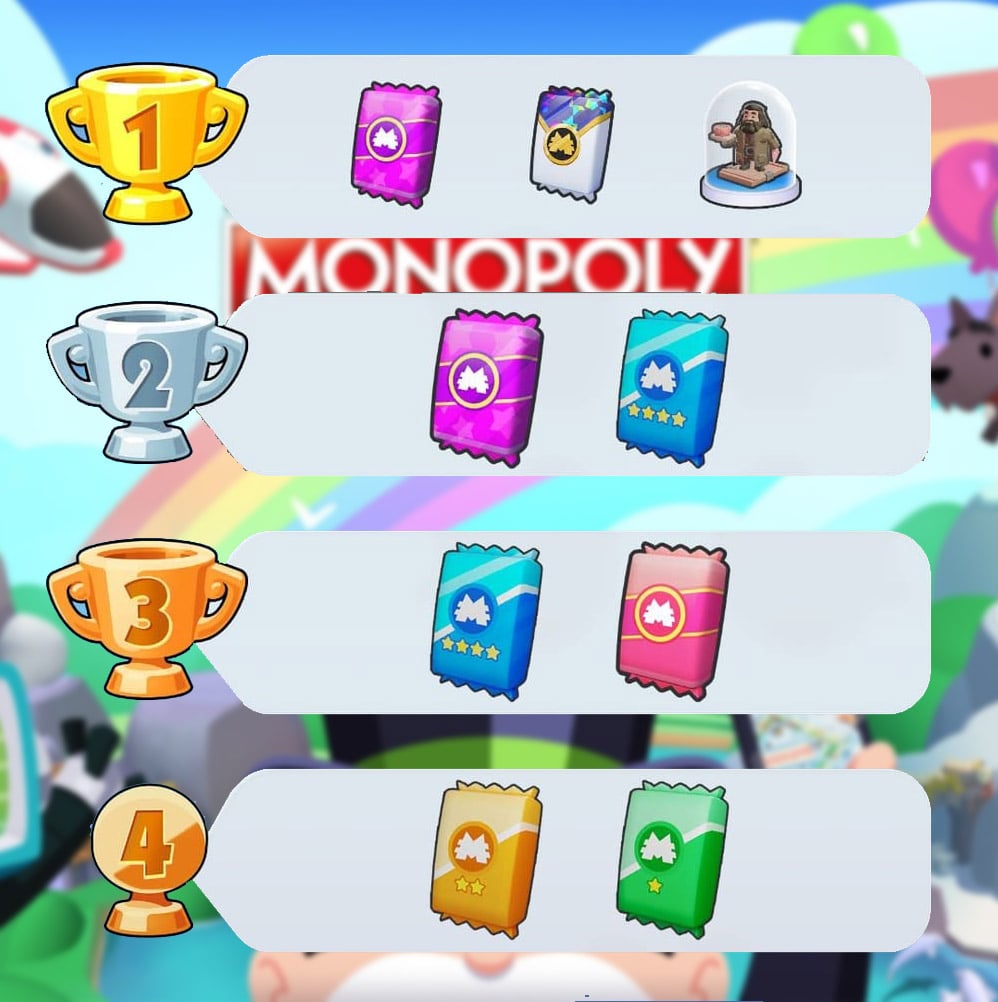
↖ Final Ranking Rewards (Granted After Event Ends)
These rewards land once the event ends, so the smartest strategy is the one that maximizes your final placement—not the one that makes you feel ahead early.
| Placement | Rewards |
|---|---|
| 1st | 5-star sticker pack + 4-star sticker pack + exclusive new tokens |
| 2nd | 4-star sticker pack + 3-star sticker pack |
| 3rd | 3-star sticker pack + 2-star sticker pack |
| 4th | 2-star sticker pack + 1-star sticker pack |
↖ The Practical Strategy Guide
Before the five tips, here's the core mental model I use:
- Flags are your fuel.
- Races are your spending windows.
- Race 3 is your leverage point (because medal rewards are doubled).
- Multipliers are your risk dial (they change variance more than people admit).
Now let's make that actionable.
↖ Build a Team You Can Predict, Not Just a Team You Like
A strong team isn't only high level; it's reliability under time pressure.
↖ What I do (experience-based)
I aim for teammates who:
- will be online during at least two overlapping windows with me
- respond fast enough to coordinate a push (even just save flags for Race 3)
- don't disappear after the first hype hour
Because here's the ugly truth: a single inactive teammate can force the rest of the team into panic-spending to compensate.
↖ Why this works
If your team's flag spending is unsynchronized, you waste the biggest advantage Racers gives you: planned bursts. That's not motivational talk—it's math. A coordinated push concentrates points when it matters most.
↖ If-then trigger
If you notice someone is silent and not contributing early, then treat it as a forecasting signal and switch during the team-up phase instead of hoping they wake up.
↖ Treat the 25-Hour Team-Up Phase Like a Flag-Printing Window
The team-up phase is your setup stage. I play it like a scavenger sprint.
↖ Where flags typically come from
- Board play (landing outcomes + progression)
- Tournaments
- Quick Wins
- Store gifts (small, but take them)
Here's how I prioritize it.
| Source | What I do | Why it matters |
|---|---|---|
| Tournaments | I push until rewards taper off | Best flag density when you're already rolling |
| Quick Wins | I complete all, early | Guaranteed flags with low dice risk |
| Board play | I roll when I can chain value | Flags + cash + progression stack together |
| Store gifts | I claim on timer | Free flags are still flags |
↖ A real play pattern I use
During that ~25-hour setup window, I do short sessions rather than one long binge. When I tested this across multiple events, the short-session approach reduced my oops, I wasted dice chasing nothing moments—because I'm more likely to stop when the board turns cold.
↖ Don't Blow All Flags Early; Budget Them Across Races (Especially Race 3)
Flags feel like use me now, but they're actually use me at the right time.
↖ My budgeting rule (simple and effective)
I split my total flags into:
- Baseline spending for each race (to avoid falling hopelessly behind)
- A reserved chunk for Race 3, because medal rewards are doubled there
| When | Flag plan | What it means |
|---|---|---|
| Race 1–2 | Spend enough to stay competitive | You're buying position, not trying to win the war yet |
| Race 3 (double medals) | Spend the most | Your flags convert into the most meaningful progress |
| Race 4 (if applicable) | Spend based on standings | If you're ahead, defend; if behind, choose your battles |
↖ If-then trigger
If you're already leading comfortably after Race 3, then I switch to defensive spending: smaller bursts to block overtakes rather than chasing record laps.
↖ Common trap (A vs B)
- A: Emptying flags in Race 1 feels powerful.
- B: Saving for Race 3 is how you flip final standings when others run out of fuel.
If you've ever ended an event thinking I started so strong, then collapsed, this is usually why.
↖ Lap Rewards: Pick What You Need, Not What Looks Shiny
Lap rewards are deceptively important because they shape your next 12–24 hours.
↖ My selection order
1. Flags (when I'm behind or when Race 3 is coming)
2. Dice (when the board/tournament is hot and I can multiply value)
3. Stickers (when I'm stable and placement looks safe)
↖ Why this works
Choosing flags or dice is basically choosing future attempts. Stickers are a payoff, but flags/dice are how you earn the payoff. That's why I usually pick economy first—unless I'm already locked into a placement.
↖ If-then trigger
If you find you're constantly short on flags right before a race, then prioritize flags in lap rewards until that problem disappears.
↖ Dice Popper Multiplier: Control Variance Like a Pro
This is the quiet skill gap in Racers. Multipliers don't just change your average points; they change your volatility.
↖ How I actually set it
- Low multiplier when I want consistent scoring and I'm protecting a lead
- Higher multiplier when I need a swing to catch up (and accept risk)
| Situation | Multiplier approach | Reason |
|---|---|---|
| Protecting a lead | Low / steady | Reduces variance; fewer catastrophic whiffs |
| Middle of the pack | Medium | Balanced risk-return |
| Must catch up fast | High | You're buying comeback odds, not stability |
↖ A practical example from my runs
When I'm 2nd/3rd late and the gap is meaningful, I'll take controlled high-multiplier attempts in short bursts. If it hits, I climb. If it misses, I stop early instead of rage-spending the rest of my dice.
That last part matters: risk is fine; uncontrolled tilt is expensive.
↖ Simple Race Day Checklist I Follow
This is the checklist I keep in my notes so I don't overthink mid-event.
| Phase | My checklist |
|---|---|
| Team-up | Lock a reliable team, farm flags from tournaments + quick wins |
| Race 1 | Spend enough to avoid falling too far behind |
| Race 2 | Match the lobby pace; don't drain reserves |
| Race 3 | Push hardest (double medals), coordinate timing if possible |
| Late game | If leading: defend with low variance. If behind: take calculated high-variance shots |
↖ FAQ
↖ 1) When do final ranking rewards arrive?
Final ranking rewards are granted once the event ends (not after each race).
↖ 2) Should I always save flags for Race 3?
If you're trying to maximize final placement, then yes—Race 3 is the best leverage point because medal rewards are doubled.
If you're at risk of being eliminated from contention early, then spend enough in Race 1–2 to stay within striking distance.
↖ 3) Is switching teams worth it?
If you notice inactivity or mismatched schedules during team-up, then switching is usually correct. A nice but absent teammate costs more than you think, because it forces everyone else into inefficient spending.
↖ 4) What's the safest multiplier strategy?
If you're already ahead, then low multiplier is safer because it reduces variance.
If you're behind late, then higher multipliers can be justified—but only in controlled bursts.
↖ Summary
Hogwarts Racers rewards players who plan, not players who sprint blindly. I treat flags like a budget, build a team I can predict, and save my biggest push for Race 3 where the medal value spikes. If you copy only one idea from this guide, make it this: spend to stay alive early, then spend to win at the right moment.
Most Popular Posts
- Monopoly GO The Simpsons Album: Sets, Stickers, Rewards, Dates & Best Strategy
- Monopoly Go Golden Blitz Event (Ever After Season): Schedule, Gold Stickers & Best Trades
- Monopoly GO Villainous Partners Event: Schedule, Rewards, and Best Strategy
- Monopoly GO Gingerbread Partners Event Guide: Event Time, Rewards, Tokens, and Best Strategy
- Monopoly GO Simpsons Partners Event (June 12): Rewards, Start Time, Milestones, and Best Strategy
- Monopoly GO Springfield Partners Event (June 30): Rewards, Start Time, Best Strategy
Popular Category Lists
- Grow a Garden / (286)
- ARC Raiders / (262)
- CoD: Black Ops 7 / (166)
- Monopoly Go / (146)
- MLB 26 / (144)
- Star Citizen / (112)
- Steal a Brainrot / (89)
- Sailor Piece / (68)
- ARK Survival Ascended / (67)
- Diablo IV / (61)
- Forza Horizon 6 / (60)
- Blox Fruits / (60)
- CoD: BLACK OPS 6 / (55)
- Adopt Me / (53)
- Path of Exile 2 / (48)
- Monster Hunter Wilds / (46)
- Windrose / (44)
- Path of Exile / (40)
- Grow a Garden 2 / (40)
- Bee Swarm Simulator / (36)