


 0
0ARC Raiders Stella Montis Guides: Medical Research Fastest Farming Blueprints
- KITE
- Share
- ARC Raiders
- 01/07/26
- 1036
Stella Montis has two problems that feed each other: it's easy to get lost, and it's easy to waste time. If you're farming blueprints, those two issues are basically the same issue - every wrong hallway is one less high-value container you touch, which means fewer ARC Raiders blueprints per hour.
So I built a routine that fixes both at once. First, I navigate the map using a small set of anchors (instead of trying to memorize every room). Then I use those anchors to run a tight blueprint loop: empty loadout, Lobby + Medical Research, prioritize specific container types, and reset the moment a blueprint drops. With repeated sessions, my normal good day outcome is around 7–8 blueprints per 30 minutes - roughly one blueprint every 4–5 minutes, RNG willing.
- 1) The Two Systems You Need Work Together
- 1.1 Navigation System
- 1.2 Blueprint System
- 2) Fast 10-Second Orientation
- 2.1 Visual cues I trust in real raids
- 2.2 My rule: don't memorize the map—memorize the loops
- 3) The Holy Trinity Anchor: Medical → Assembly → Loading Bay
- 3.1 Why this triangle is the best anchor
- 3.2 Navigation cheat sheet
- 4) Extract Loops: Metro vs AirShaft (Pick Based on Pressure)
- 4.1 Metro: fast, central, often contested
- 4.2 AirShaft: usually calmer, sometimes longer
- 4.3 Extract choice table (speed vs safety)
- 5) Blueprint Farm: Why Lobby + Medical Research Is the Sweet Spot
- 5.1 Lobby is a blueprint coverage zone
- 5.2 Medical Research complements the pool
- 6) Container Priority: What I Loot First (and What I Skip)
- 7) The Speed Trick: Default Slots vs Extra Slot Scanning
- 7.1 Why slot scanning saves real minutes
- 7.2 Don't worship the heuristic
- 8) The 30-Minute Blueprint Loop
- 8.1 The loadout rule: empty (or near-empty)
- 8.2 Per-raid objective: 2–5 minutes, then end
- 8.3 Late raid protocol: quick lottery, then reset
- 9) Real Results and What to Expect
- 10) Risk Management: How to Keep the Route Zero Economic Risk
- 10.1 The #1 trap: staying after a blueprint
- 10.2 ARC interference: pass, don't fight
- 10.3 Noise discipline: quiet routes are faster routes
- FAQ
- 1) Is this really zero risk if I can get killed?
- 2) I keep getting lost—what's the first thing to memorize?
- 3) When should I choose AirShaft over Metro?
- 4) I'm not getting blueprints—what am I doing wrong?
- 5) Can I do this if I'm bad at PvP?
- 6) Day raids or night raids for this loop?
- Summary
↖ 1) The Two Systems You Need Work Together
↖ 1.1 Navigation System
Because Stella Montis is dense and multi-level, I'll just explore turns into aimless laps. The fix is a zone-and-floor correspondence mindset:
- Identify your zone quickly.
- Move through known connectors that reliably return you to your core loop.
- Choose an extract route based on current pressure.
This means you stop guessing—and guessing is where most time dies.
↖ 1.2 Blueprint System
Blueprint farming is a throughput game:
- How many top-tier containers can you touch per minute?
- How fast can you end a run once you hit a blueprint?
That's why I go in empty and reset aggressively. Dying is annoying, but it isn't costly—and that changes how fast you can play.
↖ 2) Fast 10-Second Orientation
Before you sprint, do this once per raid. It prevents the classic two wrong doors spiral.
↖ 2.1 Visual cues I trust in real raids
- Medical / Med Research: blue-lined walls, clinical layout.
- Metro: train tracks, station feel, long sightlines.
- Cultural Archives: storage/library vibes, corridor-heavy.
- Lobby: mixed civilian/residential feel, central connectors.
If you spawn and immediately hear footsteps or shots, then assume close spawns and stop playing on autopilot. Stella Montis spawns are tight.
↖ 2.2 My rule: don't memorize the map—memorize the loops
Instead of remembering Room X connects to Room Y, I remember:
- Which zones feed into my main triangle
- Which routes reach Metro or AirShaft without crossing the loudest lanes
That's enough to stay efficient under pressure.
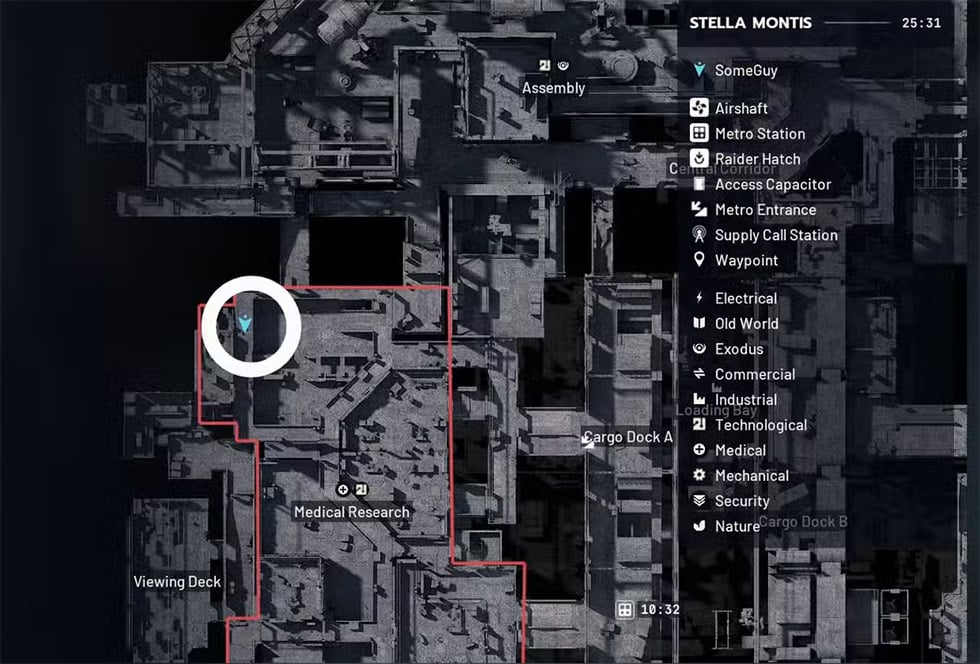
↖ 3) The Holy Trinity Anchor: Medical → Assembly → Loading Bay
This triangle is my home base. If I can return to it, I'm never truly lost.
↖ 3.1 Why this triangle is the best anchor
- Multiple entrances/exits = fewer hard traps
- Easy vertical options (stairs/ropes/ziplines)
- Natural access to both major extracts (Metro and AirShaft)
In practice, if one doorway becomes unsafe (players holding it, bots stacking it), you rotate through the other side of the triangle and keep the tempo.
↖ 3.2 Navigation cheat sheet
| From | To | Fast connector | Noise level | Use it when |
|---|---|---|---|---|
| Medical outskirts | Assembly | Side door route (avoid loud breaches) | Low–Medium | You want access without advertising |
| Assembly | Loading Bay | Stairs up | Medium | You need a fast rotate/reposition |
| Loading Bay | Med Research | Follow the blue-walled corridor line | Low–Medium | You want meds/augment boxes or a flank |
| Loading Bay | Metro | Down toward tracks/station connectors | Medium–High | You're extracting or rotating central |
| Sandbox side | AirShaft | Side-room bypass + sprint + door control | Low–Medium | Metro feels hot, you want a calmer exit |
Key takeaway: you always want two ways to reach the same destination. Redundancy is what keeps you alive and efficient.
↖ 4) Extract Loops: Metro vs AirShaft (Pick Based on Pressure)
↖ 4.1 Metro: fast, central, often contested
Metro is a hub. Hubs attract people. People attract third parties.
- If it sounds quiet and you're not carrying much, Metro is often the quickest clean exit.
- If it's loud, then Metro can become a time sink.
↖ 4.2 AirShaft: usually calmer, sometimes longer
AirShaft is my I want to leave without drama option.
If you're being chased, then close doors behind you. That simple habit buys you an absurd amount of time on Stella Montis because pathing and room density break pursuit lines.
↖ 4.3 Extract choice table (speed vs safety)
| Extract | Best for | Risk profile | My default choice when… |
|---|---|---|---|
| Metro | Quick exit, central re-orient | Higher player traffic | I hear little/no fighting nearby |
| AirShaft | Safer exit under pressure | Longer travel if far | Metro is spicy or I'm being hunted |

↖ 5) Blueprint Farm: Why Lobby + Medical Research Is the Sweet Spot
↖ 5.1 Lobby is a blueprint coverage zone
Lobby packs several container ecosystems into one dense area:
- Raider-style containers → weapon/parts blueprint chances
- Residential containers (bins/suitcases/trash) → attachment blueprint chances
- Augment containers (augment boxes) → augment blueprint chances (and sometimes parts)
- Stella Montis has a map-wide blueprint pool (grenades/mines) that can roll across many container types
This means you're not farming one blueprint type—you're farming the intersection of multiple blueprint pools.
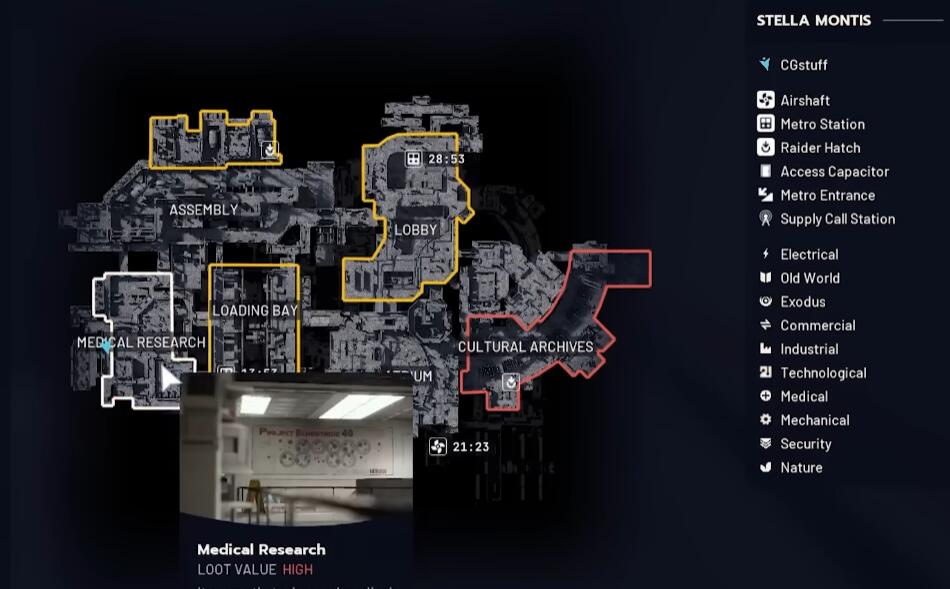
↖ 5.2 Medical Research complements the pool
Medical Research adds:
- Medical containers → medical blueprint chances
- More augment boxes → another roll at augment/parts
So the loop becomes: Lobby for volume + variety, Medical Research for medical coverage + re-rolls.
↖ 6) Container Priority: What I Loot First (and What I Skip)
This is the table that keeps my blueprint/hour high.
| Container Type | Best blueprint outcomes | Priority | Fast rule of thumb | Time cost |
|---|---|---|---|---|
| Augment containers (augment boxes) | Augments, sometimes parts, plus map-wide explosives pool | Very High | Baseline item count is common; an extra slot often signals blueprint/key/special | Low |
| Residential (bins, suitcases, trash) | Attachments + map-wide explosives pool | High (on-path) | If it looks fatter than usual, slow down and verify | Medium |
| Raider-style (bags, weapon cases, ammo/grenade cases) | Weapons + gun parts | High (clustered) | Hit clusters; don't detour for singles | Medium |
| Medical containers | Medical blueprints | Medium (High if you need medical) | Only elevate if you're missing medical prints | Medium |
| Random outliers | Unreliable | Low | Detours kill your blueprint/minute | High |
If you want one sentence to remember: augment boxes first, then whatever you can loot without breaking your line.
↖ 7) The Speed Trick: Default Slots vs Extra Slot Scanning
↖ 7.1 Why slot scanning saves real minutes
Many container types tend to drop a consistent number of items most of the time. When you open one and see an extra item slot, that extra often correlates with:
- a blueprint
- a key
- another special item
This matters because it changes your behavior. You don't read loot, you scan → decide → move.
↖ 7.2 Don't worship the heuristic
Loot systems are messy. Sometimes a container rolls odd (low-value defaults, weird counts). Use slot scanning as a time-saving bias, not a law—especially if you're doing normal raids rather than blueprint sprints.
↖ 8) The 30-Minute Blueprint Loop
↖ 8.1 The loadout rule: empty (or near-empty)
Because:
- Death doesn't cost you gear.
- Resets are painless.
- You stop hesitating.
↖ 8.2 Per-raid objective: 2–5 minutes, then end
Each raid, I do three things:
1. Commit immediately to Lobby or Medical Research based on spawn.
2. Touch as many priority containers as possible (augment boxes first).
3. End the raid the moment I hit a blueprint:
- If extract is fast and quiet, I extract.
- If extract costs time or feels risky, I reset.
If you find yourself reorganizing inventory mid-run, you're losing the race against your own clock.
↖ 8.3 Late raid protocol: quick lottery, then reset
If you load in and doors are open and the route looks picked clean, do this:
- Hit only your best 3–6 container spots
- If nothing drops, reset immediately
Instead of spending 10 minutes confirming the raid is empty, you spend 60–90 seconds proving it and moving on.
↖ 9) Real Results and What to Expect
Across repeated sessions using this combined navigation + farming approach, my typical result is:
- ~7–8 blueprints per 30 minutes
- Rough pace: ~1 blueprint every 4–5 minutes (RNG swings are real)
I've had sessions slowed by:
- late spawns
- getting shot by players while empty
- ARC pressure (bots forcing detours)
But because the loop is short and resets are cheap, those bad runs don't destroy the hour.
↖ 10) Risk Management: How to Keep the Route Zero Economic Risk
↖ 10.1 The #1 trap: staying after a blueprint
If you catch yourself:
- detouring for single containers
- clearing extra rooms just in case
- staying to see what else I get
you've turned a sprint into a marathon. The fix is brutal and effective: leave on blueprint.
↖ 10.2 ARC interference: pass, don't fight
You don't need clean fights; you need clean movement.
- If you can route around bots, route around.
- If you must cross, watch attack rhythms and go on the gap.
- If something sticks to you, change line—don't duel it for pride.
Empty loadout makes pragmatism easy.
↖ 10.3 Noise discipline: quiet routes are faster routes
Breaching and loud engagements pull people in. If your goal is blueprints and traversal, staying quiet means fewer interruptions—and fewer interruptions means more containers per minute.
↖ FAQ
↖ 1) Is this really zero risk if I can get killed?
It's zero economic risk, not invincible. You're removing the gear-loss downside and shrinking the time-loss downside by keeping raids short and resets fast.
↖ 2) I keep getting lost—what's the first thing to memorize?
Memorize the Medical–Assembly–Loading Bay triangle, plus one path to Metro and one path to Air Shaft. That gives you a reliable home base and two exits.
↖ 3) When should I choose AirShaft over Metro?
If you hear sustained fighting near Metro or suspect campers/third parties, AirShaft often feels calmer. If time is critical and it's quiet, Metro is faster.
↖ 4) I'm not getting blueprints—what am I doing wrong?
Usually one of these:
- You're detouring too much (low container touches per minute)
- You're staying in late/looted raids too long
- You're not ending runs immediately after a blueprint
Tighten the loop to 2–5 minutes and your rate typically improves.
↖ 5) Can I do this if I'm bad at PvP?
Yes. If you hear footsteps or gunfire, then rotate off the line and preserve time. The method avoids PvP by design: fast routes, high-density container hits, and resets.
↖ 6) Day raids or night raids for this loop?
For blueprint volume with lower stress, day raids are usually more consistent. Night raids can be higher pressure and may skew attachment outcomes upward, but your movement tax is higher.
↖ Summary
Stella Montis becomes manageable when you run it like a system: identify your zone, return to the Medical–Assembly–Loading Bay anchor, choose Metro or AirShaft based on pressure, then execute a strict Lobby + Medical Research blueprint loop. Pair that navigation backbone with container priority and fast resets, and your blueprint farming stops feeling like luck and starts feeling like throughput.

Most Popular Posts
- ARC Raiders Riven Tides Key Room Guide: Best Hotel Keys, Loot Routes, Secure & Crane Storage
- ARC Raiders Damage Fireflies Trial Guide: Best Farm Method on Buried City Night Raid
- ARC Raiders Riven Tides Update: New Map & Items, ARC Turbine, Rewards, and Best Early Strategy
- ARC Raiders Bettina Guide: Best Build, Buffs, and How to Use It Against ARC
- ARC Raiders Solo Search Supply Drops Guide: Best Buried City Route, Beacon Locations
- Arc Raiders Season 4 Riven Tides Update, Rewards, Safe Skins, and Release Timeline
Popular Category Lists
- Grow a Garden / (286)
- ARC Raiders / (263)
- CoD: Black Ops 7 / (166)
- Monopoly Go / (146)
- MLB 26 / (145)
- Star Citizen / (113)
- Steal a Brainrot / (89)
- ARK Survival Ascended / (70)
- Sailor Piece / (68)
- Forza Horizon 6 / (61)
- Diablo IV / (61)
- Blox Fruits / (60)
- CoD: BLACK OPS 6 / (55)
- Adopt Me / (53)
- Path of Exile 2 / (48)
- Monster Hunter Wilds / (46)
- Windrose / (44)
- Path of Exile / (40)
- Grow a Garden 2 / (40)
- Bee Swarm Simulator / (36)


