0
0Monopoly GO Sticker Treasures (Oct 12): Minimum Pickaxe Strategy, Rewards, and Pro Tips
- Aisling
- Share
- Monopoly Go
- 10/09/25
- 1032
If you only remember one thing about the Oct 12 Monopoly GO Sticker Treasure Hunt, make it this: your pickaxes are your real currency. You'll dig across 20 levels of grids, chasing treasures that unlock premium rewards—5-star 6 Stickers Pack, a Wild Sticker, and a Swap Pack—while converting leftover pickaxes into dice at a 1:3 rate. The trick isn't just to win; it's to win efficiently. That means understanding how many pickaxes you need, where to dig first, and when to stop.
- How the Event Works
- The Grand Prize
- Levels and Rewards
- The Core Strategy: Minimum Pickaxe Logic
- Example Scenarios from Practice
- When to Stop Digging
- Reward Targeting and Value Math
- Day-One Plan for Oct 12
- Common Mistakes to Avoid
- My Field Notes
- FAQ
- Summary

↖ How the Event Works
- - You start with 4 pickaxes. You'll earn more through regular gameplay (rolls, milestones, tournaments).
- - There are 20 levels total, with cumulative dice rewards of 1,500.
- - Any pickaxe you don't spend converts to 3 dice at the end. That conversion rate is generous enough to change how you play.
Every unnecessary dig is a triple loss—lost pickaxe, delayed level completion, and fewer end-of-event dice. If you can guarantee treasures with fewer digs, you capture more value twice: earlier level rewards and more leftover dice.
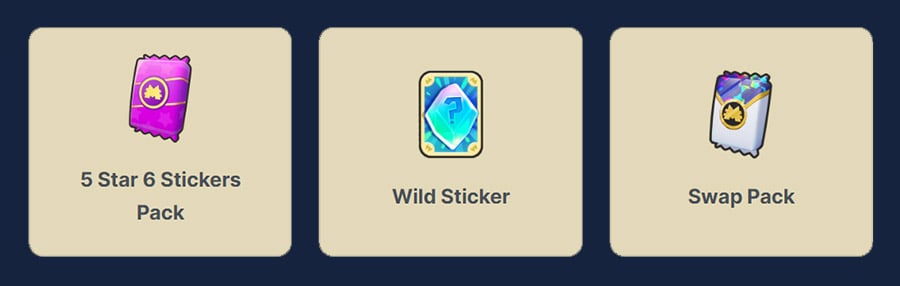
↖ The Grand Prize
Here are the main rewards you can earn during the treasure hunt:
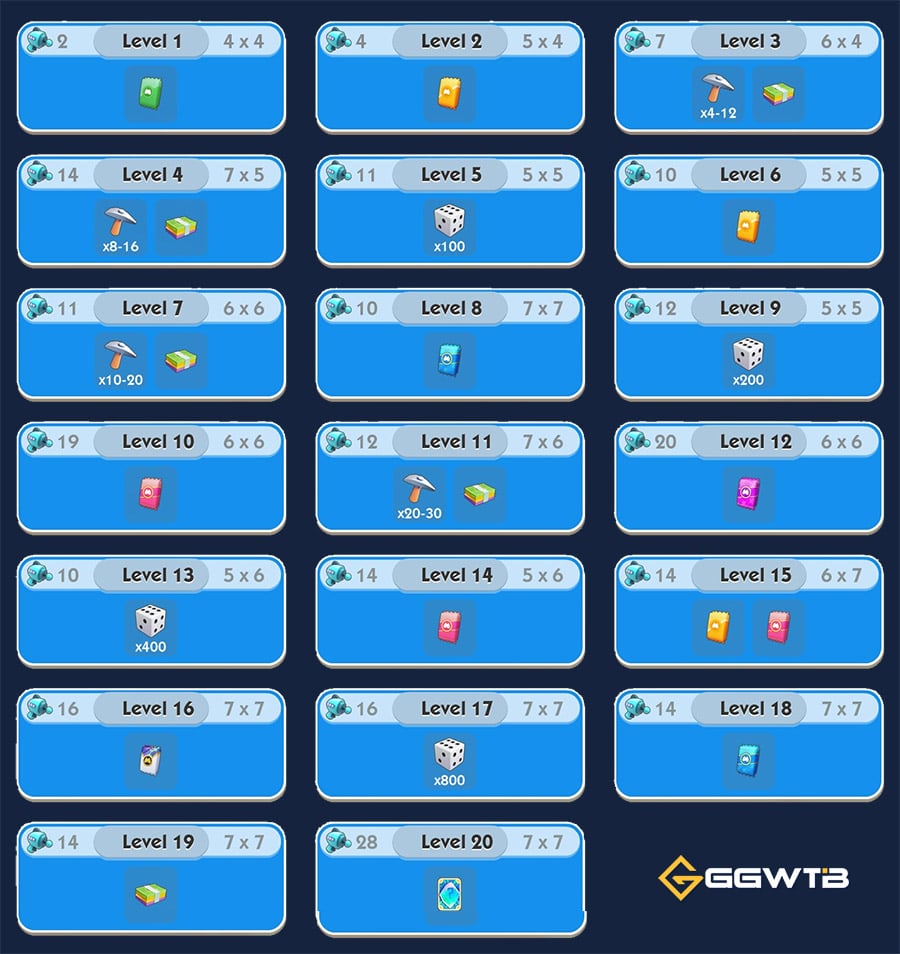
↖ Levels and Rewards
Full breakdown of each level, including grid size, minimum pickaxes required, and rewards for completion:
↖ The Core Strategy: Minimum Pickaxe Logic
- The treasure distribution per grid is limited; you don't need to dig every tile. Your goal: cover the grid with the fewest informed digs.
- Think in coverage, not luck. On small grids, a perimeter-first sweep reduces uncertainty fast; on larger grids, switch to pattern-based probing.
- Practical rule of thumb I use:
- Small grids (e.g., 3x3, 4x4): start with corners and mid-edges. This gives maximal adjacency info.
- Medium grids (e.g., 5x5): checkerboard probing (every other tile) to sample the map, then collapse on likely zones.
- Large grids (6x6+): two-phase—line-scan (every second cell in two rows and two columns), then cluster finish.
Edges and corners have fewer neighbors, so each dig resolves more uncertainty per pickaxe.
↖ Example Scenarios from Practice
- - 4x4 grid: I typically secure all treasures in 6–8 picks using a two corners + two mid-edges → center inference path. If early hits are cold, I escalate to checkerboard at 50% density.
- - 5x5 grid: A 13-tile checkerboard probe (alternating tiles) often reveals 70–80% of target zones. I then spend 3–5 finishing picks for a 16–18 total. If you hit 3 cold rows in a row, pivot to column bias.
- - 6x6 grid: Start with 6-row line scans (every other tile in rows 2 and 5) plus two column scans (columns 2 and 5), about 16 picks to map hotspots, then 6–8 to finish. Expect 20–24 total if treasure density is low.
If you find 2 treasures within 4 adjacent probes, assume local clustering and finish the block before expanding; this avoids over-probing elsewhere.
↖ When to Stop Digging
- - If your next dig is purely blind and you've already secured the level's completion reward, stop. Those pickaxes convert to dice at 3:1 later.
- - If you're one dig away from clearing a level milestone (extra dice or a premium pack), continue; milestone value > 3 dice in most cases.
- - If you notice your hit rate dropped below 20% over the last 5 picks, pause and reassess pattern; forced digging is worse than saving for conversion.
↖ Reward Targeting and Value Math
- - Headliners: 5★ x6 Stickers Pack, Wild Sticker, Swap Pack. These are your collection accelerators.
- - Total dice reward: 1,500 across 20 levels. If each leftover pickaxe gives 3 dice, saving even 10 pickaxes is a 30-dice swing—roughly equivalent to a small tournament push or a mini-burst in events.
- - If you're chasing album completion, Wild Sticker > Swap Pack in immediate value; if your set is 1–2 stickers short and you have an active trading group, Swap Pack can overtake value.
- - Personal benchmark: I aim to bank 8–15 leftover pickaxes by the end. In past hunts with similar rules, that amounted to 24–45 bonus dice, enough to tip a leaderboard.
↖ Day-One Plan for Oct 12
- - Step 1: Spend initial 4 pickaxes on edge-corner probes to map quickly; don't chase a dry center early.
- - Step 2: Play normally to earn pickaxes; spend in batches of 10–15 for better pattern reading.
- - Step 3: For each level, set a soft cap: “If not complete by X picks, stop and carry over.” X grows with grid size but stays conservative.
- - Step 4: Prioritize levels with milestone rewards that align with your goals (dice if you chase events today; stickers if album season is closing).
- - Step 5: Final 12 hours: convert-heavy mindset—only dig where the probability is favorable; otherwise, bank for 3-dice conversion.
↖ Common Mistakes to Avoid
- - Full-clearing every grid for satisfaction. Fun, but expensive. You only need the treasures, not the map.
- - Spending pickaxes one by one as you earn them. Batch spending lets you detect patterns and reduces variance.
- - Ignoring diminishing returns. If two patterns fail, change the probing method; don't double down on a dry zone.
- - Forgetting the conversion. Ending with zero pickaxes is often worse than ending one milestone short.
↖ My Field Notes
- On earlier hunts, a corner-first + checkerboard hybrid consistently saved me 3–6 pickaxes per mid-size level.
- I track hit rate per 5 digs. If it drops below 20%, I switch zones or stop. This alone improved my leftover conversion by ~30%.
- The best value spike tends to be one level before the final tier; don't blow your bank too early if the top reward is locked behind a sharp pickaxe ramp.
↖ FAQ
Q: Do I need to clear all tiles to finish a level?
A: No. You only need the treasures. Anything beyond that is wasted picks unless a milestone requires full reveal (rare).
Q: How many pickaxes should I hold for the end?
A: Aim for 8–15 if you can. That's 24–45 dice, which is meaningful for event chaining.
Q: Is the Wild Sticker worth chasing over the 5★ pack?
A: Usually yes, if you're missing a specific card; the Wild Sticker is flexible. If you need multiple high-rarity cards, the 5★ x6 pack can be better per-card.
Q: What if I have bad luck on a large grid?
A: Switch from edge-first to line-scan or checkerboard, then collapse on hot zones. Set a hard stop to preserve conversion value.
Q: Should I spend pickaxes immediately on Oct 12?
A: Use the initial 4 to scout one level, then save in batches. Better read, better returns.
↖ Summary
Treat pickaxes as a convertible currency: either they earn you treasures now or turn into dice later at a strong 3:1 rate. If you probe edges first, use checkerboard or line scans on larger grids, and set stop rules, you'll beat the average dig cost per level and walk away with the marquee rewards—plus a tidy pile of leftover dice to fuel your next push.

Most Popular Posts
- Monopoly GO The Simpsons Album: Sets, Stickers, Rewards, Dates & Best Strategy
- Monopoly Go Golden Blitz Event (Ever After Season): Schedule, Gold Stickers & Best Trades
- Monopoly GO Villainous Partners Event: Schedule, Rewards, and Best Strategy
- Monopoly GO Gingerbread Partners Event Guide: Event Time, Rewards, Tokens, and Best Strategy
- Monopoly GO Simpsons Partners Event (June 12): Rewards, Start Time, Milestones, and Best Strategy
- Monopoly GO Springfield Partners Event (June 30): Rewards, Start Time, Best Strategy
Popular Category Lists
- Grow a Garden / (286)
- ARC Raiders / (277)
- CoD: Black Ops 7 / (166)
- MLB 26 / (149)
- Monopoly Go / (148)
- Star Citizen / (127)
- Steal a Brainrot / (90)
- ARK Survival Ascended / (84)
- Sailor Piece / (68)
- Forza Horizon 6 / (66)
- Diablo IV / (62)
- Blox Fruits / (61)
- Adopt Me / (56)
- CoD: BLACK OPS 6 / (55)
- Grow a Garden 2 / (53)
- Path of Exile 2 / (48)
- Monster Hunter Wilds / (46)
- Windrose / (44)
- Path of Exile / (40)
- Bee Swarm Simulator / (37)