0
0Steal a Brainrot Ban Hammer Mastery and Acquire Guide & Hidden Mechanics
- Jordan
- Share
- Steal a Brainrot
- 01/09/26
- 1428
The Ban Hammer is the undisputed king of area control in Steal a Brainrot. Whether you are looking to defend a rare brainrot or simply want to clear a path through a crowded server, this admin-style gear offers a level of power that few other items can match. It isn't just a weapon; it is a statement. When that lightning strikes, everyone in the vicinity knows who is in charge.

We have spent the last few weeks dissecting every mechanic of this tool—from the official purchase route to a complex UI exploit that has been circulating in 2026. This guide will walk you through how to get it and, more importantly, how to use it to stay at the top of the leaderboard.
- How to Acquire the Ban Hammer?
- Method 1: The Official Route
- Method 2: The 2026 UI Glitch (Experimental)
- Mastering the Mechanics: Lightning and Knockback
- The Power of the Charge
- The Hidden Jump Attack
- Tactical Strategies for Dominance
- FAQ: Everything You Need to Know
- Summary
↖ How to Acquire the Ban Hammer?
There are currently two ways to add this legendary item to your arsenal. One is straightforward, while the other requires the precision of a surgeon.

↖ Method 1: The Official Route
For those who want immediate access without the risk of a patch breaking their progress, the shop is the way to go.
1. Open the Shop and navigate to the Gear section.
2. Purchase the Ban Hammer for 1499 Robux.
3. Once purchased, it remains a permanent part of your inventory, ready to be deployed at any time.
↖ Method 2: The 2026 UI Glitch (Experimental)
If you are starting with a fresh account and zero Robux, I have successfully tested a sequence that tricks the game's transaction handler. Warning: This requires exact execution.
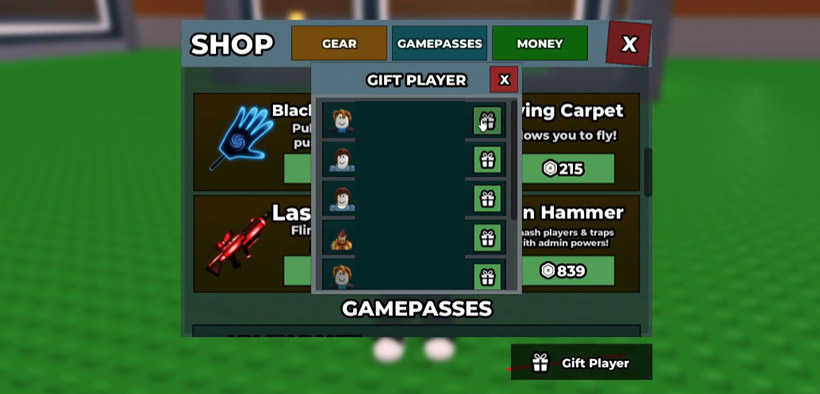
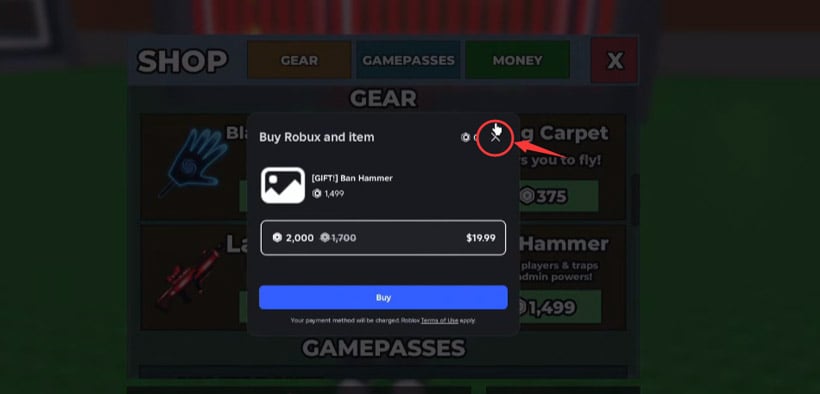
The UI Prime: Open the shop, select Gift Player, and click on the Ban Hammer. Immediately hit the X button. Repeat this, but the second time, click Back instead of the X.
The Physical Trigger: Hold a standard Brainrot item in your base. While holding it, walk to the center strip and attempt to buy a different item. This creates a logic overlap.
The Reset Sequence: Reset your character. Go to the shop and click on a high-value item (like the Flying Cup), then close it. Return to your base, sell your Brainrot, and stand on a neighbor's "Lock Base" trigger before resetting again.
The Final Validation: Lock your own base (wait for the cooldown if necessary). Go to the Index, scroll to the Rainbow section, and click the very last icon. Finally, go to the Coin Shop and click on an item you cannot afford.
The Critical Wait: After performing these steps, you must stay in the server for 20 minutes, then leave and stay offline for 2 hours. This allows the server-side cache to refresh with the glitched item status.
↖ Mastering the Mechanics: Lightning and Knockback
Getting the hammer is only half the battle. To use it effectively, you must understand the "Charge and Release" system.
↖ The Power of the Charge
Unlike basic slaps, the Ban Hammer requires patience. If you simply tap the attack button, the explosion will be underwhelming. You need to hold the attack for 3 to 4 seconds.
Why does this matter? Because the size of your impact zone scales with time. You should watch the circle on the ground; when it turns bright blue, you have reached maximum output. This is the moment to release.
↖ The Hidden Jump Attack
In my testing, I discovered that the most effective way to use the Ban Hammer is from the air. If you activate the hammer while jumping—or better yet, jumping from a ledge—the explosion radius is significantly larger than a ground-based strike.
| Attack Type | Radius | Knockback Force | Best For... |
|---|---|---|---|
| Quick Tap | Small | Low | 1v1 Self-defense |
| Grounded Charge | Medium | High | Defending a doorway |
| Jump Attack | Massive | Extreme | Clearing the Belt / Group Fights |
↖ Tactical Strategies for Dominance
If you find yourself being swarmed by players near the belt, do not panic. Use these advanced tactics to maintain control:
Anticipate the Rush: If you see a group heading toward your rare brainrots, start charging your hammer before they enter your base. By the time they reach the loot, your circle will be blue and ready to detonated.
Zoning: You don't always have to fire. Sometimes, simply standing near the belt with a yellow or blue charging circle is enough to scare off potential thieves. This is psychological zoning.
The High-Ground Drop: Always look for verticality. Jumping from a higher platform and releasing a fully charged strike mid-air makes you nearly untouchable while maximizing the splash damage.
↖ FAQ: Everything You Need to Know
Is the glitch permanent?
Glitches are subject to game updates. While it works in the current 2026 build, the official 1499 Robux purchase is the only 100% guaranteed permanent method.
Why did my hammer not appear after the 2-hour wait?
The most common reason is failing the "Base Lock" step. The game must register a successful state change (locking your base) while the UI is glitched for the exploit to save.
Can multiple players use the Ban Hammer at once?
Yes, but be careful. If two players drop lightning at the same time, the knockback forces can cancel each other out or send you flying in an unintended direction.
↖ Summary
The Ban Hammer is more than just a flashy gear item; it is the ultimate tool for anyone serious about defending their territory in Steal a Brainrot. Whether you use the precision of the UI glitch or the reliability of the shop, mastering the 4-second blue charge and the jump attack will make you a nightmare for your opponents. Timing is your greatest weapon—wait for the blue flash, and let the lightning do the rest.
Most Popular Posts
- Steal A Brainrot Cyber Update Guide: Best Craft Recipes, Rainbow Chances, Traits, and Profit Tips
- How to Get Every Steal a Brainrot Cyber Craft Brainrots?
- How to Unlock DUGGY BROS in Steal a Brainrot: Best Red Carpet and Crafting Strategy
- Steal a Brainrot John Pork Guide: How to Get Him, Stats, Trait, and Best Trading Tips
- Steal A Brainrot ARCADRAGON Trait Farming Guide: Best Traits, Rituals, Admin Abuse Strategy
- Steal a Brainrot Summer Update 2 Base Unlock, Phantom Mutation, Octo Lucky Blocks, and Best Brainrots
Popular Category Lists
- Grow a Garden / (286)
- ARC Raiders / (266)
- CoD: Black Ops 7 / (166)
- Monopoly Go / (146)
- MLB 26 / (145)
- Star Citizen / (116)
- Steal a Brainrot / (89)
- ARK Survival Ascended / (74)
- Sailor Piece / (68)
- Forza Horizon 6 / (63)
- Diablo IV / (61)
- Blox Fruits / (60)
- CoD: BLACK OPS 6 / (55)
- Adopt Me / (53)
- Path of Exile 2 / (48)
- Monster Hunter Wilds / (46)
- Windrose / (44)
- Grow a Garden 2 / (42)
- Path of Exile / (40)
- Bee Swarm Simulator / (36)