


 0
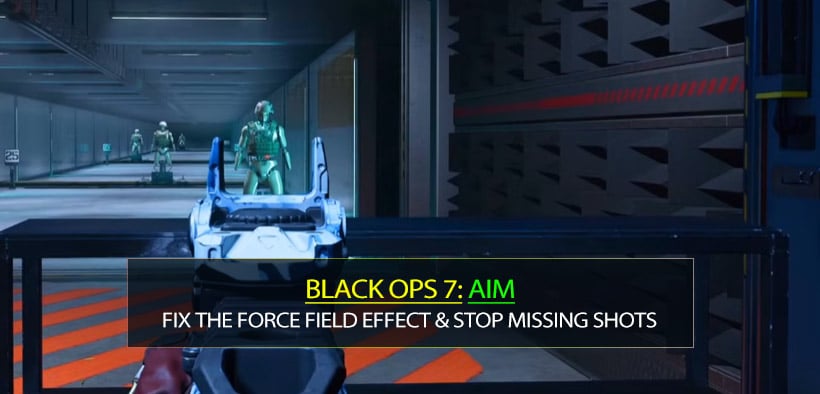
0Black Ops 7 Ultimate Aim Guide: Fix the Force Field Effect & Stop Missing Shots
- JAMIE
- Share
- CoD: Black Ops 7
- 01/09/26
- 1239
You know that feeling. You see an enemy, you center your screen, you aim down sights (ADS), but the millisecond you snap to them, you drift off. You try to micro-adjust back onto their body, but it feels like they have an invisible force field pushing your crosshair away.
It is frustrating, and your first instinct is to blame your own aim. Stop doing that. It is not your raw skill that is the problem; it is the game working against your current configuration.
Through extensive testing in the firing range and live matches, I have combined the best movement mechanics with a specific set of counter-intuitive settings. This guide will help you achieve sticky aim —where your reticle feels magnetically attached to the target.
- The Visual Foundation & The Chest Rule
- The Chest Aim Rule
- Field of View (FOV) Strategy
- The Movement Secret (Rotational Aim Assist)
- The Counter-Steering Technique
- The Magic Setting – Deadzone Inputs
- Sensitivity & Response Curve
- Sensitivity: Finding the Middle Ground
- The Response Curve Debate: Standard vs. Dynamic
- The Hardware Advantage
- FAQ: Troubleshooting Your Aim
- Summary
↖ The Visual Foundation & The Chest Rule
Before we touch the controller settings, we need to address where you are aiming and how you see the enemy. If you can't see them clearly, no amount of aim assist will save you.
↖ The Chest Aim Rule
Many players instinctively aim for the head to get a fast kill. In Black Ops 7, this is a gamble you will often lose.
The Mechanic: When you get shot, your character flinches upwards.
The Result: If you aim at the head and flinch, you are shooting the sky. If you aim at the upper chest and flinch, the recoil and flinch naturally carry your shots into a headshot multiplier.

↖ Field of View (FOV) Strategy
There is a misconception that maxing out your FOV to 120 is always best. While it lets you see more periphery, it shrinks your targets.
| Setting | Recommended Value | Why It Works |
|---|---|---|
| Field of View | 100 - 115 | 108 is my sweet spot. It balances peripheral vision without making enemies look like ants. |
| ADS Field of View | Independent | Crucial. "Affected" reduces visual recoil but shrinks targets. Independent zooms in, making the enemy physically larger on your screen. |
| Camera Movement | Least (50%) | Reduces screen shake so you don't lose visual contact during explosions. |
↖ The Movement Secret (Rotational Aim Assist)
Now, let's talk about the mechanic that separates average players from pros: Rotational Aim Assist.
If you are standing still and just moving your right stick to aim, you are playing on "Hard Mode." Standard aim assist only slows down your sensitivity near a target; it doesn't "stick." To get that magnetic lock, you must engage your Left Stick.
↖ The Counter-Steering Technique
To get the strongest possible stickiness, you need to engage in counter-steering:
If you strafe LEFT in-game: Move your aiming stick (Right Stick) slightly RIGHT.
If you strafe RIGHT in-game: Move your aiming stick (Right Stick) slightly LEFT.
This engages the rotational aim assist algorithm aggressively. Even if you are just holding a lane, you should be wiggling your Left Stick. This constant input tells the game, "I am moving, please help me track," and keeps the aim assist active.
↖ The Magic Setting – Deadzone Inputs
This is the section that changes everything. Most guides tell you to set everything to zero for maximum responsiveness. Do not do that.
When your Right Stick Min Deadzone is at 0, the game registers the tiniest, microscopic jitters of your thumb (or stick drift). These unintended inputs can actually fight against the aim assist bubble, breaking the "lock." You want your input to be deliberate.
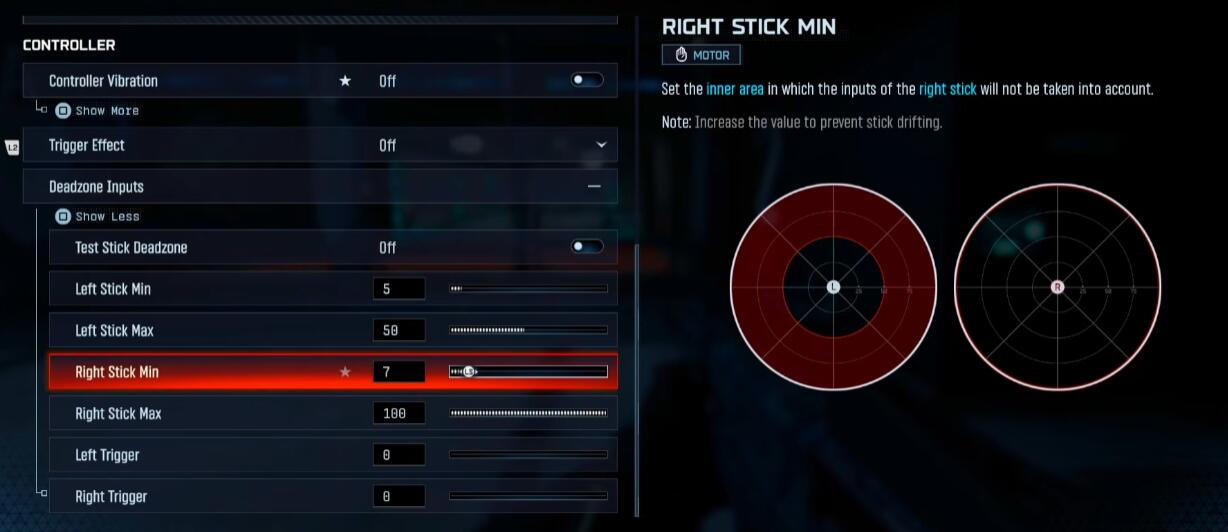
Here are the optimal Deadzone settings for sticky aim:
| Setting | Value | Why This Works |
|---|---|---|
| Left Stick Min | 0 - 5 | Set to 0 for instant movement. Use 5 if you have stick drift. |
| Left Stick Max | 50 - 60 | Allows you to hit max sprint speed with less physical movement. |
| Right Stick Min | 7 | The Secret. Prevents micro-jitters from breaking aim assist. Ensures every movement is intentional. |
| Right Stick Max | 100 | Ensures you have the full range of motion for your aim. |
Why 7?
In my testing, a value of 7 on the Right Stick Min provides a perfect threshold. It filters out the "noise" of your thumb resting on the stick while ensuring that when you do want to adjust, the game registers it as a conscious decision.
↖ Sensitivity & Response Curve
Now that your deadzones are tuned, let's look at how the camera moves.
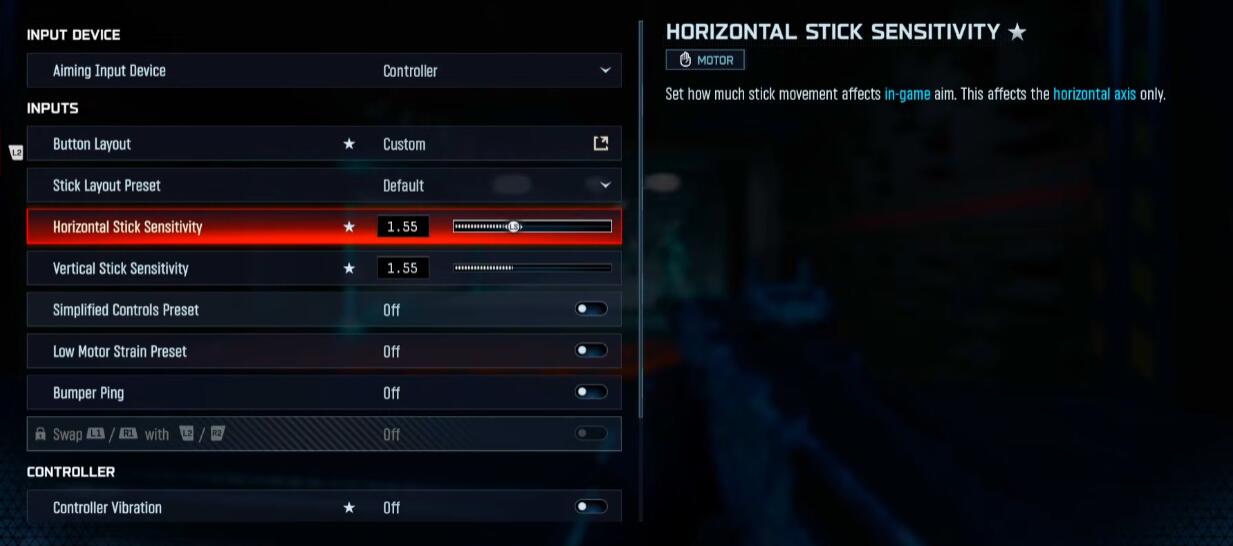
↖ Sensitivity: Finding the Middle Ground
If your sensitivity is too high (like 4.0), you will overshoot the target and break the aim assist bubble. If it is too low, you cannot turn on enemies behind you.
My Recommendation:1.55 (Horizontal/Vertical).
Range: Start at 1.3 and do not go higher than 1.7.
The Logic: 1.55 allows you to snap onto targets quickly but provides enough resistance to stay on target while tracking.
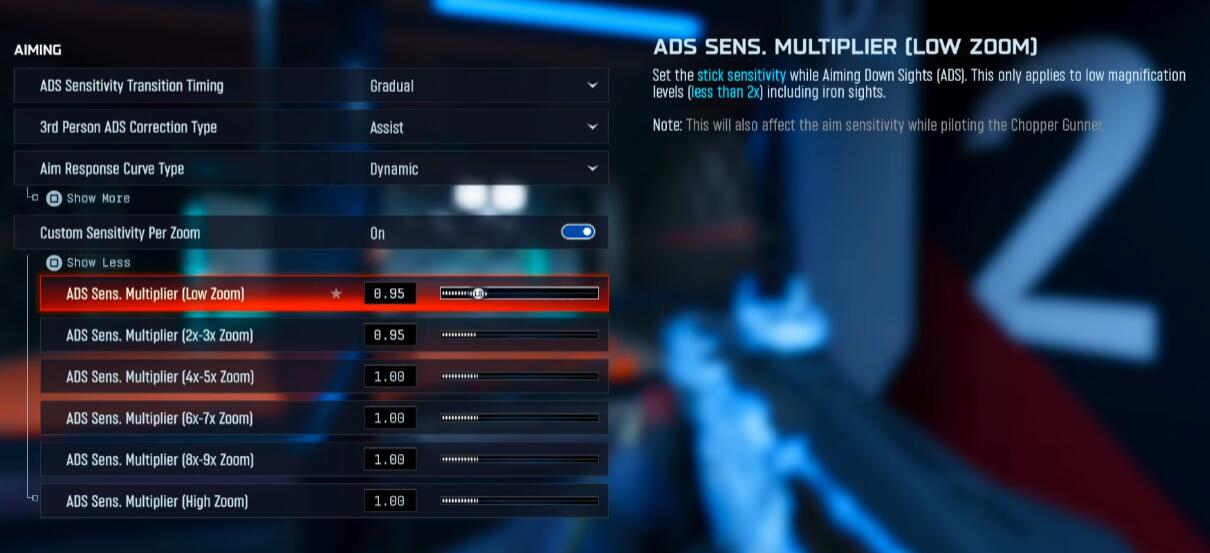
↖ The Response Curve Debate: Standard vs. Dynamic
I have tested both extensively. While Standard is reliable, Dynamic is the superior choice for aggressive play.
| Feature | Setting | Explanation |
|---|---|---|
| Aim Response Curve | Dynamic | Offers a snappy initial movement (good for flicking) with precise control for tracking. |
| Curve Slope Scale | 0.80 | If using Dynamic, lower this to 0.80 to smooth out the curve. |
| ADS Sens. Transition | Gradual | Highly Recommended. Smooths the change between hip-fire and ADS speed, preventing jarring stops. |
| Custom Zoom (Low) | 0.95 | Slightly lowering this helps with tracking at close range (up to 3x zoom). |
Note: If you struggle with over-correcting, you can stick to "Standard" with a 1.0 Slope Scale. It is "stickier" but slower.
↖ The Hardware Advantage
Finally, stop fighting your own controller. There are two physical changes you need to make immediately.
1. Turn Off Vibration & Trigger Effects:
This is non-negotiable. When your controller rumbles, your thumb vibrates. When your thumb vibrates, you are inputting micro-movements into the stick. As we discussed in the Deadzone section, micro-movements fight aim assist. Turn it all off.
2. Flip Your Bumpers (L1/R1 for Aim/Shoot):
If you are on a PlayStation controller, the travel time for a trigger (L2/R2) is milliseconds longer than a bumper (L1/R1). In a game where TTK (Time to Kill) is instant, those milliseconds matter.
↖ FAQ: Troubleshooting Your Aim
Q: I changed my Right Stick Min to 7, but it feels unresponsive. Why?
A: It might feel "heavy" at first if you are used to 0. Give it 3-5 matches. The goal isn't twitchiness; it's consistency. If it still feels too slow, check if your Max Deadzone is set to 100.
Q: Should I use "Instant" ADS Transition Timing?
A: Only if you are an elite player who centers perfectly before aiming down sights. For the vast majority of players, "Gradual" provides a smoother transition that helps correct aim as you zoom in.
Q: Why do you recommend Independent FOV when pros use Affected?
A: Pros use Affected to minimize visual recoil because they have perfect recoil control. If you are reading this guide, your issue is likely staying on target. Independent makes the target larger, making it easier for your eyes and the aim assist to track.
Q: My aim is still going all over the place. What else could it be?
A: Are you moving? Remember, Rotational Aim Assist only works if your Left Stick is engaged. If you stand still like a statue, you lose 60% of your aim assist strength.
↖ Summary
To stop missing shots in Black Ops 7, you have to stop fighting the game's systems. It comes down to a simple formula:
1. Visuals: Use Independent FOV and aim for the Chest.
2. Settings: Set Right Stick Min Deadzone to 7 to eliminate interference and switch to Dynamic Response Curve.
3. Movement: Always keep your Left Stick moving to activate Rotational Aim Assist.
The game wants to help you hit shots. You just need to give it the right instructions. Apply these settings, warm up in the firing range, and watch that "force field" disappear.

Most Popular Posts
- Black Ops 7 Endgame Exotic Affinity Weapons Guide: Best Bonuses, Full Weapon List, and Farming Tips
- Black Ops 7 Zombies Totenreich Easter Egg Guide: Fast Solo & Co-Op Main Quest Walkthrough
- Black Ops 7 Cherry Fizz Guide: Fastest Illicit Cargo Event Route for Season 4
- Black Ops 7 Season 04 Endgame META: Best 5 Weapons After the XR3 Ion Nerf
- Black Ops 7 Season 4 Release Date, Maps, Weapons, Zombies, Warzone, and MW4 Reveal Prep
- Black Ops 7 Zombies Fast KOWAKUJO Easter Egg Guide: Cat Wonder Weapon, Evidence Puzzles
Popular Category Lists
- Grow a Garden / (286)
- ARC Raiders / (266)
- CoD: Black Ops 7 / (166)
- Monopoly Go / (146)
- MLB 26 / (145)
- Star Citizen / (116)
- Steal a Brainrot / (89)
- ARK Survival Ascended / (74)
- Sailor Piece / (68)
- Forza Horizon 6 / (63)
- Diablo IV / (61)
- Blox Fruits / (60)
- CoD: BLACK OPS 6 / (55)
- Adopt Me / (53)
- Path of Exile 2 / (48)
- Monster Hunter Wilds / (46)
- Windrose / (44)
- Grow a Garden 2 / (42)
- Path of Exile / (40)
- Bee Swarm Simulator / (36)


