0
0Steal A Brainrot Craft Brainrots Mega Guides: Editor Trait Stacking and Batch Crafting
- Jordan
- Share
- Steal a Brainrot
- 01/04/26
- 1278
Editing Brainrots looks like a slot machine. Limited crafting events feel like a panic test. The trick is treating both like the same thing: a production system with inputs, bottlenecks, and rules for protecting your best assets.
When we pushed for 100 trillion in Steal A Brainrot style economy loops, the run didn't turn because I got lucky once. It turned because I raised my income floor and stopped nuking my best unit for a 1% dream roll. And when the 2026 limited craft dropped in Craft a Brainrot, the same mindset paid off: map the dependency tree, buy bottlenecks first, and keep the bench busy.
- The Big Idea: One System, Two Machines
- How the Editor Actually Makes You Rich
- 1) The Editor is a two-stage pipeline (and rarity is the ceiling)
- 2) Trait stacking is the real snowball
- Push Loop
- 1) Establish a base income floor first
- 2) Decide what to edit using contribution + traits (not vibes)
- 3) Switch from hunting to compounding at the first big jump
- 4) Mutation keep vs reroll (judge by output, not skin)
- 5) A real run tempo check (numbers that keep me honest)
- 6) The two-lane economy that makes this safe
- How to Craft the NEW Limited 2026
- 1) The dependency tree (what the 2026 actually requires)
- 2) Exact bench inputs (no guessing, no UI confusion)
- Fast Production Plan (Batching That Actually Saves Time)
- 1) Batch shopping list (per 1× 2026)
- 2) Parallel crafting flow (multi-bench) vs single-bench order
- 3) The 1-hour timer: when skipping is rational
- 4) Output reality check (a quick data point from my run)
- One Unified Don't Waste Progress Rule Set (Editor + Crafting)
- Unified Decision Table — What to do next based on your bottleneck
- FAQ
- 1) In the Editor, should I prioritize rarity or mutation?
- 2) When should I stop rerolling and just farm to 100T?
- 3) Why do traited units feel stronger after multiple edits?
- 4) Where do I craft the 2026 Brainrot?
- 5) What's the hardest prerequisite for 2026?
- 6) Is Candy/Gold 2026 guaranteed if my ingredients are Candy/Gold?
- Summary
↖ The Big Idea: One System, Two Machines
Both games reward the same behavior:
- Protect your engine (top earners / core assets).
- Cycle fodder (low performers / non-essential pieces).
- Remove bottlenecks (trash rarity outcomes, missing ingredients, idle benches).
- Scale with volume once you have stability.
That's the foundation. Now let's make it practical.
↖ How the Editor Actually Makes You Rich
↖ 1) The Editor is a two-stage pipeline (and rarity is the ceiling)
Here's the mental model I use because it stops me from making emotional rerolls:
1. Rarity roll: your unit is converted into a random unit from that rarity tier.
2. Mutation roll: the resulting unit gets a mutation that can boost output or synergy.
Why this matters: rarity controls the pool (your ceiling). Mutation mostly controls the multiplier (how hard that unit hits inside the ceiling).
- If you're stuck rolling low rarity, a cool mutation often can't rescue the output.
- If you hit high rarity (Mythic / God / Secret / OG-type tiers), even average mutations can still be bankable.
↖ 2) Trait stacking is the real snowball
Traits are the compounding layer. The moment I noticed that re-editing already-modified units could add or preserve traits, my strategy changed from hunt one jackpot to raise expected value per spin.
This means:
- A traited unit is not just a unit—it's a reroll seed.
- Re-editing traited units can lead to double traits, triple traits, and occasionally that ultra-rare style outcome.
I've had runs where income went from feels slow to why is everything printing money simply because I fed traited units back into the machine instead of constantly resetting from scratch.
↖ Push Loop
↖ 1) Establish a base income floor first
I don't start by chasing perfection. I start by building a stable engine that can pay for mistakes.
What I do:
- Edit early/cheap units until I have several good enough earners.
- Replace the worst performer first, repeatedly.
Why: upgrading your bottom chunk tends to give the biggest ROI per spin because you're lifting dead weight.
↖ 2) Decide what to edit using contribution + traits (not vibes)
If you're staring at your base thinking who goes into the machine, use this.
What to Edit Next (priority order)
| Situation | Edit Priority | Why | What I do |
|---|---|---|---|
| Worst earner, no traits | Highest | Fast, reliable floor increase | Feed into Editor immediately |
| Medium earner, 1 trait | High | Trait momentum can compound | Re-edit to chase stronger tier + better mutation |
| Top earner, 0 traits | Medium | High value but no compounding | Only edit if I can tolerate a downgrade |
| Top earner, 2–3 traits | Lowest | This is the bankroll | I protect it and cycle other units |
↖ 3) Switch from hunting to compounding at the first big jump
Early game is hunting tiers. Mid/late game is compounding traits on already-strong tiers.
A rule I follow because it prevents self-sabotage:
If a roll jumps my income by an order of magnitude (example: ~200k/sec → ~2M/sec, or millions/sec → billions/sec), I stop gambling it mindlessly.
If you find you're emotionally tempted to reroll your current best unit, then force yourself to check its share of total income first (next table).
Do I Risk This Unit? (protect the engine)
| Your current best unit contributes… | Edit it? | Safe condition trigger |
|---|---|---|
| < 5% of total income | Yes | You won't feel the loss |
| 5–25% of total income | Maybe | Only if you have a backup earner |
| > 25% of total income | No | Edit others first; keep the run alive |
↖ 4) Mutation keep vs reroll (judge by output, not skin)
Mutations vary by balance, but the pattern is consistent: some are cosmetic, some are economy-breaking.
Mutation keep/reroll heuristics
| Mutation bucket (examples) | Keep when… | Reroll when… | Notes |
|---|---|---|---|
| Ultra-rare (Rainbow/Candy/Special) | Almost always | Only if the tier is truly awful | Often best multipliers or synergy hooks |
| Strong mid-high (Galaxy/Radioactive/Yin-Yang) | Usually | If it's still bottom-tier output | Great for building trait stacks |
| Common boosts (Gold/Diamond/Lava/Blood-rot) | Depends on actual output | If it doesn't raise your floor | Judge with numbers, not hype |
↖ 5) A real run tempo check (numbers that keep me honest)
This is the pacing I see when the compounding loop kicks in:
- Early: ~1M total feels slow, but it funds serious rerolls.
- Mid: landing a strong high-tier unit often pushes you into tens of millions quickly.
- Breakpoint: once you have a unit in billions/sec, you can jump ~1T → ~30T fast depending on idling and slots.
- Finish: ~75T → 100T is usually wait time, not skill time, if your engine is stable.
If you reach 1T and your best unit is still in the millions/sec, then your bottleneck is tier quality (and trait momentum), not slot count. Edit and stack—don't just buy more low-tier filler.
↖ 6) The two-lane economy that makes this safe
I run my base like it has two lanes:
- Lane A: Protected earners (top 1–3 units I don't touch)
- Lane B: Reroll fodder (everything else cycling through the Editor)
This means: I can take risks without bankrupting the run.
↖ How to Craft the NEW Limited 2026
↖ 1) The dependency tree (what the 2026 actually requires)
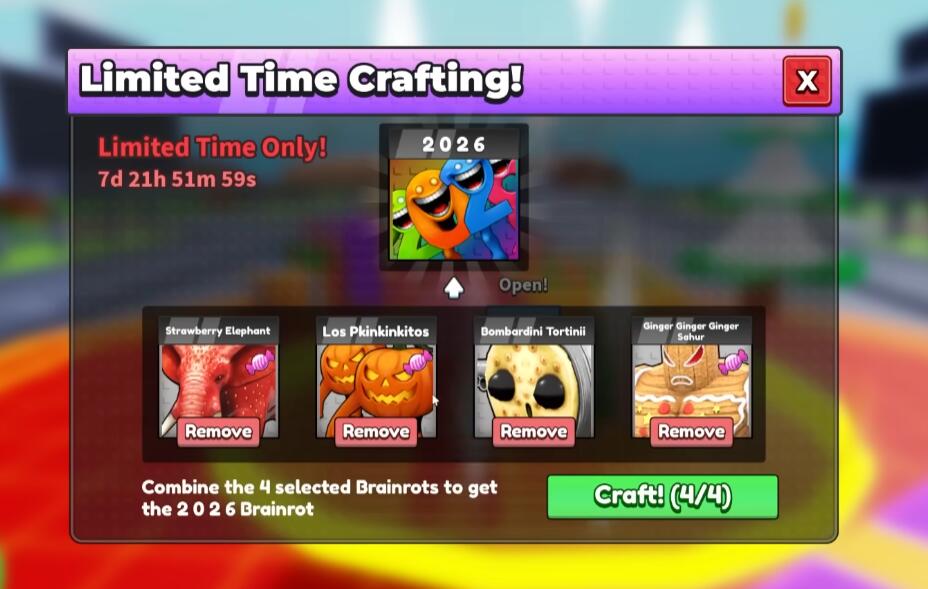
To craft the 2026 Brainrot, you need four crafted Brainrots:
- Strawberry Elephant
- Los Pinkitos
- Bombardini Tortini
- Ginger Ginger Ginger Sahur
Then you craft 2026 at the Happy New Year 2026 station (the craft timer shows 1 hour in the event UI).
Dependency Overview Table (printable checklist)
| Target | Ingredients required | Where items come from | Usual bottleneck |
|---|---|---|---|
| Strawberry Elephant | Fruit + Elephant + Tree + Cactus + Shark + Shoe | Store / stock / animals | Easy, but crafted often—batch it |
| Los Pinkitos | Monkey + Elephant + Mouse (Rodent) + Cactus + Shark + Shoe | Animals + stock | Monkey availability/cost |
| Bombardini Tortini | Iron + Bird + Fruit + Cactus + Shark + Shoe | Stock + animals | Combo gate (need Bird + Iron + Fruit together) |
| Ginger Ginger Ginger Sahur | Monkey + Iron + Tree + Cactus + Shoe + Cheese | Animals + stock | Most expensive/time-heavy prereq |
| 2026 Brainrot | All four prerequisites above | Happy New Year 2026 station | 1-hour timer (plan around it) |
↖ 2) Exact bench inputs (no guessing, no UI confusion)
I list these in bench order so you can place items quickly.
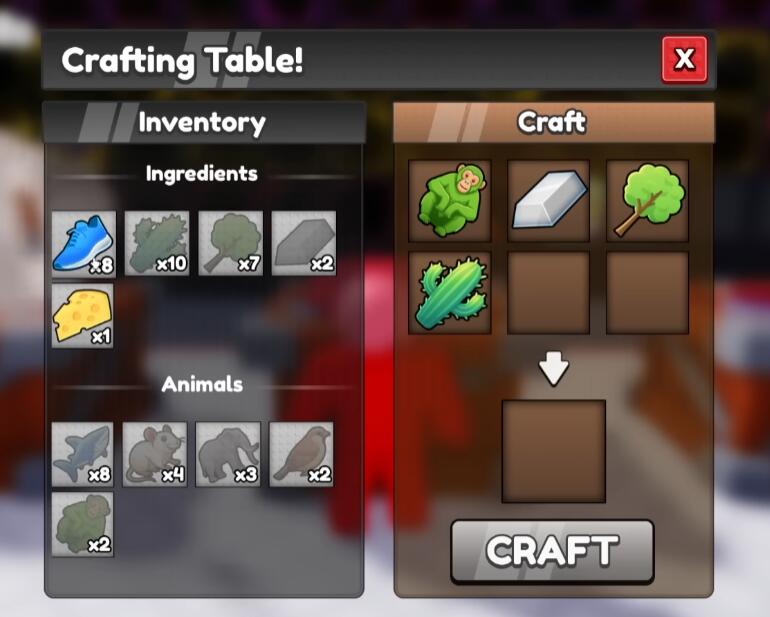
Strawberry Elephant — bench inputs
- Fruit
- Elephant
- Tree
- Cactus
- Shark
- Shoe
If you discover Fruit or Elephant is out of stock, then don't idle your bench—switch to buying your bottlenecks first (Monkey, Iron, Cheese).
Los Pinkitos — bench inputs
- Monkey
- Elephant
- Mouse (Rodent)
- Cactus
- Shark
- Shoe
What this means in practice: Monkeys are basically crafting fuel during events. I treat them like priority inventory, not I'll grab it later.
Bombardini Tortini — bench inputs
- Iron
- Bird
- Fruit
- Cactus
- Shark
- Shoe
I've seen players buy Iron and forget Bird (or the other way around), then stare at the bench like it betrayed them. This recipe is a classic complete the trio gate.
Ginger Ginger Ginger Sahur — bench inputs
- Monkey
- Iron
- Tree
- Cactus
- Shoe
- Cheese
This is usually where your money/time spikes.
If you find you're short on cash mid-chain, then craft the cheaper prerequisites first (Strawberry Elephant, Los Pinkitos) while you farm—bench uptime is free efficiency.
↖ Fast Production Plan (Batching That Actually Saves Time)
↖ 1) Batch shopping list (per 1× 2026)
Before I craft anything, I stock the entire set. This avoids the worst failure mode: half-built chain + missing one glue item.
| Item | Quantity (per 1× 2026) | Used in |
|---|---|---|
| Fruit | 2 | Strawberry Elephant, Bombardini Tortini |
| Elephant | 2 | Strawberry Elephant, Los Pinkitos |
| Tree | 2 | Strawberry Elephant, Ginger Sahur |
| Cactus | 4 | All four prerequisites |
| Shark | 3 | Strawberry Elephant, Los Pinkitos, Bombardini Tortini |
| Shoe | 4 | All four prerequisites |
| Monkey | 2 | Los Pinkitos, Ginger Sahur |
| Mouse (Rodent) | 1 | Los Pinkitos |
| Iron | 2 | Bombardini Tortini, Ginger Sahur |
| Bird | 1 | Bombardini Tortini |
| Cheese | 1 | Ginger Sahur |
Why this batching works: Cactus + Shoe are universal glue, while Monkey + Iron are typical blockers. Buying blockers first prevents dead time.
↖ 2) Parallel crafting flow (multi-bench) vs single-bench order
If you have multiple benches, I start them like this:
1. Strawberry Elephant
2. Los Pinkitos
3. Bombardini Tortini
4. Ginger Sahur
If you only have one bench, I use this order:
Strawberry Elephant → Los Pinkitos → Bombardini Tortini → Ginger Sahur
Not because it's cute—because it's safe. Ginger Sahur is the most demanding prereq, so I want everything easy completed before I commit the expensive pieces.
↖ 3) The 1-hour timer: when skipping is rational
I treat skipping like a resource trade:
- If you want one 2026 for collection value, waiting is fine.
- If you're mass crafting (chasing a premium variant like Candy/Gold), time becomes the currency.
If you can't reliably log back in before the event ends, then skipping can be worth it because it prevents missing the limited window entirely.
↖ 4) Output reality check (a quick data point from my run)
In one of my test crafts, the 2026 displayed around 34,000 income, while an existing set of units totaled around 45,000 together.
This means: 2026 is not automatically the single best earner in every base. Its real value can spike if you hit a stronger variant, or if it fits your progression better than your current mid-tier slots.
If you find your 2026 is only slightly better than your mid-tier units, then treat it as:
- limited-time collection value, and/or
- a stepping stone while you keep upgrading your top earners.
↖ One Unified Don't Waste Progress Rule Set (Editor + Crafting)
Here's the merged logic I follow so I don't spiral into rerolls or stalled crafts.
↖ Unified Decision Table — What to do next based on your bottleneck
| You are stuck because… | Do this next | Why it works |
|---|---|---|
| Your total income feels flat | Replace worst earners first (Editor fodder lane) | Raises the floor; more spins per hour |
| You keep downgrading your run | Stop editing anything >25% of total income | Protects the engine from collapse |
| You roll decent mutations but still feel weak | Push higher rarity before caring about mutation cosmetics | Multiplying a small base stays small |
| Your crafting bench keeps idling | Batch-buy glue + blockers (Shoe/Cactus + Monkey/Iron/Cheese) | Eliminates one missing item stalls |
| You want premium variants | Scale volume: multiple sets, back-to-back crafts | The only consistent counter to RNG is attempts |
↖ FAQ
↖ 1) In the Editor, should I prioritize rarity or mutation?
I prioritize rarity because it defines the unit pool (your ceiling). Mutation is where I optimize once I'm already hitting strong tiers.
↖ 2) When should I stop rerolling and just farm to 100T?
When I have a stable unit producing billions/sec, 100T becomes mostly time.
If you're already above ~75T, then a high-risk edit often isn't worth it unless you're chasing a special outcome for fun.
↖ 3) Why do traited units feel stronger after multiple edits?
Because traits act like a compounding layer. Even if each roll is random, your expected outcome improves when the system allows trait stacking or carryover.
↖ 4) Where do I craft the 2026 Brainrot?
At the Happy New Year 2026 limited-time station/area. You add the four prerequisite Brainrots into that interface.
↖ 5) What's the hardest prerequisite for 2026?
Ginger Ginger Ginger Sahur is usually the pain point because it needs Monkey + Iron + Cheese and tends to spike cost/time.
↖ 6) Is Candy/Gold 2026 guaranteed if my ingredients are Candy/Gold?
Assume RNG unless the game explicitly states inheritance rules. I treat premium variants as probability problems and solve them with batching and volume.
↖ Summary
My fastest progress—whether I'm pushing 100T with Editor rerolls or racing a limited 2026 craft—comes from the same discipline: protect the engine, cycle fodder, and remove bottlenecks before they remove your momentum. If you play it like a factory instead of a casino, every session produces something useful: a higher income floor, a stronger trait stack seed, or a complete set of prerequisites ready to cook while you're offline.
Most Popular Posts
- Steal A Brainrot Cyber Update Guide: Best Craft Recipes, Rainbow Chances, Traits, and Profit Tips
- How to Get Every Steal a Brainrot Cyber Craft Brainrots?
- How to Unlock DUGGY BROS in Steal a Brainrot: Best Red Carpet and Crafting Strategy
- Steal a Brainrot John Pork Guide: How to Get Him, Stats, Trait, and Best Trading Tips
- Steal A Brainrot ARCADRAGON Trait Farming Guide: Best Traits, Rituals, Admin Abuse Strategy
- Steal a Brainrot Summer Update 2 Base Unlock, Phantom Mutation, Octo Lucky Blocks, and Best Brainrots
Popular Category Lists
- Grow a Garden / (286)
- ARC Raiders / (266)
- CoD: Black Ops 7 / (166)
- Monopoly Go / (146)
- MLB 26 / (145)
- Star Citizen / (116)
- Steal a Brainrot / (89)
- ARK Survival Ascended / (74)
- Sailor Piece / (68)
- Forza Horizon 6 / (63)
- Diablo IV / (61)
- Blox Fruits / (60)
- CoD: BLACK OPS 6 / (55)
- Adopt Me / (53)
- Path of Exile 2 / (48)
- Monster Hunter Wilds / (46)
- Windrose / (44)
- Grow a Garden 2 / (42)
- Path of Exile / (40)
- Bee Swarm Simulator / (36)