0
0VV: Ultimatum Byakuya Captain Build: Best Senbonzakura Stats, Kido, Combos, and PvP Setup
- Merni
- Share
- VV: Ultimatum
- 07/02/26
- 358
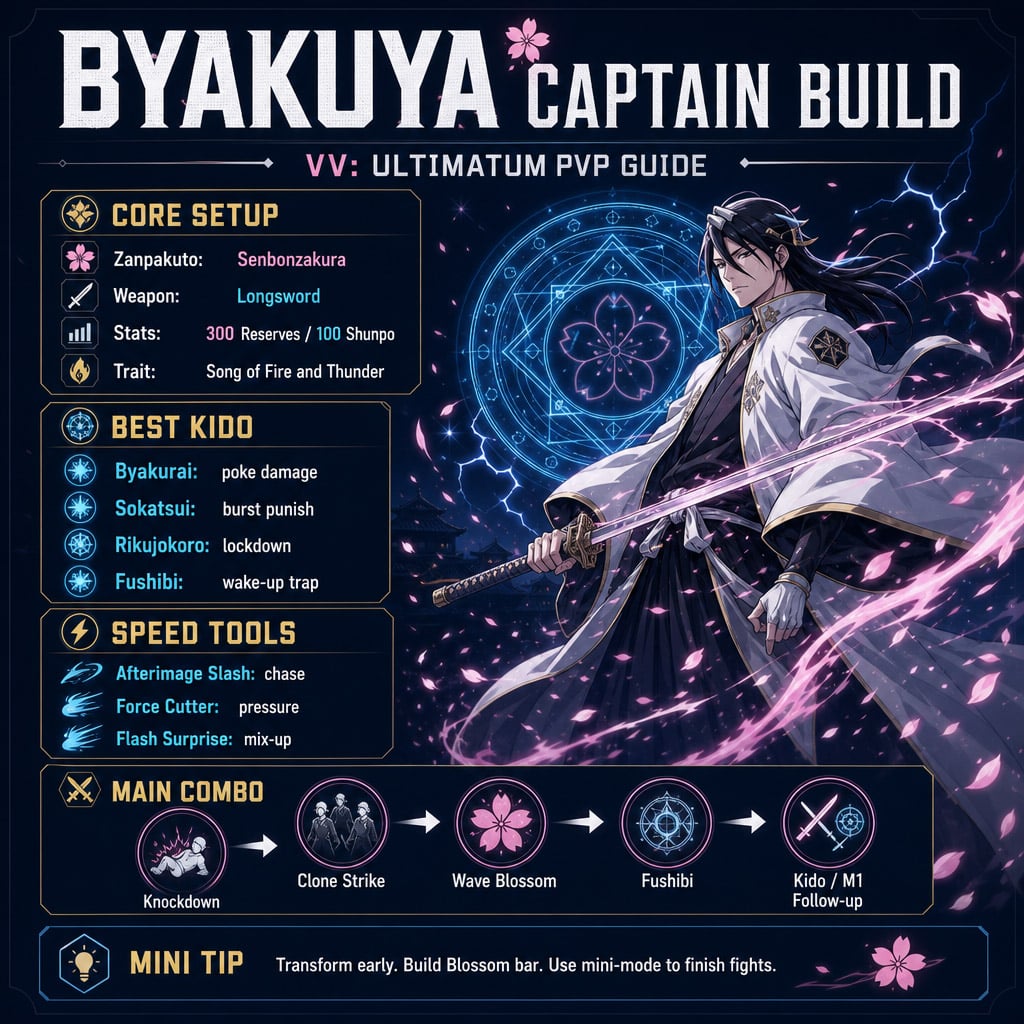
Byakuya is not a mash build. You win by controlling space, forcing knockdowns, layering Fushibi, then cashing out with Senbonzakura mini-mode. This setup is simple, fast, and tested in real PvP: Senbonzakura Longsword + Kido + Speed tools.
- Best Byakuya Build in VV: Ultimatum
- Best Stats for Byakuya Captain Build
- Why 300 Reserves?
- Why 100 Shunpo?
- Senbonzakura Longsword Setup
- Why Longsword?
- Senbonzakura Ability Points
- Best Kido for Byakuya Build
- Best Ascension Fragment Target
- Why Fushibi Is Mandatory
- Best Trait: Song of Fire and Thunder
- Best Speed Skills for Byakuya
- How to Use Speed Correctly
- Core Byakuya Combo Routes
- Main Bread-and-Butter Combo
- Practical PvP Routes
- How to Use Senbonzakura Mini-Mode
- PvP Gameplan for Byakuya
- Neutral
- Pressure
- Defense
- Common Mistakes
- FAQ
- What is the best Byakuya build in VV: Ultimatum?
- What stats should I use for Byakuya?
- What is Byakuya's best combo?
- Is Senbonzakura good in VV: Ultimatum?
- What should I spend Ascension Fragments on?
- Summary
↖ Best Byakuya Build in VV: Ultimatum
This is the clean Captain-style Byakuya setup. It has strong chase, solid Reiatsu economy, and reliable pressure after knockdowns.
| Slot | Best Choice | Reason |
|---|---|---|
| Zanpakuto | Senbonzakura | Best thematic fit, strong Blossom pressure |
| Weapon Variant | Longsword | Better reach, cleaner M1 spacing |
| Stats | 300 Reserves / 100 Shunpo | Skill uptime + mobility |
| Trait | Song of Fire and Thunder | Buffs M1 pressure and Kido stun |
| Core Style | Knockdown + Kido trap | Consistent PvP pressure |
Run this if you want a build that rewards timing, spacing, and clean confirms. It is not brainless, but it is very consistent once the loop clicks.
↖ Best Stats for Byakuya Captain Build
Use this stat spread:
| Stat | Points | Purpose |
|---|---|---|
| Reserves | 300 | Keeps Reiatsu stable during Kido and Senbonzakura pressure |
| Shunpo | 100 | Better chase, disengage, and repositioning |
| Flex | Remaining points | Adjust for comfort or gear |
↖ Why 300 Reserves?
Byakuya burns Reiatsu fast if you spam. 300 Reserves gives enough room to use Kido, Shikai skills, and movement without going dry after one exchange.
If you keep running out of Reiatsu, the build is not the issue. You are throwing skills without confirms. Use M1s first. Spend skills after knockdowns or forced movement.
↖ Why 100 Shunpo?
Byakuya needs mobility. 100 Shunpo lets you chase rolls, punish whiffs, and reposition like a real speed-based Captain build.
If enemies keep escaping after your opener, you either need cleaner timing or better Shunpo usage.
↖ Senbonzakura Longsword Setup
Senbonzakura is the core of this build. The buffed skill speed and stronger Wave Blossom make it far more reliable now.
↖ Why Longsword?
| Variant | Value | Verdict |
|---|---|---|
| Longsword | Better range, safer M1 pressure | Best choice |
| Short sword | Faster feel, weaker reach | Usable |
| Heavy variant | More impact, less fluid | Not ideal |
Longsword lets us play at tip range. That matters because Byakuya should not be trading face-to-face with heavy bruisers.
↖ Senbonzakura Ability Points
| Investment | Points | Why It Matters |
|---|---|---|
| Blossom generation | 6 | Builds mini-mode faster |
| Aftercut / damage route | 4 | Adds damage after skill hits |
| Longsword path | Required | Supports spacing and M1 pressure |
The goal is simple: build Blossom bar fast, enter mini-mode, then force the enemy to waste every defensive option.
↖ Best Kido for Byakuya Build
Byakuya's Kido is not filler. It is how we lock people down and extend pressure.
| Kido | Role | Use It When |
|---|---|---|
| Byakurai | Fast poke / percent damage | Enemy backs up or tries to reset |
| Sokatsui | Burst damage | You have a clean punish window |
| Rikujokoro | Lockdown | Enemy is moving too much |
| Fushibi | Wake-up trap | After downslam or knockdown |
↖ Best Ascension Fragment Target
Spend Ascension Fragments on Sokatsui first. It gives the build real burst and fits the Kido-heavy Byakuya style.
↖ Why Fushibi Is Mandatory
Your main damage loop depends on Fushibi.
Knock them down.
Place Fushibi.
Force a bad wake-up.
Punish the escape.
If your enemies keep rolling out for free, your Fushibi timing is late.
↖ Best Trait: Song of Fire and Thunder
Use Song of Fire and Thunder.
| Effect | Benefit |
|---|---|
| Fire | More M1 pressure |
| Thunder | Adds stun value to Kido |
| Electrocution chance | Creates extra openings |
| Hybrid scaling | Works with sword + Kido playstyle |
This trait turns every Kido hit into more than damage. It adds disruption. That is huge for a build that wins by keeping the enemy stuck in pressure.
↖ Best Speed Skills for Byakuya
Speed tools make the build feel like Byakuya and make it work in PvP.
| Skill | Priority | Use Case |
|---|---|---|
| Afterimage Slash | Very High | Chase, punish rolls, extend pressure |
| Force Cutter | High | Neutral pressure and follow-up |
| Flash Surprise | Medium-High | Behind-the-back mix-up |
| Vortex Edge | Optional | Skip if staying thematic |
↖ How to Use Speed Correctly
Do not spam mobility raw. Good players will wait and punish.
Use speed after:
- Enemy rolls
- Enemy whiffs a skill
- Enemy panic-blocks
- Enemy tries to reset spacing
Afterimage Slash is the main chase tool. Flash Surprise is the mix-up. Force Cutter is the pressure button.
↖ Core Byakuya Combo Routes
The build does not need long combo chains. It needs repeatable pressure.
↖ Main Bread-and-Butter Combo
| Step | Action | Result |
|---|---|---|
| 1 | Knockdown | Starts pressure |
| 2 | Z Step / Clone Strike | Close gap |
| 3 | Wave Blossom | Downslam |
| 4 | Fushibi | Wake-up trap |
| 5 | Kido / M1 / Afterimage | Continue pressure |
This is the combo to drill. It works because it turns one knockdown into a full pressure cycle.
↖ Practical PvP Routes
| Situation | Best Response |
|---|---|
| Enemy rolls away | Afterimage Slash chase |
| Enemy blocks | Force Cutter or delayed Kido |
| Enemy runs | Flash Surprise → Byakurai |
| Enemy is downslammed | Fushibi immediately |
| Multiple enemies group up | AoE Kido + Senbonzakura pressure |
The key is patience. Do not spend every cooldown at once. Make them answer one layer, then punish the answer.
↖ How to Use Senbonzakura Mini-Mode
Transform early. Fight actively. Build Blossom bar.
| Action | Value |
|---|---|
| Downslam pressure | High Blossom gain |
| Senbonzakura skills | High pressure |
| Active Shikai fighting | Faster mini-mode access |
| Clean follow-ups | Better snowball |
Mini-mode is the payoff. Once it is active, do not waste it chasing one runner across the map. Use it to finish low HP targets, punish groups, or swing a close fight.
In extended fights, you can get mini-mode more than once if you stay active and land your pressure routes.
↖ PvP Gameplan for Byakuya
↖ Neutral
Play outside enemy range. Use Longsword M1s, movement, and Kido checks.
| Enemy Does This | You Do This |
|---|---|
| Rushes in | Block, parry, M1 punish |
| Holds block | Force Cutter or delayed Kido |
| Runs away | Flash Surprise or Byakurai |
| Spams skills | Bait, then Afterimage Slash |
| Rolls after every hit | Chase with Shunpo |
↖ Pressure
Your pressure loop:
1. Touch them with M1 or Kido.
2. Force knockdown.
3. Use Wave Blossom.
4. Drop Fushibi.
5. Chase with Afterimage Slash if they escape.
6. Build Blossom bar.
7. Mini-mode and finish.
↖ Defense
Do not trade with heavy melee builds. Byakuya wins with clean spacing, not ego duels.
If you are getting deleted, slow down. Block more. Let them miss first.
↖ Common Mistakes
| Mistake | Fix |
|---|---|
| Transforming late | Pop Shikai early to build Blossom |
| Spamming Kido raw | Use Kido after confirms |
| Ignoring Fushibi | Drop it after every good downslam |
| Overusing Flash Surprise | Save it for mix-ups |
| Chasing too far in mini-mode | Swap targets or control space |
| Fighting with no Reiatsu | Use M1s to pace pressure |
Most bad Byakuya players lose because they play too flashy. Good Byakuya players play sharp.
↖ FAQ
↖ What is the best Byakuya build in VV: Ultimatum?
The best setup is Senbonzakura Longsword, 300 Reserves, 100 Shunpo, Song of Fire and Thunder, with Byakurai, Sokatsui, Rikujokoro, Fushibi, and Speed skills like Afterimage Slash and Force Cutter.
↖ What stats should I use for Byakuya?
Run 300 Reserves / 100 Shunpo. Reserves keep your Kido and Shikai pressure active. Shunpo gives the mobility needed to chase, escape, and punish whiffs.
↖ What is Byakuya's best combo?
Use:
Knockdown → Z Step / Clone Strike → Wave Blossom → Fushibi → Kido or M1 follow-up
This is the main pressure loop. It is simple and reliable.
↖ Is Senbonzakura good in VV: Ultimatum?
Yes. Senbonzakura is solid after the buffs. Faster skills, better Wave Blossom value, and strong mini-mode pressure make it a real PvP option.
↖ What should I spend Ascension Fragments on?
Spend them on Sokatsui first. It gives Byakuya stronger Kido burst and makes the build more threatening after confirms.
↖ Summary
The best Byakuya Captain build in VV: Ultimatum is built around Senbonzakura Longsword, 300 Reserves, 100 Shunpo, Song of Fire and Thunder, and a Kido-heavy pressure loop.
Your win condition is simple:
Knockdown → Wave Blossom → Fushibi → chase → Blossom mini-mode.
Play clean. Do not mash. Control space with Longsword, punish movement with Speed skills, and use Kido to keep enemies trapped. That is where Byakuya becomes dangerous.
Most Popular Posts
- VV: Ultimatum Best Shikai, Schrift & Resurrection Tier List: Updated Meta Guide
- Best Hakuda Build in VV: Ultimatum: Top Shinigami Ranked Setup
- VV Ultimatum Blooming Madness Shikai Guide: Best Build, Skills, Dual Swords, Combos, and Update 2 Code
- VV: Ultimatum Reroll Farming Guide: Best Ability Reroll, Weapon Reroll, Hogyoku, and Gauntlet Methods
- VV Ultimatum Fast Unlock Every Title Guides: Boss, Gauntlet, PvP and Playtime Titles
- How to Get Ascension 2 in VV: Ultimatum: Fast Update 2 Guide
Popular Category Lists
- Grow a Garden / (286)
- ARC Raiders / (267)
- CoD: Black Ops 7 / (166)
- Monopoly Go / (147)
- MLB 26 / (146)
- Star Citizen / (122)
- Steal a Brainrot / (89)
- ARK Survival Ascended / (79)
- Sailor Piece / (68)
- Forza Horizon 6 / (65)
- Diablo IV / (61)
- Blox Fruits / (61)
- Adopt Me / (56)
- CoD: BLACK OPS 6 / (55)
- Path of Exile 2 / (48)
- Grow a Garden 2 / (48)
- Monster Hunter Wilds / (46)
- Windrose / (44)
- Path of Exile / (40)
- Bee Swarm Simulator / (36)