0
0 Created: Jul 26,2026 | ARC Raiders
ARC Raiders Hatch Key Guide: Farm, Craft, and Use Them for Safer Extractions

Hatch Keys are the difference between a clean extract and feeding your loot to some guy with a shotgun. They open sealed Raider Hatches — hidden manhole extracts scattered across the map — giving you a quiet way back to Speranza instead of fighting through a camped exit.
Here's the deal: treat hatch keys as insurance, not decoration. Farm them, craft them, spend them smart. Below is everything that actually matters.
- What a Raider Hatch Key Does
- When It's Actually Worth Using
- How to Get Hatch Keys
- Buying from Shani
- Crafting
- Station Upgrades You Need
- Utility Station Level 2
- Refiner Upgrades (Feeds the Crafting Chain)
- Best Farming Route: Pilgrim's Peak (Bluegate)
- Route Steps
- If It's Already Looted
- Daily Routine for a Steady Key Supply
- How to Actually Use One
- When to Hold vs. When to Burn a Key
- Common Mistakes
- Target Reserve by Playstyle
- FAQ
- What does a Raider Hatch Key do?
- Is it consumed after one use?
- Where do I buy Hatch Keys?
- What's the crafting recipe?
- Where's the best farming spot for materials?
- Bottom Line
What a Raider Hatch Key Does
- Unlocks sealed hatches — hidden extraction points, not the main ones.
- Consumed on use. One key, one extract.
- Stays in inventory. No need to equip it.
- Best saved for high-value runs — good loot, finished objectives, low HP situations.
Not flashy, but they quietly save you thousands in gear over time.
When It's Actually Worth Using
Use it if:
- You're carrying rare materials or a weapon you don't want to lose.
- You just finished a quest objective.
- Nearby extracts are contested or you hear gunfire near them.
- You're low on heals or armor.
Skip it if:
- You're running a free loadout with nothing valuable.
- A safe standard extract is right there.
Because hatches dodge the crowded exits, they cut PvP risk significantly. In our runs, one clean Pilgrim's Peak clear produces enough mats for roughly two keys — so using one to escape and crafting two more still nets a profit.
The mindset: don't just spend keys — cycle them.
How to Get Hatch Keys
Three ways. Not all equal.
| Method | Reliability | Notes |
|---|---|---|
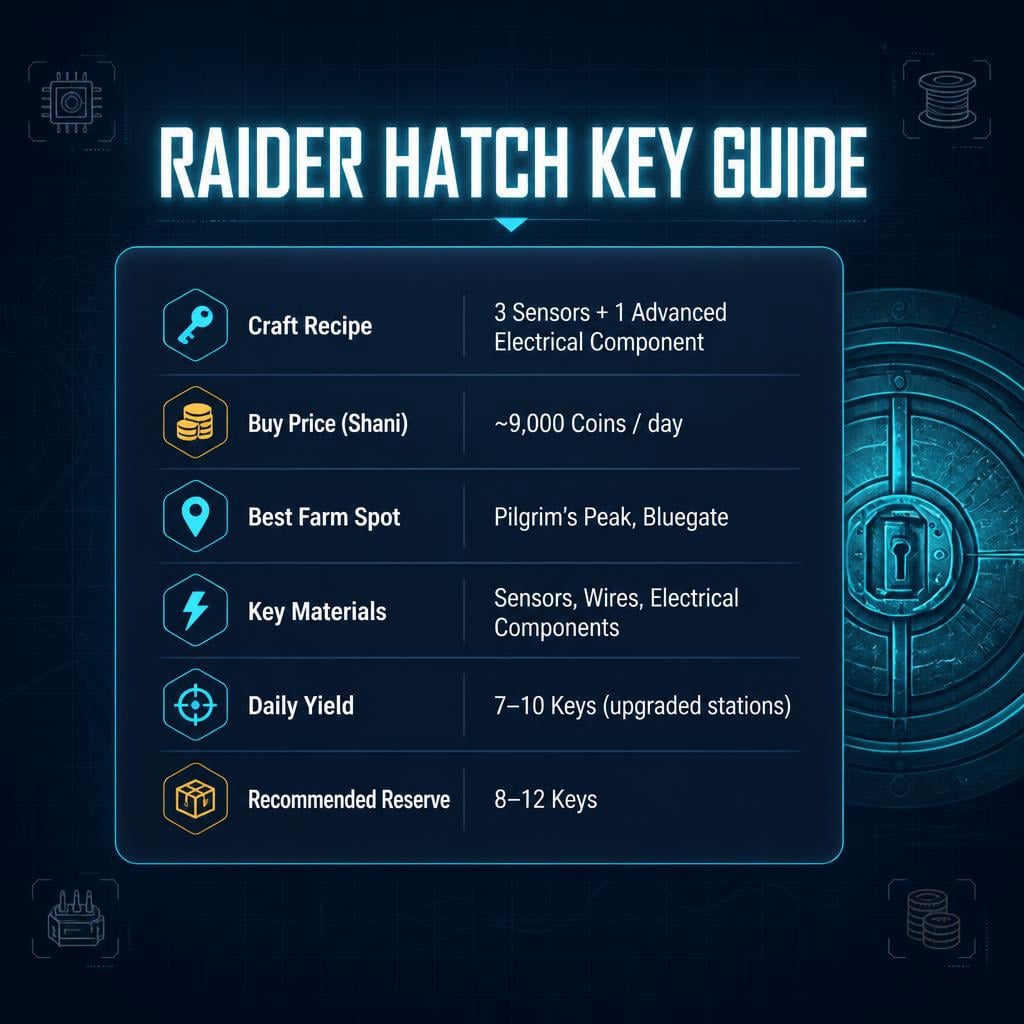
| Buy from Shani | High | ~9,000 coins, up to 2/day reported |
| Craft at Utility Bench | Very High | Best long-term method |
| Loot off enemies/containers | Low | Too random to rely on |
Combine buying + crafting. Looting is a bonus, not a strategy.
Buying from Shani
Shani sells them daily at Speranza. If you're actively raiding, one key easily pays for itself the moment it saves your loadout. Buy daily if you can afford it — treat it as a subscription to not losing your stuff.
Crafting
Recipe commonly reported: 3 Sensors + 1 Advanced Electrical Component.
That component breaks down further into basic electrical parts, so your real farming targets are simple:
- Sensors
- Wires
- Basic electrical materials
- Upgraded Utility Bench
Station Upgrades You Need
Utility Station Level 2
| Material | Amount | Where |
|---|---|---|
| Damaged Heat Sink | 2 | Tech zones, on top of shelves/desks |
| Electrical Components | 5 | Recycle spare electrical loot |
| Niche Scanners | 6 | Loot off Niche enemies directly |
Don't hope for scanners to drop randomly — hunt Niches. Heat sinks sit in the open more than you'd expect; check surfaces, not just containers.
Refiner Upgrades (Feeds the Crafting Chain)
| Level | Materials | Farm Notes |
|---|---|---|
| Level 2 | 3 Toasters, 5 ARC Motion Cores, 8 Fireball Burners | Residential zones, ARC units, indoor Fireballs |
| Level 3 | 10 ARC Circuitry, 6 Bombardier Cells, 3 Motors | ARC Probes, Bombardiers, car engines |
Toasters: Grandioso Apartments (Buried City), The Village / Raider Refuge (Bluegate).
Bombardier Cells are the hard part — solo players should fight from indoor cover with an escape route already planned. Don't start that fight with your back to open ground; explosions attract company fast.
Motors: Collapsed Highway (Bluegate) — check closed-hood cars. About 1 in 10 vehicles gives a hit.
Best Farming Route: Pilgrim's Peak (Bluegate)
This is the spot. High density of both electrical and tech loot, sits near the map edge, close to extracts.
Typical clean-run yield:
| Material | Typical Result |
|---|---|
| Sensors | 4–7 |
| Wires | 1–2 stacks |
| Batteries | Full stack |
| Electrical/Advanced Components | Common/occasional |
That's roughly two hatch keys per run.
Route Steps
1. Run a cheap or free loadout — this is a farming run, not a fight.
2. Spawn near Pilgrim's Peak? Go direct, but avoid open sprints.
3. Spawn southwest? Hit Adorned Wreckage first — camera setups there often drop Sensors.
4. At Pilgrim's Peak, loot everything: computers, wall machines, drawers, cabinets, upper tower.
5. If you can open security breaches, check the upstairs one — bonus weapons/modules.
6. Extract once your bag is full of Sensors/Wires. Greed gets you killed.
If It's Already Looted
Don't bail immediately. Check the machines anyway — most players skip environmental loot because it doesn't fit their bag, not because it's empty. Missing Sensors but plenty of Wires? Take the Wires; they still feed the crafting chain.
Daily Routine for a Steady Key Supply
| Action | Estimated Keys |
|---|---|
| Buy from Shani | 1–2 |
| Buy Sensors/Wires from Celeste (if in stock) | 1–2 |
| 2–3 Pilgrim's Peak runs | 4–6 |
Realistic daily total: 7–10 keys once your stations are upgraded.
How to Actually Use One
1. Carry the key in inventory (no need to equip).
2. Open the map, look for the C-shaped half-circle icon.
3. Confirm no countdown timer — that means it's not a proper sealed hatch.
4. Approach slowly, listen before committing.
5. Interact with the panel, extract.
Warning: don't assume every hatch-looking icon works the same way. If it has a timer or acts differently, your key won't fix that.
When to Hold vs. When to Burn a Key
Use it immediately if: rare loot secured, objective done, normal extracts are far or contested, you're low on heals, you're overloaded and slow.
Save it if: loot is junk, you're standing next to a safe standard extract, the hatch route runs straight through active combat.
The best use of a key almost always feels a little early. Wait until things are collapsing and the hatch might be too far to matter.
Common Mistakes
| Mistake | Fix |
|---|---|
| Burning keys on low-value raids | Save for runs worth protecting |
| Forgetting to bring one | Check inventory pre-raid |
| Ignoring Wires | They're key materials too |
| Only relying on loot drops | Craft your own supply |
| Sprinting to the hatch | Alerts everyone nearby — walk it |
| Skipping looted machines | Check anyway — Sensors get left behind |
Target Reserve by Playstyle
| Playstyle | Reserve |
|---|---|
| Casual | 3–5 |
| Regular farmer | 8–12 |
| Quest-focused | 10–15 |
| High-value looter | 15+ |
8–12 is the sweet spot for most players — enough freedom to use them without hoarding like a dragon.
FAQ
What does a Raider Hatch Key do?
Unlocks a sealed Raider Hatch — a hidden extraction manhole — letting you exit back to Speranza away from standard, more contested extracts.
Is it consumed after one use?
Yes. One key per hatch extraction, no exceptions.
Where do I buy Hatch Keys?
Shani, the Security Trader in Speranza. Reported price: ~9,000 coins, limited daily stock.
What's the crafting recipe?
3 Sensors + 1 Advanced Electrical Component, requiring an upgraded Utility Station.
Where's the best farming spot for materials?
Pilgrim's Peak in Bluegate — strong Sensor and Wire density, close to extracts, usually worth two keys per clean run.
Bottom Line
Stop treating Hatch Keys as a rare emergency item. Build a loop: buy from Shani, farm Pilgrim's Peak, craft at your Utility Station, repeat.
Once that cycle runs on autopilot, you'll always have a key in your pocket when it counts — and extraction stops being a gamble.

Most Popular Posts
- ARC Raiders Update 1.42: Phantom Targets Farming Guide (Glitched Wasps, Rewards, Regional Conditions)
- ARC Raiders Hullcracker Blueprints: Fastest Way to Complete The Major's Footlocker
- ARC Raiders Best Pop Trigger Strategy: Fast Phantom Targets Damage Guide
- ARC Raiders Subway Skin Guide: Unlock the Subterranean Outfit
- ARC Raiders Looting Mk. 3 Survivor Blueprint Guide: Best Blue Gate Route and Drop Locations
- ARC Raiders Medium & Heavy Gun Parts Blueprint Guide: Best Farm Route, Locations, and Refiner Crafting
Popular Category Lists
- ARC Raiders / (350)
- Grow a Garden / (294)
- CoD: Black Ops 7 / (167)
- Star Citizen / (162)
- MLB 26 / (159)
- Monopoly Go / (152)
- ARK Survival Ascended / (127)
- Steal a Brainrot / (99)
- Blox Fruits / (74)
- Adopt Me / (74)
- Forza Horizon 6 / (72)
- Sailor Piece / (68)
- Grow a Garden 2 / (68)
- Diablo IV / (62)
- CoD: BLACK OPS 6 / (55)
- Aion 2 / (49)
- Path of Exile 2 / (48)
- Monster Hunter Wilds / (46)
- Windrose / (44)
- Donut SMP / (41)