



 0
0 Created: Jul 31,2026 | ARC Raiders
ARC Raiders Oil Farm Route: Rivington Tides Beats Stella Montis (Wharf → Stacking Yard Guide)

Stella Montis is the safe Oil route. Everyone runs it. That's the problem.
Rivington Tides is our go-to instead. Same Oil density, way less traffic, and it stacks Turbo Pumps + Explosive Compound on top — items Stella Montis just doesn't deliver as consistently.
This isn't a check every container guide. It's a tight loop: Wharf → Port Authority → drawer area → Stacking Yard → Customs House → extract. Learn the hidden spots once, and you'll out-loot 90% of the lobby every run.
- Rivington Tides vs. Stella Montis
- The Route (Step-by-Step)
- Turbo Pumps Are the Whole Point
- What to Extract vs. Recycle
- Stacking Yard: Don't Be Lazy Here
- Customs House: Exterior Only
- Comets = Free Explosive Compound
- Best Conditions to Run This
- Realistic Run Value
- Combat Notes
- Extraction
- Quick Checklist
- FAQ
- Is Rivington Tides really better than Stella Montis for Oil?
- What's the most important item on this route?
- Should I recycle Turbo Pumps or Rocket Thrusters mid-raid?
- How much Oil can I expect per run?
- Is Beach Combing good for this farm?
- Summary
Rivington Tides vs. Stella Montis
| Factor | Stella Montis | Rivington Tides |
|---|---|---|
| Oil consistency | High | Very High |
| Explosive Compound | Medium | High (Comets) |
| Container density | Good | Excellent |
| Turbo Pump spawns | Inconsistent | Reliable |
| Player traffic | Contested | Spread out |
| Speed | Faster | Slower, bigger payout |
Bottom line: Stella Montis if you're in a hurry. Rivington Tides if you actually want a full bag.
The Route (Step-by-Step)
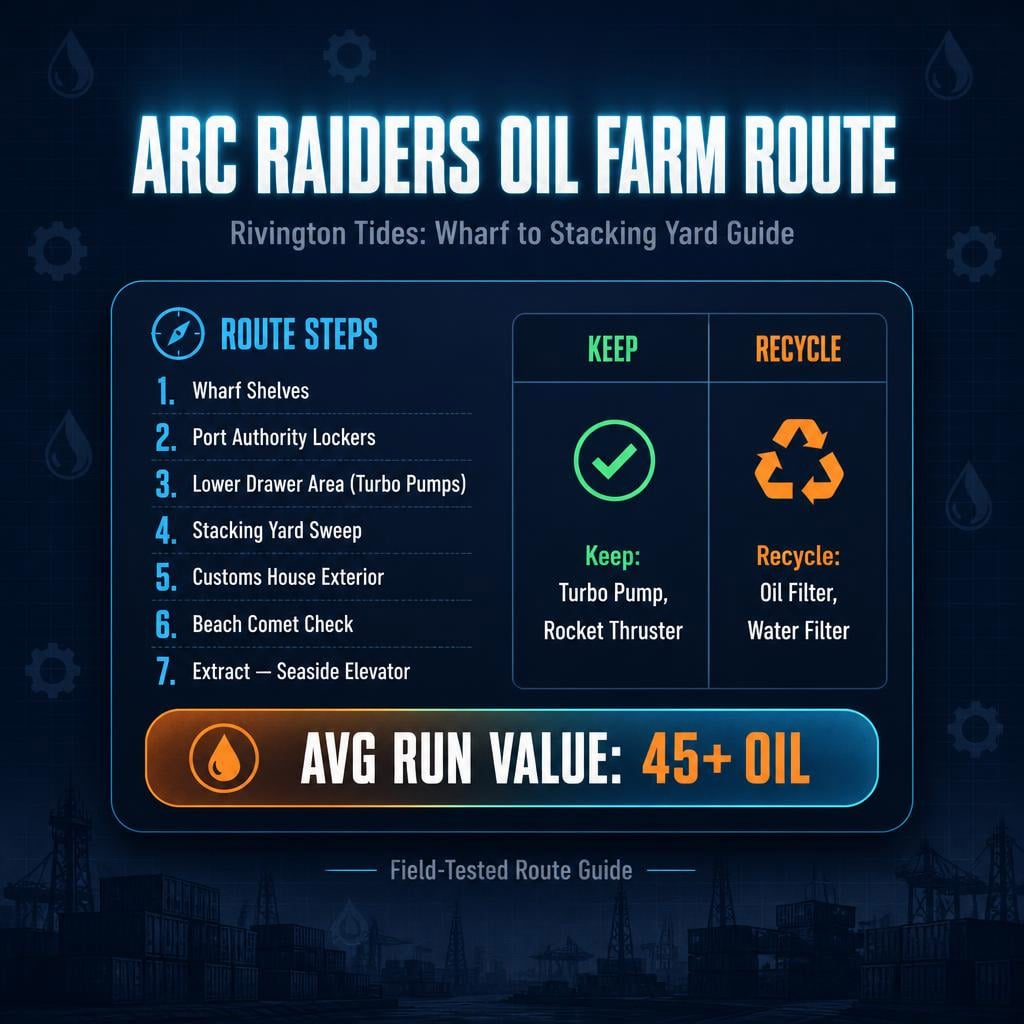
| Step | Location | Loot Priority |
|---|---|---|
| 1 | Wharf shelves | Water Filters (quick warm-up, don't linger) |
| 2 | Port Authority | Red lockers — Oil, Explosive Compound, Springs |
| 3 | Corner locker room | More red lockers + check security breaches |
| 4 | Lower drawer area | 2 drawers = reliable Turbo Pumps |
| 5 | Stacking Yard | Main farm zone — check ALL angles |
| 6 | Customs House side | Exterior containers only, skip interiors |
| 7 | Beach | Comet check for Explosive Compound |
| 8 | Seaside Elevator / hatch | Extract once you're carrying value |
Don't rush Wharf. It's just the appetizer. The real Oil starts at Port Authority.
Turbo Pumps Are the Whole Point
Two drawers near Stacking Yard consistently drop Turbo Pumps. That's roughly 6 Oil value before you even touch the main containers.
Do not recycle Turbo Pumps in-raid. They break into multiple Oil at base — recycling them mid-run torches value for nothing.
Same logic applies to Rocket Thrusters. Better Synth Fuel return at base. Carry them out unless your bag is genuinely in crisis.
What to Extract vs. Recycle
| Item | In-Raid | At Base |
|---|---|---|
| Turbo Pump | Never | Always |
| Rocket Thruster | Usually not | Yes |
| Oil Filter | Fine | Optional |
| Water Filter | Fine | Optional |
| Crude Explosives | Keep if farming compound | — |
Rule of thumb: Recycle the common stuff, extract the special stuff.
Stacking Yard: Don't Be Lazy Here
This is where most players leave value on the table. They loot the front row and bounce.
Check behind stacks. Check above. Check the low gaps. The vertical layout hides loot — that's exactly why this route beats Stella Montis on total volume.
Expect: Oil, Oil Filters, Water Filters, Synthesized Fuel, Turbo Pumps, Rocket Thrusters, Crude Explosives, Springs, Magnets, and the occasional strong weapon attachment.
Customs House: Exterior Only
Same industrial loot pool as Stacking Yard, just spread further.
Skip interior rooms and locked/key areas unless they're on your direct path. They're not Oil-focused and they cost time you don't need to spend.
Comets = Free Explosive Compound
Work a Comet check into your route timing — before Stacking Yard, mid-route, or right before extraction.
If Comets are already cleared, don't chase them. Empty spawns waste time. If they're up and safe, kill them — the Explosive Compound boost is what separates this route from a plain container run.
Best Conditions to Run This
Day Raid > Beach Combing for pure Oil focus. Beach Combing adds event loot that dilutes your industrial drops slightly.
Low player traffic = more untouched containers = better haul. This route already spreads players out more than Stella Montis, so you're ahead by default.
Realistic Run Value
| Source | Approx. Value |
|---|---|
| Recycled Oil items | 20+ Oil |
| Carried Oil stack | 8+ Oil |
| Synth Fuel conversion | 2+ Oil |
| Turbo Pumps (extracted) | 15+ Oil |
| Rocket Thruster/Synth Fuel | 2+ Oil |
| Total | 45+ Oil |
That's the benchmark for a solid run — not a lucky one.
Combat Notes
- Ticks hide under structures near the drawer area — clear before looting.
- Wasps — break line of sight, kill fast.
- Bastions/Bombardiers — avoid unless you came prepared. Not worth it for an Oil run.
- Bring a Snap Hook. Vertical container access and quick repositioning both matter here.
If you're carrying Turbo Pumps, don't die for one more container. Leave once your value is secured.
Extraction
Seaside Elevator is the default exit — clean and close.
If it's hot, rotate to a hatch immediately. Don't sit on 40+ Oil hoping the coast clears. Greed is how your Oil becomes someone else's Oil.
Quick Checklist
- Wharf shelves
- Port Authority red lockers
- ]Corner locker room + security breach
- Lower drawer area — Turbo Pumps
- Stacking Yard full sweep (check all angles)
- Customs House exterior
- Recycle common items if overweight
- Beach Comet check
- Extract via Seaside Elevator or hatch
FAQ
Is Rivington Tides really better than Stella Montis for Oil?
Yes — if you know the container layout. More total containers, more hidden spots, reliable Turbo Pumps, and Comet-based Explosive Compound. Stella Montis wins only on speed.
What's the most important item on this route?
Turbo Pumps. They convert into multiple Oil at base. Find them, keep them, extract them.
Should I recycle Turbo Pumps or Rocket Thrusters mid-raid?
No to both. Extract and recycle at base for significantly better value.
How much Oil can I expect per run?
45+ Oil on a solid run, combining recycled items, Turbo Pumps, and Synth Fuel. Weak runs land lower, but the drawer spawns keep it stable.
Is Beach Combing good for this farm?
It's fine, but Day Raid is cleaner for pure Oil. Beach Combing pulls in event loot that competes with industrial spawns.
Summary
Rivington Tides wins because it stacks value instead of relying on one big loot box: red lockers, Turbo Pump drawers, dense Stacking Yard containers, and Comet-based Explosive Compound.
Extract Turbo Pumps and Rocket Thrusters. Recycle common Oil items only when your bag forces it. Sweep the hidden angles in Stacking Yard. Do that consistently and 45+ Oil per run isn't a lucky outcome — it's the floor.

Most Popular Posts
- ARC Raiders Update 1.42: Phantom Targets Farming Guide (Glitched Wasps, Rewards, Regional Conditions)
- ARC Raiders Hullcracker Blueprints: Fastest Way to Complete The Major's Footlocker
- ARC Raiders Best Pop Trigger Strategy: Fast Phantom Targets Damage Guide
- ARC Raiders Subway Skin Guide: Unlock the Subterranean Outfit
- ARC Raiders Looting Mk. 3 Survivor Blueprint Guide: Best Blue Gate Route and Drop Locations
- ARC Raiders Medium & Heavy Gun Parts Blueprint Guide: Best Farm Route, Locations, and Refiner Crafting
Popular Category Lists
- ARC Raiders / (354)
- Grow a Garden / (294)
- CoD: Black Ops 7 / (167)
- Star Citizen / (163)
- MLB 26 / (159)
- Monopoly Go / (153)
- ARK Survival Ascended / (128)
- Steal a Brainrot / (99)
- Blox Fruits / (74)
- Adopt Me / (74)
- Forza Horizon 6 / (72)
- Sailor Piece / (68)
- Grow a Garden 2 / (68)
- Diablo IV / (62)
- CoD: BLACK OPS 6 / (55)
- Aion 2 / (52)
- Path of Exile 2 / (48)
- Monster Hunter Wilds / (46)
- Windrose / (44)
- Maplestory Classic / (42)






