0
0 Created: Sep 21,2026 | ARK Survival Ascended
ARK Survival Ascended Best Non-Knockout Tames: Top 5 Ranked With Taming Methods

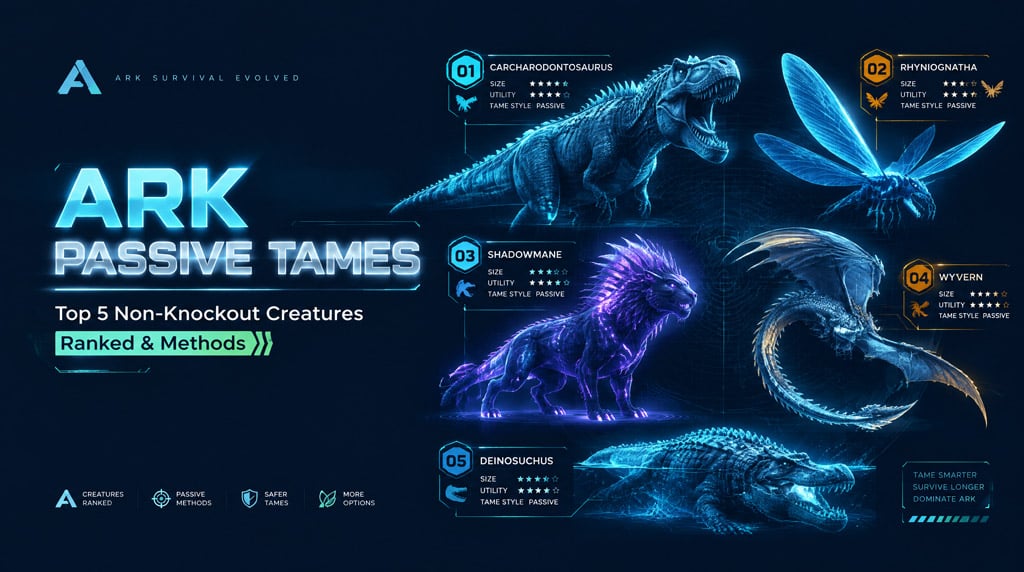
A single failed passive tame costs top-tier breeding stock, hours of corpse farming, and high-tier kits. This guide ranks ARK's five premier non-knockout creatures by progression impact and breaks down the exact trapping, feeding, and recovery protocols required to secure them on your first attempt.
- Top 5 Non-Knockout Tames: Progression & Risk Matrix
- 1. Carcharodontosaurus: Apex Ground Combat
- Trap Setup & Trust Phase
- Mounted Frenzy Route
- 2. Rhyniognatha: Ultimate Transport & Base Utility
- Impregnation Checklist
- Craving Management
- 3. Shadowmane: Saddle-Free Assault Specialist
- Fish Basket Preparation
- Stealth Infiltration Cycle
- 4. Deinosuchus: Amphibious Boss & Route Anchor
- 5. Wyvern: Aerial Progression Accelerator
- Trench Heist Tactics
- FAQ (Frequently Asked Questions)
- What is the absolute best non-knockout tame in ARK?
- Can you tame an adult Wyvern passively?
- Why does the Shadowmane taming bar drop or reset?
- What host creature gives the best Rhyniognatha stats?
- Can Deinosuchus be tamed without Superior Kibble?
Top 5 Non-Knockout Tames: Progression & Risk Matrix
| Rank | Creature | Taming Mechanic | Primary Utility | Critical Failure Point | Hard Prerequisite |
|---|---|---|---|---|---|
| 1 | Carcharodontosaurus | Corpse trust feeding + mounted kill streak | Sustained ground boss/alpha combat | Route starvation or taking wild damage while mounted | High drag-weight corpses (Baby Rex/Carno) |
| 2 | Rhyniognatha | Pheromone host impregnation + cravings | Heavy structural lift & air defense | Craving item lockout or dropping host below 10% wild HP | Bronto/Giga/Carcha host + pheromone |
| 3 | Shadowmane | Stealth hand-feeding basketed fish | Saddle-free amphibious combat | Approach angle detection or server desync waking | 1.5x+ fish in Fish Baskets + Ghillie |
| 4 | Deinosuchus | Passive mouth feeding during basking | Semi-aquatic bleed damage & boss tank | Head-on collision or shoreline predator agro | Superior Kibble + Ghillie armor |
| 5 | Wyvern | Egg heist, incubation, and milk feeding | Aerial transit, scouting, and trench farming | Stamina depletion in trench crossfire | High-speed Pteranodon or Griffin (150%+ MS) |
1. Carcharodontosaurus: Apex Ground Combat
The Carcharodontosaurus outpaces the Giganotosaurus in sustained combat thanks to Bloodrage (which grants up to 100% bonus melee damage and rapid health regeneration) and its sweeping tail-spin knockback.
Trap Setup & Trust Phase
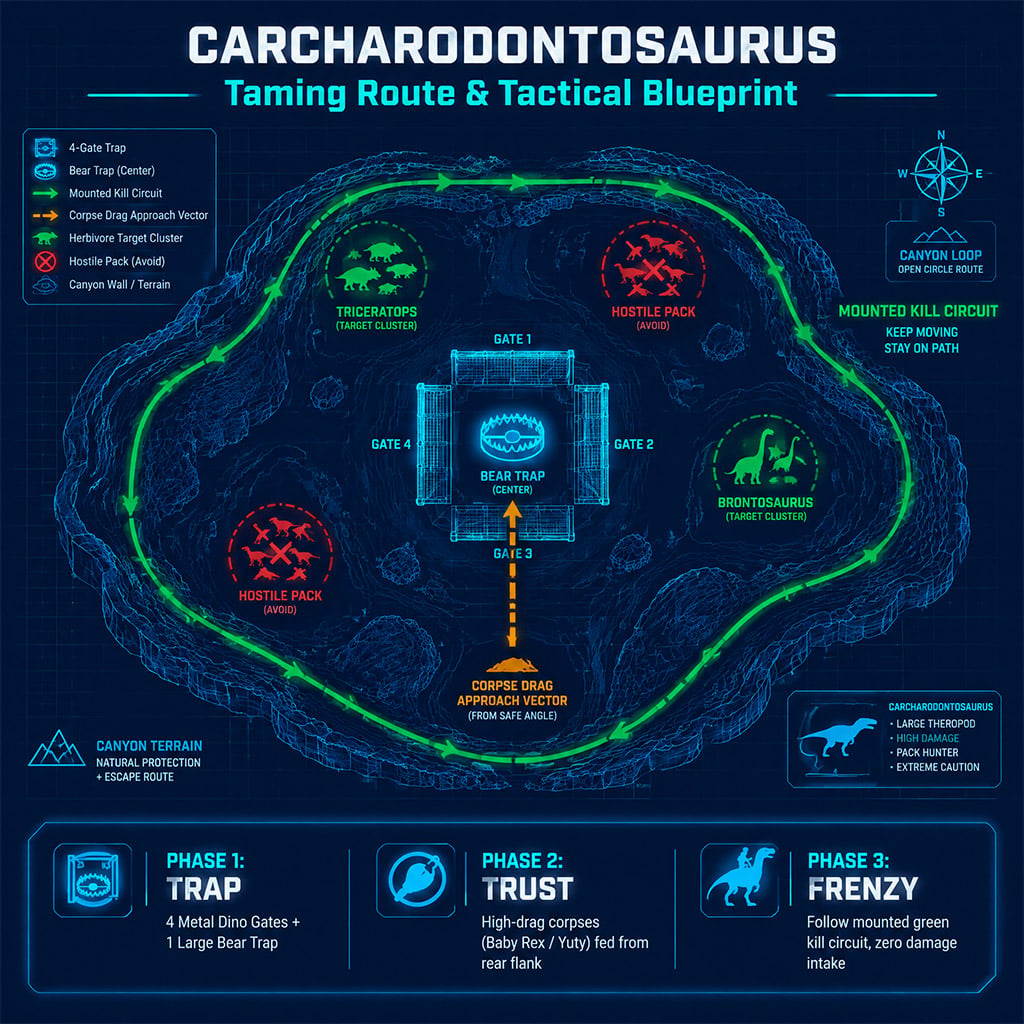
- Trap Blueprint: Construct a 3-sided trap using 4 Metal Dinosaur Gateways and 1 Large Bear Trap centered within. Lure the Carcha into the bear trap, then place the fourth gate behind it.
- Corpse Mechanics: Trust points scale directly with corpse drag weight. Small wildlife is useless. Use Baby Rexes, Baby Diplodocus, or wild Yutyrannus corpses.
- Execution: Wear full Ghillie. Drag the corpse directly to the snout while crouched. Back away the second the Carcha lowers its head to sniff. Repeat until the Friend meter is full (green ring complete).
Mounted Frenzy Route
- Release the Carcha from the trap immediately upon mounting.
- Target Selection: Prioritize medium-to-large passive or neutral wildlife (Brontos, Stegos, Triceratops).
- The Golden Rule: Avoid getting bogged down by high-knockback packs (Allosaurus, Kentrosaurus). Any damage taken by the Carcha during the mounted phase cuts taming effectiveness permanently.
2. Rhyniognatha: Ultimate Transport & Base Utility
The Rhyniognatha carries Vaults, operational structures, and heavy creatures (up to Rex class), rendering standard air logistics obsolete.
Impregnation Checklist
1. Pheromone Retrieval: Kill male Rhyniognathas in swamp biomes to obtain Rhyniognatha Pheromone.
2. Host Selection: Offspring stats inherit directly from the host. Sacrificing a low-tier creature yields garbage. Use a high-stat, cryo-bred Brontosaurus, Gigantosaurus, or Carcharodontosaurus.
3. The Trap: Box the female Rhyniognatha in a large stone/metal cage (6x6x6 walls with behemoth gates).
4. Health Threshold: Lower the wild female below 10% maximum health. Feed the pheromone to your host tame and bring it inside the trap.
5. Dismount: Step off the host and retreat. The female will pin and impregnate the host if aggro is unbroken.
Craving Management
- The gestation period requires satisfying 5 sequential craving requests (each granting a 20% stat inheritance boost).
- Pre-stage a refrigeration unit on-site containing: Exceptional/Extraordinary Kibble, Battle Tartare, Shadow Steak Saute, Focal Chili, Golden Hesperornis Eggs, and Absorbent Substrate. Missing a single craving permanently caps offspring efficiency at 80% or below.
3. Shadowmane: Saddle-Free Assault Specialist
Shadowmanes ignore standard saddle armor limits with their passive 80-armor hide at level 100, combined with chain lightning stuns, stealth cloaking, and teleport strikes.
Fish Basket Preparation
- Catch fish using Fish Baskets in deep rivers.
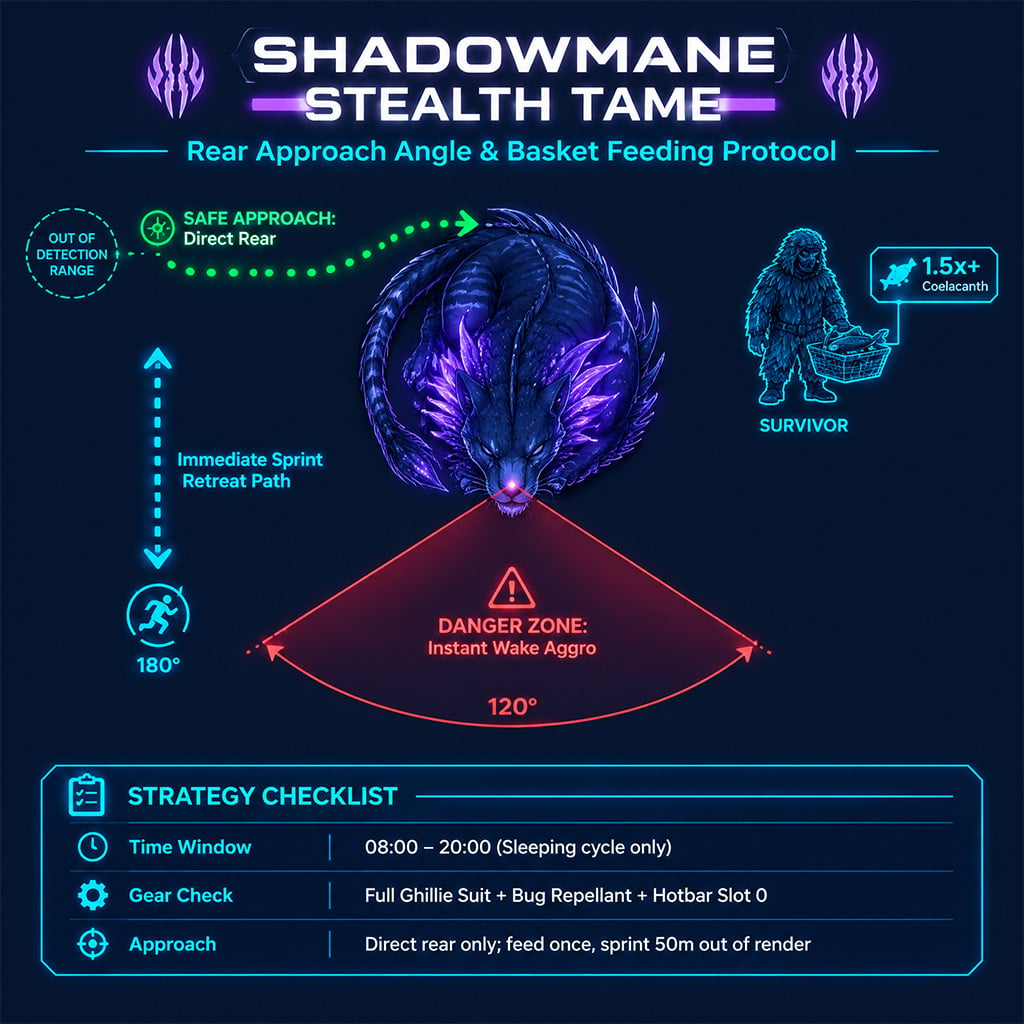
- Weight Matters: Only use fish with a size multiplier of 1.5x or higher (Coelacanth or Sabertooth Salmon). Anything lower stretches taming cycles and multiplies wake-up risks.
Stealth Infiltration Cycle
1. Track the Shadowmane from a distance until midday (it only sleeps between 08:00 and 20:00 in-game time).
2. Equip full Ghillie and apply Bug Repellant to eliminate detection range.
3. Put the filled Fish Basket in your last inventory slot.
4. Approach strictly from directly behind the tail. Approaching from the front or flanks instantly triggers alert aggro.
5. Feed once, turn 180 degrees immediately, and sprint out of render range.
6. Track with a tracking node or spyglass until it falls asleep again.
4. Deinosuchus: Amphibious Boss & Route Anchor
Deinosuchus bridges river crossings and provides a heavy armor-penetrating Giga Bite attack that deals massive percentage-based bleed damage against bosses and alphas.
| Step | Action Protocol | Tactical Note |
|---|---|---|
| 1. Site Clearing | Eliminate all wild Sarcos, Piranhas, and Kaprosuchus within 50 meters. | Secondary aggro cancels the basking animation instantly. |
| 2. Stance Trigger | Wait on high ground until the Deinosuchus opens its jaws to bask. | The open-mouth basking state lasts 15 to 45 seconds. |
| 3. Approach Angle | Approach horizontally from the rear flank (behind the back legs). | Walking near the snout triggers an instant snap that deals massive damage. |
| 4. Feeding | Insert Superior Kibble into the hotbar and execute the feed prompt. | Back away immediately; it closes its jaws 3 seconds after feeding. |
5. Wyvern: Aerial Progression Accelerator
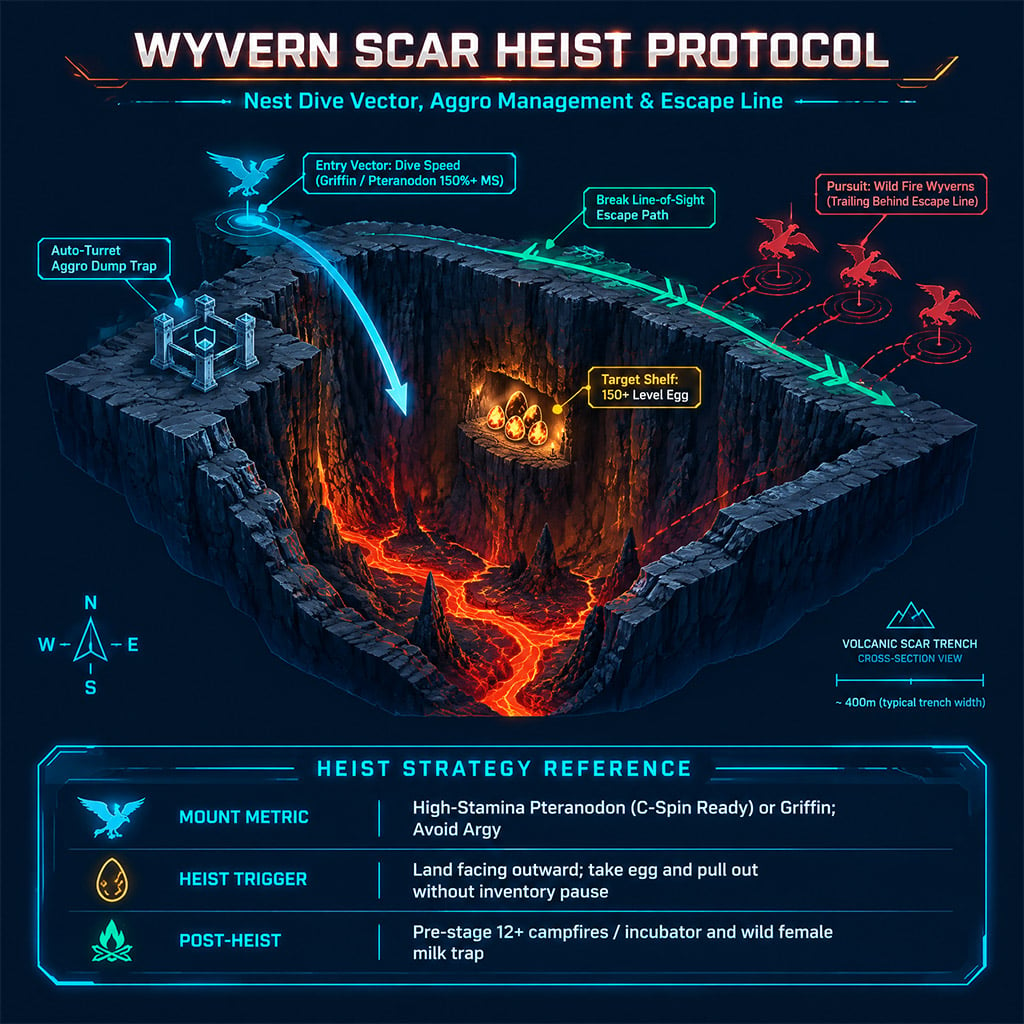
Wyverns solve mid-game travel limitations and dominate early-game base defense, but require an indirect egg heist rather than standard taming.
Trench Heist Tactics
- Mount Selection: Use a high-stamina Pteranodon (C-spin maneuver ready) or a high-movement Griffin. Never use an Argy; its low speed makes escaping chasing wild Wyverns impossible.
- Trap Placement: Build a 4-gateway trap near the canyon rim with an automated turret or an enclosure containing a high-level bashed Stego/Rex to dump aggro.
- The Pull: Dive in, grab an egg of level 150+ (aim for Lightning or Fire first), and immediately burn stamina climbing straight out along canyon edges to break line-of-sight breath attacks.
- Incubation & Raising:
- Requires high heat (minimum 12–15 Campfires, 2–3 Standing Torches in a U-shape, or an Egg Incubator).
- Babies consume only Wyvern Milk until fully matured. Knock out wild female Wyverns or kill Alpha Wyverns to secure milk before the egg hatches.
FAQ (Frequently Asked Questions)
What is the absolute best non-knockout tame in ARK?
The Carcharodontosaurus is the strongest non-knockout tame for ground dominance due to its Bloodrage ability, which out-damages a Giga while healing continuously. If base operations and troop transport are your bottlenecks, the Rhyniognatha takes the top spot.
Can you tame an adult Wyvern passively?
No. Standard wild Wyverns (Fire, Lightning, Poison, Ice) cannot be tamed through passive feeding or knockouts. You must steal a wild egg from a trench nest, incubate it, and raise the hatchling using Wyvern Milk.
Why does the Shadowmane taming bar drop or reset?
The taming bar resets if the Shadowmane detects the player, enters combat with local fauna, wakes up while you are within its vision cone, or takes damage from wild creatures. Always wear Ghillie, feed strictly from the tail, and clear the surrounding area before it sleeps.
What host creature gives the best Rhyniognatha stats?
A fully imprinted, high-stat Gigantosaurus, Carcharodontosaurus, or Brontosaurus provides the highest baseline drag weight and stat inheritance for a Rhyniognatha host. Sacrificing low-tier mounts results in poor final base stats and restricted carry weight.
Can Deinosuchus be tamed without Superior Kibble?
Yes, you can use raw prime meat or regular raw fish meat, but taming effectiveness will drop noticeably, and the feeding intervals will double. Superior Kibble guarantees the highest bonus levels and requires the fewest basking cycles.

I’m Benjamin Walsh, an Australian Senior Copy Editor at GGWTB focused on survival crafting, open-world exploration, and extraction games. My guides weigh base locations, supply routes, and what deserves the last slot in your backpack. When editing, I look for skipped prerequisites and unclear directions—a useful guide shouldn’t send you across the map without the right tools.

Most Popular Posts
- ARK Genesis Part 1 Mission Loot Guide: Best Farms for Flak, Tech & Hazard Gear
- ARK Survival Ascended Lunar Biome Cave Locations: All 6 Caves From World Teleporter
- ARK: Survival Ascended Bjarnheim Farming Guide: Element, Pearls, Metal & Boss Routes
- ARK: Survival Ascended Lumina Dinos Guide: Spawn Locations, Taming Steps & Umbra Synergy
- ARK Survival Ascended Best Genesis Missions for Loot and Hexagons
- Thylacoleo Location on Genesis 1 (ASA): Spawn Coordinates, Force-Spawn Method & Fast Taming Guide
Popular Category Lists
- ARC Raiders / (345)
- Grow a Garden / (292)
- CoD: Black Ops 7 / (167)
- Star Citizen / (161)
- MLB 26 / (159)
- Monopoly Go / (152)
- ARK Survival Ascended / (126)
- Steal a Brainrot / (98)
- Blox Fruits / (74)
- Adopt Me / (73)
- Forza Horizon 6 / (72)
- Sailor Piece / (68)
- Grow a Garden 2 / (68)
- Diablo IV / (62)
- CoD: BLACK OPS 6 / (55)
- Path of Exile 2 / (48)
- Monster Hunter Wilds / (46)
- Aion 2 / (46)
- Windrose / (44)
- Donut SMP / (41)