0
Created: Sep 21,2026 | COD: Modern Warfare 4
Best MW4 Meta Loadouts: M4A1, ISO Kastov 762 & X-58 Nyx Setup

Most weapon builds fail because players stack heavy stabilization parts until their handling speeds crawl. Optimize your class around engagement distance and sprint recovery to break hard choke points without sacrificing reaction time.
- Weapon Selection Matrix: Map Role & Engagement Range
- M4A1: Mid-Range Tactical Workhorse
- Practical Build Rules
- ISO Nightshade: Aggressive Objective Breaching
- Practical Build Rules
- Kastov 762: Heavy Lane Suppression
- Practical Build Rules
- X-58 Nyx: Dynamic Strafe Tracking
- Practical Build Rules
- SMG Head-to-Head: ISO Nightshade vs. X-58 Nyx
- FAQ (Frequently Asked Questions)
- What is the most versatile all-around weapon among these four?
- Which SMG performs better in close-quarters hardpoint matches?
- Why does the Kastov 762 feel inconsistent at long range?
- When should you avoid using an extended magazine?
- How should you adjust your loadout when facing heavy enemy pressure?
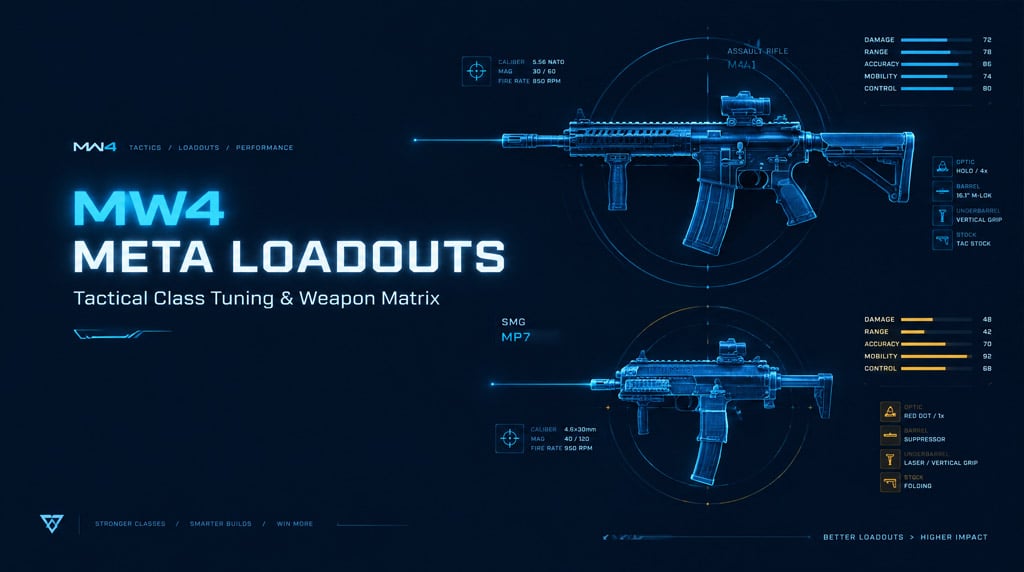
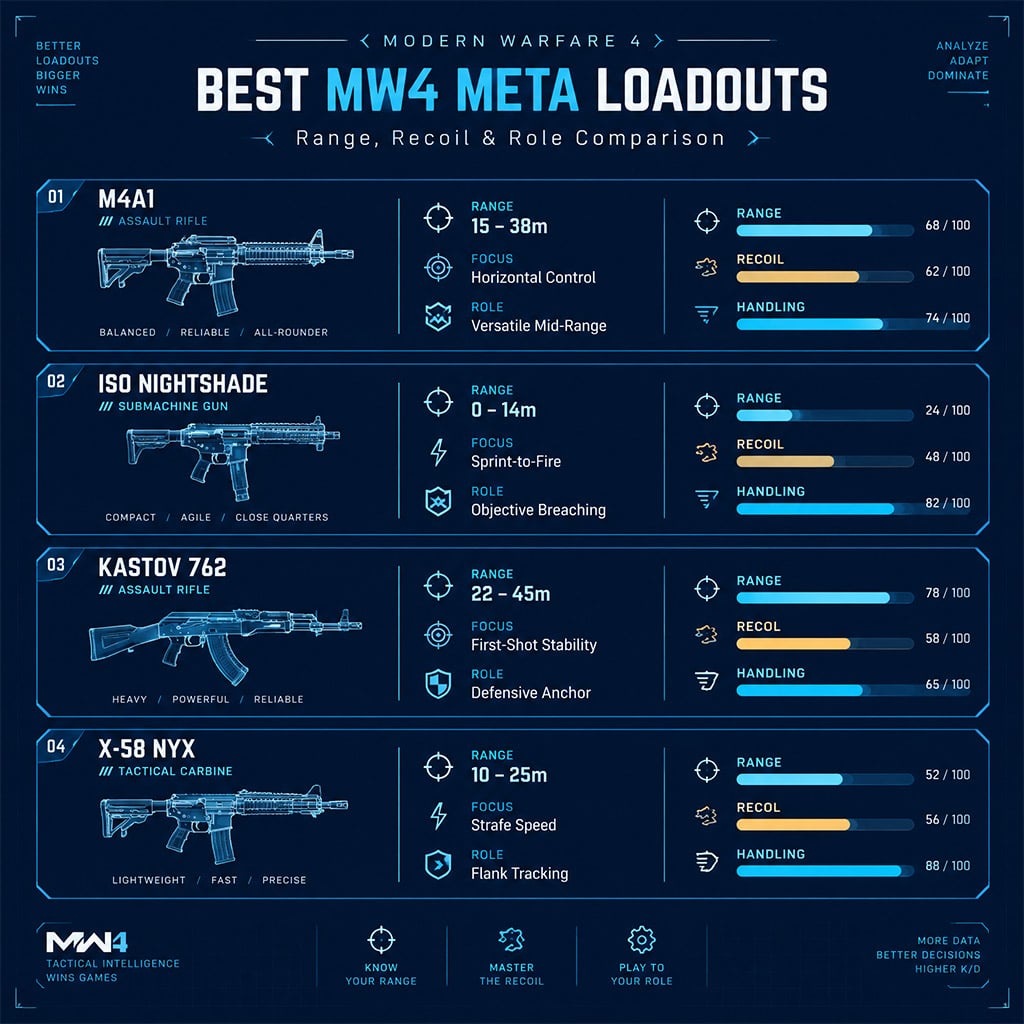
Weapon Selection Matrix: Map Role & Engagement Range
Pick your primary based on the sightlines you hold, not community hype.
| Weapon | Optimal Engagement Range | Primary Build Focus | Immediate Disqualification Point |
|---|---|---|---|
| M4A1 | 15m – 38m (Versatile Lane) | Horizontal balance & bullet velocity | You run aggressive point-blank hardpoint routes |
| ISO Nightshade | 0m – 14m (Close Interior) | Sprint-to-fire & hip-to-ADS speed | The route forces 30-meter open sightlines |
| Kastov 762 | 22m – 45m (Static Anchor) | First-shot recentering & visual stability | You must push and clear corners unassisted |
| X-58 Nyx | 10m – 25m (Flank & Strafe) | Lateral strafe speed & ADS handling | You rely on sustained full-auto room clearing |
M4A1: Mid-Range Tactical Workhorse
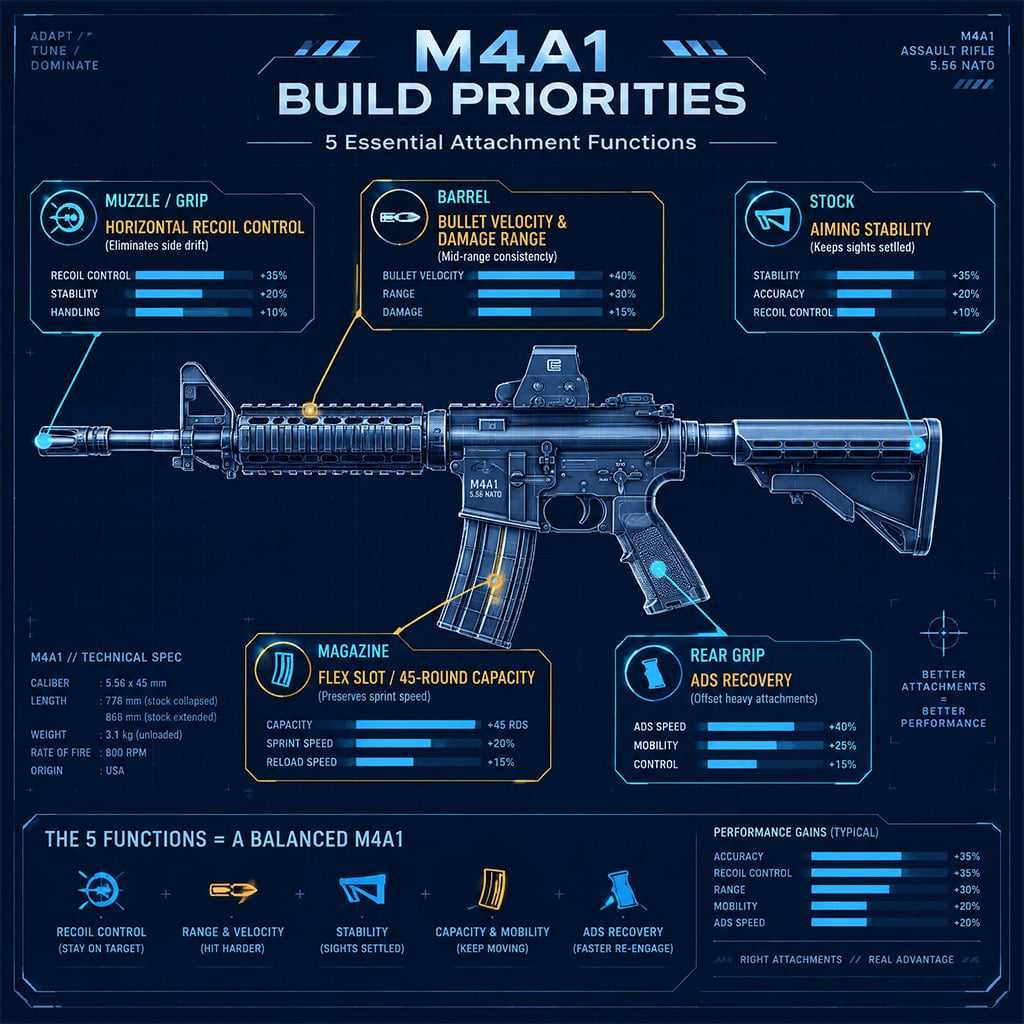
The M4A1 handles unpredictable routes better than any specialist weapon. Its fatal flaw is over-tuning: stacking heavy barrels and suppressors ruins aim-down-sights (ADS) timing, leaving you helpless against aggressive submachine guns.
Practical Build Rules
Neutralize Horizontal Kick: Predictable vertical rise is easy to pull against; sudden lateral bounce causes missed shots. Use an angled muzzle or grip to kill side-to-side drift.
Preserve ADS Frames: Limit yourself to one heavy recoil component. Offset it immediately with an ultralight stock or high-tension rear grip.
Keep Clean Iron Sights: Skip optics unless your barrel selection blocks the target horizon. Spend that free slot on strafe mobility.
Avoid Oversized Magazines: A 60-round drum imposes heavy movement and sprint-out penalties. Stick to standard or 45-round magazines to protect your mobility.
Tactical Verdict: Clear rooms with standard assault rifles only while pre-aimed. If your sight picture is not settled before you round a corner, swap to an SMG.
ISO Nightshade: Aggressive Objective Breaching
The ISO Nightshade dominates interiors through sheer burst speed. However, excessive mobility parts make the gun bounce violently outside point-blank range, turning medium-distance engagements into guaranteed losses.
Practical Build Rules
Eliminate Sprint-to-Fire Delay: Standard sprint recovery gets you killed by stationary defenders. Prioritize sprint-to-fire components over raw ADS speed.
Stabilize the First Six Rounds: High-fire-rate SMGs win or lose on the initial burst. Add a light muzzle compensator to flatten initial climb.
Equip Extended Capacity: High cyclic fire rates empty small magazines instantly. Run an extended magazine so you can clear two defenders without ducking into cover to reload.
Control Tactical Sprinting: Break your tactical sprint before rounding doorways to bypass weapon-raise animations.
Tactical Verdict: Never challenge head-glitches or long courtyard lanes with this platform. If you cannot close the gap to under 15 meters using tactical routes, disengage immediately.
Kastov 762: Heavy Lane Suppression
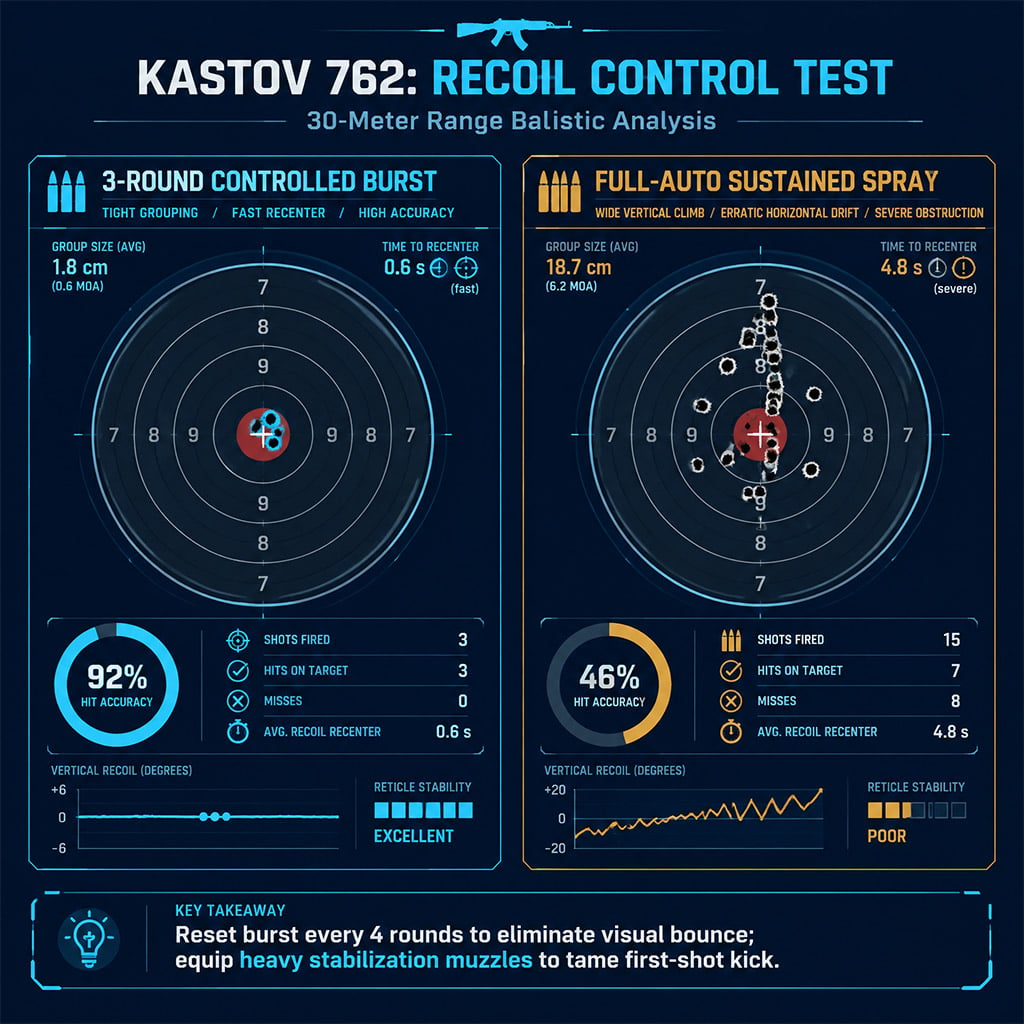
The Kastov 762 delivers punishing damage profiles over medium distances, but severe muzzle rise and sustained kick punish careless full-auto firing.
Practical Build Rules
Tame First-Shot Deviation: Heavy first-shot kick knocks the reticle completely off target. Install heavy compensators and stabilization stocks to pull the sights back to center instantly.
Enforce Three-Round Bursts: Sustained full-auto past 30 meters wastes ammo and misses shots. Fire three- to four-round bursts to reset the recoil cycle.
Clear Muzzle Flash Obstruction: The default gas signature often obscures small targets. Run a low-profile flash hider or clean dot sight to keep sightlines clear.
Hold Defensive Angles: This weapon functions poorly on the move. Plant your feet, mount cover when possible, and force enemies into your field of fire.
Tactical Verdict: If an aggressive squad rushes your building, drop back. Changing to a secondary or holding an anchor position works better than taking sudden close-quarters fights with this rifle.
X-58 Nyx: Dynamic Strafe Tracking
The X-58 Nyx bridges the gap between assault rifle stability and SMG handling. It rewards active gunners who challenge opponents while strafing across doorways.
Practical Build Rules
Stack Lateral Strafe Mobility: The Nyx's main advantage is moving fast while firing. Build around mobility stocks and light handguards that boost strafe speed.
Skip Heavy Recoil Control: The Nyx has smooth, predictable base handling. Adding heavy control parts ruins its mobility without providing meaningful accuracy gains.
Extend Damage Range Modestly: Run a match-grade barrel to push your maximum damage range out to 22 meters, matching mid-range rifles.
Keep the Standard Magazine: Rely on swift tactical reloads instead of heavy drum magazines to keep your sprint recovery fast.
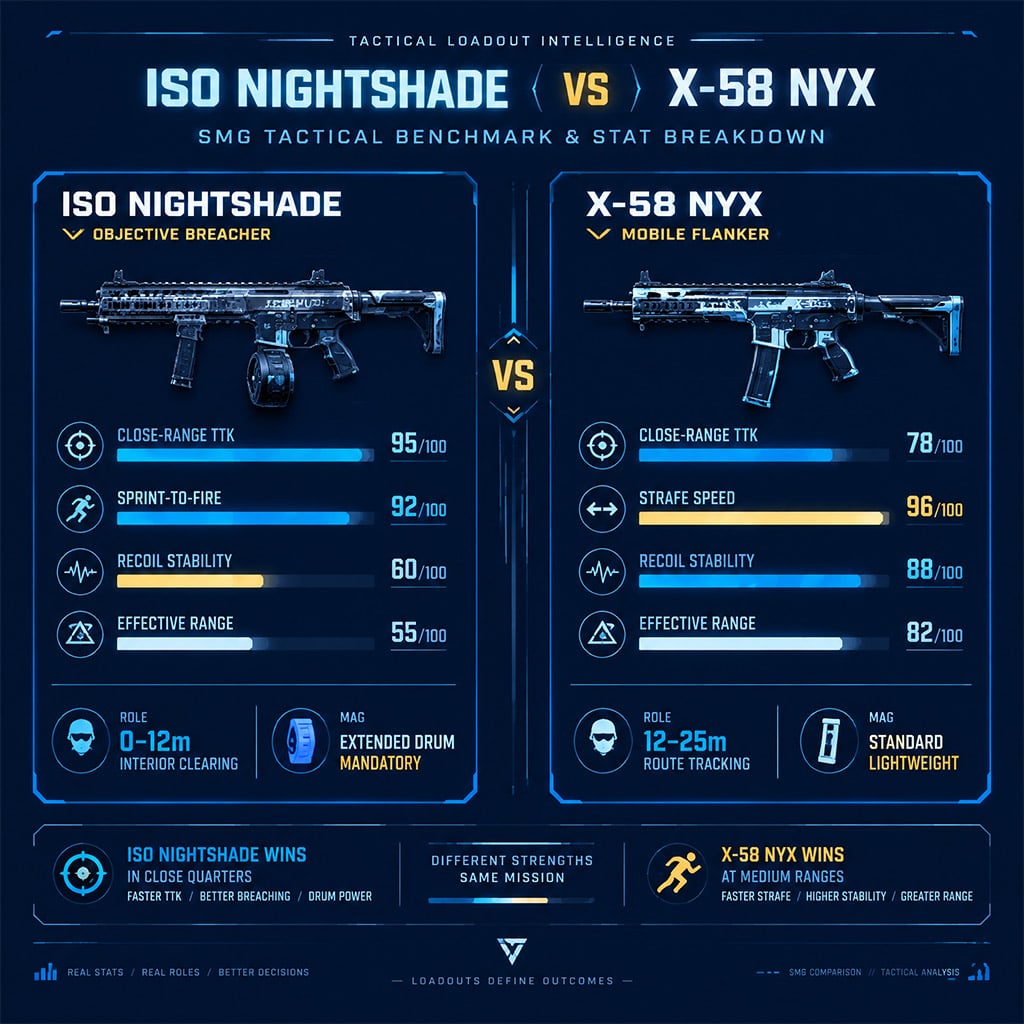
SMG Head-to-Head: ISO Nightshade vs. X-58 Nyx
| Tactical Variable | ISO Nightshade | X-58 Nyx |
|---|---|---|
| Optimal Combat Distance | 0 to 12 meters | 12 to 25 meters |
| Preferred Playstyle | Direct point breaches & slides | Angular peeking & lateral strafing |
| Recoil Behavior | Rapid initial jump | Flat, predictable diagonal drift |
| Magazine Priority | Mandatory extended magazine | Standard magazine preferred |
| Primary Failure State | Severe damage falloff beyond 15m | Outgunned by high-fire-rate weapons up close |
Tactical Verdict: Pick the ISO Nightshade when holding hardpoint interiors where targets appear at point-blank range. Use the X-58 Nyx for roaming flanks and mid-range street fights.
FAQ (Frequently Asked Questions)
What is the most versatile all-around weapon among these four?
The M4A1 remains the most dependable all-around choice. It handles point-to-point map rotations without severe mobility penalties or major range drop-offs.
Which SMG performs better in close-quarters hardpoint matches?
The ISO Nightshade is unmatched inside 12 meters due to its fire rate and rapid sprint-to-fire speed. The X-58 Nyx requires wider angles and strafing room to beat dedicated close-range weapons.
Why does the Kastov 762 feel inconsistent at long range?
Uncontrolled sustained fire causes heavy visual bounce and wide recoil drift. Fire short, disciplined bursts of three to four rounds to let the reticle recenter between shots.
When should you avoid using an extended magazine?
Skip extended magazines on mobile roaming builds where every millisecond of aim-down-sights and sprint-to-fire speed matters. High-capacity drums impose handling penalties that often cost you opening gunfights.
How should you adjust your loadout when facing heavy enemy pressure?
Strip off heavy barrels and large magazines to reclaim handling speed. Gaining three to four frames of faster weapon-raise timing helps counter aggressive enemy pushes better than extra recoil control.

I’m Sofia Bergström, a Swedish Managing Editor covering FPS, competitive shooters, and extraction shooters for GGWTB. My guides focus on loadout trade-offs, positioning, and when to commit—or cut your losses. A weapon’s stats tell only part of the story; I focus on how it fits your role and the fight ahead.
Most Popular Posts
- MW4 Beta Meta Weapons Class Setups: Attachments, Perks, and Tuning included
- MW4 Beta Easter Eggs: All 15 Secrets, Locked Doors, Hidden Routes & Unlocks Tested
- Modern Warfare 4 Settings: Best Controller, Graphics & PC Config for Max FPS
- Modern Warfare 4 Beta Best Weapons, Loadouts, Perks & Killstreaks
- MW4 DMZ Hajin Map: Confirmed Features, Release Date and What's Still Unknown
- COD Warzone Season 5 Reloaded Meta Loadouts: Best Weapon Builds After the Update
Popular Category Lists
- ARC Raiders / (377)
- Grow a Garden / (302)
- Star Citizen / (174)
- CoD: Black Ops 7 / (168)
- MLB 26 / (159)
- Monopoly Go / (153)
- ARK Survival Ascended / (132)
- Steal a Brainrot / (101)
- Adopt Me / (80)
- Blox Fruits / (74)
- Forza Horizon 6 / (72)
- Aion 2 / (68)
- Sailor Piece / (68)
- Grow a Garden 2 / (68)
- COD: Modern Warfare 4 / (64)
- Diablo IV / (62)
- CoD: BLACK OPS 6 / (55)
- Maplestory Classic / (51)
- Path of Exile 2 / (48)
- Monster Hunter Wilds / (46)