


 0
0Bee Swarm Simulator (2026) Full Progression Guide: From Zero To Supreme Star Amulet
- NELSO
- Share
- Bee Swarm Simulator
- 02/08/26
- 6418
Progress in Bee Swarm Simulator doesn't usually collapse because of one big mistake—it collapses because of ten small purchases that felt harmless. We've watched it happen on our own alts: a few impulse tools, wasted eggs, early boosts with rare materials… and suddenly the Diamond Mask and SSA timeline doubles.
This guide is built to prevent that. We'll walk stage-by-stage from your first minutes to Supreme Star Amulet (SSA), while keeping your honey spending tight, your materials protected, and your hive strong enough to clear quests efficiently. Here's how we do it in practice.
- The Core Idea
- Gear Progression
- Hive Composition
- Why Mixed Hive Wins?
- The Only Buffs
- Bombs
- Event Bees
- Materials
- Diamond Eggs
- Glitter
- Gumdrops
- Stingers
- Star Jellies
- Star Eggs
- SSA Roadmap
- FAQs
- Should We Really Rush 25 Bees First?
- Is Golden Rake Worth It Or A Trap?
- Why Bubble Mask And Early Blue Lean?
- Are Mythic Bees Required Early?
- Why Skip Marks Early?
- When Do We Stop Being Mixed And Choose A Color?
- Finally
↖ The Core Idea
Our progression rule is simple: buy what unlocks the next power spike, and skip what only feels good for a day.
- We optimize for quest completion speed early (mixed fields), not single-field farming.
- We prioritize capacity + conversion + stable buffs, because those scale every minute you play.
- If you find yourself thinking this looks fun, we pause and ask: does it shorten the road to 33/35/40/45 bees or SSA? If not, we don't buy it.
↖ Gear Progression
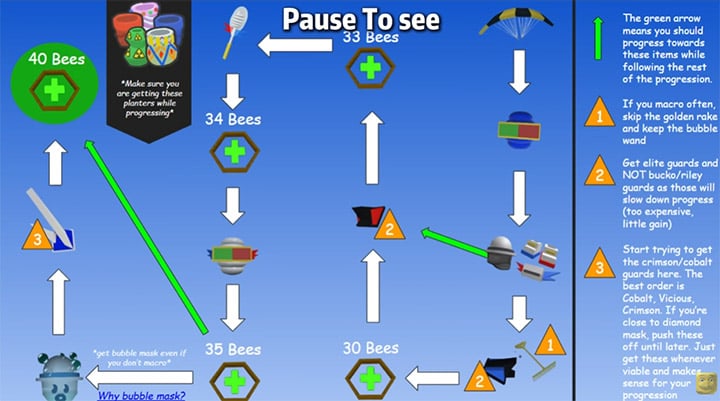
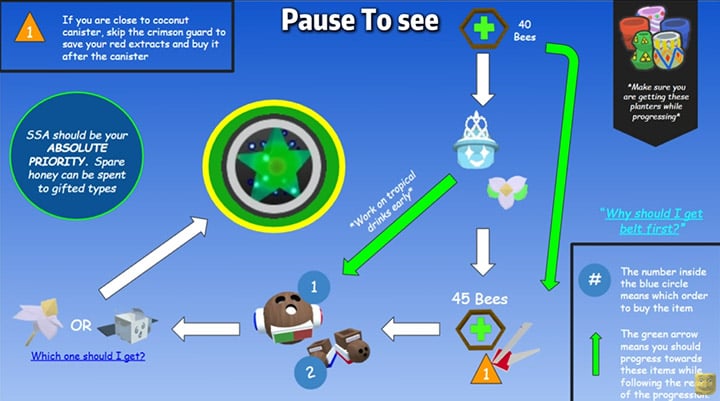
Below is the clean path we use. It's not the only path, but it's the one that minimizes honey waste.
| Milestone | Buy / Upgrade | Why it matters | Hard Don't List |
|---|---|---|---|
| Start → 25 bees | Bubble Wand + Blue Backpack | Cheap, strong early collection, smooth questing | Don't overbuy side tools |
| Early gear set | Beekeeper's Boots + Helmet + Belt | Best early efficiency per honey | Don't chase luxury stats |
| 30 bees | Elite Blue Guard + Elite Red Guard | Huge value; stability in combat/collection | Don't skip guards |
| 33 bees | Porcelain Dipper + Porcelain Port-O-Hive | First true skyrocket spike in honey/hour | Don't delay these |
| Optional | Golden Rake | Decent value if you're not delaying milestones | Don't treat it as mandatory |
| 35 bees | Bubble Mask | Cheapest strong mask for early blue-leaning efficiency | Don't detour into expensive masks too early |
| 40 bees (path) | Crimson + Cobalt Guards | Endgame-relevant guards; synergy value | Don't keep weaker guards for now |
| Midgame priority | Diamond Mask (requires 5 Diamond Eggs) | Capacity + instant conversion passive = blue progression cornerstone | Don't spend Diamond Eggs elsewhere |
| Parallel grind | Petal Belt | Massive overall upgrade; scales with everything | Don't waste Star Jellies needed for it |
| 45 bees | Coconut Canister + Coconut Clogs | Big midgame leap: capacity, survivability, consistency | Don't buy filler gear instead |
| Spirit Bear track | Windy Bee (donate Spirit Petal to Wind Shrine) | Strong utility and long-term value | Don't rush donation before you're ready |

If you're ever short on honey, we farm until we can buy the next milestone item in one go, instead of spreading honey across multiple almost upgrades.
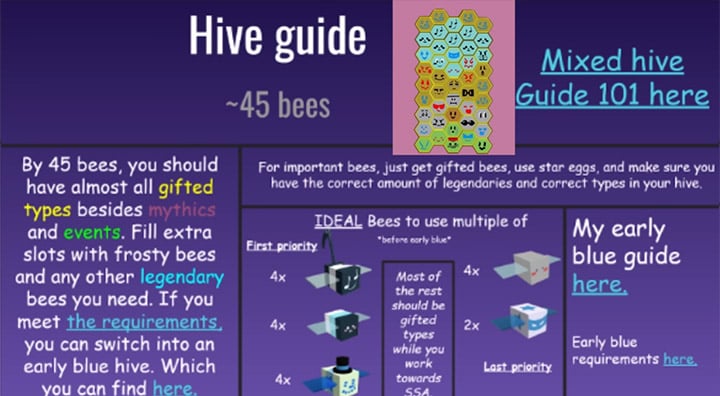
↖ Hive Composition
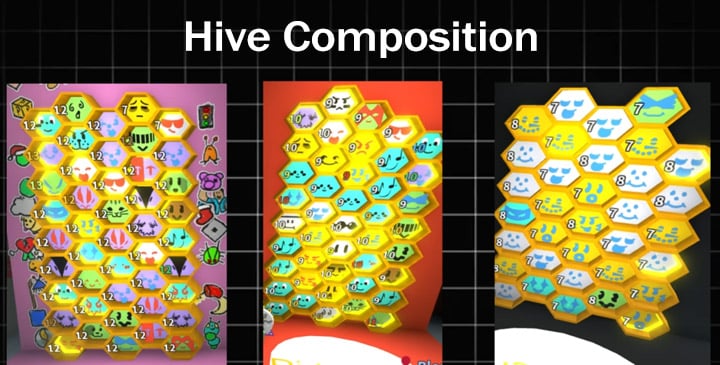
↖ Why Mixed Hive Wins?
A lot of players try to go blue or go red too early. That's not efficient for the first half of the game because quests force you into many fields.
So we build a mixed hive that does two jobs:
- Keeps core buffs up nearly all the time.
- Produces enough bombs/collection to make every quest faster.
If you notice you're strong in one field but slow everywhere else, then your quest pace drops—and quest pace is your early economy.
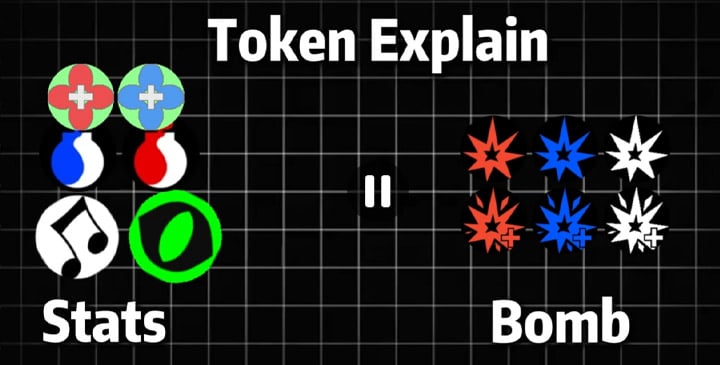
↖ The Only Buffs
We focus on tokens that multiply your pollen consistently.
| Buff / Token Type | Target Uptime | How many providers (rule of thumb) | Why we care |
|---|---|---|---|
| Red & Blue Boost stacks | Keep stacks near max | 4–5 total providers | Early scaling is absurd; stacks multiply your base output |
| Baby Love | Near-permanent | 3–4 providers | 2× pollen effect changes your whole minute-to-minute |
| Melody | Near-permanent | 3–4 providers (e.g., Music) | Crit power surge = faster conversion via higher yield |
| Focus | Very frequent | 4–5 providers | Crit chance consistency; smooths farming |
| Rage | Steady | 2–3 providers | You'll need it for tougher enemies like Coconut Crab later |
| Haste | Comfortable movement speed | 3–4 providers | Less walking = more pollen; also safer in fights |
On our midgame alt, simply stabilizing Baby Love + Melody + Focus (without any new gear) noticeably improved honey flow because token downtime was the real bottleneck, not tool power.
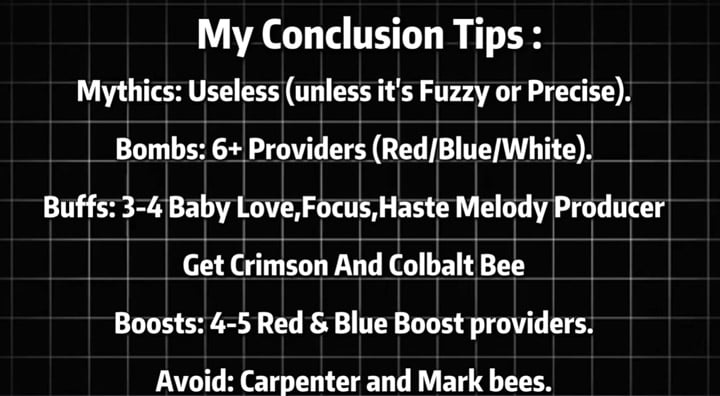
↖ Bombs
In the early game, bombs are your workhorse. More bombs = more pollen collected per second, especially while your bag size and convert rate are still catching up.
- Aim for 6+ bomb providers across colors.
- If you have Crimson + Cobalt, their synergy helps reduce how many pure white bomb bees you need.
Important correction (where many players burn slots):
Marks aren't your early-game money printer. Bees chosen mainly for marks often underperform compared to bees that keep your core buffs and bombs flowing. If you already have a useful gifted for a hive bonus, great—but we don't build around marks early.
↖ Event Bees
We buy event bees in the order that compounds value the longest.
| Order | Event Bee | Why we buy it now | If you delay this… |
|---|---|---|---|
| 1 | Tabby Bee | Stacks scale over time; earlier = stronger later | You lose days/weeks of compounding |
| 2 | Cobalt Bee | Strong utility + synergy + early stability | Mixed hive feels lopsided |
| 3 | Crimson Bee (recommended) | Balances tokens and bomb synergy | More reliance on extra bomb bees |
| 4 | Festive Bee | Solid utility; helps overall progression | Slower momentum, fewer helpful drops |
What we skip early:
- Photon Bee: strong later, but early value can be weaker than compounding tickets into other priorities.
- Puppy Bee: tickets are too precious early; the payoff isn't aligned with rushing milestones.
If you find yourself short on tickets, then we cut nice-to-haves and keep tickets reserved for Star Treats and the core event path.
↖ Materials
If you only follow one section, follow this one. The late-game gear requirements are brutal, and early boosting with scarce materials is the classic slow-death mistake.

↖ Diamond Eggs

- Goal: keep exactly 5 Diamond Eggs reserved for Diamond Mask.
- Sources you'll realistically see: questlines and rare drops from tougher enemies/bosses.
If you find yourself thinking I'll just use one egg, then you're trading a short dopamine hit for a long-term wall. Diamond Mask is not optional if you're leaning blue.
↖ Glitter

- Glitter is required in many major crafts/upgrades.
- We avoid spending it on early field boosting.
If you're tempted to boost early, then use cheaper alternatives and keep glitter for gear progression.
↖ Gumdrops

- Target: save 2,500 for Gummy Bee first.
- After that, gumdrops still matter for crafting, so we don't spam them casually.
↖ Stingers
- First milestone:500 for Vicious Bee.
- After buying Vicious, we still conserve stingers because later requirements stack up.
If you see a Vicious Bee spawn, then we always prioritize killing it—consistent stinger income beats praying for catch-up later.
↖ Star Jellies

- Reserve: keep what you need for major crafts (notably Petal Belt requirements in many progression paths).
- Star Jellies vanish fast when used as just one more roll.
↖ Star Eggs

- Save Star Eggs until you've discovered most gifted types (excluding mythics).
- Using them late improves your odds of pushing SSA discovery requirements efficiently.
↖ SSA Roadmap
SSA requires discovering 40 different gifted bee types. We approach it like a checklist, not a casino.
Our SSA preparation loop:
- Keep progressing gear and bees count (toward 45 → 50).
- Use Royal Jelly strategically when it's efficient.
- Use Star Treats on event bees and high-value bees to lock gifted types you can't reliably roll.
If you discover you're stuck at, say, 34–38 gifted types, then you stop random spending and switch to deliberate completion: target what's missing, not what's flashy.
↖ FAQs
↖ Should We Really Rush 25 Bees First?
Yes—because more bees means more tokens, more passive conversion, faster quest completion, and more consistent buff uptime. If you're strong with fewer bees but slow on quests, then you're not actually progressing.
↖ Is Golden Rake Worth It Or A Trap?
It's not a trap, but it's not a milestone either. If buying it delays Porcelain Dipper/Port-O-Hive, then we skip it. If you can buy it without delaying the next major purchase, then it's fine.
↖ Why Bubble Mask And Early Blue Lean?
Because it's a cost-efficient power spike and pairs well with the capacity/conversion direction you'll want when Diamond Mask becomes available. If you're not ready to protect 5 Diamond Eggs, then you're not ready to commit to the Diamond Mask timeline.
↖ Are Mythic Bees Required Early?
No. They can help, but early progress is usually gated by gear milestones, buff uptime, and materials discipline. If you have mythics but your buffs drop constantly, then your hive is expensive rather than effective.
↖ Why Skip Marks Early?
Because early honey is dominated by consistent multipliers (boost stacks, Baby Love, Melody, Focus) and bomb frequency. If your hive can't keep those buffs stable, then marks won't rescue your honey rate.
↖ When Do We Stop Being Mixed And Choose A Color?
After SSA is unlocked and your hive level and gear support specialization. If you specialize before SSA and before you can sustain the right passives and field strategy, then your questing slows and your material needs spike.
↖ Finally
The heart of this route isn't buying more—it's buying the right things at the right time. We turn milestone gear into long-term value, use a mixed hive to keep quest speed high, follow a tight event-bee ticket order so value compounds, and lock down Diamond Eggs and other scarce materials so the Diamond Mask and Petal Belt don't get delayed. Then we push SSA with a checklist mindset, steadily completing the 40 gifted-type discoveries without turning progression into a slot machine.
When we follow this rhythm, progression becomes controllable: each stage has a clear target, clear no-buy zones, and a clear next upgrade. Honey stops disappearing quietly—and starts turning into visible power and milestones.

Most Popular Posts
- Bee Swarm Simulator Progression Guide: Best Gear Order from Early Game to Endgame
- Bee Swarm Simulator Bee Bear Quest Guide: Best Fields, Blooms, Stickers & Petal Cub Tips
- Bee Swarm Simulator Planters Guide: Best Fields, Nectar, Growth Times, and Buying Order
- How to Make 20B+ Pollen in Hive Hub as a Blue Hive in Bee Swarm Simulator
- Bee Swarm Simulator Best Mythic Bee: Ranked for Every Hive
- BSS Beesmas Update This Week: BBM Quest, Honeyday, Timer Extension, and Best Prep Guide
Popular Category Lists
- Grow a Garden / (286)
- ARC Raiders / (266)
- CoD: Black Ops 7 / (166)
- Monopoly Go / (146)
- MLB 26 / (145)
- Star Citizen / (116)
- Steal a Brainrot / (89)
- ARK Survival Ascended / (74)
- Sailor Piece / (68)
- Forza Horizon 6 / (63)
- Diablo IV / (61)
- Blox Fruits / (60)
- CoD: BLACK OPS 6 / (55)
- Adopt Me / (53)
- Path of Exile 2 / (48)
- Monster Hunter Wilds / (46)
- Windrose / (44)
- Grow a Garden 2 / (42)
- Path of Exile / (40)
- Bee Swarm Simulator / (36)


