


 0
0Why Blue Hive is the Best Endgame Choice in Bee Swarm Simulator (2026)?
- WYNN
- Share
- Bee Swarm Simulator
- 02/08/26
- 1533
Best Hive Color is a trick question in Bee Swarm Simulator. The real question is: which color fits the way you actually play—your time online, your patience for RNG, your willingness to boost, and your tolerance for slow boss kills.
From what we've seen across main accounts and rebuilds, Blue is often the best endgame starting color because it's the easiest to activate, the cheapest to stabilize, and the most consistent at printing honey while you stay online. Not because it wins every contest, but because it wins the one that matters most for progression: steady, repeatable income with fewer expensive dependencies.
Let's break down how Blue works, why it's so forgiving, and what you need so you don't swap early and make your life harder.
- When Blue Is Best?
- The Player Profile Blue Rewards
- Minimum Don't Swap Yet Checklist
- How a Blue Hive Actually Makes Honey?
- The Core Mechanic: Pop Star → Bubble Bloat → Bigger Bag + Faster Convert
- Why Blue Is Often The Cheapest Endgame Color To Start?
- SSA Requirement: Single Passive Is Enough to Start
- Lower Reliance on Certain High-Value Consumables
- The Blue Playstyle: Passive by Design
- Solo vs Group vs Tadpole Support
- What You Need to Succeed as Blue?
- Pros & Cons
- Common Blue Mistakes
- Mistake 1: Swapping Before SSA Is Ready
- Mistake 2: Treating Blue Like Red
- Mistake 3: Low Bubble Density During Pop Star Windows
- FAQs
- Q1) Is Blue Always The Best Endgame Hive?
- Q2) What's The Single must-have For Blue?
- Q3) Do We Need A Double-passive SSA For Blue?
- Q4) Can Blue Work Without Macroing?
- Q5) Why Do Blue Players Care So Much About Bubbles And Balloons?
- Q6) When Should We Consider Swapping From Blue To Red/White?
- Conclusion
↖ When Blue Is Best?
Blue shines when your goal is to build a reliable honey engine that can fund everything else—gifteds, gear crafts, late-game experiments, even a future swap to Red/White.
↖ The Player Profile Blue Rewards
Blue tends to be your best choice if:
- You're online a lot and you value consistency over peak bursts.
- You prefer a macro-friendly style (or at least semi-passive farming).
- You want a color that can start working with a single SSA passive instead of chasing expensive double-passive perfection.
If you find you can only play short sessions and you crave big boost moments, then Blue will feel slow. That doesn't make Blue bad—it means Blue isn't matching your schedule.
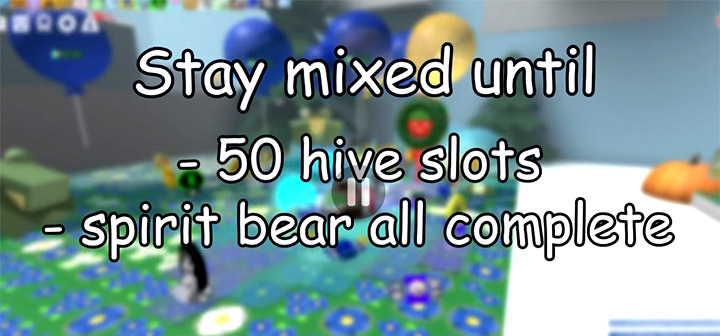
↖ Minimum Don't Swap Yet Checklist
We keep our hive mixed until we can meet these conditions:
| Requirement | Why it matters | If you're missing it… do this |
|---|---|---|
| 50 bees (recommended baseline) | More slots = more consistency in tokens and balloon value | Keep mixed, push bee slots first |
| Spirit Bear questline completed (recommended) | You avoid getting stuck on multi-field quests with a specialized hive | Finish Spirit Bear before hard committing |
| SSA unlocked (Star Hall access) | Blue needs Pop Star to feel like Blue | Don't swap without SSA availability |
This matters because swapping too early doesn't just lower honey—it slows quests, delays materials, and forces messy re-roll cycles.
↖ How a Blue Hive Actually Makes Honey?
Blue honey is built on a loop: Stay in Field → Load Balloons → Convert Efficiently → Repeat. The power comes from stacking mechanics that reward time online.
↖ The Core Mechanic: Pop Star → Bubble Bloat → Bigger Bag + Faster Convert
A working Blue hive is not more blue pollen. It's a system that turns bubble popping into conversion power.
- Pop Star (SSA passive) triggers periodically after collecting boost tokens.
- During Pop Star's window, your job is to pop as many bubbles as possible.
- That window pays you with Bubble Bloat, which increases your backpack capacity in blue fields and improves hive conversion efficiency.
Why Does This Feel So Strong?
Because capacity and conversion are multiplicative with time spent collecting. A bigger bag lets you stay in field longer, and faster conversion reduces downtime at the hive. Not flashy—just relentless.
If you find yourself constantly returning to the hive with small loads, then you're not doing Blue yet. You're missing either Pop Star uptime, bubble generation, or enough field time to let the loop compound.
↖ Why Blue Is Often The Cheapest Endgame Color To Start?
People call Blue cheap and leave it there. We prefer to be specific: Blue is cheap because it asks for fewer high-cost RNG wins up front.
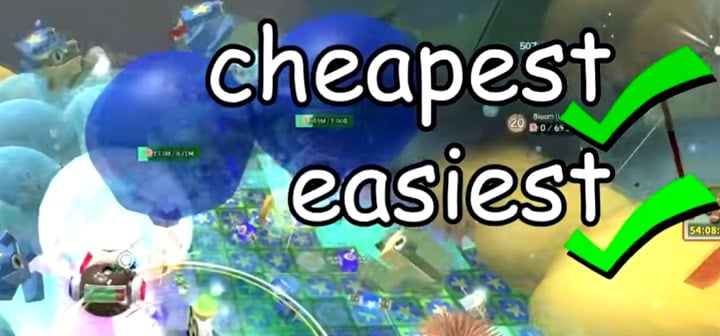
↖ SSA Requirement: Single Passive Is Enough to Start
Blue is famous for one reason: you can start functioning well with Pop Star as a single passive.
| Color direction | Typical feels good requirement | What makes it expensive |
|---|---|---|
| Blue | SSA with Pop Star (single passive can work) | Less pressure to roll perfect doubles immediately |
| Red / White | Often wants stronger synergy and higher-end setups early | More RNG cost + more must-have pieces |
If you find yourself burning trillions worth of rerolls chasing perfect SSA stats before you even have a stable income, then Blue is the safer first landing. Build the engine first, then chase perfection.
↖ Lower Reliance on Certain High-Value Consumables
Blue tends to be less dependent on constant high-intensity boosting and certain premium consumables to show numbers. That means:
- You can save resources while still earning.
- Your progress is less fragile if you miss a boost day.
This is one reason many players use Blue as a bridge hive: it funds the expensive transition into Red or White later.
↖ The Blue Playstyle: Passive by Design
Blue's rhythm is keep the machine running. That's why macroing is commonly recommended: it keeps you in field long enough for Bubble Bloat and balloon value to compound.
↖ Solo vs Group vs Tadpole Support
Blue gets better when the field is saturated with bubbles and the flowers are healthy.
| Setup | What you gain | What you trade off |
|---|---|---|
| Solo Blue | Simple, consistent, low coordination | Slower max-field conditions |
| Blue group | More bubbles, better field state, smoother Pop Star value | Needs coordination/time overlap |
| Tadpole-focused support (alts or friends) | Very high bubble density and field stability | Requires extra accounts or teammates |
If you notice your bubbles feel scarce or your Pop Star windows feel empty, then group play or bubble-heavy support helps more than another random upgrade.
↖ What You Need to Succeed as Blue?
We keep this essentials-first. Blue has a deep optimization rabbit hole, but you don't need the whole rabbit on day one. Here's the Essential Components
| Component | Must-have or later? | Why |
|---|---|---|
| SSA with Pop Star | Must-have for real Blue identity | Enables Bubble Bloat loop |
| Big capacity + strong conversion gear | Must-have | Blue's cycle depends on staying in field and dumping efficiently |
| Bubble generation (Tadpole-style role) | High priority | More bubbles = more Pop Star value |
| Balloon value (Buoyant-style role) | High priority | Balloons store and amplify your collected pollen |
| Full gifted mythics | Later | Helpful, but not required to start earning reliably |
| Tide Popper | Later (strong upgrade) | Great buffs, but Blue can start before it |
If you find your honey is steady but too slow, then your next upgrades should improve bubble density, balloon value, and conversion speed—not random damage or cosmetic changes.
↖ Pros & Cons
Blue is powerful, but it's not magic. Here's the honest trade.
| Category | Blue Hive Reality | Why it matters |
|---|---|---|
| Cost to start | Lower (Pop Star single passive can carry) | You get profitable sooner |
| Honey style | Steady, repeatable, compounding | Great for long online time |
| Boost dependence | Lower than burst colors | Less stress, more consistency |
| Damage | Typically lower | Bosses and high-round challenges take longer |
| Fun factor | Often more passive | You'll spend more time running the engine than actively fighting |
| Skill ceiling | High if you min-max | Lots of later optimizations exist |

If you discover you're constantly timing out or struggling with combat content, then keep a combat plan separate from honey-making. Blue can fund your upgrades, but it won't automatically turn you into a boss-melting machine.
↖ Common Blue Mistakes
↖ Mistake 1: Swapping Before SSA Is Ready
- Symptom: you're blue, but nothing feels different.
- Fix: unlock SSA access first; don't commit without Pop Star availability.
↖ Mistake 2: Treating Blue Like Red
- Symptom: you burn resources to chase spikes and end up poorer.
- Fix: optimize uptime and field time; let compounding do the work.
↖ Mistake 3: Low Bubble Density During Pop Star Windows
- Symptom: Pop Star triggers, but your Bubble Bloat stacks barely grow.
- Fix: increase bubble-producing roles, farm with other blue players, or add bubble support.
↖ FAQs
↖ Q1) Is Blue Always The Best Endgame Hive?
No—Blue is often the best first endgame color because it's easier and cheaper to stabilize. If you want peak burst numbers and you play active boost sessions, then Red/White may fit your style better.
↖ Q2) What's The Single must-have For Blue?
SSA with Pop Star. If you don't have access to SSA yet, then stay mixed and build toward it first.
↖ Q3) Do We Need A Double-passive SSA For Blue?
Not to start. If you find yourself delaying your entire economy to chase a perfect double passive, then you're skipping the step where Blue is supposed to fund your upgrades.
↖ Q4) Can Blue Work Without Macroing?
Yes, but it's slower and more hands-on. If you can't stay online consistently, then Blue's compounding advantage shrinks—because the engine needs time running.
↖ Q5) Why Do Blue Players Care So Much About Bubbles And Balloons?
Because Pop Star rewards bubble popping, and balloons store value that gets converted at the hive. If either side is weak, then the loop underperforms.
↖ Q6) When Should We Consider Swapping From Blue To Red/White?
When your Blue engine has funded the expensive parts of a new build (gifteds, rerolls, gear crafts). If you swap before you can afford the new color's requirements, then you'll feel like you lost progress overnight.
↖ Conclusion
Blue is best for many players because it turns endgame honey-making into a reliable system: stay in field, build balloon value, trigger Pop Star, stack Bubble Bloat, convert fast, repeat. It's not the most explosive color, but it's the most forgiving way to build a stable economy—especially if you're online often and you want progress that doesn't depend on perfect RNG or constant boosting.
If you match Blue's rhythm, your account stops feeling like it's gambling for income and starts behaving like it has a paycheck.

Most Popular Posts
- Bee Swarm Simulator Progression Guide: Best Gear Order from Early Game to Endgame
- Bee Swarm Simulator Bee Bear Quest Guide: Best Fields, Blooms, Stickers & Petal Cub Tips
- Bee Swarm Simulator Planters Guide: Best Fields, Nectar, Growth Times, and Buying Order
- How to Make 20B+ Pollen in Hive Hub as a Blue Hive in Bee Swarm Simulator
- Bee Swarm Simulator Best Mythic Bee: Ranked for Every Hive
- BSS Beesmas Update This Week: BBM Quest, Honeyday, Timer Extension, and Best Prep Guide
Popular Category Lists
- Grow a Garden / (286)
- ARC Raiders / (266)
- CoD: Black Ops 7 / (166)
- Monopoly Go / (146)
- MLB 26 / (145)
- Star Citizen / (116)
- Steal a Brainrot / (89)
- ARK Survival Ascended / (74)
- Sailor Piece / (68)
- Forza Horizon 6 / (63)
- Diablo IV / (61)
- Blox Fruits / (60)
- CoD: BLACK OPS 6 / (55)
- Adopt Me / (53)
- Path of Exile 2 / (48)
- Monster Hunter Wilds / (46)
- Windrose / (44)
- Grow a Garden 2 / (42)
- Path of Exile / (40)
- Bee Swarm Simulator / (36)


